MyBatis 后端对数据库进行操作
Posted Fly upward
tags:
篇首语:本文由小常识网(cha138.com)小编为大家整理,主要介绍了MyBatis 后端对数据库进行操作相关的知识,希望对你有一定的参考价值。
目录
1.MyBatis 是什么?
MyBatis 是⼀款优秀的持久层框架,它⽀持⾃定义 SQL、存储过程以及⾼级映射。MyBatis 去除了很多JDBC 代码以及设置的参数和获取结果集的工作。MyBatis 可以通过简单的 XML 或注解来配置和映射原始类型、接⼝和 Java POJO (Plain Old Java Object。普通老式 Java对象)为数据库中的记录。2. MyBatis 的重要性
对于后端开发来说,程序是由两个重要部分组成的:1.后端程序 2.数据库⽽这两个重要的组成部分要通讯,就要依靠数据库连接⼯具
1.JDBC 2. MyBatis
JDBC 的操作流程:
1. 创建数据库连接池 DataSource 2. 通过 DataSource 获取数据库连接 Connection 3. 编写要执⾏带 ? 占位符的 SQL 语句 4. 通过 Connection 及 SQL 创建操作命令对象 Statement 5. 替换占位符:指定要替换的数据库字段类型,占位符索引及要替换的值 6. 使⽤ Statement 执⾏ SQL 语句 7. 查询操作:返回结果集 ResultSet,更新操作:返回更新的数量 8. 处理结果集 9. 释放资源对于 JDBC 来说,整个操作⾮常的繁琐,我们不但要拼接每⼀个参数,⽽且还要按照模板代码的⽅式,⼀步步的操作数据库,并且在每次操作完,还要⼿动关闭连接等,⽽所有的这些操作步骤都需要在每个⽅法中重复书写。 对于 MyBatis ,它可以帮助我们更⽅便、更快速的操作数据库。
3. MyBatis 查询
框架交互流程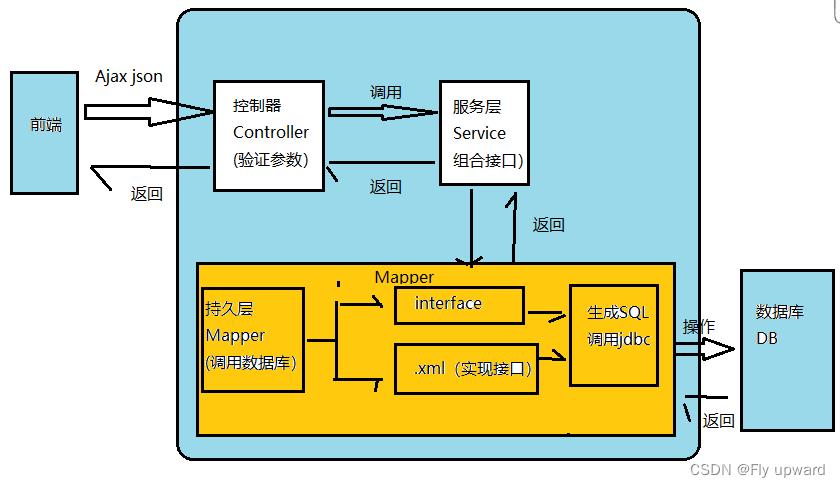 MyBatis 也是⼀个 ORM 框架,
ORM(Object Relational Mapping),即对象关系映射。在⾯向对
象编程语⾔中,将关系型数据库中的数据与对象建⽴起映射关系,进⽽⾃动的完成数据与对象的互相转换:
MyBatis 也是⼀个 ORM 框架,
ORM(Object Relational Mapping),即对象关系映射。在⾯向对
象编程语⾔中,将关系型数据库中的数据与对象建⽴起映射关系,进⽽⾃动的完成数据与对象的互相转换:
1. 将输⼊数据(即传⼊对象)+SQL 映射成原⽣ SQL 2. 将结果集映射为返回对象,即输出对象ORM 把数据库映射为对象: 数据库表(table)--> 类(class) 记录(record,⾏数据)--> 对象(object) 字段(field) --> 对象的属性(attribute)
⼀般的 ORM 框架,会将数据库模型的每张表都映射为⼀个 Java 类。 也就是说使⽤ MyBatis 可以像操作对象⼀样来操作数据库中的表,可以实现对象和数据库表之间的转换。
3.1 创建数据库和表
使⽤ MyBatis 的⽅式来读取⽤户表中的所有⽤户
创建用户表
drop table if exists  userinfo;
create table userinfo(
    id int primary key auto_increment,
    username varchar(100) not null,
    password varchar(32) not null,
    photo varchar(500) default '',
    createtime datetime default now(),
    updatetime datetime default now(),
    `state` int default 1
) default charset 'utf8mb4';
3.2 添加MyBatis框架⽀持
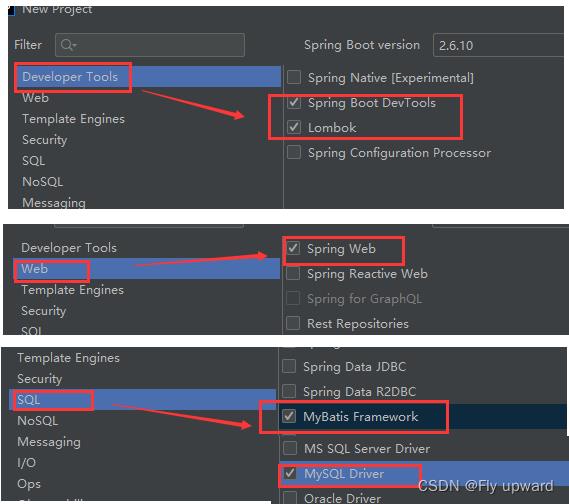
3.2.1 新项目添加MyBatis
在创建新项目时,来到这一步,只需将下面的勾选即可
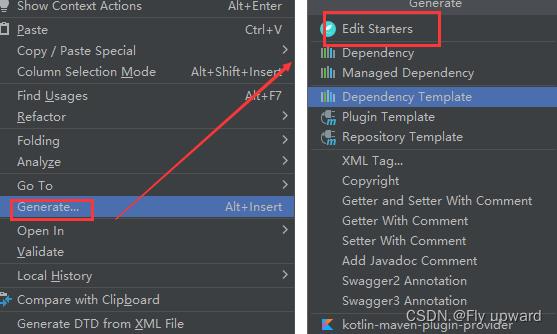
3.2.1 老项⽬添加 MyBatis
在 pom.xml 文件页面 鼠标右键进行下面操作

3.3 配置连接字符串和MyBatis
3.3.1 配置连接字符串
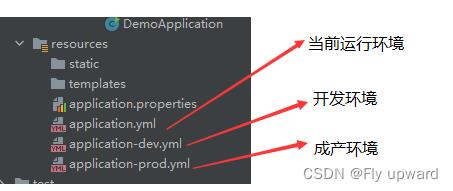
将当前运行环境选择开发环境的配置
application-dev.yml
#开发环境
#配置数据库连接
spring:
  datasource:
    url: jdbc:mysql://127.0.0.1:3306/myblog?characterEncoding=utf8
    username: root
    password: 123456
    driver-class-name: com.mysql.cj.jdbc.Driver

# 开启 MyBatis SQL 打印
logging:
  level:
    com:
      example:
        demo: debug
mybatis:
  configuration:
    log-impl: org.apache.ibatis.logging.stdout.StdOutImpl
application.yml
选择开发环境
spring:
  profiles:
    active: dev
3.3.2 配置mybatis 中的 xml 保存路径
MyBatis 的 XML 中保存是查询数据库的具体操作 SQL,配置在 application.yml 中#配置mybatis xml 保存路径
mybatis:
mapper-locations: classpsth:mybatis/**Mapper.xml3.4 添加后端代码
下⾯按照后端开发的⼯程思路,也就是下⾯的流程来实现 MyBatis 查询所有⽤户的功能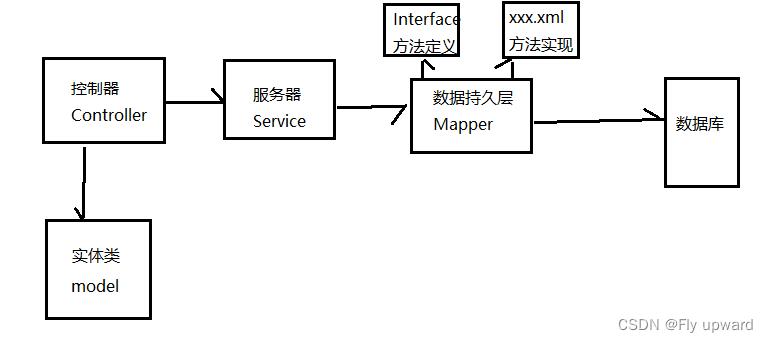
目录结构:
3.4.1 添加实体类
先添加用户实体类
/**
 * 普通用户实体类
 */
@Data
public class UserInfo
    private Integer id;
    private String name;
    private String password;
    private String photo;
    private String createtime;
    private String updatetime;
    private int state;
3.4.2 添加 mapper 接口
数据持久层的接口定义:
/**
 * 实现数据库映射
 */

@Mapper
public interface UserMapper
    //查询用户 ID
    public UserInfo getUserById(@Param("id") Integer id);
3.4.3 添加UserMapper.xml
数据持久层的实现,mybatis 的固定 xml 格式
<?xml version="1.0" encoding="UTF-8"?>
<!DOCTYPE mapper PUBLIC "-//mybatis.org//DTD Mapper 3.0//EN" "http://mybatis.org/dtd/mybatis-3-mapper.dtd">
<!-- namespace 要设置是实现接口的具体包名加类名 -->
<mapper namespace="com.example.demo.mapper.UserMapper">


</mapper><?xml version="1.0" encoding="UTF-8"?>
<!DOCTYPE mapper PUBLIC "-//mybatis.org//DTD Mapper 3.0//EN" "http://mybatis.org/dtd/mybatis-3-mapper.dtd">
<!-- namespace 要设置是实现接口的具体包名加类名 -->
<mapper namespace="com.example.demo.mapper.UserMapper">
<resultMap id="BaseMap" type="com.example.demo.model.UserInfo">
<!-- 主键映射 -->
<id column="id" property="id"></id>
<!-- 普通属性映射 -->
<result column="username" property="name"></result>
</resultMap>
<!-- 根据 id 查询用户 -->
<select id="getUserById" resultMap="BaseMap">
select * from userinfo where id=$id
</select>
</mapper>标签说明:
<mapper>标签:需要指定 namespace 属性,表示命名空间,值为 mapper 接⼝的全限定 名,包括全包名.类名。 <select>查询标签:是⽤来执⾏数据库的查询操作的: id:是和 Interface(接⼝)中定义的⽅法名称⼀样的,表示对接⼝的具体实现⽅法。 resultType:是返回的数据类型,也就是开头我们定义的实体类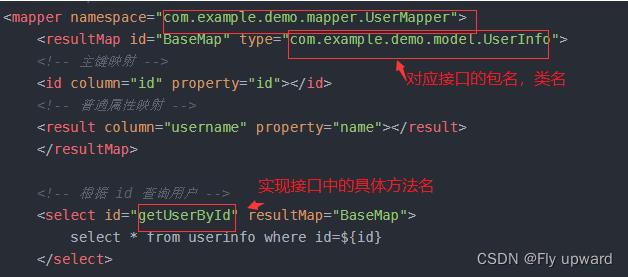
3.4.4 添加Service
决定调用哪个mapper
@Service
public class UserService

    @Resource
    private UserMapper userMapper;

    public UserInfo getUserById(Integer id)
        return userMapper.getUserById(id);
3.4.5 添加 Controller
@Controller
@ResponseBody
@RequestMapping("/user")
public class UserController

    @Autowired
    private UserService userService;

    @RequestMapping("/getuserbyid")
    public UserInfo getUserById(Integer id)
        if (id == null) return null;
        return userService.getUserById(id);

4.增删改操作
4.1 修改用户操作
在 UserMapper 中增加修改的代码
    //修改方法根据 ID 修改名称
    public int update(@Param("id") Integer id,
                      @Param("name") String username);
UserMapper.xml 中增加接口的实现标签和具体的执行SQL
    <update id="update" >
        update userinfo set username=#name where id=#id
    </update>
通过单元测试,实现成功
   @Test
    void update()
        int result = userMapper.update(2,"fei");
        Assertions.assertEquals(1,result);

查询SQL语句可知,已经修改了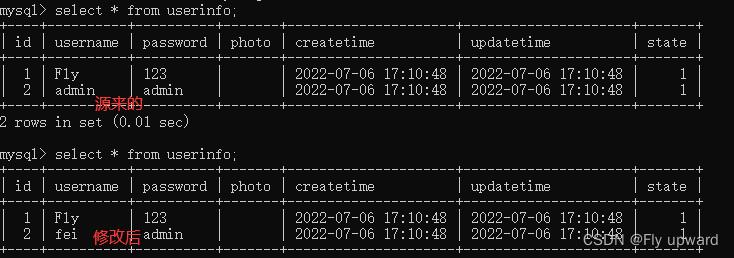
如果仅仅是为了测试功能是否实现,而不修改数据库中的内容,可以加入注解 @Transactional
    @Test
    @Transactional // 添加此注解后,执行完单元测试,不会修改数据库中的内容,即事务回滚
    void update()
        int result = userMapper.update(2,"fei");
        Assertions.assertEquals(1,result);
4.2 删除用户操作
在 UserMapper 中增加删除的代码
    //删除方法
    public int del(@Param("id") Integer id);
UserMapper.xml 中增加接口的实现标签和具体的执行SQL
<!--删除操作-->
<delete id="del">
delete from userinfo where id=#id;
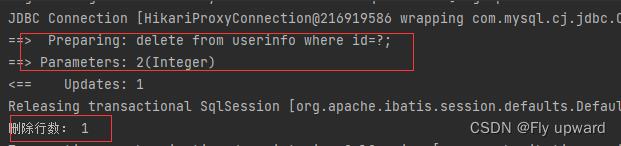
</delete>单元测试
    @Test
    @Transactional
    void del()
        int result = userMapper.del(2);
        System.out.println("删除行数: " + result);
        Assertions.assertEquals(1,result);
4.3 增加用户操作
在 UserMapper 中添加增加的代码
    //增加用户方法
    // 传过来的是对象而不是某个成员变量
    public int add(UserInfo userInfo);
UserMapper.xml 中增加接口的实现标签和具体的执行SQL
<!--增加操作,返回受影响的行数-->
<insert id="add">
insert into userinfo(username,password,photo)
values(#username, #password, #photo); <!--和对象里面的属性一一对应-->
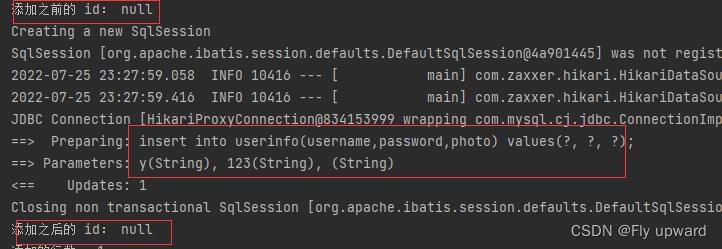
</insert>单元测试
    @Test
    //@Transactional
    void add()
        UserInfo userInfo = new UserInfo();
        userInfo.setName("y");
        userInfo.setPassword("123");
        userInfo.setPhoto("");
        System.out.println("添加之前的 id: " + userInfo.getId());
        int result = userMapper.add(userInfo);
        System.out.println("添加之后的 id: " + userInfo.getId());
        System.out.println("添加的行数: " + result);
        Assertions.assertEquals(1,result);
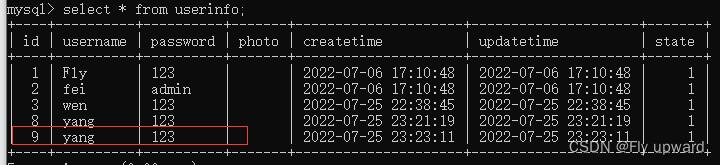
4.4 增加用户并有自增ID
在 UserMapper 中添加增加的代码
    //添加用户,返回自增ID
    public int addGetId(UserInfo userInfo);
UserMapper.xml 中增加接口的实现标签和具体的执行SQL
<!--增加操作,返回受影响的行数和自增ID-->
<insert id="addGetId" useGeneratedKeys="true" keyProperty="id" keyColumn="id">
insert into userinfo(username,password,photo)
values(#name, #password, #photo); <!--和对象里面的属性一一对应-->
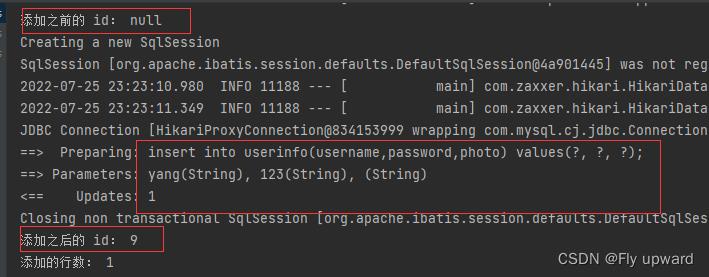
</insert>单元测试
    @Test
    //@Transactional
    void addGetId()
        UserInfo userInfo = new UserInfo();
        userInfo.setName("yang");
        userInfo.setPassword("123");
        userInfo.setPhoto("");
        System.out.println("添加之前的 id: " + userInfo.getId());
        int result = userMapper.addGetId(userInfo);
        System.out.println("添加之后的 id: " + userInfo.getId());
        System.out.println("添加的行数: " + result);
        Assertions.assertEquals(1,result);
5. 参数占位符 # 和 $
#:预编译处理 。处理时,成一个 问号? ,赋值时会加上 单引号 ‘ ’
$:字符直接替换
区别:
1.定义不同 预编译处理是指:MyBatis 在处理#时,会将 SQL 中的 # 替换为?号,使⽤ PreparedStatement 的set ⽅法来赋值。 直接替换:是MyBatis 在处理 $ 时,就是把 $ 替换成变量的值。 2.使用不同:# 适用于所有类型的参数匹配,但$ 只适用于数值类型 3.安全性不同:# 性能高,并且没有安全问题;但 $ 存在SQL注入的安全问题#:预编译处理 占位符,当成 value 值来使用, 即加上 ‘ ’
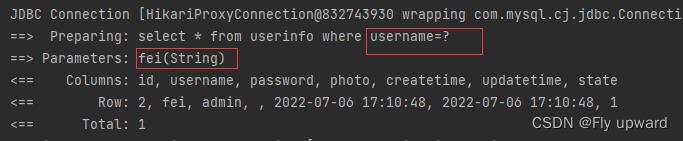
    <select id="gerUserFullById" resultType="com.example.demo.model.UserInfo">
        select * from userinfo where username=#name
    </select>
@Test
void gerUserFullById()
UserInfo userInfo = userMapper.gerUserFullById("fei");
System.out.println("userInfo: " + userInfo);
$:字符直接替换
不加任何符合,直接替换上去,连成一个SQL 命令
    <select id="gerUserFullById" resultType="com.example.demo.model.UserInfo">
        select * from userinfo where username=$name
    </select>
单元测试结果

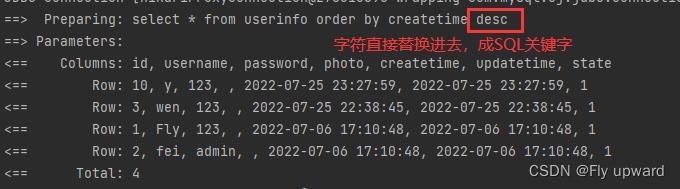
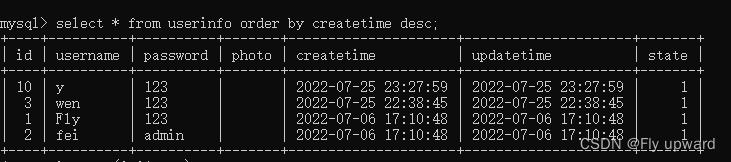
5.1 desc 降序排序
//对用户进行排序
    public List<UserInfo> getOrderList(@Param("order") String order);
此处使用的是 $, 如果使用 # 的话,会编译出错,因为它会把 desc 当成 ‘desc’ 一个value 值来使用,不构成一个 SQL命令语句
    <select id="getOrderList" resultType="com.example.demo.model.UserInfo">
        select * from userinfo order by createtime $order
    </select>
单元测试
    @Test
    void getOrderList()
        List<UserInfo> list = userMapper.getOrderList("desc");
        log.info("列表: " + list);
5.2 登录(SQL注入)
    //登录功能
    public UserInfo login(@Param("name") String username,
                          @Param("password") String password);
1) 在使用$ 时,需要加单引号,因为是直接替换
    <select id="login" resultType="com.example.demo.model.UserInfo">
        select * from userinfo where username='$name' and password='$password';
    </select>
单元测试
    @Test
    void login()
        String username = "Fly";
        String password = "";
        UserInfo userInfo = userMapper.login(username,password);
        log.info("用户信息: " + userInfo);

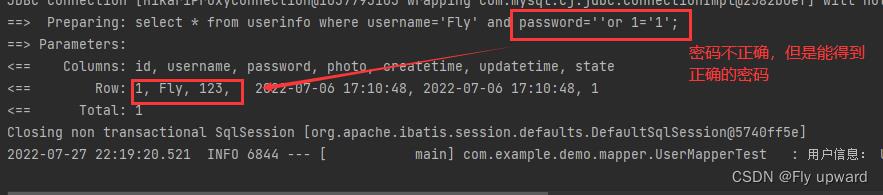
使用 " 'or 1=' 1" 时,SQL注入,密码会泄露,如下,因此在登录时应使用#
    @Test
    void login()
        String username = "Fly";
        //String password = "";
        String password = "'or 1='1";
        UserInfo userInfo = userMapper.login(username,password);
        log.info("用户信息: " + userInfo);
2)# 预编译处理,不会出现密码泄露
    <!--登录功能-->
    <select id="login" resultType="com.example.demo.model.UserInfo">
        <!--select * from userinfo where username='$name' and password='$password'; -->
        select * from userinfo where username=#name and password=#password;
</select> 
5.3 like 查询
    //like 模糊查询
    public List<UserInfo> getUserByName(@Param("name") String username);
1)直接使用 # 会报错
因为赋值时会加上单引号 ‘’
select * from userinfo where username like '%#name%'就相当于下面的语句,不符合查询条件
select * from userinfo where username like '%'name'%'2)使用$ 是不会报错,但在业务层的值不能穷举
3)# 在like中的正确用法,加上contat 拼接,演示如下

正确用法
因为# 在赋值的时候,会带上单引号‘’ ,所以下面的#不需要带单引号
    <!--like 模糊查询-->
    <select id="getUserByName" resultType="com.example.demo.model.UserInfo">
        <!-- select * from userinfo where username like '%#name%'-->
        select * from userinfo where username like concat('%',#name,'%')
    </select>
单元测试
    @Test
    void getUserByName()
        String username = "l";
        List<UserInfo> list= userMapper.getUserByName(username);
        log.info("用户列表: " + list);

6.多表查询
6.1 返回类型:resultType
绝大数查询场景可以使用 resultType 进行返回,如下
    <!-- 根据 id 查询用户 -->
    <select id="getUserById" resultType="com.example.demo.model.UserInfo">
        select * from userinfo where id=$id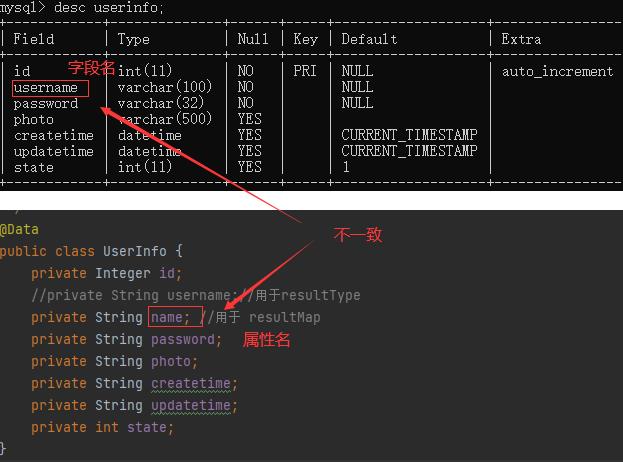
</select>6.2 返回字典映射:resultMap
使用场景:字段名称和程序中的属性名不同的情况, 可使⽤ resultMap 配置映射; 一对一和一对多关系可以使用 resultMap 映射并查询数据1)字段名程序中的属性名不一致
userMapper.xml 代码如下
    <!-- 根据 id 查询用户 -->
    <select id="getUserById" resultType="com.example.demo.model.UserInfo">
        select * from userinfo where id=$id
    </select>
查询结果


userMapper.xml 代码如下
    <resultMap id="BaseMap" type="com.example.demo.model.UserInfo">
        <!--主键映射-->
        <id column="id" property="id"></id>
        <!--普通属性映射-->
        <result column="username" property="name"></result>
        <result column="password" property="password"></result>
        <result column="photo" property="photo"></result>
        <result column="createtime" property="createtime"></result>
        <result column="updatetime" property="updatetime"></result>

    </resultMap>

    <!-- 根据 id 查询用户 -->
    <select id="getUserById" resultMap="BaseMap">
        select * from userinfo where id=$id
</select> @Test
void getUserById()
UserInfo userInfo = userMapper.getUserById(1);
//Assertions.assertNotNull(userInfo);
log.info("查询行数:" + userInfo);
查询结果

6.3 一对一表查询
创建文章实体类 ArticleInfo
@Data
public class ArticleInfo
    private int id;
    private String title;
    private String content;
    private String createtime;
    private String updatetime;
    private int uid;
    private int rcount;
    private int state;
    private UserInfo userInfo;
mapper 实现数据库映射 ArticleMapper
@Mapper
public interface ArticleMapper
    //根据文章 id 获取文章
    public ArticleInfo getArticleById(@Param("id") Integer id); //文章id
数据库命令,数据持久层的实现, ArticleMapper.xml
<mapper namespace="com.example.demo.mapper.ArticleMapper">
    <resultMap id="BaseMap" type="com.example.demo.model.ArticleInfo">
        <!--主键映射-->
        <id column="id" property="id"></id>
        <!--普通属性映射-->
        <result column="title" property="title"></result>
        <result column="content" property="content"></result>
        <result column="createtime" property="createtime"></result>
        <result column="uid" property="uid"></result>
        <result column="rcount" property="rcount"></result>
        <result column="state" property="state"></result>
        <association property="userInfo"
                     resultMap="com.example.demo.mapper.UserMapper.BaseMap"
                     columnPrefix="u_"></association>
    </resultMap>

    <select id="getArticleById" resultMap="BaseMap">
       select a.*,u.* from articleinfo a left join userinfo u on a.uid=u.id
    </select>
</mapper>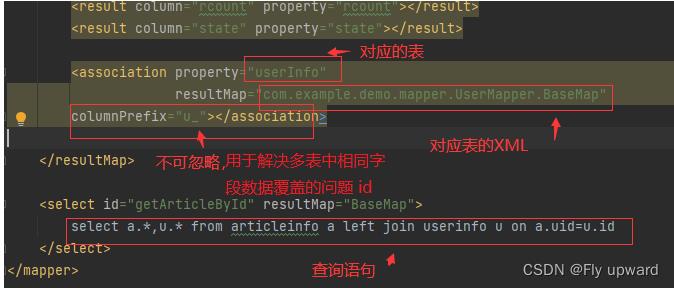
单元测试
    //将类属性注入
    @Resource
    private ArticleMapper articleMapper;

    @Test
    void getArticleById()
        ArticleInfo articleInfo = articleMapper.getArticleById(1);
        log.info("查询结果:" + articleInfo  );
查询结果

6.4 一对多
一个用户对应多篇文章
实体类
@Data
public class UserInfo
    private Integer id;
    //private String username;//用于resultType
    private String name; //用于 resultMap
    private String password;
    private String photo;
    private String createtime;
    private String updatetime;
    private int state;
    //一对多
    private List<ArticleInfo> artlist;
mapper
   //一对多,多表查询
    //根据用户 id 查询用户及用户发表的所有文章
    public UserInfo getUserAndArticleByUid(@Param("uid") Integer uid);
XML
<resultMap id="BaseMap" type="com.example.demo.model.UserInfo">
        <!--主键映射-->
        <id column="id" property="id"></id>
        <!--普通属性映射-->
        <result column="username" property="name"></result>
        <result column="password" property="password"></result>
        <result column="photo" property="photo"></result>
        <result column="createtime" property="createtime"></result>
        <result column="updatetime" property="updatetime"></result>
        <result column="state" property="state"></result>
        <!--多表查询-->
        <collection property="artlist"
                    resultMap="com.example.demo.mapper.ArticleMapper.BaseMap"
                    columnPrefix="a_">
        </collection>
    </resultMap>

    <!--多表查询-->
    <select id="getUserAndArticleByUid" resultMap="BaseMap">

        select u.*,a.id a_id,a.title a_title,a.content a_content,
        a.createtime a_createtime,
        a.updatetime a_updatetime from userinfo u left join articleinfo a
        on u.id=a.uid where u.id=#uid

    </select>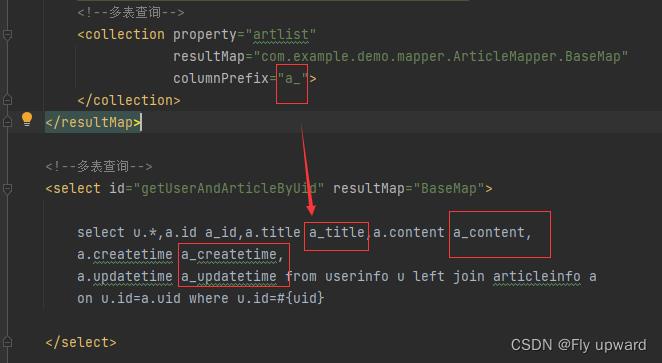
单元测试
   @Test
    void getUserAndArticleByUid()
        UserInfo userInfo = userMapper.getUserAndArticleByUid(1);
        log.info("用户详情:" + userInfo);
7.动态SQL使用
动态SQL是mybatis 的强大特性之一,能够完成不同条件的SQL拼接
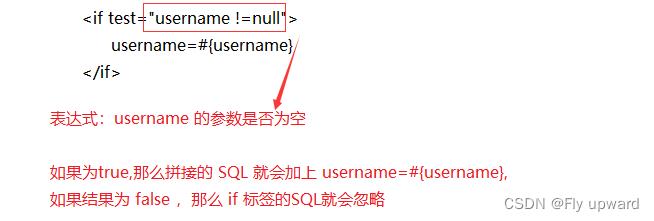
7.1 <if> 标签
在填写个人信息时,会经常遇到一些必填项,一些非必填项,如下

判断一个参数是否有值,如果没值,就会隐藏 if 中的SQL
现在有一张用户表
在新增用户的时候,将 photo 设为非比传参数

1)传入photo 时
mapper
    //动态SQL,添加用户,photo为非必传参数
    public int add2(UserInfo userInfo);
UserMapper.xml
    <!--动态SQL,添加用户-->
    <insert id="add2">
        insert into userinfo(username,password
        <if test="photo !=null">
            ,photo
        </if>
        ) values(#name, #password
        <if test="photo !=null">
            , #photo
        </if>
        )
    </insert>
注意 test 中的 photo 和 #,是传⼊对象中的属性,不是数据库字段
单元测试
    @Test
    void add2()
        UserInfo userInfo = new UserInfo();
        userInfo.setName("杨通");
        userInfo.setPassword("123");
        userInfo.setPhoto("123.jpg");
        int result = userMapper.add2(userInfo);
        log.info("添加用户:" + result);
添加结果


2)不传入 photo 时
不用像没使用动态SQL时,将 userInfo.setPhoto(""); 设为空,直接忽略不写就行了
    @Test
    void add2()
        UserInfo userInfo = new UserInfo();
        userInfo.setName("黄空");
        userInfo.setPassword("123");
        //userInfo.setPhoto("123.jpg");
        int result = userMapper.add2(userInfo);
        log.info("添加用户:" + result);
动态SQL直接忽略photo,添加成功


7.2 <trim> 标签
最主要的作用:去除SQL语句前后多余的某个字符
语法:
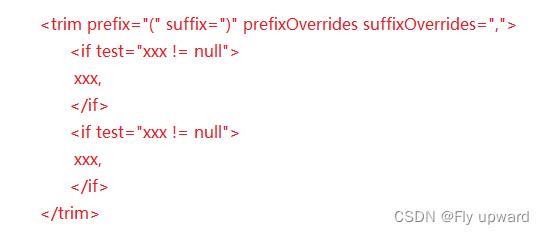
prefix: 表示这个语句快,以prefix的值作为前缀 suffix:表示整个语句块,以suffix的值作为后缀 prefixOverrides:表示整个语句块要去除掉的前缀 suffixOverrides:表示整个语句块要去除掉的后缀
UserMapper
    //动态SQL, <trim> 标签。添加用户,photo为非必传参数
    public int add3(UserInfo userInfo);
UserMapper.xml
    <!--动态SQL,<trim> 标签。添加用户-->
    <insert id="add3">
        insert into userinfo
        <trim prefix="(" suffix=")" suffixOverrides=",">
            <if test="name != null">
                <!--这里拼接的是数据库中的字段-->
                username,
            </if>
            <if test="password != null">
                password,
            </if>
            <if test="photo != null">
                photo
            </if>
        </trim>
        values
        <trim prefix="(" suffix=")" suffixOverrides=",">
            <if test="name != null">
                #name,
            </if>
            <if test="password != null">
                #password,
            </if>
            <if test="photo != null">
                #photo
            </if>
        </trim>
    </insert>
单元测试
这里不传photo,看拼接的字段前的一个逗号是否还在
    @Test
    void add3()
        UserInfo userInfo = new UserInfo();
        userInfo.setName("黄小小");
        userInfo.setPassword("123");
        //userInfo.setPhoto("123.jpg"); 这里不传,看拼接的字段前的一个逗号是否还在
        int result = userMapper.add2(userInfo);
        log.info("添加用户:" + result);


7.3 <where> 标签
主要作用:实现查询中的 where SQL替换,它可以实现如果没有任何的查询条件,那么他可以因此查询中的 where SQL ,但如果存在查询中条件,那么会生成where的 SQL查询,并且使用 where 标签可以自动的去除最后一个 and字符。
1)SQL 替换
根据 id 查询用户:
    <!-- 根据 id 查询用户 -->
    <select id="getUserById" resultMap="BaseMap">
        select * from userinfo
        <where>
            <if test="id != null">
                id=#id
            </if>

        </where>
    </select>
当传入的 id 为 null 时
  @Test
    void getUserById()
       UserInfo userInfo = userMapper.getUserById(null);
        //Assertions.assertNotNull(userInfo);
        log.info("查询行数:" + userInfo);

2)去除 and
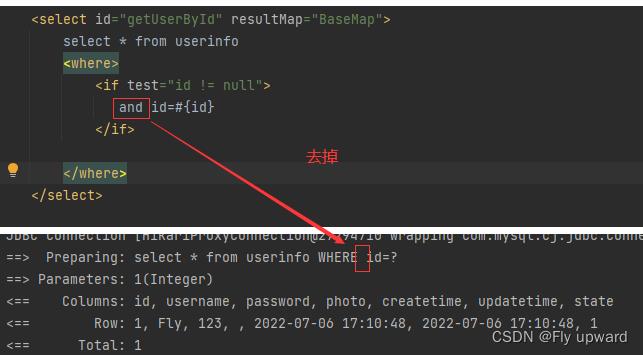
或者通过 id 或者 username 来查询时,如果username 为空就会去掉
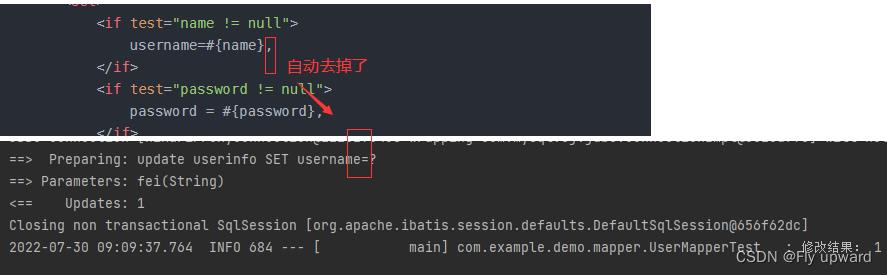
7.4 <set> 标签
作用:进行修改操作是,配合 if 来处理非必传字段,他的特点是主动去除最后一个英文逗号
语法:
update table_name
  <set>
    <if test="xxx">
        ...
    </if>
    ...
  </set>
  where ...
1)修改用户名
UserMapper
    //动态SQL, <set> 标签。修改用户
    public int update2(UserInfo userInfo);
UserMapper.xml
    <update id="update2">
        update userinfo
        <set>
            <if test="name != null">
                username=#name,
            </if>
            <if test="password != null">
                password = #password,
            </if>
            <if test="photo != null">
                photo = #photo
            </if>
        </set>
    </update>
单元测试
    @Test
    void update2()
        UserInfo userInfo = new UserInfo();
        userInfo.setId(1); //查找 id 为 1 的用户
        userInfo.setName("fei"); // 将用户名修改为 fei
        int result = userMapper.update2(userInfo);
        log.info("修改结果: " + result);

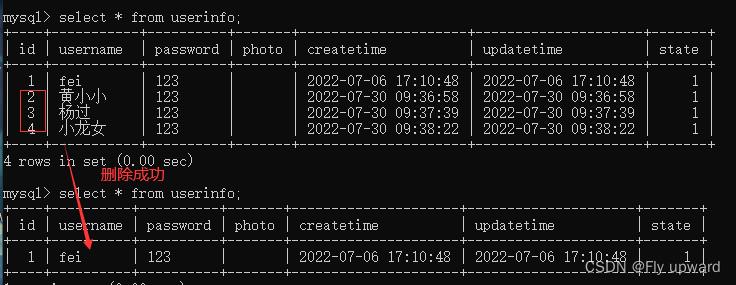
7.5 <foreach> 标签
对集合进⾏遍历时可以使⽤该标签。<foreach>标签有如下属性:collection: 绑定方法参数中的集合,如List 、Set、Map或数组对象 item: 遍历时的每一个对象 open:语句块开头的字符串 close:语句块结束的字符串 separator:每次遍历之间间隔的字符串
示例:根据用户 id 来对用户进行删除
UserMapper
    //动态SQL,<foreach>,删除多个用户
    public int delId(List<Integer> ids);
UserMapper.xml
    <!--动态SQL,删除多个用户-->
    <delete id="delId">
        delete from userinfo where id in
        <foreach collection="ids" open="(" close=")" item="id" separator=",">
            #id
        </foreach>
    </delete>
单元测试
    @Test
    void delId()
        List<Integer> list = new ArrayList<>();
        list.add(2);
        list.add(3);
        list.add(4);
        int result = userMapper.delId(list);
        log.info("删除的行数:" + result);
结果

使用 React Native 和 Laravel 后端对 Pusher 进行身份验证
【中文标题】使用 React Native 和 Laravel 后端对 Pusher 进行身份验证【英文标题】:Authenticating Pusher using React Native and a Laravel Backend 【发布时间】:2018-08-09 22:48:34 【问题描述】:我正在尝试使用以下 React Native 脚本对私人广播进行身份验证。
import React from 'react';
import  StyleSheet, Text, View  from 'react-native';
import Pusher from 'pusher-js/react-native';

export default class App extends React.Component
  componentWillMount()
    Pusher.logToConsole = true;
    var pusher = new Pusher('*********',
      authEndpoint: 'http://app.pgm/api/authtest',
      cluster: 'eu',
      encrypted: true
    );

    const channel = pusher.subscribe('private-chat-1');
上面的内容被发布到下面的函数中,下面的函数在从 Postman 测试时返回一个身份验证令牌。但是,当我通过 React Native 运行应用程序时,我得到以下响应。
  public function pusher(Request $request)
        $pusher = new Pusher(config('broadcasting.connections.pusher.key'), config('broadcasting.connections.pusher.secret'), config('broadcasting.connections.pusher.app_id'));

        echo $pusher->socket_auth($request->channel_name, $request->socket_id);
[exp] Pusher:无法检索身份验证信息。 0客户端必须经过身份验证才能加入私人或在线频道。见:https://pusher.com/docs/authenticating_users [exp] Pusher : 在 private-chat-1 上没有回调 pusher:subscription_error
这让我认为 Laravel 没有收到帖子数据。我目前没有任何可以阻止请求的中间件。
谁能看出我哪里出错了?
【问题讨论】:
你找到解决办法了吗,我也遇到同样的问题 【参考方案1】:我在Postman 和React Native 两端都运行良好。我使用了以下代码。就我而言,我没有使用密钥encrypted: true。
我正在成功监听事件。
代码
    // Pusher Logging
    Pusher.logToConsole = true;

    // Initialization & Configuration
    const pusher = new Pusher('****************',
      cluster: '***',
      authEndpoint:
        'http://domain/products/chat/public/api/authtest',
    );

    // Making Connection
    pusher.connection.bind('connected', function (data)
      console.log(data.socket_id);
    );

    // Subscribe Channel
    var channel = pusher.subscribe('private-channel-name', (data) =>
      console.log('Subscribe Channel');
      console.log(data);
    );

    // Accessing Channel
    const channelInfo = pusher.channel('private-chatify');
    console.log('channel Info');
    console.log(channelInfo);

    // Listen Event
    channel.bind('yourevent', function (data)
      console.log('An event was triggered with message');
      console.log(data);
      console.log(data.message);
    );
希望对你有帮助。
【讨论】:
以上是关于MyBatis 后端对数据库进行操作的主要内容,如果未能解决你的问题,请参考以下文章