Java微信公众平台开发_02_启用服务器配置
Posted shirayner
tags:
篇首语:本文由小常识网(cha138.com)小编为大家整理,主要介绍了Java微信公众平台开发_02_启用服务器配置相关的知识,希望对你有一定的参考价值。
一、准备阶段
需要准备事项:
1.一个能在公网上访问的项目:
见:【 Java微信公众平台开发_01_本地服务器映射外网 】
2.一个微信公众平台账号:
去注册:(https://mp.weixin.qq.com/)
3.策略文件
见:【 Java企业微信开发_Exception_02_java.security.InvalidKeyException: Illegal key size 】
4.微信官方消息加解密工具包
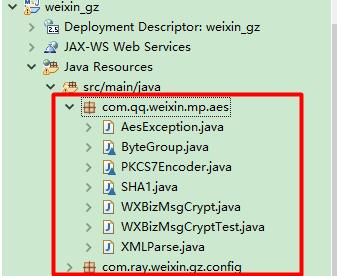
需要下载微信官方的消息加解密的工具包,主要是AES加密工具。由于这是企业微信的加解密包,因此我们后面还需要对这个加解密包进行一些修改。
下载地址:https://wximg.gtimg.com/shake_tv/mpwiki/cryptoDemo.zip
下载完将其添加进工程中:
二、填写服务器配置
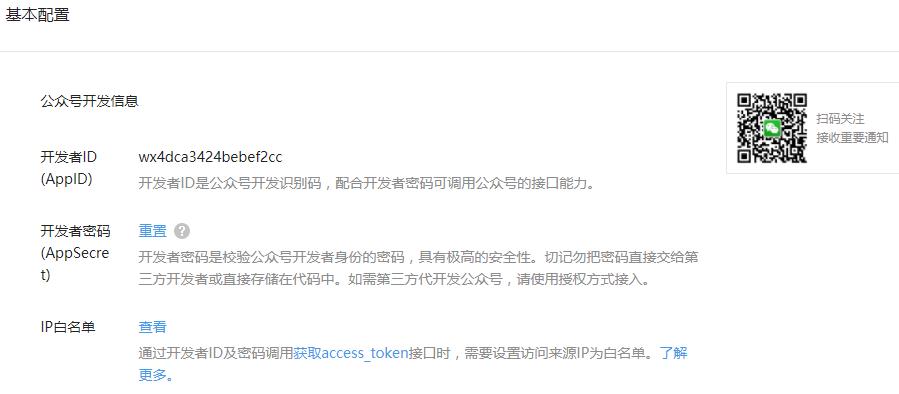
1.记住 AppID 和 AppSecret
登录微信公众平台,开发—>基本配置—>公众号开发信息
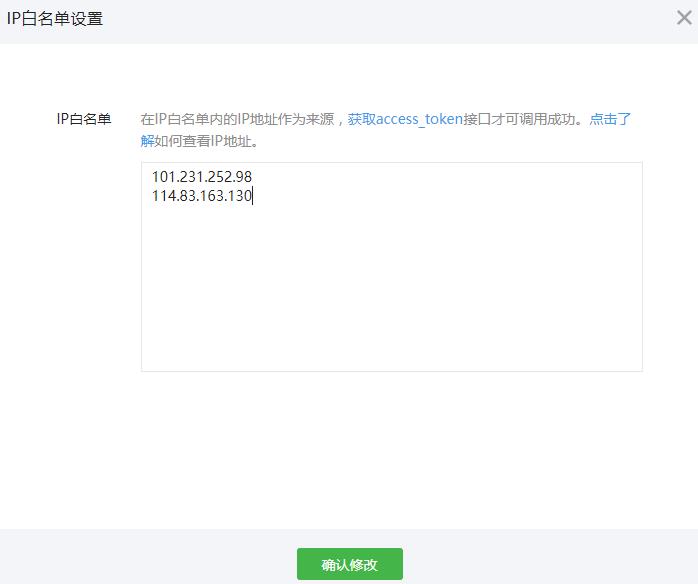
2.设置IP白名单
(1)登录微信公众平台,开发—>基本配置—>公众号开发信息—>ip白名单—>查看—>修改
(2)需要将服务器的公网ip添加进去。若需要添加多个ip,则每行添加一个ip即可。
(3)查询服务器的公网ip:
window系统: 直接百度搜索ip即可
Linux系统: 参见【 Linux_服务器_01_查看公网IP 】
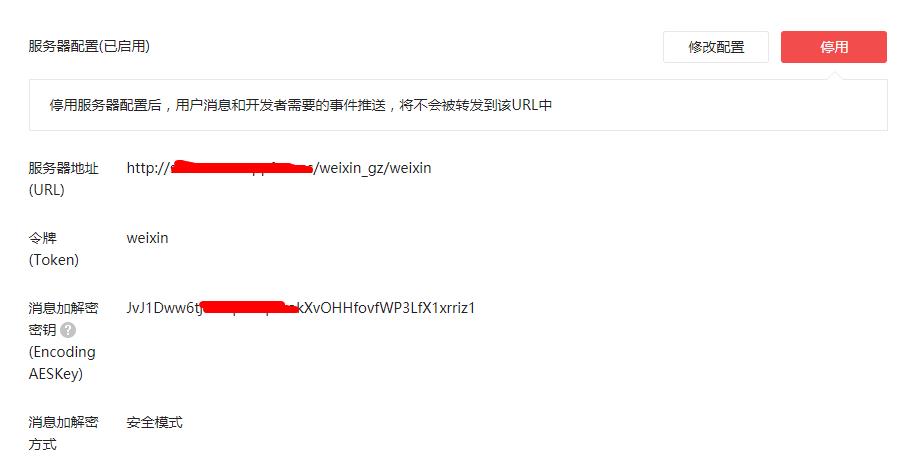
3.填写服务器配置
登录微信公众平台,开发—>基本配置—>服务器配置—>修改配置
3.1 URL:
开发者用来接收微信消息和事件的接口URL 。在三种情况下会请求这个URL:
(1)回调模式:
填写完服务器配置,点击提交,微信服务器将发送GET请求到填写的服务器地址URL上,并携带上四个参数 signature 、timestamp、nonce、echostr
(2)接收消息:
当用户发送消息给公众号时,消息将被以POST方式推送到到填写的服务器地址URL上,
在安全模式(推荐)下,携带上六个参数 signature 、timestamp、nonce、openid、encrypt_type(加密类型,为aes)和msg_signature(消息体签名,用于验证消息体的正确性)
在明文模式(默认)下,携带上六个参数 signature 、timestamp、nonce、openid
(3)接收事件
当特定的用户操作引发事件推送时,(如用户点击某个click菜单按钮时),事件将被以POST方式推送到到填写的服务器地址URL上。 请求参数 同 接受消息
3.2 Token:
随机填写,要与代码中保持一致。生成加解密工具类、生成签名 时会用到
3.3 EncodingAESKey:
随机生成,要与代码中保持一致,生成加解密工具类时会用到。EncodingAESKey即消息加解密Key,长度固定为43个字符,从a-z,A-Z,0-9共62个字符中选取。
3.4 消息加解密方式
这里选择安全模式,这样在接收消息和事件时,都需要进行消息加解密。若选明文模式,则在接收消息和事件时,都不需要进行消息加解密。
三、验证服务器地址的有效性
1. 设置失败
填写完服务器配置后,这时我们点击提交,会提示设置失败。这是因为我们点击提交后,微信服务器将发送GET请求到填写的服务器地址URL上,并携带上四个参数 signature 、timestamp、nonce、echostr ,开发者接收到者四个参数之后,需要对这四个参数与token一起 进行签名校验。
2.签名校验的流程
(1)将token、timestamp、nonce三个参数进行字典序排序
(2)将三个参数字符串拼接成一个字符串进行sha1加密 得到一个签名signature1
(3)开发者将获得加密后的字符串signature1与signature进行比较
(4)若二者相同,则认为此次GET请求来自微信服务器,可原样返回echostr参数内容,配置成功。
若二者不相同,则认为此次GET请求不是来自微信服务器,不可原样返回echostr参数内容,配置失败。
总结:用 token、timestamp、nonce 生成一个签名signature1,并与signature比较,若相同,则原样返回echostr,若不同则配置失败。
3.微信服务器怎么判断签名校验是否成功?
若微信服务器收到原样的echostr,则任务校验成功。也就是说如果你收到signature 、timestamp、nonce、echostr 后,什么都不做,就只原样返回一个echostr,微信服务器还是认为你校验成功了。
4.签名校验的代码实现
4.1 用SHA1算法生成安全签名 signature1


/**
     * 微信公众号SHA1加密算法
     * 用SHA1算法生成安全签名
     * @param token 票据
     * @param timestamp 时间戳
     * @param nonce 随机字符串
     * @return 安全签名
     * @throws AesException
     */
    public static String getSHA1_WXGZ(String token, String timestamp, String nonce) throws AesException
              {
        try {
            String[] array = new String[] { token, timestamp, nonce };
            StringBuffer sb = new StringBuffer();
            //1.将token、timestamp、nonce三个参数进行字典序排序
            Arrays.sort(array);

            //2.将三个参数字符串拼接成一个字符串进行sha1加密
            for (int i = 0; i < 3; i++) {
                sb.append(array[i]);
            }
            String str = sb.toString();
            //2.2 SHA1签名生成
            MessageDigest md = MessageDigest.getInstance("SHA-1");
            md.update(str.getBytes());
            byte[] digest = md.digest();

            StringBuffer hexstr = new StringBuffer();
            String shaHex = "";
            for (int i = 0; i < digest.length; i++) {
                shaHex = Integer.toHexString(digest[i] & 0xFF);
                if (shaHex.length() < 2) {
                    hexstr.append(0);
                }
                hexstr.append(shaHex);
            }
            return hexstr.toString();
        } catch (Exception e) {
            e.printStackTrace();
            throw new AesException(AesException.ComputeSignatureError);
        }
    }
}
4.2 验证signature1是否与signature相同
/**
     *
     * 验证URL
     * @param msgSignature
     * @param timeStamp 时间戳,对应URL参数的timestamp
     * @param nonce 随机串,对应URL参数的nonce
     * @param echoStr 随机串,对应URL参数的echostr
     *
     * @return 解密之后的echostr
     * @throws AesException 执行失败,请查看该异常的错误码和具体的错误信息
     */
    /**
     * @desc :微信公众号  验证url
     *
     * @param msgSignature  签名串,对应URL参数的msg_signature
     * @param token 公众平台上,开发者设置的token
     * @param timeStamp   时间戳,对应URL参数的timestamp
     * @param nonce 随机数,对应URL参数的nonce
     * @return
     *    true  验证成功
     * @throws AesException boolean
     */
    public boolean verifyUrl_WXGZ(String msgSignature, String token , String timeStamp, String nonce) throws AesException {
        //1.进行SHA1加密
        String signature = SHA1.getSHA1_WXGZ(token, timeStamp, nonce);

        //2.验证 token、timestamp、nonce进行SHA1加密生成的signature 是否与url传过来msgSignature相同
        if (!signature.equals(msgSignature)) {
            throw new AesException(AesException.ValidateSignatureError);
        //3.若相同,则url验证成功,返回true
        }else{
            return true;
        }
    }
4.3 在servlet的doGet方法中进行url的校验
    //1.接收  回调模式  的请求
    protected void doGet(HttpServletRequest request, HttpServletResponse response)  {
        logger.info("get--------------");
        //一、校验URL
        //1.准备校验参数
        // 微信加密签名
        String msgSignature = request.getParameter("signature");
        // 时间戳
        String timeStamp = request.getParameter("timestamp");
        // 随机数
        String nonce = request.getParameter("nonce");
        // 随机字符串
        String echoStr = request.getParameter("echostr");

        PrintWriter out=null;
        try {
            //2.校验url
            //2.1 创建加解密类
            WXBizMsgCrypt wxcpt = new WXBizMsgCrypt(Env.TOKEN,Env.ENCODING_AES_KEY,Env.APP_ID);

            //2.2进行url校验
            //不抛异常就说明校验成功
            boolean mark= wxcpt.verifyUrl_WXGZ(msgSignature, Env.TOKEN, timeStamp, nonce);

            //2.3若校验成功,则原样返回 echoStr
            if (mark) {
                out = response.getWriter();
                out.print(echoStr);
            }


        } catch (AesException e) {
            // TODO Auto-generated catch block
            e.printStackTrace();
        } catch (IOException e) {
            // TODO Auto-generated catch block
            e.printStackTrace();
        } finally {
            if (out != null) {
                out.close();
                out = null;                       //释放资源
            }
        }
    }
四、代码实现
1.微信配置类—Env.java
微信公众号接入配置类
package com.ray.weixin.gz.config;

/**@desc  : 微信公众号接入配置
 *
 * @author: shirayner
 * @date  : 2017年9月27日 下午4:57:36
 */

public class Env {

    /**
     * 1. 企业应用接入秘钥相关
     */
    //public static final String APP_ID = "wx4dca3424bebef2cc";
   // public static final String APP_SECRET = "068e2599abf88ba78491a07906f3c56e";

    //测试号
    public static final String APP_ID = "wxa0064ea657f80062";
    public static final String APP_SECRET = "fcc960840df869ad1a46af7993784917";


    /**
     * 2.服务器配置:
     * 启用并设置服务器配置后,用户发给公众号的消息以及开发者需要的事件推送,将被微信转发到该URL中
     */
    public static final String TOKEN = "weixin";
    public static final String ENCODING_AES_KEY = "JvJ1Dww6tjUU2psC3pmokXvOHHfovfWP3LfX1xrriz1";


}
2.HTTP请求工具类—HttpHelper.java
package com.ray.weixin.gz.util;

import java.io.File;
import java.io.FileOutputStream;
import java.io.IOException;
import java.io.InputStream;

import org.apache.http.Header;
import org.apache.http.HeaderElement;
import org.apache.http.HttpEntity;
import org.apache.http.HttpResponse;
import org.apache.http.HttpStatus;
import org.apache.http.NameValuePair;
import org.apache.http.client.config.RequestConfig;
import org.apache.http.client.methods.CloseableHttpResponse;
import org.apache.http.client.methods.HttpGet;
import org.apache.http.client.methods.HttpPost;
import org.apache.http.entity.ContentType;
import org.apache.http.entity.StringEntity;
import org.apache.http.entity.mime.MultipartEntityBuilder;
import org.apache.http.entity.mime.content.FileBody;
import org.apache.http.impl.client.CloseableHttpClient;
import org.apache.http.impl.client.HttpClients;
import org.apache.http.protocol.BasicHttpContext;
import org.apache.http.util.EntityUtils;
import com.alibaba.fastjson.JSON;
import com.alibaba.fastjson.JSONObject;


/**
 * HTTP请求封装,建议直接使用sdk的API
 */
public class HttpHelper {

    /**
     * @desc :1.发起GET请求
     *
     * @param url
     * @return JSONObject
     * @throws Exception
     */
    public static JSONObject doGet(String url) throws Exception {

        //1.生成一个请求
        HttpGet httpGet = new HttpGet(url);
        //2.配置请求的属性
        RequestConfig requestConfig = RequestConfig.custom().setSocketTimeout(5000).setConnectTimeout(5000).build();//2000
        httpGet.setConfig(requestConfig);

        //3.发起请求,获取响应信息
        //3.1 创建httpClient
        CloseableHttpClient httpClient = HttpClients.createDefault();
        CloseableHttpResponse response = null;
        try {
            //3.2 发起请求,获取响应信息
            response = httpClient.execute(httpGet, new BasicHttpContext());

            //如果返回结果的code不等于200,说明出错了
            if (response.getStatusLine().getStatusCode() != 200) {

                System.out.println("request url failed, http code=" + response.getStatusLine().getStatusCode()
                        + ", url=" + url);
                return null;
            }
            //4.解析请求结果
            HttpEntity entity = response.getEntity();      //reponse返回的数据在entity中
            if (entity != null) {
                String resultStr = EntityUtils.toString(entity, "utf-8");  //将数据转化为string格式
                System.out.println("GET请求结果:"+resultStr);
                JSONObject result = JSON.parseObject(resultStr);    //将String转换为 JSONObject

                if(result.getInteger("errcode")==null) {
                    return result;
                }else if (0 == result.getInteger("errcode")) {
                    return result;
                }else {
                    System.out.println("request url=" + url + ",return value=");
                    System.out.println(resultStr);
                    int errCode = result.getInteger("errcode");
                    String errMsg = result.getString("errmsg");
                    throw new Exception("error code:"+errCode+", error message:"+errMsg);
                }
            }
        } catch (IOException e) {
            System.out.println("request url=" + url + ", exception, msg=" + e.getMessage());
            e.printStackTrace();
        } finally {
            if (response != null) try {
                response.close();                     //释放资源

            } catch (IOException e) {
                e.printStackTrace();
            }
        }

        return null;
    }


    /** 2.发起POST请求
     * @desc :
     *
     * @param url   请求url
     * @param data  请求参数(json)
     * @return
     * @throws Exception JSONObject
     */
    public static JSONObject doPost(String url, Object data) throws Exception {
        //1.生成一个请求
        HttpPost httpPost = new HttpPost(url);

        //2.配置请求属性
        //2.1 设置请求超时时间
        RequestConfig requestConfig = RequestConfig.custom().setSocketTimeout(100000).setConnectTimeout(100000).build();
        httpPost.setConfig(requestConfig);
        //2.2 设置数据传输格式-json
        httpPost.addHeader("Content-Type", "application/json");
        //2.3 设置请求参数
        StringEntity requestEntity = new StringEntity(JSON.toJSONString(data), "utf-8");
        httpPost.setEntity(requestEntity);

        //3.发起请求,获取响应信息
        //3.1 创建httpClient
        CloseableHttpClient httpClient = HttpClients.createDefault();
        CloseableHttpResponse response = null;

        try {


            //3.3 发起请求,获取响应
            response = httpClient.execute(httpPost, new BasicHttpContext());

            if (response.getStatusLine().getStatusCode() != 200) {

                System.out.println("request url failed, http code=" + response.getStatusLine().getStatusCode()
                        + ", url=" + url);
                return null;
            }

            //获取响应内容
            HttpEntity entity = response.getEntity();
            if (entity != null) {
                String resultStr = EntityUtils.toString(entity, "utf-8");
                System.out.println("POST请求结果:"+resultStr);

                //解析响应内容
                JSONObject result = JSON.parseObject(resultStr);

                if(result.getInteger("errcode")==null) {
                    return result;
                }else if (0 == result.getInteger("errcode")) {
                    return result;
                }else {
                    System.out.println("request url=" + url + ",return value=");
                    System.out.println(resultStr);
                    int errCode = result.getInteger("errcode");
                    String errMsg = result.getString("errmsg");
                    throw new Exception("error code:"+errCode+", error message:"+errMsg);
                }
            }
        } catch (IOException e) {
            System.out.println("request url=" + url + ", exception, msg=" + e.getMessage());
            e.printStackTrace();
        } finally {
            if (response != null) try {
                response.close();              //释放资源

            } catch (IOException e) {
                e.printStackTrace();
            }
        }

        return null;
    }

    /**
     * @desc : 3.上传文件
     *
     * @param url   请求url
     * @param file  上传的文件
     * @return
     * @throws Exception JSONObject
     */
    public static JSONObject uploadMedia(String url, File file) throws Exception {
        HttpPost httpPost = new HttpPost(url);
        CloseableHttpResponse response = null;
        CloseableHttpClient httpClient = HttpClients.createDefault();
        RequestConfig requestConfig = RequestConfig.custom().setSocketTimeout(5000).setConnectTimeout(5000).build();
        httpPost.setConfig(requestConfig);

        HttpEntity requestEntity = MultipartEntityBuilder.create().addPart("media",
                new FileBody(file, ContentType.APPLICATION_OCTET_STREAM, file.getName())).build();
        httpPost.setEntity(requestEntity);

        try {
            response = httpClient.execute(httpPost, new BasicHttpContext());

            if (response.getStatusLine().getStatusCode() != 200) {

                System.out.println("request url failed, http code=" + response.getStatusLine().getStatusCode()
                        + ", url=" + url);
                return null;
            }
            HttpEntity entity = response.getEntity();
            if (entity != null) {
                String resultStr = EntityUtils.toString(entity, "utf-8");

                JSONObject result = JSON.parseObject(resultStr);
                //上传临时素材成功
                if (result.getString("errcode")== null) {
                    // 成功
                    //result.remove("errcode");
                    //result.remove("errmsg");
                    return result;
                } else {
                    System.out.println("request url=" + url + ",return value=");
                    System.out.println(resultStr);
                    int errCode = result.getInteger("errcode");
                    String errMsg = result.getString("errmsg");
                    throw new Exception("error code:"+errCode+", error message:"+errMsg);
                }
            }
        } catch (IOException e) {
            System.out.println("request url=" + url + ", exception, msg=" + e.getMessage());
            e.printStackTrace();
        } finally {
            if (response != null) try {
                response.close();                  //释放资源


            } catch (IOException e) {
                e.printStackTrace();
            }
        }

        return null;
    }

    /**
     * @desc : 4.下载文件 -get
     *
     * @param url  请求url
     * @param fileDir  下载路径
     * @return
     * @throws Exception File
     */
    public static File downloadMedia(String url, String fileDir) throws Exception  {
        //1.生成一个请求
        HttpGet httpGet = new HttpGet(url);
        //2.配置请求属性
        RequestConfig requestConfig = RequestConfig.custom().setSocketTimeout(100000).setConnectTimeout(100000).build();
        httpGet.setConfig(requestConfig);

        //3.发起请求,获取响应信息
        //3.1 创建httpClient
        CloseableHttpClient httpClient = HttpClients.createDefault();
        CloseableHttpResponse response = null;

        //4.设置本地保存的文件
        //File file = new File(fileDir);
        File file = null;
        try {
            //5. 发起请求,获取响应信息
            response = httpClient.execute(httpGet, new BasicHttpContext());
            System.out.println("HttpStatus.SC_OK:"+HttpStatus.SC_OK);
            System.out.println("response.getStatusLine().getStatusCode():"+response.getStatusLine().getStatusCode());
            System.out.println("http-header:"+JSON.toJSONString( response.getAllHeaders() ));
            System.out.println("http-filename:"+getFileName(response) );

            //请求成功
            if(HttpStatus.SC_OK==response.getStatusLine().getStatusCode()){

                //6.取得请求内容
                HttpEntity entity = response.getEntity();

                if (entity != null) {
                    //这里可以得到文件的类型 如image/jpg /zip /tiff 等等 但是发现并不是十分有效,有时明明后缀是.rar但是取到的是null,这点特别说明
                    System.out.println(entity.getContentType());
                    //可以判断是否是文件数据流
                    System.out.println(entity.isStreaming());

                    //6.1 输出流
                    //6.1.1获取文件名,拼接文件路径
                    String fileName=getFileName(response);
                    fileDir=fileDir+fileName;
                    file = new File(fileDir);
                    //6.1.2根据文件路径获取输出流
                    FileOutputStream output = new FileOutputStream(file);

                    //6.2 输入流:从钉钉服务器返回的文件流,得到网络资源并写入文件
                    InputStream input = entity.getContent();

                    //6.3 将数据写入文件:将输入流中的数据写入到输出流
                    byte b[] = new byte[1024];
                    int j = 0;
                    while( (j = input.read(b))!=-1){
                        output.write(b,0,j);
                    }
                    output.flush();
                    output.close();
                }
                if (entity != null) {
                    entity.consumeContent();
                }
            }
        } catch (IOException e) {
            System.out.println("request url=" + url + ", exception, msg=" + e.getMessage());
            e.printStackTrace();
        } finally {
            if (response != null) try {
                response.close();                       //释放资源


            } catch (IOException e) {
                e.printStackTrace();
            }
        }

        return file;
    }


    /**
     * @desc : 5.下载文件 - post
     *
     * @param url  请求url
     * @param data  post请求参数
     * @param fileDir 文件下载路径
     * @return
     * @throws Exception File
     */
    public static File downloadMedia(String url, Object data, String fileDir) throws Exception  {
        //1.生成一个请求
        HttpPost httpPost = new HttpPost(url);

        //2.配置请求属性
        //2.1 设置请求超时时间
        RequestConfig requestConfig = RequestConfig.custom().setSocketTimeout(100000).setConnectTimeout(100000).build();
        httpPost.setConfig(requestConfig);
        //2.2 设置数据传输格式-json
        httpPost.addHeader("Content-Type", "application/json");
        //2.3 设置请求参数
        StringEntity requestEntity = new StringEntity(JSON.toJSONString(data), "utf-8");
        httpPost.setEntity(requestEntity);

        //3.发起请求,获取响应信息
        //3.1 创建httpClient
        CloseableHttpClient httpClient = HttpClients.createDefault();
        CloseableHttpResponse response = null;

        //4.设置本地保存的文件
        //File file = new File(fileDir);
        File file = null;
        try {
            //5. 发起请求,获取响应信息
            response = httpClient.execute(httpPost, new BasicHttpContext());
            System.out.println("HttpStatus.SC_OK:"+HttpStatus.SC_OK);
            System.out.println("response.getStatusLine().getStatusCode():"+response.getStatusLine().getStatusCode());
            System.out.println("http-header:"+JSON.toJSONString( response.getAllHeaders() ));
            System.out.println("http-filename:"+getFileName(response) );

            //请求成功
            if(HttpStatus.SC_OK==response.getStatusLine().getStatusCode()){

                //6.取得请求内容
                HttpEntity entity = response.getEntity();

                if (entity != null) {
                    //这里可以得到文件的类型 如image/jpg /zip /tiff 等等 但是发现并不是十分有效,有时明明后缀是.rar但是取到的是null,这点特别说明
                    System.out.println(entity.getContentType());
                    //可以判断是否是文件数据流
                    System.out.println(entity.isStreaming());

                    //6.1 输出流
                    //6.1.1获取文件名,拼接文件路径
                    String fileName=getFileName(response);
                    fileDir=fileDir+fileName;
                    file = new File(fileDir);
                    //6.1.2根据文件路径获取输出流
                    FileOutputStream output = new FileOutputStream(file);

                    //6.2 输入流:从钉钉服务器返回的文件流,得到网络资源并写入文件
                    InputStream input = entity.getContent();

                    //6.3 将数据写入文件:将输入流中的数据写入到输出流
                    byte b[] = new byte[1024];
                    int j = 0;
                    while( (j = input.read(b))!=-1){
                        output.write(b,0,j);
                    }
                    output.flush();
                    output.close();
                }
                if (entity != null) {
                    entity.consumeContent();
                }
            }
        } 以上是关于Java微信公众平台开发_02_启用服务器配置的主要内容,如果未能解决你的问题,请参考以下文章