SSH框架简化(struts2+spring+hibernate)
Posted 该用户已进疯人院
tags:
篇首语:本文由小常识网(cha138.com)小编为大家整理,主要介绍了SSH框架简化(struts2+spring+hibernate)相关的知识,希望对你有一定的参考价值。
目的:
通过对ssh框架有了基础性的学习,本文主要是使用注解的方式来简化ssh框架的代码编写。
注意事项:
1.运行环境:Windows 8-64位,Eclipse(开发工具),jdk1.8.0_91,Tomcat 8.0,struts-2.3.30-apps,spring-framework-4.2.2.RELEASE,hibernate-release-5.2.2.Final,mysql数据库
2.问:既然说是简化版那么到底简化了哪些呢?
答:①原来的属性set注入改为注解
②原来的Connection(连接数据库)包改为jdbc.properties文件配置
③由于加入hibernate之后我们不需要创建表,但是向数据库里插入数据还是得自己写,以下就是插入语句:
use news;
insert into news(title,content,begintime,username) values(\'美国之死\',\'如何干掉美国...\',\'2012-03-01\',\'xiaowen\');
insert into news(title,content,begintime,username) values(\'美国之死2\',\'如何干掉美国2...\',\'2012-03-02\',\'xiaohong\');
insert into news(title,content,begintime,username) values(\'美国之死3\',\'如何干掉美国3...\',\'2012-03-03\',\'xiaochen\');
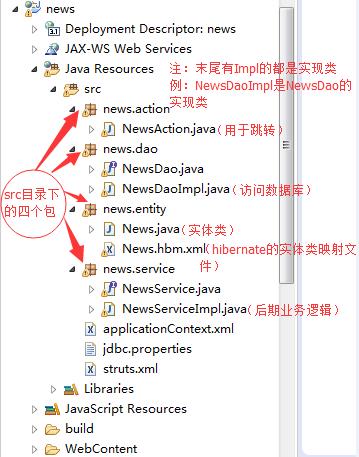
文件总序:
src目录:
WEB-INF目录下:
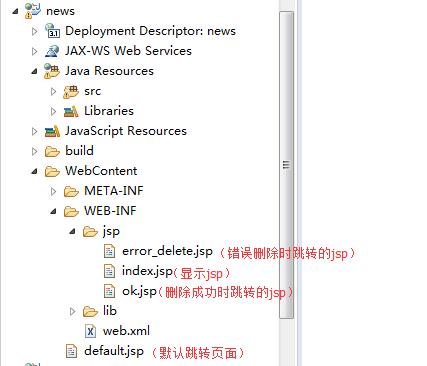
(开始)
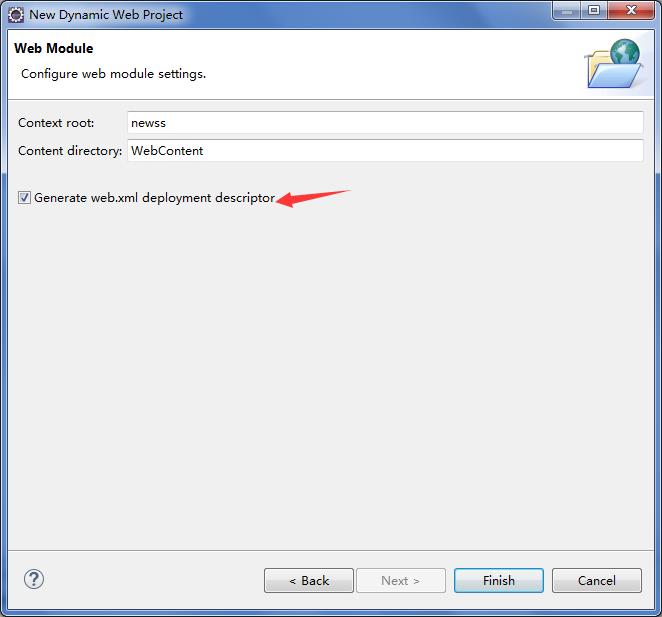
一. 在eclipse右键新建一个项目并勾上生成web.xml文件
二.导入struts、spring、hibernate 相关jar包(具体可看第一篇ssh框架)
地址:未简化版ssh(struts2+spring+hibernate)框架搭建
三.在WEB-INF目录下的web.xml文件配置过滤器(struts2)和监听器(spring)
<?xml version="1.0" encoding="UTF-8"?>
<web-app xmlns:xsi="http://www.w3.org/2001/XMLSchema-instance" xmlns="http://xmlns.jcp.org/xml/ns/javaee" xsi:schemaLocation="http://xmlns.jcp.org/xml/ns/javaee http://xmlns.jcp.org/xml/ns/javaee/web-app_3_1.xsd" id="WebApp_ID" version="3.1">
  <display-name>news</display-name>
  <welcome-file-list>
    <welcome-file>default.jsp</welcome-file>
  </welcome-file-list>

<!-- struts2过滤器 -->
  <filter>
    <filter-name>struts2</filter-name>
    <filter-class>org.apache.struts2.dispatcher.ng.filter.StrutsPrepareAndExecuteFilter</filter-class>
  </filter>
  <filter-mapping>
    <filter-name>struts2</filter-name>
    <url-pattern>/*</url-pattern>
  </filter-mapping>

<!-- spring监听器 -->
  <context-param>
    <param-name>contextConfigLocation</param-name>
    <param-value>classpath:applicationContext.xml</param-value>
  </context-param>
  <listener>
    <listener-class>org.springframework.web.context.ContextLoaderListener</listener-class>
  </listener>
</web-app>
四.在项目新建四个包

五.在news.dao包中新建一个接口(interface):
package news.dao;

import java.util.List;

public interface NewsDao {
    public List showAllNews();
    //显示首页所有数据(查询使用的。PS:本例没用到)
    public String findNews();
    public String deleteSingleNews(Integer id);
}
六.在news.dao包新建一个类NewsDaoImpl实现NewsDao接口
package news.dao;

import java.util.ArrayList;
import java.util.List;

import javax.annotation.Resource;

import org.hibernate.Session;
import org.hibernate.SessionFactory;
import org.hibernate.query.Query;
import org.springframework.beans.factory.annotation.Autowired;
import org.springframework.beans.factory.annotation.Qualifier;
import org.springframework.context.annotation.Scope;
import org.springframework.stereotype.Repository;

import news.entity.News;

//@Repository("myNewsDao")
@Repository
@Scope("prototype")
public class NewsDaoImpl implements NewsDao {

	@Autowired
	//@Qualifier("mySessionFactory")
	//@Resource(name="mySessionFactory")
	private SessionFactory sf;

	@Override
	public List showAllNews() {
		Session session = sf.openSession();
		session.getTransaction().begin();

		Query query = session.createQuery("from News");

		List<News> allNewList  = query.getResultList();

		session.getTransaction().commit();
		session.close();

		return allNewList;
	}

	@Override
	public String findNews() {
		return null;
	}

	@Override
	public String deleteSingleNews(Integer id) {
		Session session = sf.openSession();
		//Session session = sf.getCurrentSession();//它会与事务关联,并且在事务后自动关闭
		Query query = session.createQuery("from News where id=:myid");

		query.setParameter("myid", id);
		List<News> deleteList  = query.getResultList();
		//如果搜索出来是1条,就删除,如果是0条就不管了
		if ( deleteList.size()==1 ) {
			News news = deleteList.get(0);
			System.out.println("删除对象:"+news.getTitle()+ " Id:"+news.getId());
			session.getTransaction().begin();
			session.delete(news);
			session.getTransaction().commit();
			session.close();
			//sessionFactory关闭策略
			//1.坚持使用数据库连接池(例如C3P0)
			//2.sessionFactory就不关闭,而使用hibernate事务自动关闭功能
			// 说明:sf.openSession();  必须关闭
			//    sf.openSession(); 改为:sf.getCurrentSession();
			//getCurrentSession创建的线程会在事务提交或者事务回滚后自动关闭
			//sf.close();
		}


		return "deleteOK";
	}

}
注意:原来的spring setter注入,改为注解
七. 在news.service包中新建一个接口NewsServic
package news.service;

import java.util.List;

public interface NewsService {
	public List showAllNews();
	public String findNews();
	public String deleteSingleNews(Integer id);
}
八.在news.service包中新建一个类实现NewsService接口
package news.service;

import java.util.List;

import javax.annotation.Resource;

import org.springframework.beans.factory.annotation.Autowired;
import org.springframework.beans.factory.annotation.Qualifier;
import org.springframework.context.annotation.Scope;
import org.springframework.stereotype.Service;

import news.dao.NewsDao;
import news.entity.News;

//@Service("myNewsService")
@Service
@Scope("prototype")
public class NewsServiceImpl implements NewsService {

	//Autowired和Qualifier 属于spring的注解,


	//jdk自带注解resource可以替代Autowired
	/*
	 * 用resource的好处:
	 * 1. 代码与spring 解耦,不依赖于spring
	 * 2. 代码中没有spring的存在,可以随时切换任意一套类似spring的框架
	 */
	@Autowired
	//@Qualifier("myNewsDao")
	//@Resource(name="myNewsDao")
	private NewsDao nd;


	@Override
	public List showAllNews() {
		//可以增加一个业务逻辑,比如:把文章的内容进行截取为20字符
		//通过DAO获取数据
		List<News> allNewList = nd.showAllNews();
		//在return 之间,可以进行各种业务逻辑操作

		return allNewList;
	}

	@Override
	public String findNews() {
		// TODO Auto-generated method stub
		return null;
	}

	@Override
	public String deleteSingleNews(Integer id) {
		//需要做以下判断,例如有没有权限删除,又或者判断下面是否有级联子子记录

		//当可以删除时,调用DAO给直接删除
		String returnValue = "deleteFailed";
		returnValue = nd.deleteSingleNews(id);
		// TODO Auto-generated method stub
		return returnValue;
	}

}
九.在news.action包中新建一个NewsAction类
package news.action;

import java.util.List;

import javax.annotation.Resource;

import org.springframework.beans.factory.annotation.Autowired;
import org.springframework.beans.factory.annotation.Qualifier;
import org.springframework.context.annotation.Scope;
import org.springframework.stereotype.Controller;

import com.opensymphony.xwork2.ActionSupport;

import news.entity.News;
import news.service.NewsService;

//@Controller("myNewsAction")
@Controller               //默认就是类的首字母小写newsAction
@Scope("prototype")
public class NewsAction extends ActionSupport {

	private String message;

	public String getMessage() {
		return message;
	}

	public void setMessage(String message) {
		this.message = message;
	}

	//获取从客户端传递过来的值
	private Integer id;
	public Integer getId(){
		return this.id;
	}

	//strtus自动的赋值
	public void setId(Integer id) {
		this.id = id;
	}


	@Autowired
	//@Qualifier("myNewsService")
	//@Resource(name="myNewsService")
	private NewsService ns;

	//定义1个list用于前端jsp显示
	private List<News> allNewList;

	public List<News> getAllNewList() {
		return allNewList;
	}

	//显示首页所有数据
	public String showAllNews(){
		//调用service 中的showAllNews,获取所有的数据,
		//然后保存到
		allNewList = ns.showAllNews();
		return "success";
	}

	//显示首页所有数据(查询使用的。PS:本例没用到)
	public String findNews(){
		return "";
	}

	public String deleteSingleNews(){
		System.out.println("从客户端传递过来的ID:"+id);
		String returnValue = ns.deleteSingleNews(id);
		return returnValue;
	}

}
十.在webcontent目录下新建一个default.jsp

<%@ page language="java" contentType="text/html; charset=UTF-8"
    pageEncoding="UTF-8"%><%

    response.sendRedirect("NewsAction_showAllNews.action");
%>
十一.在src目录下创建struts.xml
<?xml version="1.0" encoding="UTF-8" ?> <!DOCTYPE struts PUBLIC "-//Apache Software Foundation//DTD Struts Configuration 2.3//EN" "http://struts.apache.org/dtds/struts-2.3.dtd"> <struts> <constant name="struts.objectFactory" value="spring" /> <!-- 第1步:先定义一个包 --> <package name="mypck001" extends="struts-default"> <action name="NewsAction_*" class="newsAction" method="{1}"> <result name="success">/WEB-INF/jsp/index.jsp</result> <!-- 希望删除成功后,重新执行1次首页显示内容 --> <result name="deleteOK" type="redirectAction">NewsAction_showAllNews.action?message=deleteok&id=${id}</result> </action> </package> </struts>
十二.在src目录下新建一个applicationContext.xml配置文件
<?xml version="1.0" encoding="UTF-8"?>
<beans xmlns="http://www.springframework.org/schema/beans"
    xmlns:xsi="http://www.w3.org/2001/XMLSchema-instance" xmlns:p="http://www.springframework.org/schema/p"
    xmlns:aop="http://www.springframework.org/schema/aop" xmlns:context="http://www.springframework.org/schema/context"
    xmlns:jee="http://www.springframework.org/schema/jee" xmlns:tx="http://www.springframework.org/schema/tx"
    xsi:schemaLocation="
            http://www.springframework.org/schema/aop http://www.springframework.org/schema/aop/spring-aop-4.2.xsd
            http://www.springframework.org/schema/beans http://www.springframework.org/schema/beans/spring-beans-4.2.xsd
            http://www.springframework.org/schema/context http://www.springframework.org/schema/context/spring-context-4.2.xsd
            http://www.springframework.org/schema/jee http://www.springframework.org/schema/jee/spring-jee-4.2.xsd
            http://www.springframework.org/schema/tx http://www.springframework.org/schema/tx/spring-tx-4.2.xsd">

    <!-- 原理:自动注入processor解析器,用来解析注解 -->
    <!--
     <context:annotation-config/>
     -->

    <!-- 自动扫描包,也会自动注入解释器,所以不需要 context:annotation-config-->
    <context:component-scan base-package="news"></context:component-scan>


    <!-- 引入外部属性文件 -->
    <context:property-placeholder location="classpath:jdbc.properties" />

    <bean id="sessionFactory"
        class="org.springframework.orm.hibernate5.LocalSessionFactoryBean">
        <!-- 注入连接池,包含了数据库用户名,密码等等信息 -->
        <property name="dataSource" ref="myDataSource" />

        <!-- 配置Hibernate的其他的属性 -->
        <property name="hibernateProperties">
            <props>
                <prop key="hibernate.dialect">org.hibernate.dialect.MySQL5Dialect</prop>
                <prop key="hibernate.show_sql">true</prop>
                <prop key="hibernate.format_sql">true</prop>
                <prop key="hibernate.connection.autocommit">false</prop>
                <!-- 开机自动生成表 -->
                <prop key="hibernate.hbm2ddl.auto">update</prop>
            </props>
        </property>
        <property name="mappingResources">
            <list>
                <value>news/entity/News.hbm.xml</value>
            </list>
        </property>

    </bean>

    <bean id="myDataSource" class="com.mchange.v2.c3p0.ComboPooledDataSource">
        <property name="driverClass" value="${jdbc.driver}" />
        <property name="jdbcUrl" value="${jdbc.url}" />
        <property name="user" value="${jdbc.user}" />
        <property name="password" value="${jdbc.password}" />
        <!-- 每300秒检查所有连接池中的空闲连接 -->
        <property name="idleConnectionTestPeriod" value="300"></property>
        <!-- 最大空闲时间,900秒内未使用则连接被丢弃。若为0则永不丢弃 -->
        <property name="maxIdleTime" value="900"></property>
        <!-- 最大连接数 -->
        <property name="maxPoolSize" value="2"></property>

    </bean>


</beans>
十三.在news.entity包中新建一个映射文件News.hbm.xml(实体类和数据库表的映射)
<?xml version="1.0" encoding="UTF-8"?>
<hibernate-mapping xmlns="http://www.hibernate.org/xsd/hibernate-mapping">

     <class name="news.entity.News" table="news">
        <id name="id" column="id">
        	<generator class="native"></generator>
        </id>
        <property name="title" type="string" length="50" column="title" not-null="true"></property>
        <property name="content" type="text" length="50000" column="content" not-null="true"></property>
        <property name="begintime" type="date" column="begintime" not-null="true"></property>
        <property name="username" type="string" length="20" column="username" not-null="true"></property>
    </class>
</hibernate-mapping>
十四.在src目录下配置jdbc.properties(外部属性文件)
<!-- mysql数据库 -->
jdbc.driver=com.mysql.jdbc.Driver
jdbc.url=jdbc:mysql://localhost:3306/news
jdbc.user=root
jdbc.password=123456

<-- oracle数据库 -->
#oracle
jdbc_oracle.driver=oracle.jdbc.driver.OracleDriver
jdbc_oracle.url=jdbc:oracle:thin@127.0.0.1:1521:orcl
jdbc_oracle.user=news
jdbc_oracle.password=123456
十五.在WEB-INF目录下新建一个jsp(folder),并且在jsp下新建三个jsp文件
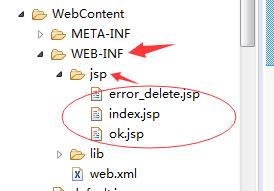
error_delete.jsp
<%@ page language="java" contentType="text/html; charset=UTF-8"
    pageEncoding="UTF-8"%>
<!DOCTYPE html PUBLIC "-//W3C//DTD HTML 4.01 Transitional//EN" "http://www.w3.org/TR/html4/loose.dtd">
<html>
<head>
<meta http-equiv="Content-Type" content="text/html; charset=UTF-8">
<title>Insert title here</title>
</head>
<body>
删除失败,原因:xxxxx
</body>
</html>
index.jsp
<%@ page language="java" contentType="text/html; charset=UTF-8"
    pageEncoding="UTF-8"%>
<%@ taglib uri="/struts-tags" prefix="s" %>
<!DOCTYPE html PUBLIC "-//W3C//DTD HTML 4.01 Transitional//EN" "http://www.w3.org/TR/html4/loose.dtd">
<html>
<head>
<meta http-equiv="Content-Type" content="text/html; charset=UTF-8">
<title>Insert title here</title>
</head>
<body>

提示信息:<s:property value="message"/>
删除id:<s:property value="id"/>
<br><br><br><br>

<s:iterator value="allNewList">
	<s:property value="id"/>
	<s:property value="title"/>
	<s:a value="NewsAction_deleteSingleNews?id=%{id}">删除</s:a>
	<br>
</s:iterator>
</body>
</html>
ok.jsp
<%@ page language="java" contentType="text/html; charset=UTF-8"
    pageEncoding="UTF-8"%>
<!DOCTYPE html PUBLIC "-//W3C//DTD HTML 4.01 Transitional//EN" "http://www.w3.org/TR/html4/loose.dtd">
<html>
<head>
<meta http-equiv="Content-Type" content="text/html; charset=UTF-8">
<title>Insert title here</title>
</head>
<body>
ok
</body>
</html>
运行后的效果:
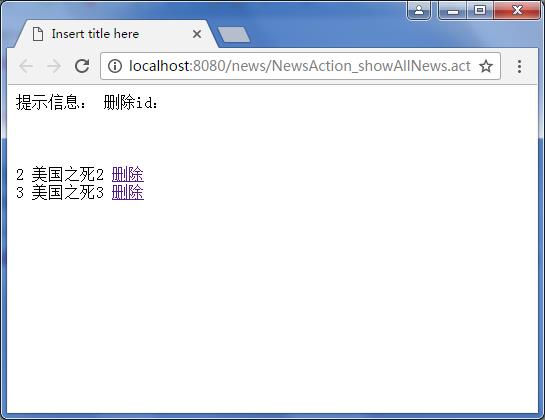
(结束)
以上是关于SSH框架简化(struts2+spring+hibernate)的主要内容,如果未能解决你的问题,请参考以下文章
SSH框架的简化(struts2spring4hibernate5)