mybatis generator在eclipse上的配置与使用(在maven上配置方法)
Posted
tags:
篇首语:本文由小常识网(cha138.com)小编为大家整理,主要介绍了mybatis generator在eclipse上的配置与使用(在maven上配置方法)相关的知识,希望对你有一定的参考价值。
mybatis generator在eclipse上的配置主要有在以下几个文件上需要进行修改内容:pom.xml,以及配置文件generatorConfig.xml的创建与编写。
1.在pom.xml上添加
在pom.xml上添加以下配置信息:
<plugin>
    <groupId>org.mybatis.generator</groupId>
    <artifactId>mybatis-generator-maven-plugin</artifactId>
    <version>1.3.2</version>
    <executions>
        <execution>
            <id>Generate MyBatis Files</id>
            <goals>
                <goal>generate</goal>
            </goals>
            <phase>generate</phase>
            <configuration>
                <verbose>true</verbose>
                <overwrite>true</overwrite>
            </configuration>
        </execution>
    </executions>
    <dependencies>
        <dependency>
            <groupId>mysql</groupId>
            <artifactId>mysql-connector-java</artifactId>
            <version>5.1.33</version>
        </dependency>
        <dependency>
            <groupId>org.mybatis.generator</groupId>
            <artifactId>mybatis-generator-core</artifactId>
            <version>1.3.5</version>
        </dependency>
        <dependency>
            <groupId>org.mybatis</groupId>
            <artifactId>mybatis</artifactId>
            <version>3.4.4</version>
        </dependency>
    </dependencies>
</plugin>
其中,以下代码为以maven插件的形式配置mybatis generator,且后面的dependencies标签的内容为导入相关jar包。
<groupId>org.mybatis.generator</groupId>
<artifactId>mybatis-generator-maven-plugin</artifactId>
<version>1.3.2</version>
<executions>
    <execution>
        <id>Generate MyBatis Files</id>
        <goals>
            <goal>generate</goal>
        </goals>
        <phase>generate</phase>
        <configuration>
            <verbose>true</verbose>
            <overwrite>true</overwrite>
        </configuration>
    </execution>
</executions>
2.在resource下创建generatorConfig.xml文件
其内容如下:
<?xml version="1.0" encoding="UTF-8"?>
<!DOCTYPE generatorConfiguration
        PUBLIC "-//mybatis.org//DTD MyBatis Generator Configuration 1.0//EN"
        "http://mybatis.org/dtd/mybatis-generator-config_1_0.dtd">

<generatorConfiguration>
    <!-- 加载驱动配置properties文件 -->
    <properties resource="JDBC.properties" />
    <!-- MySQL数据库驱动包位置 -->
    <classPathEntry location="E:/repository/mysql/mysql-connector-java/6.0.6/mysql-connector-java-6.0.6.jar" />

    <context id="my" targetRuntime="MyBatis3">
        <commentGenerator>
            <!-- 是否去除自动生成的时间注释 true:是 , false:否 -->
            <property name="suppressDate" value="false" />
            <!-- 是否去除自动生成的注释 true:是 , false:否 -->
            <property name="suppressAllComments" value="true" />
        </commentGenerator>
        <!-- 通过驱动配置文件导入的数据连接数据库 -->
        <jdbcConnection driverClass="${jdbc.driverClassName}"
            connectionURL="${jdbc.url}" userId="${jdbc.username}" password="${jdbc.password}" />

        <!-- java类型处理器
                用于处理DB中的类型到Java中的类型,默认使用JavaTypeResolverDefaultImpl;
                注意一点,默认会先尝试使用Integer,Long,Short等来对应DECIMAL和 NUMERIC数据类型; -->
        <javaTypeResolver>
            <property name="forceBigDecimals" value="false" />
        </javaTypeResolver>
        <!-- 自动为每一个生成的类创建一个构造方法,构造方法包含了所有的field;而不是使用setter; -->
        <javaModelGenerator targetPackage="com.inClass.bean"
            targetProject="D:/eclipse/test/src/main/java">
            <property name="enableSubPackages" value="true" />
            <property name="trimStrings" value="true" />
        </javaModelGenerator>
        <!-- 生成SQL map的XML文件生成器,
            注意,在Mybatis3之后,我们可以使用mapper.xml文件+Mapper接口(或者不用mapper接口),
            或者只使用Mapper接口+Annotation,所以,如果 javaClientGenerator配置中配置了需要生成XML的话,这个元素就必须配置
            targetPackage/targetProject:同javaModelGenerator -->
        <sqlMapGenerator targetPackage="com.inClass.mapper.xml"
            targetProject="D:/eclipse/test/src/main/java">
            <property name="enableSubPackages" value="true" />
        </sqlMapGenerator>

        <!-- 对于mybatis来说,即生成Mapper接口,注意,如果没有配置该元素,那么默认不会生成Mapper接口
            targetPackage/targetProject:同javaModelGenerator
            type:选择怎么生成mapper接口(在MyBatis3/MyBatis3Simple下):
            1,ANNOTATEDMAPPER:会生成使用Mapper接口+Annotation的方式创建(SQL生成在annotation中),不会生成对应的XML;
            2,MIXEDMAPPER:使用混合配置,会生成Mapper接口,并适当添加合适的Annotation,但是XML会生成在XML中;
            3,XMLMAPPER:会生成Mapper接口,接口完全依赖XML;
            注意:如果context是MyBatis3Simple:只支持ANNOTATEDMAPPER和XMLMAPPER -->
        <javaClientGenerator targetPackage="com.inClass.mapper"
            targetProject="D:/eclipse/test/src/main/java"
            type="XMLMAPPER">
            <property name="enableSubPackages" value="true" />
        </javaClientGenerator>

        <!-- 选择一个table来生成相关文件,可以有一个或多个table,必须要有table元素
                选择的table会生成一下文件:
            1,SQL map文件
            2,生成一个主键类;
            3,除了BLOB和主键的其他字段的类;
            4,包含BLOB的类;
            5,一个用户生成动态查询的条件类(selectByExample, deleteByExample),可选;
            6,Mapper接口(可选)
            tableName(必要):要生成对象的表名; -->
        <table tableName="xx_order" domainObjectName="Order"
            enableCountByExample="false" enableUpdateByExample="false"
            enableDeleteByExample="false" enableSelectByExample="false"
            selectByExampleQueryId="false">
            <generatedKey  column="ID"  sqlStatement="selectuuid_short()"
                 identity="false"/>
        </table>

        <table tableName="xx_order_item" domainObjectName="OrderItem"
            enableCountByExample="false" enableUpdateByExample="false"
            enableDeleteByExample="false" enableSelectByExample="false"
            selectByExampleQueryId="false">
            <generatedKey  column="ID"  sqlStatement="selectuuid_short()"
                 identity="false"/>
        </table>

        <table tableName="xx_payment_method" domainObjectName="PaymentMethod"
            enableCountByExample="false" enableUpdateByExample="false"
            enableDeleteByExample="false" enableSelectByExample="false"
            selectByExampleQueryId="false">
            <generatedKey  column="ID"  sqlStatement="selectuuid_short()"
                 identity="false"/>
        </table>

        <table tableName="xx_product" domainObjectName="Product"
            enableCountByExample="false" enableUpdateByExample="false"
            enableDeleteByExample="false" enableSelectByExample="false"
            selectByExampleQueryId="false">
            <generatedKey  column="ID"  sqlStatement="selectuuid_short()"
                 identity="false"/>
        </table>
    </context>
</generatorConfiguration>
以上代码中,table标签的tableName对应数据库表格名称,domainObjectName对应要生成的实体类的名称。
3.使用mybatis generator
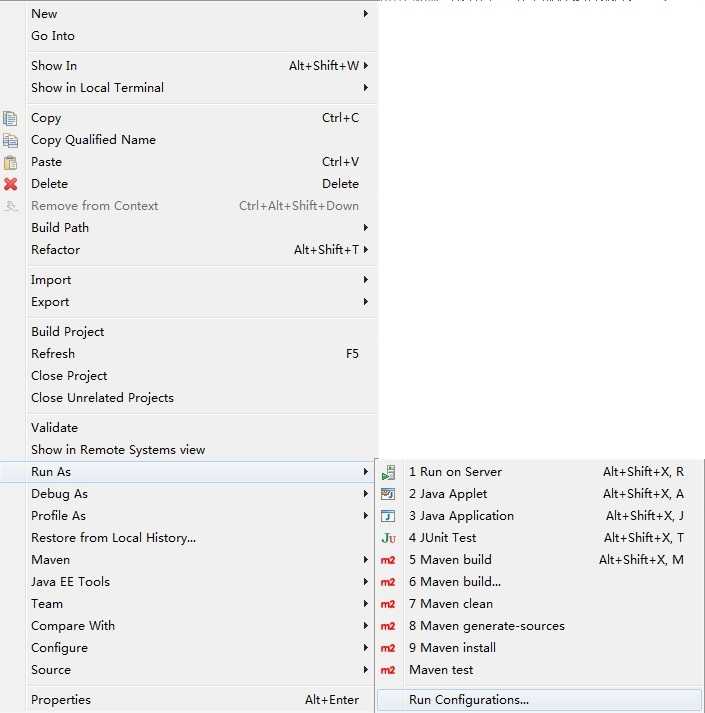
右键项目,点击Run As,Run Configerations。

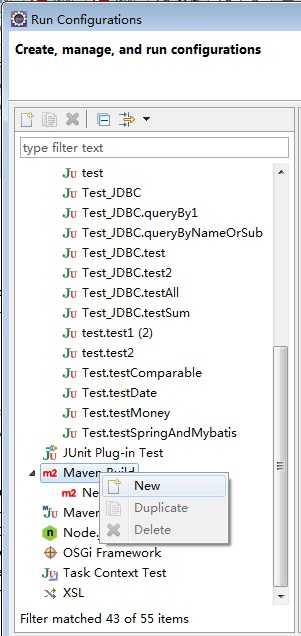
然后在Run Configurations界面,右键Maven Build,new一个configuration

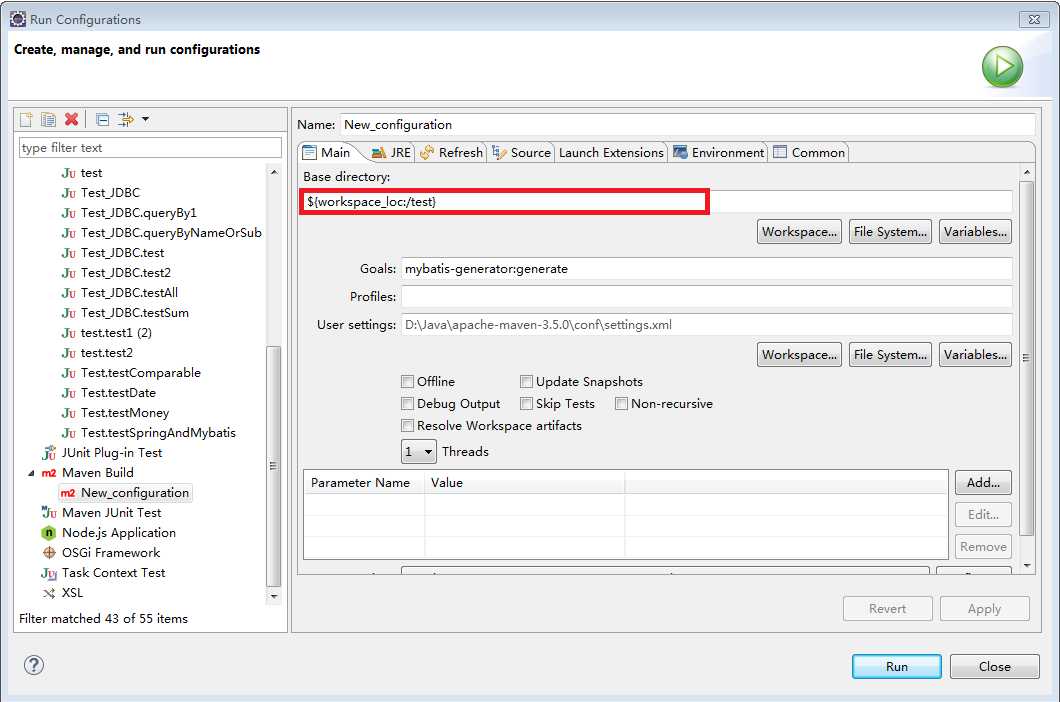
点击new 出来的configuration,按下图填入相关信息,且红框内需写入项目的路径,其余内容跟图片所示一样

最后点击run,运行,完成自动生成文件。
Ps.导入的jar包的版本不能太高(可能跟generator的jar版本有关)。
以上是关于mybatis generator在eclipse上的配置与使用(在maven上配置方法)的主要内容,如果未能解决你的问题,请参考以下文章