JAVA NIO学习笔记
Posted insaneXs
tags:
篇首语:本文由小常识网(cha138.com)小编为大家整理,主要介绍了JAVA NIO学习笔记相关的知识,希望对你有一定的参考价值。
概述
Java NIO(New IO)是一个可以替代标准Java IO API 的IO API(从Jav a 1. 4开始),Java NIO提供了与标准IO不同的IO工作方式。由以下几个核心的部分组成:
- Buffers(缓冲区)
- Ch an n el s(通道)
- Sel ect ors(多路复用器)
- Buffers(缓冲区 )
除布尔类型外,每个基本类型数据都有对应的特定Buffer对象,如(ByteBuffer, CharBuffer, DoubleBuffer,FloatBuffer, IntBuffer, LongBuffer, ShortBuffer)。而Buffer是所有这些的父类。Buffer可以被理解为一个数据容器,或者说就是一个缓冲区,用来存放数据。Buffer
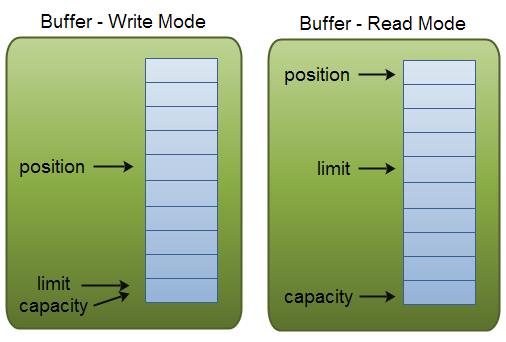
有四个重要的属性,分别是capacity(容量)、limit(限制)、position(位置)、mark(标记)。
- capacity:表示该缓冲的容量。
- limit:表示往Buffer中读或写时可以到的最大位置,当超出limit时,将会抛出异常。
- position:表示当前所在的位置。 mark:用来备份position,以便在之后可以重新退回position的位置。
- 如下图所示:

- 上述四种属性的关系是:0 <= 标记 <= 位置 <= 限制 <= 容量。
- 每个缓冲区都是可读,但并不是每个缓冲区都是可写的。以ByteBuffer为例,可以通过ByteBuffer.asReadOnlyBuffer()方法创建一个只读的缓冲区(asReadOnlyBuffer是一个抽象方法,具体实现交由其子类实现)。当对只读缓冲区进行写入操作时,会抛出ReadOnlyBufferException异常。另外,缓冲区并非是线程安全的,当多个线程操作缓冲区时,需要进行必要的同步操作。
- ByteBuffer重要api:
| 方法名 | 返回类型 | 说明 |
| capacity() | int | 返回此缓冲区的容量 |
| clear() | Buffer | 清除此缓冲区,会将limit设置为capaticy,将position设置为0,但是并不会清空Buffer中的内容,详见示例一 |
| flip() | Buffer | 反转此缓冲区,将limt设置为position的值,将position设置为0,一般用于读写转换 |
| limit() | int | 返回此缓冲区的limit |
| limit(int newLimit) | Buffer | 设置此缓冲器的limie,返回Buffer自身 |
| mark() | Buffer | 设置mark,返回Buffer自身 |
| position() | int | 返回position |
| position(int newPosition) | Buffer | 设置position,返回Buffer自身 |
| hasRemaining() | boolean | 判断position是否已经到达limit |
| remaining() | int | 返回limit和position之前的偏移量 |
| reset() | Buffer | 将posistion设置为mark的位置 |
示例一:
 1 public class BufferExercise1 {
 2     public static void main(String[] args){
 3         ByteBuffer buffer = ByteBuffer.allocate(1024);
 4
 5         buffer.put("hello world".getBytes());
 6         buffer.flip();
 7         //标记
 8         buffer.mark();
 9         while(buffer.hasRemaining()){
10             byte b = buffer.get();
11             System.out.println("position " + buffer.position() + ": " + (char)b);
12         }
13         System.out.println("before clear:");
14         System.out.println(buffer.position());
15         System.out.println(buffer.limit());
16
17         buffer.clear();
18         System.out.println("after clear:");
19         System.out.println(buffer.limit());
20         System.out.println(buffer.position());
21         System.out.println((char)buffer.get(3));
22     }
23 }
Channel(通道 )
Channel类主要的分为四种:
- FileChannel(用于文件读写的通道)
- DatagramChannel(可以收发UDP的通道)
- SocketChannel(连接TCP Socket的通道)
- ServerSocketChannel(可以监听到新的SOCKET连接的通道)
介绍这四种的Channel前,我们先由底层开始认识下主要的接口(注:以下介绍的都为interface)。
- Channel接口:继承了IO包中的Closeable接口,是通道的基本定义。通道是可处于打开或关闭状态的。因此该接口定义了close()方法用于关闭接口和isOpen()方法判断通道是否处于打开状态。一般情况下,通道都是线程安全的。
- InterruptibleChannel:实现此接口的通道是可异步关闭的。当一个线程阻塞在实现了该接口通道的I/O操作上,另一个接口可以调用该通道的close方法关闭。或者是调用阻塞线程的interupt方法关闭通道,并设置阻塞线程为可中断状态。
- WriteableByteChannel和ReadableByteChannel:分别定义了通道的写和读字节的操作。
- ByteChannel:继承了WriteableByteChannel和ReadableByteChannel。并未提供新的方法,只是对字节通道做了统一。
- GatteringByteChannel和ScatteringByteChannel:分别继承了WriteableByteChannel和ReadableByteChannel,提供了集中写(由多个缓冲区写入通道)和分散读(将通道中的数据依次读入多个缓冲区,一个缓冲区满了后开始填充下一个缓冲区)。
下面来介绍四种主要的Channel。
- FileChannel:用于读取、写入、映射和操作文件的通道。实现了ByteChannel,GatheringByteChannel和ScatteringByteChannel。因此具有读写甚至是批量读写的字节的功能。此外,它还提供了对文件的特定操作。
先通过代码了解一下FileChannel的一些基本用法。
 1 public class FileChannelExer1 {
 2
 3     public static void main(String[] args) throws IOException {
 4         // TODO Auto-generated method stub
 5         File file = new File("E:\\\\exercise\\\\learnNIO\\\\data.txt");
 6
 7         FileInputStream fis = new FileInputStream(file);
 8
 9         FileChannel fc = fis.getChannel();
10
11         System.out.println(fc.position());
12
13         ByteBuffer buffer = ByteBuffer.allocate(1024);
14
15         //从通道读入数据到缓冲区,read返回有多少字节被读入缓冲区
16         while(fc.read(buffer) > 0){
17             buffer.flip();
18
19             //查看缓冲区中的数据
20             while(buffer.hasRemaining()){
21                 System.out.print((char)buffer.get());
22             }
23         }
24
25         //使用完通道后必须关闭通道
26         fc.close();
27
28         fis.close();
29     }
30
31
32 }
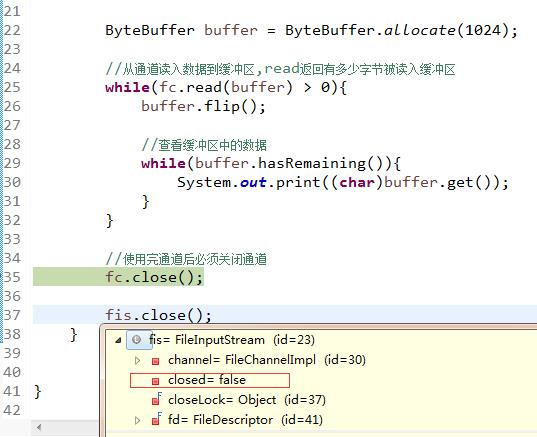
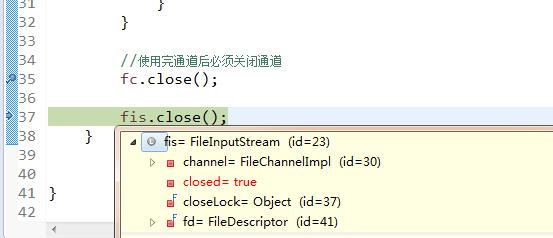
这里我们调用流的close()方法是想确认下通道的关闭是否会关闭流。


对比通道close()方法的执行前后,我们可以发现在通道关闭时,流也被关闭了。
我们在来测试下从InputStream中获取的通道是否为可写的:
public class FileChannelExer2 {

    public static void main(String[] args) throws IOException {
        // TODO Auto-generated method stub
        File file = new File("E:\\\\exercise\\\\learnNIO\\\\data.txt");

        FileInputStream fis = new FileInputStream(file);

        FileChannel fc = fis.getChannel();

        System.out.println(fc.position());

        //验证从InputStream获取的Channel是否为可写
        ByteBuffer buffer = ByteBuffer.allocate(1024);

        buffer.put("say something".getBytes());

        //抛出NonWritableChannelException异常
        fc.write(buffer);

        System.out.println("ater write,the position is " + fc.position());

        //使用完通道后必须关闭通道
        fc.close();

    }

}
结果是抛出了异常,同理从FileOutputStream中获取的Channel是不可读的。
如果想要可读写的Channel,我们可以通过RandomAcessFile来获取。
 1 public class FileChannelExer4 {
 2
 3     public static void main(String[] args) throws IOException {
 4         File file = new File("E:\\\\exercise\\\\learnNIO\\\\data.txt");
 5         //以读写的方式打开
 6         RandomAccessFile randF = new RandomAccessFile(file, "rw");
 7
 8
 9         FileChannel fc = randF.getChannel();
10
11         System.out.println(fc.position());
12
13         ByteBuffer buffer = ByteBuffer.allocate(1024);
14
15         while(fc.read(buffer) > 0){
16             buffer.flip();
17             System.out.println(fc.position());
18
19             while(buffer.hasRemaining()){
20                 System.out.print((char)buffer.get());
21             }
22         }
23
24         buffer.clear();
25
26         buffer.put("say something".getBytes());
27
28         buffer.flip();
29
30         fc.write(buffer);
31
32         //使用完通道后必须关闭通道
33         fc.close();
34     }
35
36 }
- DategramChannel(收发UDP的通道)
介绍下简单的用法:
 1 public class DatagramChannelExer1 {
 2     public static void main(String[] args) throws InterruptedException{
 3         Thread server = new Thread(new Server());
 4         server.start();
 5
 6         Thread.sleep(1000);
 7
 8         Thread client = new Thread(new Client());
 9         client.start();
10
11     }
12 }
13
14 class Server implements Runnable{
15
16     @Override
17     public void run() {
18         try {
19             //创建DatagramChannel的操作时用静态的open方法,此时获得DatagramChannel的对象已经为打开状态
20             DatagramChannel dc = DatagramChannel.open();
21             SocketAddress sc = new InetSocketAddress("localhost", 9988);
22             //为了建立连接,需要对dc的socket与监听的端口进行绑定
23             dc.socket().bind(sc);
24             //创建缓冲区
25             ByteBuffer buffer = ByteBuffer.allocate(1024);
26
27             //设置是否为阻塞模式,将会影响Channel的recive行为
28             //阻塞模式下,如果没有监听到可用的消息,recive()将会阻塞直到获取到可用消息
29             //非阻塞模式下,如果没有监听到可用的消息,recive()将会立即返回null
30             //dc.configureBlocking(true);
31
32             while(true){
33                 //recive会将收到的消息读到buffer中,若果buffer已经被写满,多余的信息将会被丢弃
34                 //recive返回的对象是发报源的一些信息
35                 SocketAddress address = dc.receive(buffer);
36                 if(address != null){
37                     System.out.println(address);
38                 }
39
40                 buffer.flip();
41                 while(buffer.hasRemaining()){
42                     System.out.print((char)buffer.get());
43                 }
44                 buffer.clear();
45
46             }
47         } catch (IOException e) {
48             e.printStackTrace();
49         }
50
51     }
52 }
53
54 class Client implements Runnable{
55
56     @Override
57     public void run() {
58         try {
59             DatagramChannel dc = DatagramChannel.open();
60
61             SocketAddress target = new InetSocketAddress("localhost", 9988);
62
63             ByteBuffer buffer = ByteBuffer.allocate(1024);
64
65             buffer.put("hello world".getBytes());
66             buffer.flip();
67
68             for(int i=0; i<10; i++){
69                 //让buffer从0开始再重新读
70                 buffer.position(0);
71                 //Datagram发送报文不需要手动绑定socket,只需要指定目标SocketAddress
72                 dc.send(buffer, target);
73                 Thread.sleep(1000);
74             }
75
76             //关闭通道
77             dc.close();
78         } catch (IOException e) {
79             e.printStackTrace();
80         } catch (InterruptedException e) {
81             // TODO Auto-generated catch block
82             e.printStackTrace();
83         }
84
85     }
86
87 }
以上代码我们是用send和receive方法取代了传统Channel的基本write和read方法,再来试试用write和read是否可以达到同样的效果。
 1 public class DatagramChannelExer2 {
 2     public static void main(String[] args) throws InterruptedException{
 3         Thread server = new Thread(new Server2());
 4         server.start();
 5
 6         Thread.sleep(1000);
 7
 8         Thread client = new Thread(new Client2());
 9         client.start();
10
11     }
12 }
13
14 class Server2 implements Runnable{
15
16     @Override
17     public void run() {
18         try {
19             //创建DatagramChannel的操作时用静态的open方法,此时获得DatagramChannel的对象已经为打开状态
20             DatagramChannel dc = DatagramChannel.open();
21             SocketAddress sc = new InetSocketAddress("localhost", 9988);
22             //为了建立连接,需要对dc的socket与监听的端口进行绑定
23             dc.socket().bind(sc);
24             //创建缓冲区
25             ByteBuffer buffer = ByteBuffer.allocate(1024);
26
27             System.out.println(dc.isConnected());
28             while(true){
29                 dc.read(buffer);
30
31                 buffer.flip();
32                 while(buffer.hasRemaining()){
33                     System.out.print((char)buffer.get());
34                 }
35                 buffer.clear();
36
37             }
38         } catch (IOException e) {
39             e.printStackTrace();
40         }
41
42     }
43 }
44
45 class Client2 implements Runnable{
46
47     @Override
48     public void run() {
49         try {
50             DatagramChannel dc = DatagramChannel.open();
51
52             SocketAddress target = new InetSocketAddress("localhost", 9988);
53
54             ByteBuffer buffer = ByteBuffer.allocate(1024);
55
56             buffer.put("hello world".getBytes());
57             buffer.flip();
58
59             for(int i=0; i<10; i++){
60                 //让buffer从0开始再重新读
61                 buffer.position(0);
62                 //Datagram发送报文不需要手动绑定socket,只需要指定目标SocketAddress
63                 dc.send(buffer, target);
64                 Thread.sleep(1000);
65             }
66
67             //关闭通道
68             dc.close();
69         } catch (IOException e) {
70             e.printStackTrace();
71         } catch (InterruptedException e) {
72             // TODO Auto-generated catch block
73             e.printStackTrace();
74         }
75
76     }
77
78 }
其他代码基本不变,我们将receive()换成了read()。我们发现程序抛出了NotYetConnectionedException。还未连接的异常。说明未连接的DatagramChannel是无法调用read操作的,write操作同理。那么如何让Channel变为connectioned呢?我们需要调用其connect()方法,让他和一个SocketAddress连接。
我尝试了下connect直接用wirte和read的方式去收发消息,但是程序一直在read的时候被阻塞。还不知道问题在哪,所以以下程序仍有问题,这里只是先做记录。
 1 public class DatagramChannelExer3 {
 2     public static void main(String[] args) throws InterruptedException{
 3         Thread server = new Thread(new Server3());
 4         server.start();
 5
 6         Thread.sleep(1000);
 7
 8         Thread client = new Thread(new Client3());
 9         client.start();
10
11     }
12 }
13
14 class Server3 implements Runnable{
15
16     @Override
17     public void run() {
18         try {
19             //创建DatagramChannel的操作时用静态的open方法,此时获得DatagramChannel的对象已经为打开状态
20             DatagramChannel dc = DatagramChannel.open();
21             SocketAddress sc = new InetSocketAddress("localhost", 9988);
22             //不采取bind的方式,而是改为connect的方式
23             dc.connect(sc);
24 //          dc.configureBlocking(false);
25             //创建缓冲区
26             ByteBuffer buffer = ByteBuffer.allocate(1024);
27
28             while(true){
29                 int length = dc.read(buffer);
30                 System.out.println(length);
31
32             }
33         } catch (IOException e) {
34             e.printStackTrace();
35         }
36
37     }
38 }
39
40 class Client3 implements Runnable{
41
42     @Override
43     public void run() {
44         try {
45             DatagramChannel dc = DatagramChannel.open();
46
47             SocketAddress connectAddress = new InetSocketAddress("localhost", 9988);
48 //          SocketAddress target = new InetSocketAddress("localhost", 9989);
49
50             ByteBuffer buffer = ByteBuffer.allocate(1024);
51
52             dc.connect(connectAddress);
53             buffer.put("hello world".getBytes());
54             buffer.flip();
55
56             dc.write(buffer);
57
58             //关闭通道
59             dc.close();
60         } catch (IOException e) {
61             e.printStackTrace();
62         }
63
64     }
65
66 }
我们再来看另一端代码:
 1 public class DatagramChannelExer4 {
 2     public static void main(String[] args) throws InterruptedException{
 3
 4         Thread client = new Thread(new Client4());
 5         client.start();
 6
 7     }
 8 }
 9
10
11 class Client4 implements Runnable{
12
13     @Override
14     public void run() {
15         try {
16             DatagramChannel dc = DatagramChannel.open();
17
18             SocketAddress connectAddress = new InetSocketAddress("localhost", 9988);
19
20             SocketAddress target = new InetSocketAddress("localhost", 9989);
21
22             ByteBuffer buffer = ByteBuffer.allocate(1024);
23
24             dc.connect(connectAddress);
25             buffer.put("hello world".getBytes());
26             buffer.flip();
27
28             //抛出异常:IllegalArgumentException: Connected address not equal to target address
29             dc.send(buffer, target);
30             dc.write(buffer);
31
32             //关闭通道
33             dc.close();
34         } catch (IOException e) {
35             e.printStackTrace();
36         }
37
38     }
39
40 }
当一个DatagramChannel调用connect连接了一个socket后,就只能够收发这个地址的消息。
对DatagramChannel的connect方法做个总结:
- 是调用write和read的前提条件
- 限制数据包的接收和发送来源,提高效率
- SocketChannel(连接TCP scoket的通道)
- ServerSocketChannel(可以监听新的TCP连接的通道)
先看一段简单的示例来看一下这两个类的基本用法:
1 public class SocketChannel1 { 2 3 public static void main(String[] args){ 4 // TODO Auto-generated method stub 5 Thread server = new Thread(new Server5()); 6 server.start(); 7 8 9 ScheduledExecutorService executors = Executors.newScheduledThreadPool(1); 10 executors.scheduleWithFixedDelay(new Client5(), 1, 2, TimeUnit.SECONDS); 11 } 12 13 14 15 16 } 17 class Server5 implements Runnable{ 18 19 @Override 20 public void run() { 21 try { 22 23 ServerSocketChannel ssc = ServerSocketChannel.open(); 24 25 SocketAddress target = new InetSocketAddress("localhost", 9988); 26 27 ssc.socket().bind(target);; 28 System.out.println("Server started."); 29 30 ByteBuffer buffer = ByteBuffer.allocate(1024); 31 32 while(true){ 33 34 //非阻塞模式将立即返回NULL,而阻塞模式会在此阻塞直到有可用的SokcetChannel进来 35 SocketChannel sc = ssc.accept(); 36 System.out.println("SocketChannel accepted"); 37 sc.read(buffer); 38 39 buffer.flip(); 40 while(buffer.hasRemaining()){ 41 System.out.print((char