SpringBoot和Hibernate整合
Posted
tags:
篇首语:本文由小常识网(cha138.com)小编为大家整理,主要介绍了SpringBoot和Hibernate整合相关的知识,希望对你有一定的参考价值。
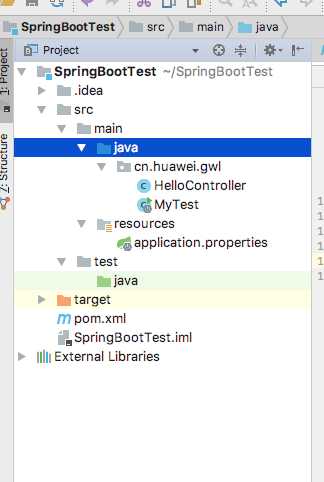
1.先使用idea创建maven项目(这个就不详细讲了,很简单的操作)
2.创建完maven项目之后添加springboot依赖,pom.xml文件如下:
<?xml version="1.0" encoding="UTF-8"?>
<project xmlns="http://maven.apache.org/POM/4.0.0"
         xmlns:xsi="http://www.w3.org/2001/XMLSchema-instance"
         xsi:schemaLocation="http://maven.apache.org/POM/4.0.0 http://maven.apache.org/xsd/maven-4.0.0.xsd">
    <modelVersion>4.0.0</modelVersion>

    <groupId>cn.tongdun.gwl</groupId>
    <artifactId>SpringBootTest</artifactId>
    <version>1.0-SNAPSHOT</version>

    <parent>
        <groupId>org.springframework.boot</groupId>
        <artifactId>spring-boot-starter-parent</artifactId>
        <version>1.5.1.RELEASE</version>
    </parent>
    <dependencies>
        <dependency>
            <groupId>junit</groupId>
            <artifactId>junit</artifactId>
            <version>3.8.1</version>
            <scope>test</scope>
        </dependency>
        <!--springboot依赖-->
        <dependency>
            <groupId>org.springframework.boot</groupId>
            <artifactId>spring-boot-starter-web</artifactId>
        </dependency>
        <dependency>
            <groupId>org.springframework.boot</groupId>
            <artifactId>spring-boot-devtools</artifactId>
            <optional>true</optional>
        </dependency>
        <dependency>
            <groupId>org.springframework.boot</groupId>
            <artifactId>spring-boot-starter-thymeleaf</artifactId>
        </dependency>
    </dependencies>

    <build>
        <finalName>hibernateSpringDemo</finalName>
        <plugins>
            <plugin>
                <groupId>org.springframework.boot</groupId>
                <artifactId>spring-boot-maven-plugin</artifactId>
                <configuration>
                    <fork>true</fork>
                </configuration>
            </plugin>
        </plugins>
    </build>

</project>
pom文件编写完毕,配置maven路径,并导入依赖.
3.接下来写一个SpringBoot入门程序
(1)新建类MyTest.java

 1 package cn.huawei.gwl;
 2
 3 import org.springframework.boot.SpringApplication;
 4 import org.springframework.boot.autoconfigure.SpringBootApplication;
 5 import org.springframework.context.annotation.ComponentScan;
 6
 7 @SpringBootApplication
 8 @ComponentScan(basePackages = "cn")
 9 public class MyTest {
10
11     public static void main(String[] args) {
12         SpringApplication.run(MyTest.class, args);
13     }
14 }
需要注意的是:这个类的上面需要添加SpringBoot的注解@SpringBootApplication,然后在主函数中开始启动.
(2)然后创建一个HelloContreller类,用来测试SpringBoot
 1 package cn.huawei.gwl;
 2
 3 import org.springframework.web.bind.annotation.PathVariable;
 4 import org.springframework.web.bind.annotation.RequestMapping;
 5 import org.springframework.web.bind.annotation.RestController;
 6
 7
 8 @RestController
 9 public class HelloController {
10
11     @RequestMapping("/say")
12     String home() {
13         System.out.println("get into");
14         return "hello world";
15     }
16
17     @RequestMapping("/hello/{name}")
18     String hello(@PathVariable String name) {
19         return "hello" + name;
20     }
21 }
需要注意的是这上面的几个注解:
- @RestController:表示这是个控制器,和Controller类似
- @EnableAutoConfiguration:springboot没有xml配置文件因为这个注解帮助我们干了这些事情,有了这个注解springboot启动的时候回自动猜测你的配置文件从而部署你的web服务器
- @RequestMapping(“/say”):这个和SpringMvc中的类似了。
- @PathVariable:参数
4.在浏览器中输入:http://localhost:8080/say 和 http://localhost:8080/hello/haha 浏览器上即可得到输出结果.
SpringBoot程序验证完毕.
5.接下来再pom.xml文件里面添加要使用的jpa依赖:
1         <dependency>
2             <groupId>org.springframework.boot</groupId>
3             <artifactId>spring-boot-starter-data-jpa</artifactId>
4         </dependency>
5         <dependency>
6             <groupId>mysql</groupId>
7             <artifactId>mysql-connector-java</artifactId>
8         </dependency>
并导入依赖
6.添加依赖之后需要配置一些连接MySQL所需要的配置,创建一个application.properties:
 1 spring.datasource.url = jdbc:mysql://localhost:3306/test
 2 spring.datasource.username = root
 3 spring.datasource.password = abcd1234
 4 spring.datasource.driverClassName = com.mysql.jdbc.Driver
 5 # Specify the DBMS
 6 spring.jpa.database = MYSQL
 7 # Show or not log for each sql query
 8 spring.jpa.show-sql = true
 9 # Hibernate ddl auto (create, create-drop, update)
10 spring.jpa.hibernate.ddl-auto = update
11 # Naming strategy
12 spring.jpa.hibernate.naming-strategy = org.hibernate.cfg.ImprovedNamingStrategy
13 # stripped before adding them to the entity manager
14 spring.jpa.properties.hibernate.dialect = org.hibernate.dialect.MySQL5Dialect
7.为main方法添加注解@EnableJpaRepositories
 1 package cn.tongdun.gwl;
 2
 3 import org.springframework.boot.SpringApplication;
 4 import org.springframework.boot.autoconfigure.SpringBootApplication;
 5 import org.springframework.context.annotation.ComponentScan;
 6 import org.springframework.data.jpa.repository.config.EnableJpaRepositories;
 7
 8
 9 @SpringBootApplication
10 @EnableJpaRepositories
11 @ComponentScan(basePackages = "cn")
12 public class MyTest {
13
14     public static void main(String[] args) {
15         SpringApplication.run(MyTest.class, args);
16     }
17 }
8.接下来创建dao层,不过在这里是repository包,例如创建一个User实体,然后再创建一个UserRepository:
 1 package cn.tongdun.gwl;
 2
 3 import org.springframework.data.jpa.repository.Query;
 4 import org.springframework.data.repository.CrudRepository;
 5 import org.springframework.data.repository.query.Param;
 6
 7 public interface UserRepository extends CrudRepository<User, Long> {
 8
 9     public User findOne(Long id);
10
11     public User save(User user);
12 }
这里面是创建一个UserRepository接口,并不需要创建UserRepository实现,springboot默认会帮你实现,继承自CrudRepository,@Param代表的是sql语句中的占位符,例如这里的@Param(“name”)代表的是:name占位符。
9.下面再控制层使用UserRepository,创建一个HibernateController:
 1 package cn.tongdun.gwl;
 2
 3 import org.springframework.beans.factory.annotation.Autowired;
 4 import org.springframework.boot.autoconfigure.EnableAutoConfiguration;
 5 import org.springframework.stereotype.Controller;
 6 import org.springframework.web.bind.annotation.RequestMapping;
 7 import org.springframework.web.bind.annotation.ResponseBody;
 8
 9 import java.util.Date;
10
11 @Controller
12 @RequestMapping("/hibernate")
13 @EnableAutoConfiguration
14 public class HibernateController {
15
16     @Autowired
17     private UserRepository userRepository;
18
19     @RequestMapping("getUserById")
20     @ResponseBody
21     public User getUserById(Long id) {
22         User u = userRepository.findOne(id);
23         System.out.println("userRepository: " + userRepository);
24         System.out.println("id: " + id);
25         return u;
26     }
27
28     @RequestMapping("saveUser")
29     @ResponseBody
30     public void saveUser() {
31         User u = new User();
32         u.setUserName("wan");
33         u.setAddress("浙江省杭州市滨江区");
34         u.setBirthDay(new Date());
35         u.setSex("男");
36         userRepository.save(u);
37     }
38 }
@Autowired代表按照类型注入,@Resource按照名称注入
至此,代码已经编写完毕,下面进入测试
10.访问http://localhost:8080/hibernate/saveUser 之后,jpa自动生成sql语句:

访问http://localhost:8080/hibernate/getUserById?id=2:

以上是关于SpringBoot和Hibernate整合的主要内容,如果未能解决你的问题,请参考以下文章
SpringBoot整合Hibernate自定义数据验证及多种方式异常处理
SpringBoot整合Hibernate-Validator校验器