Java系列讲座二:Socket网络通信实现聊天软件项目讲解(UDP)
Posted
tags:
篇首语:本文由小常识网(cha138.com)小编为大家整理,主要介绍了Java系列讲座二:Socket网络通信实现聊天软件项目讲解(UDP)相关的知识,希望对你有一定的参考价值。
上一篇我们讲了通过TCP方式实现网络通信软件开发的原理,思路及实现,今天跟大家谈谈Socket通信中UDP方式通信的软件开发步骤及主要代码讲解,UDP实现方式实现的通信软件特点是不分客户端与服务器端,一个程序既是客户端与是服务器端,典型软件是一些局域网的聊天软件,如飞鸽等软件。
UDP方式通信主要用到了java.net包中的3个类分别是DatagramPacket类,DatagramSocket类与InetAddress类,下面通过实现一个简易聊天软件小项目来讲解他们的使用方法,代码如下:
package T16;
import java.awt.BorderLayout;
import java.awt.Color;
import java.awt.FlowLayout;
import java.awt.GridLayout;
import java.awt.event.ActionEvent;
import java.awt.event.ActionListener;
import java.io.IOException;
import java.net.DatagramPacket;
import java.net.DatagramSocket;
import java.net.InetAddress;
import java.net.SocketException;
import java.net.UnknownHostException;
import java.util.Date;
import javax.swing.BorderFactory;
import javax.swing.JButton;
import javax.swing.JEditorPane;
import javax.swing.JFrame;
import javax.swing.JLabel;
import javax.swing.JOptionPane;
import javax.swing.JPanel;
import javax.swing.JTextField;
/**
* UDP通信的聊天软件
*
* */
public class UDPChat extends JFrame implements ActionListener{
private JLabel lblPort,lblAddr,lblPort2;
private JTextField txtPort,txtAddr,txtPort2;
private JButton btnConn,btnSend,btnClose;
private JEditorPane txtReceive,txtSend;
public UDPChat(int n){
}
private UDPChat(int n,int m){
}
public UDPChat() {
super("UDP通信的聊天软件");
lblPort = new JLabel("本机端口:",JLabel.RIGHT);
lblPort2 = new JLabel("对方端口:",JLabel.RIGHT);
lblAddr = new JLabel("对方地址:",JLabel.RIGHT);
txtPort = new JTextField("8888",5);
txtPort2 = new JTextField("9999",5);
InetAddress ipaddr =null;
try {
ipaddr = InetAddress.getLocalHost();
} catch (UnknownHostException e) {
e.printStackTrace();
}
txtAddr = new JTextField(ipaddr.getHostAddress(),10);
btnConn = new JButton("连接(C))");
btnConn.setMnemonic(‘C‘);
JPanel topPanel = new JPanel(new FlowLayout(FlowLayout.LEFT));
topPanel.add(lblPort);
topPanel.add(txtPort);
topPanel.add(lblAddr);
topPanel.add(txtAddr);
topPanel.add(lblPort2);
topPanel.add(txtPort2);
topPanel.add(btnConn);
txtReceive = new JEditorPane();
txtSend = new JEditorPane();
JPanel centerPanel = new JPanel(new GridLayout(2,1,5,10));
centerPanel.add(txtReceive);
txtReceive.setBorder(BorderFactory.createLoweredBevelBorder());
//接收框不能编辑
txtReceive.setEditable(false);
txtSend.setBorder(BorderFactory.createLoweredBevelBorder());
centerPanel.add(txtSend);
btnSend = new JButton("发送(S)");
btnSend.setMnemonic(‘S‘);
btnClose = new JButton("退出(X)");
btnClose.setMnemonic(‘X‘);
JPanel bottomPanel = new JPanel(new FlowLayout(FlowLayout.RIGHT));
bottomPanel.add(btnSend);
bottomPanel.add(btnClose);
add(topPanel,BorderLayout.NORTH);
//centerPanel.setBackground(Color.RED);
add(centerPanel,BorderLayout.CENTER);
add(bottomPanel,BorderLayout.SOUTH);
btnConn.addActionListener(this);
btnSend.addActionListener(this);
btnClose.addActionListener(this);
//发送按钮禁用
btnSend.setEnabled(false);
setSize(600, 400);
setVisible(true);
setLocationRelativeTo(null);
setDefaultCloseOperation(JFrame.EXIT_ON_CLOSE);
}
//创建内部类,实现接收线程
class ReceiveThread extends Thread{
DatagramSocket socket;
public ReceiveThread() {
try{
int port = Integer.parseInt(txtPort.getText().trim());
socket = new DatagramSocket(port);
}catch(Exception e){
e.printStackTrace();
}
}
@Override
public void run() {
byte[] b = new byte[1024];
DatagramPacket packet = new DatagramPacket(b,b.length);
while(true){
try {
//接收数据
socket.receive(packet);
//转换为字符串
String str = new String(b,0,packet.getLength());
//显示在接收框
String content = txtReceive.getText();
content += new Date().toLocaleString()+"\n";
content += str+"\n";
txtReceive.setText(content);
} catch (IOException e) {
e.printStackTrace();
}
}
}
}
public static void main(String[] args) {
//UDPChat chat = new UDPChat();
try {
Class.forName("T16.UDPChat").newInstance();
} catch (InstantiationException e) {
e.printStackTrace();
} catch (IllegalAccessException e) {
e.printStackTrace();
} catch (ClassNotFoundException e) {
e.printStackTrace();
}
}
@Override
public void actionPerformed(ActionEvent e) {
if(e.getSource()==btnConn){
btnConn.setEnabled(false);
btnSend.setEnabled(true);
//启动线程
new ReceiveThread().start();
}else if(e.getSource()==btnSend){
//发送内容
String str = txtSend.getText().trim();
if(str.equals("")){
JOptionPane.showMessageDialog(this, "请输入要发送的内容");
return;
}
//把要发送的内容显示到接收框
String content = txtReceive.getText();
content += new Date().toLocaleString()+"\n";
content += str+"\n";
txtReceive.setText(content);
try {
//设置对方IP地址
InetAddress ip = InetAddress.getByName(txtAddr.getText().trim());
//设置对方的端口
int port = Integer.parseInt(txtPort2.getText().trim());
//创建发送包
byte b[] = str.getBytes();
DatagramPacket p = new DatagramPacket(b,b.length,ip,port);
//创建DatagramSocket发送
DatagramSocket socket = new DatagramSocket();
//发送
socket.send(p);
//清空发送框的内容
txtSend.setText("");
} catch (UnknownHostException e1) {
e1.printStackTrace();
} catch (SocketException e2) {
e2.printStackTrace();
} catch (IOException e3) {
e3.printStackTrace();
}
}else if(e.getSource()==btnClose){
System.exit(0);
}
}
}
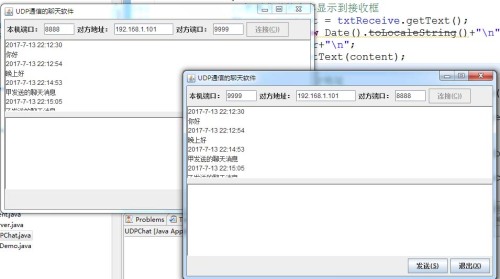
该程序必须同启动2个实例才能实现在局域网聊天,互相设置对方的端口与IP地址即可。
本人从事软件项目开发20年,10年的Java工程师系列课程的教学工作,录制30多门精品视频课程,每门课程都包含有项目实战,上课PPT,及完整的源代码下载,有兴趣的朋友可以看看我的在线课堂,
关于网络即时通讯,多线程等技术的详细介绍内容很多,如果大家有兴趣可以看看我的 java从入门到精通+QQ即时通讯软件项目实训的教学视频,链接地址:http://edu.51cto.com/course/6946.html
以上是关于Java系列讲座二:Socket网络通信实现聊天软件项目讲解(UDP)的主要内容,如果未能解决你的问题,请参考以下文章
通过基于java实现的网络聊天程序分析java中网络API和Linux Socket API关系
