SpringSecurity学习笔记:搭建最简单的SpringSecurity应用
Posted 睡猪遇上狼
tags:
篇首语:本文由小常识网(cha138.com)小编为大家整理,主要介绍了SpringSecurity学习笔记:搭建最简单的SpringSecurity应用相关的知识,希望对你有一定的参考价值。
学习过程参考自:http://www.mossle.com/docs/auth/html/pt01-quickstart.html
一、搭建Maven项目:
所需引用的jar包如下:

pom.xml文件:
<?xml version="1.0" encoding="UTF-8"?>
<project xmlns="http://maven.apache.org/POM/4.0.0" xmlns:xsi="http://www.w3.org/2001/XMLSchema-instance"
         xsi:schemaLocation="http://maven.apache.org/POM/4.0.0 http://maven.apache.org/maven-v4_0_0.xsd">

    <modelVersion>4.0.0</modelVersion>
    <packaging>war</packaging>

    <name>SpringSecurityLearn</name>
    <groupId>org.yoki.edu</groupId>
    <artifactId>SpringSecurityLearn</artifactId>
    <version>1.0-SNAPSHOT</version>

    <dependencies>
        <dependency>
            <groupId>org.springframework.security</groupId>
            <artifactId>spring-security-web</artifactId>
            <version>3.2.0.RELEASE</version>
        </dependency>
        <dependency>
            <groupId>org.springframework.security</groupId>
            <artifactId>spring-security-config</artifactId>
            <version>3.2.0.RELEASE</version>
        </dependency>
        <dependency>
            <groupId>commons-logging</groupId>
            <artifactId>commons-logging</artifactId>
            <version>1.1.3</version>
        </dependency>
    </dependencies>
</project>
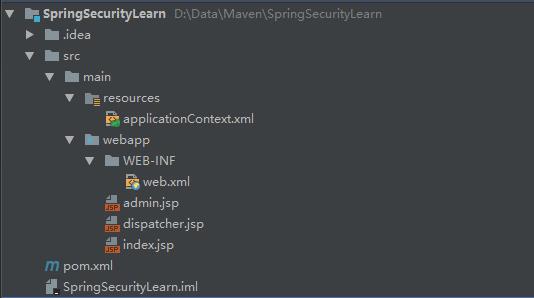
目录结构如下:

二、各个配置文件:
web.xml文件的配置:
<?xml version="1.0" encoding="UTF-8"?>
<web-app version="2.4"
         xmlns="http://java.sun.com/xml/ns/j2ee"
         xmlns:xsi="http://www.w3.org/2001/XMLSchema-instance"
         xsi:schemaLocation="http://java.sun.com/xml/ns/j2ee http://java.sun.com/xml/ns/j2ee/web-app_2_4.xsd">

    <!--载入Spring配置文件-->
    <context-param>
        <param-name>contextConfigLocation</param-name>
        <param-value>classpath:applicationContext*.xml</param-value>
    </context-param>

    <!--配置SpringSecurity过滤器-->
    <filter>
        <filter-name>springSecurityFilterChain</filter-name>
        <filter-class>org.springframework.web.filter.DelegatingFilterProxy</filter-class>
    </filter>
    <filter-mapping>
        <filter-name>springSecurityFilterChain</filter-name>
        <url-pattern>/*</url-pattern>
    </filter-mapping>

    <!--配置Spring监听器,此处必须配置,否则访问的时候将出现下面的错误!!!-->
    <listener>
        <listener-class>org.springframework.web.context.ContextLoaderListener</listener-class>
    </listener>

    <!--配置首页-->
    <welcome-file-list>
        <welcome-file>dispatcher.jsp</welcome-file>
    </welcome-file-list>

</web-app>
Spring监听器,此处必须配置,否则访问的时候将出现下面的错误:

applicationContext.xml配置文件:
<?xml version="1.0" encoding="UTF-8"?>
<beans:beans xmlns="http://www.springframework.org/schema/security"
             xmlns:beans="http://www.springframework.org/schema/beans"
             xmlns:xsi="http://www.w3.org/2001/XMLSchema-instance"
             xsi:schemaLocation="http://www.springframework.org/schema/beans
        http://www.springframework.org/schema/beans/spring-beans.xsd
        http://www.springframework.org/schema/security
        http://www.springframework.org/schema/security/spring-security.xsd">

    <!-- http部分配置如何拦截用户请求。auto-config=\'true\'将自动配置几种常用的权限控制机制,包括form, anonymous, rememberMe -->
    <http auto-config=\'true\'>
        <!-- 设置URL权限 -->
        <!-- Spring Security采用的是一种就近原则,就是说当用户访问的url资源满足多个intercepter-url时,系统将使用第一个符合条件的intercept-url进行权限控制 -->
        <!-- 此处权限的名称必须以ROLE_作为前缀,如果不这样做,在启动Web容器的时候就将报错,错误如下图-->
        <intercept-url pattern="/admin.jsp" access="ROLE_ADMIN"/>
        <intercept-url pattern="/**" access="ROLE_USER"/>
    </http>

    <authentication-manager>
        <authentication-provider>
            <user-service>
                <!-- 创建一个用户,用户名为admin,密码admin,分配ROLE_USER、ROLE_ADMIN两个角色 -->
                <user name="admin" password="admin" authorities="ROLE_USER, ROLE_ADMIN"/>
                <!-- 创建一个用户,用户名为user,密码user,分配ROLE_USER两个角色 -->
                <user name="user" password="user" authorities="ROLE_USER"/>
            </user-service>
        </authentication-provider>
    </authentication-manager>

</beans:beans>
权限的名称必须以ROLE_作为前缀,如果不这样做,在启动Web容器的时候就将报错:
org.springframework.beans.factory.BeanCreationException: Error creating bean with name \'org.springframework.security.filterChains\': Cannot resolve reference to bean \'org.springframework.security.web.DefaultSecurityFilterChain#0\' while setting bean property \'sourceList\' with key [0]; nested exception is org.springframework.beans.factory.BeanCreationException: Error creating bean with name \'org.springframework.security.web.DefaultSecurityFilterChain#0\': Cannot resolve reference to bean \'org.springframework.security.web.access.intercept.FilterSecurityInterceptor#0\' while setting constructor argument with key [11]; nested exception is org.springframework.beans.factory.BeanCreationException: Error creating bean with name \'org.springframework.security.web.access.intercept.FilterSecurityInterceptor#0\': Invocation of init method failed; nested exception is java.lang.IllegalArgumentException: Unsupported configuration attributes: [AROLE_ADMIN, AROLE_USER]
    at org.springframework.beans.factory.support.BeanDefinitionValueResolver.resolveReference(BeanDefinitionValueResolver.java:326)
    at org.springframework.beans.factory.support.BeanDefinitionValueResolver.resolveValueIfNecessary(BeanDefinitionValueResolver.java:107)
    at org.springframework.beans.factory.support.BeanDefinitionValueResolver.resolveManagedList(BeanDefinitionValueResolver.java:350)
    at org.springframework.beans.factory.support.BeanDefinitionValueResolver.resolveValueIfNecessary(BeanDefinitionValueResolver.java:154)
    at org.springframework.beans.factory.support.AbstractAutowireCapableBeanFactory.applyPropertyValues(AbstractAutowireCapableBeanFactory.java:1417)
    at org.springframework.beans.factory.support.AbstractAutowireCapableBeanFactory.populateBean(AbstractAutowireCapableBeanFactory.java:1158)
    at org.springframework.beans.factory.support.AbstractAutowireCapableBeanFactory.doCreateBean(AbstractAutowireCapableBeanFactory.java:519)
    at org.springframework.beans.factory.support.AbstractAutowireCapableBeanFactory.createBean(AbstractAutowireCapableBeanFactory.java:458)
    at org.springframework.beans.factory.support.AbstractBeanFactory$1.getObject(AbstractBeanFactory.java:296)
    at org.springframework.beans.factory.support.DefaultSingletonBeanRegistry.getSingleton(DefaultSingletonBeanRegistry.java:223)
    at org.springframework.beans.factory.support.AbstractBeanFactory.doGetBean(AbstractBeanFactory.java:293)
三、页面的编写:
dispatcher.jsp,此页面只起到一个页面跳转的作用。
<%@ page contentType="text/html;charset=UTF-8" language="java" %>
<html>
<head>
    <title>Title</title>
</head>
<body>
    <h1>Hello this is dispatcher.jsp</h1>
    <div>if you want go to admin.jsp , please click <a href="admin.jsp">here</a> !</div>
    <div>if you want go to index.jsp , please click <a href="index.jsp">here</a> !</div>
</body>
</html>
index.jsp
<%@ page contentType="text/html;charset=UTF-8" language="java" %>
<html>
<head>
    <title>Title</title>
</head>
<body>
    <h1>Hello this is index.jsp</h1>
</body>
</html>
admin.jsp
<%@ page contentType="text/html;charset=UTF-8" language="java" %>
<html>
<head>
    <title>Title</title>
</head>
<body>
<h1>Hello this is admin.jsp</h1>
</body>
</html>
四、结果:
注意:我这里使用的是IDEA配置Tomcat进行项目启动,URL路径配置为localhost:8080,如果是将项目打包放在Tomcat的webapp目录下,则为:localhost:8080/项目名称
具体的IDEA配置Tomcat请点击传送门
此登录页面是Spring Security自动生成的,一来为了演示的方便,二来避免用户自己编写登陆页面时犯错。

登录失败页面展示:

登录成功后进来跳转页面:

如果使用user用户登录的,跳转admin.jsp的时候,将会出现如下错误:

转载请标明转载出处 : https://www.cnblogs.com/FlyingPuPu/p/7117368.html
以上是关于SpringSecurity学习笔记:搭建最简单的SpringSecurity应用的主要内容,如果未能解决你的问题,请参考以下文章