Spring框架第四篇之基于注解的DI注入
Posted 闲情偶寄
tags:
篇首语:本文由小常识网(cha138.com)小编为大家整理,主要介绍了Spring框架第四篇之基于注解的DI注入相关的知识,希望对你有一定的参考价值。
一、说明
与@Component注解功能相同,但意义不同的注解还有三个:
1)@Repository:注解在Dao实现类上
2)@Service:注解在Service实现类上
3)@Controller:注解在SpringMVC的处理器上
Bean作用域:
@Scope("prototype"):用于指定对象创建模式,可以是单例模式或者原型模式,默认是singleton
基本类型属性注入:
@Value
@Autowired:byType方式的注解式注入,即根据类型注解
@Qualifier("mySchool"):byName方式的注解式注入,在使用@Qualifier时必须与@Autowired联合使用
域属性注解:
@Resource:不加name属性则为byType方式的注解式注入,但前提是注入的对象只能有一个
@Resource(name="mySchool"):byName方式的注解式注入
Bean的生命始末:
@PostConstruct:当前Bean初始化刚完毕
@PreDestroy:当前Bean即将被销毁
@Configuration:表示当前类充当Spring容器,即所有的Bean将由这个类来创建
注意:
在举例之前声明几个问题:
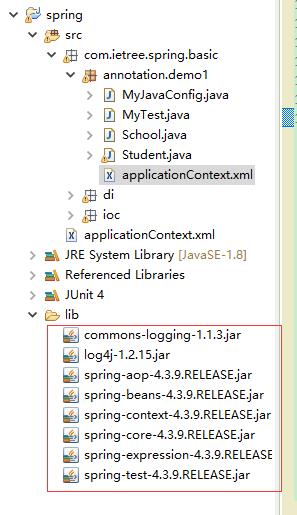
1、注解需要依赖spring-aop-4.3.9.RELEASE.jar包,所以需要导入依赖包。

2、使用注解方式注入,配置文件需要添加约束头文件:
<?xml version="1.0" encoding="UTF-8"?>
<beans xmlns="http://www.springframework.org/schema/beans"
    xmlns:xsi="http://www.w3.org/2001/XMLSchema-instance"
    xmlns:context="http://www.springframework.org/schema/context" xsi:schemaLocation="
        http://www.springframework.org/schema/beans http://www.springframework.org/schema/beans/spring-beans.xsd
        http://www.springframework.org/schema/context http://www.springframework.org/schema/context/spring-context.xsd">
也可以自己从Spring的说明文档中找到此头文件:

3、如果使用到了SpringJUnit4测试,则还需要导入spring-test-4.3.9.RELEASE.jar包
二、举例
1、首先创建一个School类:
package com.ietree.spring.basic.annotation.demo1;

import org.springframework.beans.factory.annotation.Value;
import org.springframework.stereotype.Component;

@Component("mySchool")
public class School {

    @Value(value = "清华大学")
    private String name;

    public School() {
        super();
    }

    public School(String name) {
        super();
        this.name = name;
    }

    public void setName(String name) {
        this.name = name;
    }

    @Override
    public String toString() {
        return "School [name=" + name + "]";
    }

}
创建Student类:
package com.ietree.spring.basic.annotation.demo1;

import javax.annotation.PostConstruct;
import javax.annotation.PreDestroy;
import javax.annotation.Resource;

import org.springframework.beans.factory.annotation.Autowired;
import org.springframework.beans.factory.annotation.Qualifier;
import org.springframework.beans.factory.annotation.Value;
import org.springframework.stereotype.Component;

/**
 * 说明:
 * 与@Component注解功能相同,但意义不同的注解还有三个:
 * 1)@Repository:注解在Dao实现类上
 * 2)@Service:注解在Service实现类上
 * 3)@Controller:注解在SpringMVC的处理器上
 *
 * Bean作用域:
 * @Scope("prototype"):用于指定对象创建模式,可以是单例模式或者原型模式,默认是singleton
 *
 * 基本类型属性注入:
 * @Value
 *
 * @Autowired:byType方式的注解式注入,即根据类型注解
 * @Qualifier("mySchool"):byName方式的注解式注入,在使用@Qualifier时必须与@Autowired联合使用
 *
 * 域属性注解:
 * @Resource:不加name属性则为byType方式的注解式注入,但前提是注入的对象只能有一个
 * @Resource(name="mySchool"):byName方式的注解式注入
 *
 * Bean的生命始末:
 * @PostConstruct:当前Bean初始化刚完毕
 * @PreDestroy:当前Bean即将被销毁
 */
//@Scope("prototype")
@Component("myStudent")
public class Student {

    @Value(value = "小明")
    private String name;

    @Value(value = "25")
    private int age;

    //    @Autowired
    //    @Qualifier("mySchool")
    //    @Resource(name="mySchool")
    @Resource
    private School school;// 对象属性,也叫做域属性

    public Student() {
        super();
    }

    public Student(String name, int age) {
        super();
        this.name = name;
        this.age = age;
    }

    public void setName(String name) {
        System.out.println("执行setName()");
        this.name = name;
    }

    public void setAge(int age) {
        System.out.println("执行setAge()");
        this.age = age;
    }

    public void setSchool(School school) {
        this.school = school;
    }

    @Override
    public String toString() {
        return "Student [name=" + name + ", age=" + age + ", school=" + school + "]";
    }

    @PostConstruct
    public void initAfter(){
        System.out.println("当前Bean初始化刚完毕");
    }

    @PreDestroy
    public void preDestroy(){
        System.out.println("当前Bean即将被销毁");
    }
}
创建MyJavaConfig类:
package com.ietree.spring.basic.annotation.demo1;

import org.springframework.beans.factory.annotation.Autowire;
import org.springframework.context.annotation.Bean;
import org.springframework.context.annotation.Configuration;

/**
 * @Configuration:表示当前类充当Spring容器,即所有的Bean将由这个类来创建
 */
@Configuration
public class MyJavaConfig {

    @Bean(name="mySchool")
    public School mySchoolCreator(){
        return new School("清华大学");
    }

    // autowire=Autowire.BY_TYPE:指从当前类这个容器中查找与域属性的类型具有is-a关系的Bean
    // autowire=Autowire.BY_NAME:指从当前类这个容器中查找与域属性同名的Bean
    @Bean(name="myStudent", autowire=Autowire.BY_TYPE)
    public Student myStudentCreator(){
        return new Student("小明", 25);
    }
}
创建配置文件:
<?xml version="1.0" encoding="UTF-8"?>
<beans xmlns="http://www.springframework.org/schema/beans"
    xmlns:xsi="http://www.w3.org/2001/XMLSchema-instance"
    xmlns:context="http://www.springframework.org/schema/context" xsi:schemaLocation="
        http://www.springframework.org/schema/beans http://www.springframework.org/schema/beans/spring-beans.xsd
        http://www.springframework.org/schema/context http://www.springframework.org/schema/context/spring-context.xsd">

    <!-- 扫描 com.ietree.spring.basic.annotation.demo1这个包及其子包 -->
    <context:component-scan base-package="com.ietree.spring.basic.annotation.demo1"/>

    <!-- 扫描 com.ietree.spring.basic这个包的子包 -->
    <context:component-scan base-package="com.ietree.spring.basic.*"/>

</beans>
创建测试类:
package com.ietree.spring.basic.annotation.demo1;

import org.junit.Test;
import org.junit.runner.RunWith;
import org.springframework.beans.factory.annotation.Autowired;
import org.springframework.context.ApplicationContext;
import org.springframework.context.support.ClassPathXmlApplicationContext;
import org.springframework.test.context.ContextConfiguration;
import org.springframework.test.context.junit4.SpringJUnit4ClassRunner;

@RunWith(SpringJUnit4ClassRunner.class)
@ContextConfiguration(locations="classpath:com/ietree/spring/basic/annotation/demo1/applicationContext.xml")
public class MyTest {

    @Autowired
    private Student student;

    @Test
    public void test01() {

        String resource = "com/ietree/spring/basic/annotation/demo1/applicationContext.xml";
        ApplicationContext ctx = new ClassPathXmlApplicationContext(resource);

        School school = (School) ctx.getBean("mySchool");
        System.out.println(school);

        Student student = (Student) ctx.getBean("myStudent");
        System.out.println(student);

        ((ClassPathXmlApplicationContext)ctx).close();
    }

    public void test02(){
        System.out.println(student);
    }

}
注意:如果配置了XML,同时又配置了注解,那么程序会首先选择XML配置创建对象。
以上是关于Spring框架第四篇之基于注解的DI注入的主要内容,如果未能解决你的问题,请参考以下文章