Vue3之插槽(Slot)
Posted 时光剑客
tags:
篇首语:本文由小常识网(cha138.com)小编为大家整理,主要介绍了Vue3之插槽(Slot)相关的知识,希望对你有一定的参考价值。
何为插槽
我们都知道在父子组件间可以通过v-bind,v-model搭配props 的方式传递值,但是我们传递的值都是以一些数字,字符串为主,但是假如我们要传递一个div或者其他的dom元素甚至是组件,那v-bind和v-model搭配props的方式就行不通了,但是插槽(slot)可以,插槽可以传递dom元素,在子组件中通过接收使用父组件传递过来的dom元素,我的理解就是在定义一个组件时,有些dom是动态显示的,即子组件现在不清楚调用它的组件需要咋显示,是显示button还是div,所以使用slot先占一个位置,父组件确定要显示的dom后再显示。
示例解析
插槽的基本使用
假设我们要实现一个form表单组件,由一个输入框和一个按钮组成,如下图

这时候按钮的样式可能是多样的,有的人喜欢使用button,有的喜欢使用div,所以这里我们可以将显示按钮的这里定义成一个插槽,子组件的定义如下:
 app.component('my-form',
        methods:
            handleClick()
                alert(123);

        ,
        template:
        ` <div>
            <input />
            <span @click="handleClick">
            <slot></slot> //定义插槽
            </span>
          </div>
        `
    );
注意: slot 插槽上面是无法绑定事件的,可以在上面使用一个<span>标签专门绑定事件
使用插槽:我们在使用插槽的时候可以传递一个div
 <my-form>
    <div>text</div>
 </my-from>
可以传递一个button
<my-form>
    <button>text</button>
</my-from>
还可以传递一个组件
定义一个test组件
 app.component('test',
        template:`<div>hello world</div>`
    )
传递组件给子组件
<my-form>
  <test />
</my-from>
所有测试代码:
<!DOCTYPE html>
<html lang="en">
<head>
    <meta charset="UTF-8">
    <meta http-equiv="X-UA-Compatible" content="IE=edge">
    <meta name="viewport" content="width=device-width, initial-scale=1.0">
    <title>Vue使用插槽</title>
    <script src="https://unpkg.com/vue@next"></script>
</head>
<body>
    <div id="root"></div>
</body>
<script>
 const app = Vue.createApp(
    data()
        return
            text:"提交111"

    ,
    template:
        `
        <my-form>
            <div>text</div>
        </my-from>
        <my-form>
            <button>text</button>
        </my-from>
        <my-form>
            <test />
        </my-from>
        `
    );

    app.component('test',
        template:`<div>hello world</div>`
    )

    app.component('my-form',
        methods:
            handleClick()
                alert(123);

        ,
        template:
        ` <div>
            <input />
            <span @click="handleClick">
            <slot>default</slot>
            </span>
          </div>
        `
    );
    const vm = app.mount('#root');
</script>
</html>
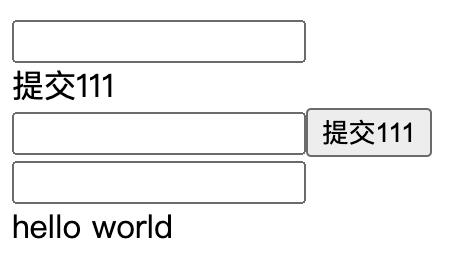
注意:我们在定义子组件的插槽时: <slot>default</slot> 会在slot中间写一个defult这里其实是为了做一个默认值处理,也就是父组件什么也不传的时候,我们就显示默认的值不加这个默认值,页面显示会有问题
运行结果:
具名插槽
我们的一个web页面结构分为:header,content,footer,我们要把header,footer做成一个插槽,让其显示:
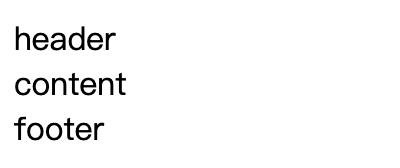 按照我们第一小节的做法:
定义一个组件:
app.component('layout',
 template:`
   <div>
      <slot></slot>
      <div>content</div>
   </div>
    `
    );
使用:
template:
 `
 <layout>
    <div >header</div>
    <div >footer</div>
 </layout>
 `
运行后我们发现不太对:
content无法放到header和footer之间,所以我们需要使用具名插槽,给插槽一个具体的名字,好摆放其位置:
把布局组件定义为:
app.component('layout',
  template:`
    <div>
      <slot name = "header"></slot>
      <div>content</div>
      <slot name = "footer"></slot>
    </div>
   `
);
使用插槽时:
 const app = Vue.createApp(
        // 具名插槽
        template:
        `
        <layout>
            <template v-slot:header>
            <div >header</div>
            </template>
            <template v-slot:footer>
            <div >footer</div>
            </template>
        </layout>
        `
    );
提示:具名插槽可以使用#header方式代替v-slot:header
所有测试代码:
<!DOCTYPE html>
<html lang="en">
<head>
    <meta charset="UTF-8">
    <meta http-equiv="X-UA-Compatible" content="IE=edge">
    <meta name="viewport" content="width=device-width, initial-scale=1.0">
    <title>使用具名插槽</title>
    <script src="https://unpkg.com/vue@next"></script>
</head>
<body>
    <div id="root"></div>
</body>
<script>
 const app = Vue.createApp(
        // 具名插槽
        template:
        `
        <layout>
            <template v-slot:header>
            <div >header</div>
            </template>
            <template v-slot:footer>
            <div >footer</div>
            </template>
        </layout>
        `
    );

    app.component('layout',
        template:`
            <div>
                <slot name = "header"></slot>
                <div>content</div>
                <slot name = "footer"></slot>
            </div>
           `
    );
    const vm = app.mount('#root');
</script>
</html>
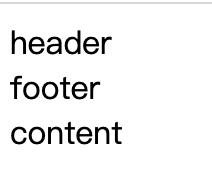
运行结果:
 这样content就被准确的放到了中间啦。
作用域插槽
当我们在使用插槽时,父组件想使用子组件的值,我们就可以使用作用域插槽。
假设定义了一个list组件,在子组件中提供了一组list值,父组件想使用这个list的值。定义组件的代码如下:
app.component('list',
 data()
   returnlist:[1,2,3]
 ,
 template:
        `
         <div>
          <slot v-for="item in list" :item="item" />
         </div>
        `
    );
使用时如下:
 const app = Vue.createApp(
        // 解构语法
        template:
        `
        <list v-slot="slotProps">
             <span>slotProps.item</span>
        </list>
        `
    );
这里使用的时候可以使用解构语法,写成:
 // 解构语法
template:
  `
   <list v-slot="item">
     <div>item</div>
   </list>
 `
这里需要注意v-slot="item里面的item必须和<slot v-for="item in list" :item="item" />这里对应,不然无法渲染出来
总结
本文主要是介绍了组件间作用域的插槽使用,插槽的使用能使我们页面的模块化更灵活,使用起来更方便,读者可以领会后多做练习,争取在项目中能很好的使用插槽知识,让我们的项目代码的复用性,可维护性更好。
以上是关于Vue3之插槽(Slot)的主要内容,如果未能解决你的问题,请参考以下文章