ASP.NET Core Identity系列之八
Posted dotNET跨平台
tags:
篇首语:本文由小常识网(cha138.com)小编为大家整理,主要介绍了ASP.NET Core Identity系列之八相关的知识,希望对你有一定的参考价值。
这一节我们主要介绍在ASP.NET Core Identity中使用策略进行授权,Policy是用户必须具备一组集合为授权访问应用程序上的资源。Identity Policy的授权可以包含对用户的Role和Claim, 这有助于我们在应用程序中构建更丰富的授权结构
例如:我们创建一个名称为MIT的Identity Policy,该Policy包含3个必要条件:“高中成绩为A”,“18岁以下”,“美国国籍”。现在我们将这个策略应用到MIT门户网站的申请区域,只有这些学生才能申请研究生课程:
高中毕业成绩为A
18岁以下
美国国籍
1、创建ASP.NET Core Identity 策略
我们在程序中创建Identity策略:
builder.Services.AddAuthorization(authorizationOptions =>

    authorizationOptions.AddPolicy("AspManager", authorizationPolicy =>

        authorizationPolicy.RequireRole("Manager");
        authorizationPolicy.RequireClaim("Coding-Skill", "ASP.NET Core MVC");
    );
);
AspManager策略有两个必要条件:
用户角色必须是Manager
用户Claim类型是 Coding-Skill,Claim值是ASP.NET Core MVC
2、基于ASP.NET Core Identity 策略授权
我们可以把刚才创建的策略使用到任何的Controller和Action方法上,在应用程序中使用基于策略授权的特性,进入ClaimsController创建一个新的Project方法,将[Authorize(Policy = "AspManager")]特性应用到该方法上,代码如下:
[Authorize(Policy = "AspManager")]
public IActionResult Project() => View("Index", User.Claims);
现在,ASP.NET Core Identity 只授权下面用户访问Project方法:
该用户属于Manager角色。
该用户有Claim类型Coding-Skill和Claim值为ASP.NET Core MVC
下面是创建Policy比较重要的方法:
名称 | 描述 |
RequireUserName(name) | 指定特定用户 |
RequireClaim(type, value) | 用户需要有Claim类型和对应的值(值类型Param: params string[] 或者 Param: IEnumerable<string>) |
RequireRole(roles) | 用户必须是指定角色的成员。参数类型为: Param: params string[] roles 或者 Param: IEnumerable<string> roles |
AddRequirements(requirement) | 指定一个客户自定义策略 |
3、测试Identity 策略授权
使用邮件:pintu@yahoo.com 密码:Coder77@1 进行测试,首先确认一下pintu是否属于Manager角色,如果不是,则添加,我们看到pintu属于Manager角色,但是没有Coding-Skill的Claim

现在我们尝试访问一下ClaimsController的Project方法,
https://localhost:7296/Claims/Project. 我们会看到访问拒绝:

因此我们需要给用户pintu添加一个类型是Coding-Skill和值是ASP.NET Core MVC的Claim。我们给pintu创建一个新的Claim ,URL为:https://localhost:7296/Claims/Create (看如下图片)

添加完之后,需要退出并且重新登录一下,我们进入如下URL
https//localhost:7296/Claims 。我们能看见最新添加的Claim
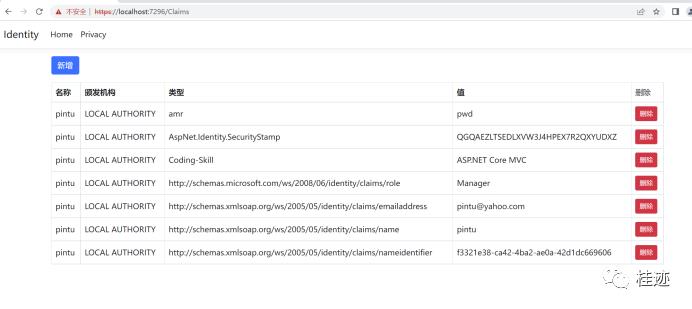
最后访问ClaimsController的Project方法,通过如下URL,https://localhost:7296/Claims/Project,这个时候我们能访问了,显示pintu用户下所有的Claims:

4、自定义Requirement策略授权
我们创建一个自定义策略,只允许Tom用户访问控制器的方法。如下所示:
创建一个类实现IAuthorizationRequirement 接口,它内部提供了一种机制判断是否授权成功或失败
创建一个实现 AuthorizationHandler类的子类,评估授权需求
我们在根目录下创建一个CustomPolicy文件夹,并在该文件夹下创建AllowUserPolicy.cs类。AllowUserPolicy.cs 类代码如下:
public class AllowUserPolicy : IAuthorizationRequirement

    public string[] AllowUsers  get; set;
    public AllowUserPolicy(params string[] allowUsers)

        AllowUsers=allowUsers;
AllowUserPolicy类实现了IAuthorizationRequirement 接口并且通过构造函数参数获取到所有允许访问资源的用户,下面我们在CustomPolicy文件夹下创建另外一个类AllowUsersHandler.cs,代码如下:
public class AllowUsersHandler : AuthorizationHandler<AllowUserPolicy>

    public override Task HandleAsync(AuthorizationHandlerContext context)

        return base.HandleAsync(context);

    protected override Task HandleRequirementAsync(AuthorizationHandlerContext context, AllowUserPolicy requirement)

        if (requirement.AllowUsers.Any(user => user.Equals(context.User.Identity?.Name, StringComparison.OrdinalIgnoreCase)))

            context.Succeed(requirement);

        else

            context.Fail();

        return Task.CompletedTask;
AllowUsersHandler授权Handler继承AuthorizationHandler类,当授权系统需要检查访问的Action时,HandleRequirementAsync()方法被调用,这个方法的参数接受AuthorizationHandlerContext 对象和AllowUserPolicy 类,AllowUserPolicy类提供了允许访问资源的用户。AuthorizationHandlerContext类主要成员如下:
名称 | 描述 |
Succeed(requirement) | 如果请求满足要求,则调用此方法。该方法的参数是AllowUserPolicy对象 |
Fail() | 如果请求不满足要求,则调用该方法 |
Resource | 这个属性返回授权访问资源的一个对象 |
因此,在HandleRequirementAsync()方法内,我们检查是否当前登录用户是否在允许登录用户的列表内,如果是,我们调用Succeed方法,否则我们调用fail方法
现在我们创建一个Policy,发送一个允许的用户到AllowUserPolicy类我们使用AddRequirements(requirement)方法添加客户自自定义策略,代码如下:
builder.Services.AddTransient<IAuthorizationHandler,AllowUsersHandler>();
builder.Services.AddAuthorization(authorizationOptions =>

    authorizationOptions.AddPolicy("AspManager", authorizationPolicy =>

        authorizationPolicy.RequireRole("Manager");
        authorizationPolicy.RequireClaim("Coding-Skill", "ASP.NET Core MVC");
    );
    authorizationOptions.AddPolicy("AllowTom", authorizationPolicy =>

        authorizationPolicy.AddRequirements(new AllowUserPolicy("tom"));
    );
);
现在,我们将这个策略应用到Controller的方法上,我们在ClaimsController中添加一个TomFiles方法并在该方法上应用这个[Authorize(Policy = "AllowTom")]特性。看如下代码:
[Authorize(Policy = "AllowTom")]
public IActionResult TomFiles() => View("Index", User.Claims);
这个方法只能被tom的用户给调用。如果别的用户调用这个方法将调转到拒绝页面。使用Tom用户进行测试,输入https://localhost:
7296/Claims/TomFiles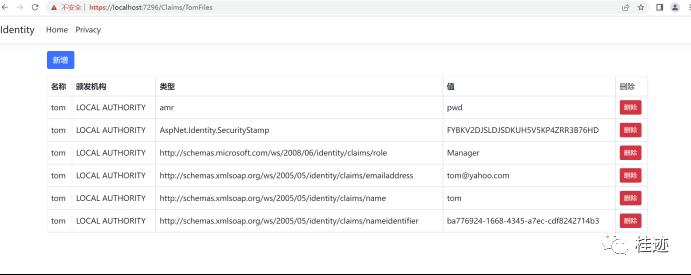
现在,我们使用pintu@yahoo.com进行登录, https://localhost:7296/Claims/TomFiles,将跳转到拒绝页面

5、不使用[Authorize]提交一个Policy
到目前为止我们可以给Control或者Controller的Action上使用[Authorize]策略,但是有些应用场景中我们不想使用[Authorize(Policy = "SomePolicy")]特性提交策略,你可以使用IAuthorizationService 接口来做,我们通过一个例子来了解一下,在CustomPolicy 目录下创建AllowPrivatePolicy.cs的类:
public class AllowPrivatePolicy : IAuthorizationRequirement


public class AllowPrivateHandler : AuthorizationHandler<AllowPrivatePolicy>

    protected override Task HandleRequirementAsync(AuthorizationHandlerContext context, AllowPrivatePolicy requirement)

        string [] allowUsers = context.Resource as string[];
        if(allowUsers.Any(user=>user.Equals(context.User.Identity?.Name,StringComparison.OrdinalIgnoreCase)))

            context.Succeed(requirement);

        else

            context.Fail();

        return Task.CompletedTask;
我们在应用程序的Program类中注册AuthorizationHandler,并创建一个新的策略叫PrivateAccess
builder.Services.AddTransient<IAuthorizationHandler, AllowUsersHandler>();
builder.Services.AddTransient<IAuthorizationHandler,AllowPrivateHandler>();
builder.Services.AddAuthorization(authorizationOptions =>

    authorizationOptions.AddPolicy("AspManager", authorizationPolicy =>

        authorizationPolicy.RequireRole("Manager");
        authorizationPolicy.RequireClaim("Coding-Skill", "ASP.NET Core MVC");
    );
    authorizationOptions.AddPolicy("AllowTom", authorizationPolicy =>

        authorizationPolicy.AddRequirements(new AllowUserPolicy("tom"));
    );
    authorizationOptions.AddPolicy("PrivateAccess", authorizationPolicy =>

        authorizationPolicy.AddRequirements(new AllowPrivatePolicy());
    );
);
注意我们没有通过policy.AddRequirements(new AllowPrivate
Policy())传递任何参数到AllowPrivatePolicy类,相反我们通过Controller传递数据。最后,在ClaimsController构造函数中添加IAuthorizationService服务。添加一个PrivateAccess方法来验证刚才我们添加的PrivateAccess。我们添加一个新的PrivateAccess方法并且使用authService.AuthorizeAsync 来验证我们刚添加的PrivateAccess策略
代码如下:
public async Task<IActionResult> PrivateAccess()

    string[] allowedUsers =  "tom", "alice" ;
    var authorized=await _authorizationService.AuthorizeAsync(User,allowedUsers,"PrivateAccess");
    if(authorized.Succeeded)

        return View("Index",User.Claims);

    else

        return new ChallengeResult();
这个方法只能有tom和alice这两个用户调用。注意我们给AllowPrivateHandler了的AuthorizeAsync()方法的第二个参数提供了allowUsers的变量。如下代码:
var authorized=await _authorizationService.AuthorizeAsync(User,allowedUsers,"PrivateAccess");AllowPrivateHandler类获取allowedUsers 值通过AuthorizationHandlerContext 类的 Resource 属性,代码如下
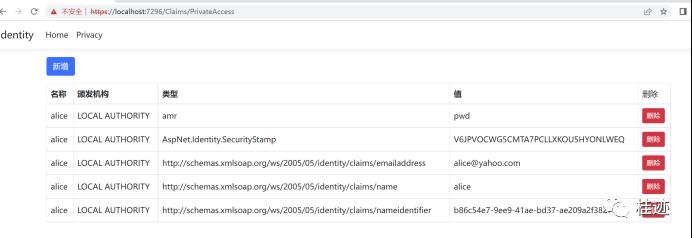
string[] allowUsers = context.Resource as string[];初始化ChallengeResult 会强制除了tom和alice以外的用户调转到登录页面。使用alice用户登录我们可以看到该方法被调用,进入https://localhost:7296/Claims/PrivateAccess
现在我们使用mary账户登录,进入相同的页面,我们发现调转到了登录页面
总结
这节我们主要讲解了关于策略授权
源代码地址:
https://github.com/bingbing-gui/Asp.Net-Core-Skill/tree/master/AspNetCore.Identity/Identity
以上是关于ASP.NET Core Identity系列之八的主要内容,如果未能解决你的问题,请参考以下文章