初学springboot, 如何快速使用maven搭建springboot项目呢
Posted
tags:
篇首语:本文由小常识网(cha138.com)小编为大家整理,主要介绍了初学springboot, 如何快速使用maven搭建springboot项目呢相关的知识,希望对你有一定的参考价值。
搭建Springboot 推荐使用maven, 但也可以不使用maven,用正常的java工程。
- 在MyEclipse上新建一个maven工程
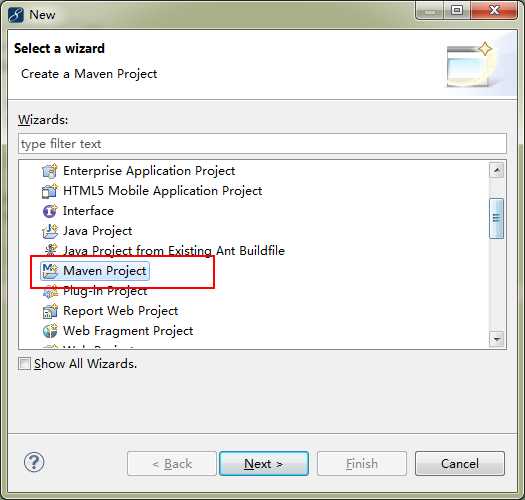
- 点击Next,选择create a simple project
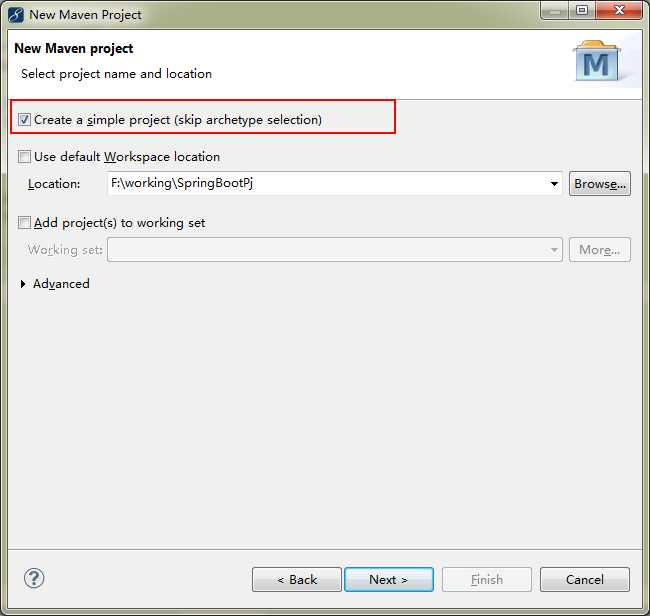
- 点击Next,输入下图所示
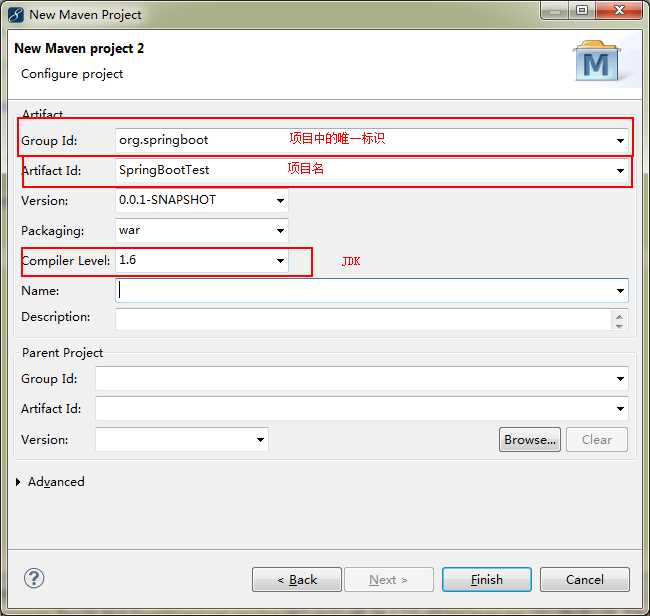
- 点击finish,稍等一下会,项目就构建完成。目录结构如下所示:
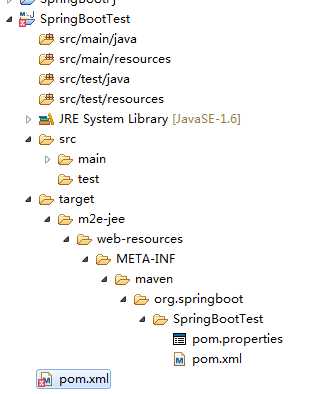
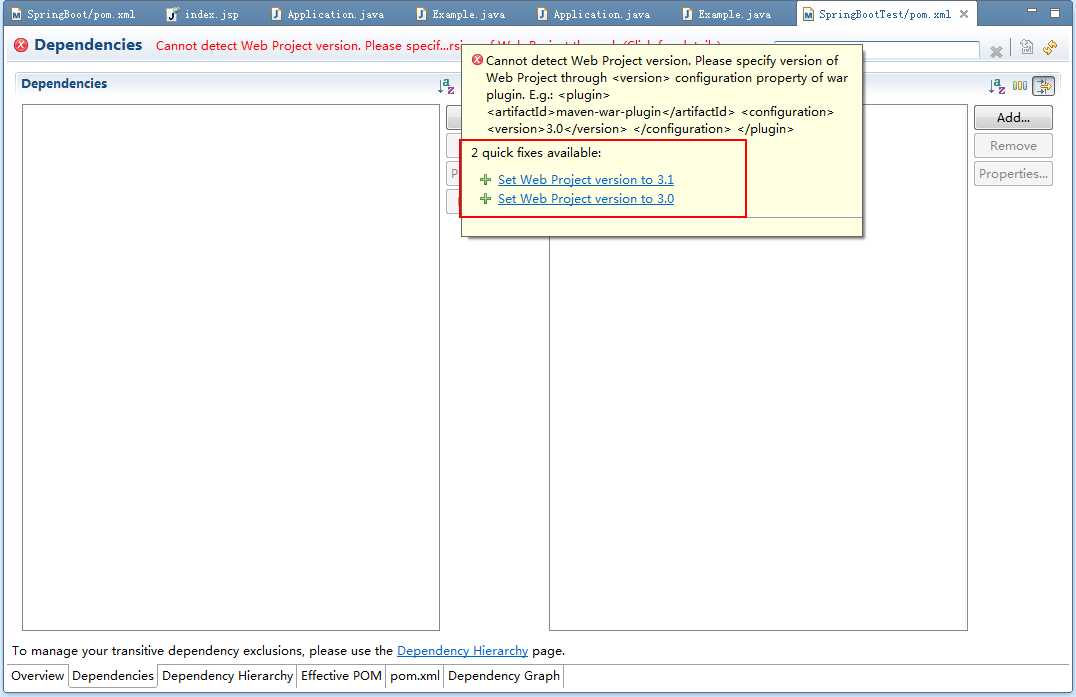
- 上图中的pom.xml提示错误,点开pom.xml,切换至:Dependencies视图,点击红色错误,弹出提示框,点击+号。完成后pom.xml将不会报错。
- pom.xml增加继承父包
<!-- 继承父包 -->
<parent>
        <groupId>org.springframework.boot</groupId>
        <artifactId>spring-boot-starter-parent</artifactId>
        <version>1.4.2.RELEASE</version>
 </parent>
- pom.xml增加依赖关系
    <dependencies>
            <!-- spring-boot的web启动的jar包 -->
        <dependency>
            <groupId>org.springframework.boot</groupId>
            <artifactId>spring-boot-starter-web</artifactId>
        </dependency>
    </dependencies>
- pom.xml 增加热部署,可选
            <!-- maven 插件 -->
            <plugin>
                <groupId>org.springframework.boot</groupId>
                <artifactId>spring-boot-maven-plugin</artifactId>
                <dependencies>
                    <dependency>
                        <groupId>org.springframework</groupId>
                        <artifactId>springloaded</artifactId>
                        <version>1.2.5.RELEASE</version>
                    </dependency>
                </dependencies>
            </plugin>
- 完整的pom.xml文件内容
<project xmlns="http://maven.apache.org/POM/4.0.0" xmlns:xsi="http://www.w3.org/2001/XMLSchema-instance"
    xsi:schemaLocation="http://maven.apache.org/POM/4.0.0 http://maven.apache.org/xsd/maven-4.0.0.xsd">
    <modelVersion>4.0.0</modelVersion>
    <groupId>org.springboot</groupId>
    <artifactId>SpringBoot</artifactId>
    <version>0.0.1-SNAPSHOT</version>
    <packaging>war</packaging>

    <!-- 继承父包 -->
    <parent>
        <groupId>org.springframework.boot</groupId>
        <artifactId>spring-boot-starter-parent</artifactId>
        <version>1.4.2.RELEASE</version>
    </parent>

    <dependencies>
            <!-- spring-boot的web启动的jar包 -->
        <dependency>
            <groupId>org.springframework.boot</groupId>
            <artifactId>spring-boot-starter-web</artifactId>
        </dependency>
    </dependencies>

    <build>
        <plugins>
            <!-- 配置java版本 -->
            <plugin>
                <artifactId>maven-compiler-plugin</artifactId>
                <configuration>
                    <source>1.6</source>
                    <target>1.6</target>
                </configuration>
            </plugin>
            <!-- 配置war版本 -->
            <plugin>
                <artifactId>maven-war-plugin</artifactId>
                <configuration>
                    <version>3.1</version>
                </configuration>
            </plugin>
            <!-- maven 插件 -->
            <plugin>
                <groupId>org.springframework.boot</groupId>
                <artifactId>spring-boot-maven-plugin</artifactId>
                <dependencies>
                    <dependency>
                        <groupId>org.springframework</groupId>
                        <artifactId>springloaded</artifactId>
                        <version>1.2.5.RELEASE</version>
                    </dependency>
                </dependencies>
            </plugin>
        </plugins>
    </build>
    <repositories>
        <repository>
            <id>spring-snapshots</id>
            <url>http://repo.spring.io/snapshot</url>
            <snapshots><enabled>true</enabled></snapshots>
        </repository>
        <repository>
            <id>spring-milestones</id>
            <url>http://repo.spring.io/milestone</url>
        </repository>
    </repositories>
    <pluginRepositories>
        <pluginRepository>
            <id>spring-snapshots</id>
            <url>http://repo.spring.io/snapshot</url>
        </pluginRepository>
        <pluginRepository>
            <id>spring-milestones</id>
            <url>http://repo.spring.io/milestone</url>
        </pluginRepository>
    </pluginRepositories>
</project>
- 如果你希望他是web项目的话,选择项目-右键-Properties-MyEclipse-Project fcets
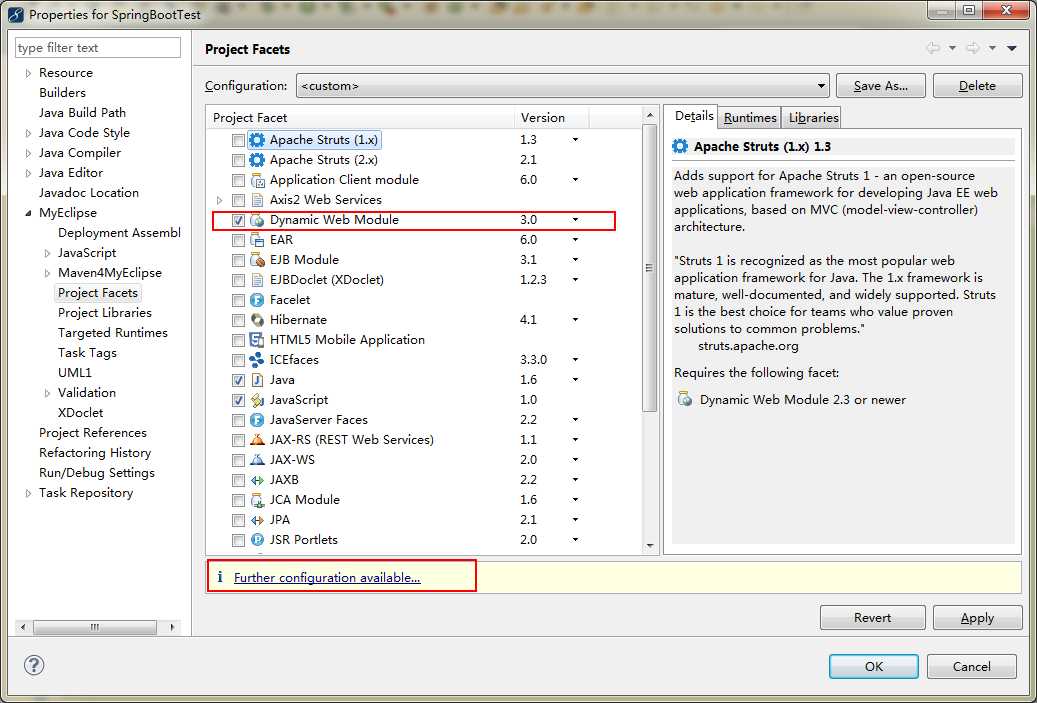
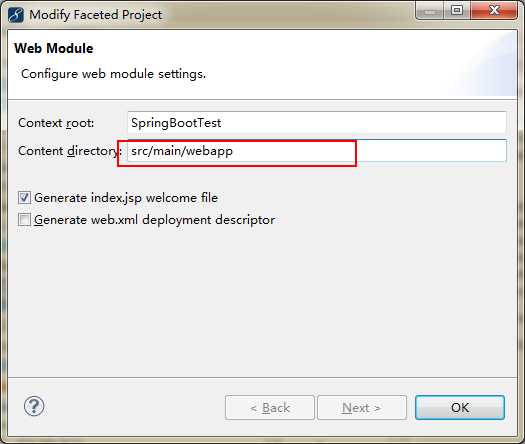
- 点击上图的Further configuration available,输入路径src/main/webapp
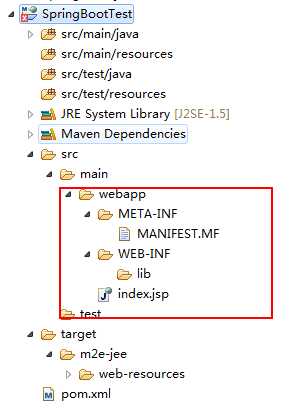
- 点击OK,在点击apply,点击OK,目录发生变化,如下图所示
- 下面接着,如何将jar包应用雨lib中呢? 选择项目右键-properties-MyEclipse-Deployment Assembly
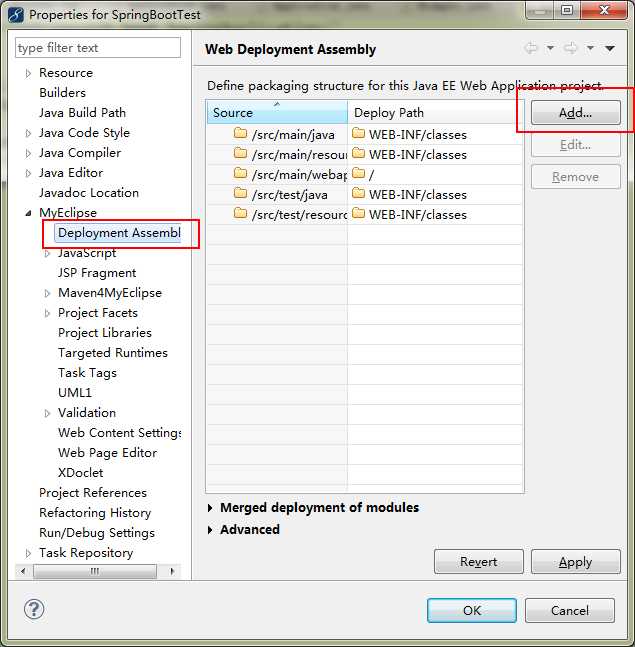
- 点击add按钮,选择java build path Entries
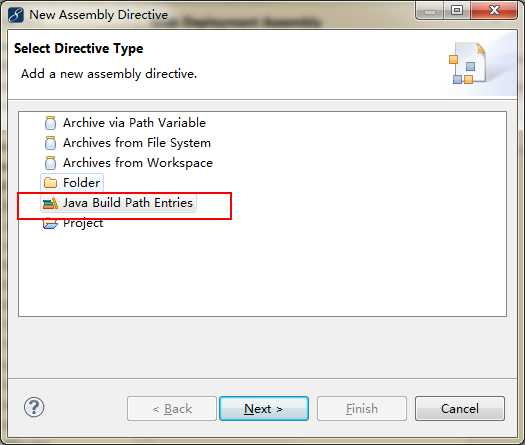
- 点击next,选择Maven Dependencies,点击finsh
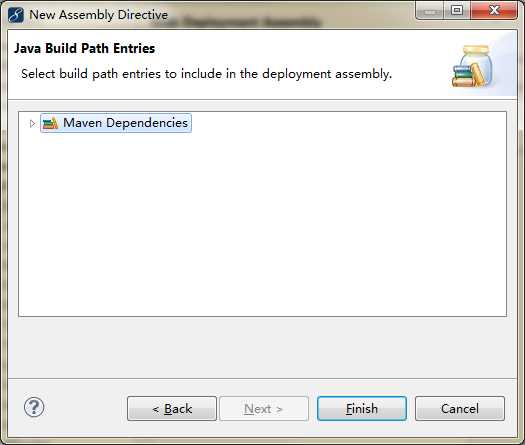
- 点击apply,点击ok,完成jar包的应用,此时srping boot 的web工程基本已部署完毕,下面来简单写一个列子
- 新建一个包含main方法的类,此地方起名用Application
@SpringBootApplication
public class Application {

    public static void main(String[] args) {
        // TODO Auto-generated method stub
        SpringApplication.run(Demo.class, args);
    }

}
- 再创建一个不需要main方法的demo类
@RestController
@EnableAutoConfiguration
public class Demo {

    @RequestMapping("/")
    String helloWord() {
        return "helloWorld";
    }
}
- 此时小列子已经写完了,由于spring boot 内置了servlet容器,所以,我们可以直接运行application类,选择项目-run as -- java application,我们将开到下图信息,这样表示已经完成。
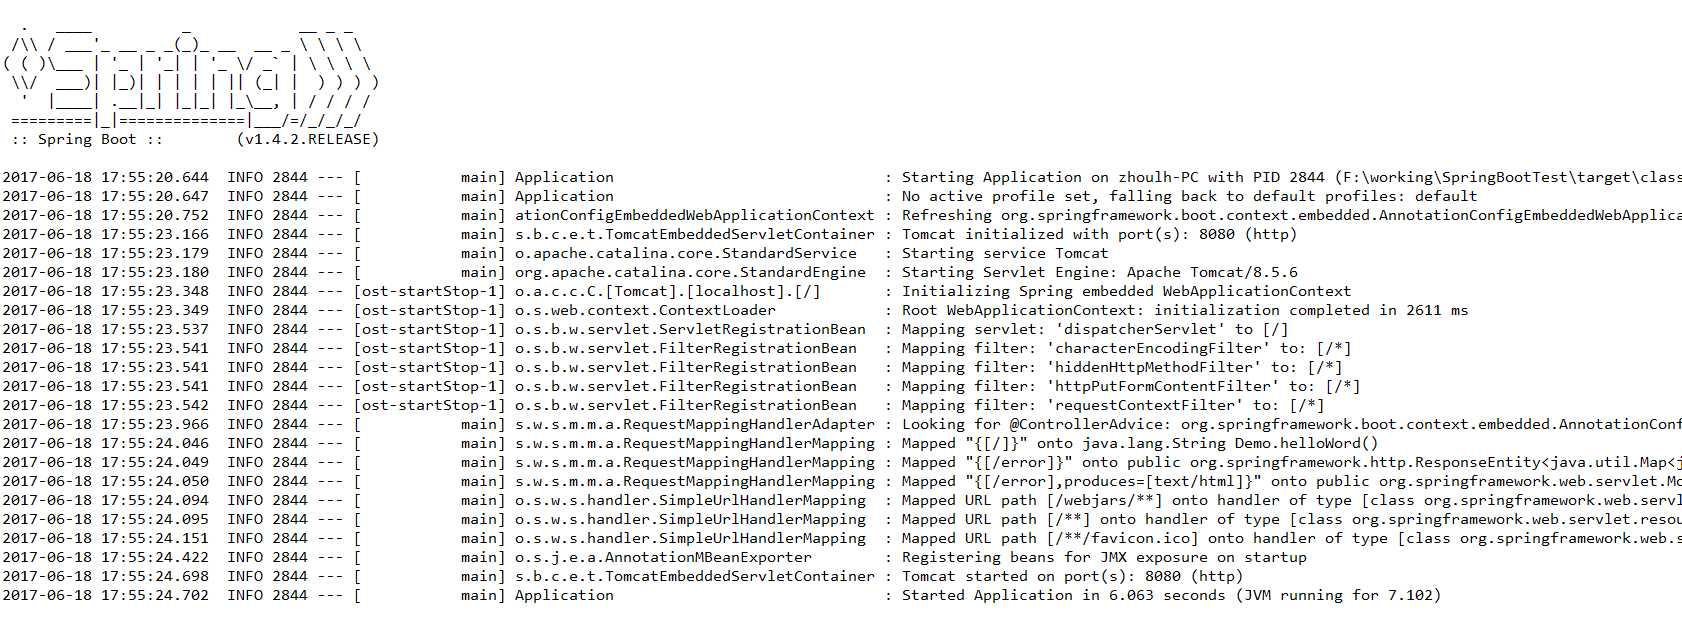
- 上图表示已经成功运行,下面我们来访问一下,打开localhost:8080,将会出现hello word信息。

- 到此,spring boot 通过maven搭建已经完成。
以上是关于初学springboot, 如何快速使用maven搭建springboot项目呢的主要内容,如果未能解决你的问题,请参考以下文章
使用IDEA快速搭建基于Maven的SpringBoot项目