springboot-21-maven多环境打包
Posted bronk
tags:
篇首语:本文由小常识网(cha138.com)小编为大家整理,主要介绍了springboot-21-maven多环境打包相关的知识,希望对你有一定的参考价值。
前几天项目需要用到分环境打包, 于是研究了下, 由于项目基于springboot的, 所以分两个情况进行说明:
1), springboot的多环境配置
2), maven-springboot的多环境配置
项目gitHub地址: https://github.com/wenbronk/springboot-maven-profile
1, springboot的环境配置比较简单, yml和properties的配置相似, 不同的是, yml只需要在同一个文件中, properties需要3个不同的文件, 分别说明:
1) pom.xml 文件:
<project xmlns="http://maven.apache.org/POM/4.0.0" xmlns:xsi="http://www.w3.org/2001/XMLSchema-instance"
    xsi:schemaLocation="http://maven.apache.org/POM/4.0.0 http://maven.apache.org/xsd/maven-4.0.0.xsd">
    <modelVersion>4.0.0</modelVersion>
    <groupId>com.wenbronk</groupId>
    <artifactId>springboot-profiles</artifactId>
    <version>0.0.1-SNAPSHOT</version>

    <!-- 添加父依赖 -->
    <parent>
        <groupId>org.springframework.boot</groupId>
        <artifactId>spring-boot-starter-parent</artifactId>
        <version>1.5.3.RELEASE</version>
    </parent>

    <!-- 锁定jdk版本 -->
    <properties>
        <!-- 指定启动类(main方法的位置) -->
        <start-class>com.wenbronk.App</start-class>
        <java.version>1.8</java.version>
        <!-- 构建编码 -->
        <project.build.sourceEncoding>UTF-8</project.build.sourceEncoding>
        <project.reporting.outputEncoding>UTF-8</project.reporting.outputEncoding>
    </properties>

    <dependencies>

        <!-- exclude掉spring-boot的默认log配置 -->
        <dependency>
            <groupId>org.springframework.boot</groupId>
            <artifactId>spring-boot-starter</artifactId>
            <exclusions>
                <exclusion>
                    <groupId>org.springframework.boot</groupId>
                    <artifactId>spring-boot-starter-logging</artifactId>
                </exclusion>
            </exclusions>
        </dependency>
        <!-- spring-boot的web启动的jar包 -->
        <dependency>
            <groupId>org.springframework.boot</groupId>
            <artifactId>spring-boot-starter-web</artifactId>
        </dependency>
        <!-- 为了构建一个即是可执行的,又能部署到一个外部容器的war文件,你需要标记内嵌容器依赖为"provided" -->
        <dependency>
            <groupId>org.springframework.boot</groupId>
            <artifactId>spring-boot-starter-tomcat</artifactId>
            <scope>provided</scope>
        </dependency>
        <!-- 引入log4j2依赖 -->
        <dependency>
            <groupId>org.springframework.boot</groupId>
            <artifactId>spring-boot-starter-log4j2</artifactId>
        </dependency>
        <!-- 加上这个才能辨认到log4j2.yml文件 -->
        <dependency>  <!-- 加上这个才能辨认到log4j2.yml文件 -->
            <groupId>com.fasterxml.jackson.dataformat</groupId>
            <artifactId>jackson-dataformat-yaml</artifactId>
        </dependency>

        <dependency>
            <groupId>org.springframework.boot</groupId>
            <artifactId>spring-boot-starter-test</artifactId>
            <scope>test</scope>
        </dependency>
        <dependency>
            <groupId>com.alibaba</groupId>
            <artifactId>fastjson</artifactId>
            <version>1.2.15</version>
        </dependency>

        <dependency>
            <groupId>org.springframework.boot</groupId>
            <artifactId>spring-boot-configuration-processor</artifactId>
            <optional>true</optional>
        </dependency>
    </dependencies>

    <build>
        <finalName>spring-boot-profiles</finalName>
    </build>

</project>
2, application.yml
spring:
  profiles:
    active: dev

# 开发环境
---
spring:
  profiles: dev

server:
  port: 8090
my:
properties:
abc: devdevdev
# 测试环境配置
---
spring:
  profiles: qa

server:
  port: 8000
my:
properties:
abc: devdevdev
# 生产环境配置
---
spring:
  profiles: prod
server:
  port: 8000
my:
properties:
abc: devdevdev
3, 编写一个类测试:
App.java
package com.wenbronk.maven;

import org.springframework.boot.SpringApplication;
import org.springframework.boot.autoconfigure.SpringBootApplication;
import org.springframework.boot.builder.SpringApplicationBuilder;
import org.springframework.boot.web.support.SpringBootServletInitializer;

@SpringBootApplication
public class App extends SpringBootServletInitializer {

    /**
     * war使用
     */
    @Override
    protected SpringApplicationBuilder configure(SpringApplicationBuilder application) {
        return application.sources(App.class);
    }

    /**
     * jar使用
     * @param args
     * @throws Exception
     * @time 2017年5月15日
     */
    public static void main(String[] args) throws Exception {
        SpringApplication.run(App.class, args);
    }

}
TestController.java
package com.wenbronk.maven.controller;

import org.springframework.beans.factory.annotation.Autowired;
import org.springframework.core.env.Environment;
import org.springframework.web.bind.annotation.RequestMapping;
import org.springframework.web.bind.annotation.RestController;

import com.wenbronk.maven.config.TestConfig;

/**
 * 测试多环境部署
 *
 * @author wenbronk
 * @time 2017年5月12日
 */
@RestController
public class TestController {

     @Autowired
     private Environment env;

     @Autowired
     private TestConfig testConfig;

    /**
     *
     * @return
     * @time 2017年5月12日
     */
    @RequestMapping(value="/test")
    public String test() {
        System.out.println("connect success");
        String property = env.getProperty("profile");
        System.out.println("property   " + property);

        String abc = testConfig.getAbc();
        System.out.println(abc);

        return "sucess";
    }

}
TestConfig.java
package com.wenbronk.maven.controller;

import org.springframework.beans.factory.annotation.Autowired;
import org.springframework.core.env.Environment;
import org.springframework.web.bind.annotation.RequestMapping;
import org.springframework.web.bind.annotation.RestController;

import com.wenbronk.maven.config.TestConfig;

/**
 * 测试多环境部署
 *
 * @author wenbronk
 * @time 2017年5月12日
 */
@RestController
public class TestController {

     @Autowired
     private Environment env;

     @Autowired
     private TestConfig testConfig;

    /**
     *
     * @return
     * @time 2017年5月12日
     */
    @RequestMapping(value="/test")
    public String test() {
        System.out.println("connect success");
        String property = env.getProperty("profile");
        System.out.println("property   " + property);

        String abc = testConfig.getAbc();
        System.out.println(abc);

        return "sucess";
    }

}
此时启动端口可以看到由yml衷配置文件所制定的配置生效
2 maven-springboot
上面的配置有时候并不能满足我们的需要, 比如 db.properites, 不通的环境需要打包不同文件夹下的配置文件, 这时候还需要maven的打包方式
mvn clean package -Dmaven.test.skip=true -P dev -e
1, pom.xml的配置
<project xmlns="http://maven.apache.org/POM/4.0.0" xmlns:xsi="http://www.w3.org/2001/XMLSchema-instance"
    xsi:schemaLocation="http://maven.apache.org/POM/4.0.0 http://maven.apache.org/xsd/maven-4.0.0.xsd">
    <modelVersion>4.0.0</modelVersion>
    <groupId>com.wenbronk</groupId>
    <artifactId>springboot-profiles-maven</artifactId>
    <version>0.0.1-SNAPSHOT</version>
    <parent>
        <artifactId>spring-boot-starter-parent</artifactId>
        <groupId>org.springframework.boot</groupId>
        <version>1.5.2.RELEASE</version>
    </parent>

    <properties>
        <start-class>com.wenbronk.profile.App</start-class>
        <java.version>1.8</java.version>
    </properties>

    <dependencies>
        <!-- exclude掉spring-boot的默认log配置 -->
        <dependency>
            <groupId>org.springframework.boot</groupId>
            <artifactId>spring-boot-starter</artifactId>
            <exclusions>
                <exclusion>
                    <groupId>org.springframework.boot</groupId>
                    <artifactId>spring-boot-starter-logging</artifactId>
                </exclusion>
            </exclusions>
        </dependency>
        <!-- spring-boot的web启动的jar包 -->
        <dependency>
            <groupId>org.springframework.boot</groupId>
            <artifactId>spring-boot-starter-web</artifactId>
        </dependency>
        <!-- 为了构建一个即是可执行的,又能部署到一个外部容器的war文件,你需要标记内嵌容器依赖为"provided" -->
        <dependency>
            <groupId>org.springframework.boot</groupId>
            <artifactId>spring-boot-starter-tomcat</artifactId>
            <scope>provided</scope>
        </dependency>
        <!-- 引入log4j2依赖 -->
        <dependency>
            <groupId>org.springframework.boot</groupId>
            <artifactId>spring-boot-starter-log4j2</artifactId>
        </dependency>
        <!-- 加上这个才能辨认到log4j2.yml文件 -->
        <dependency>  <!-- 加上这个才能辨认到log4j2.yml文件 -->
            <groupId>com.fasterxml.jackson.dataformat</groupId>
            <artifactId>jackson-dataformat-yaml</artifactId>
        </dependency>

        <dependency>
            <groupId>org.springframework.boot</groupId>
            <artifactId>spring-boot-starter-test</artifactId>
            <scope>test</scope>
        </dependency>

        <!-- springboot 热部署 -->
        <dependency>
            <groupId>org.springframework.boot</groupId>
            <artifactId>spring-boot-devtools</artifactId>
            <optional>true</optional>
            <scope>true</scope>
        </dependency>

        <dependency>
            <groupId>org.springframework.boot</groupId>
            <artifactId>spring-boot-configuration-processor</artifactId>
            <optional>true</optional>
        </dependency>

        <dependency>
            <groupId>commons-io</groupId>
            <artifactId>commons-io</artifactId>
            <version>2.5</version>
        </dependency>
    </dependencies>

    <profiles>
        <profile>
            <id>dev</id>
            <properties>
                <profileActive>dev</profileActive>
            </properties>
            <activation>
                <activeByDefault>true</activeByDefault>
            </activation>
        </profile>
        <profile>
            <id>qa</id>
            <properties>
                <profileActive>qa</profileActive>
            </properties>
        </profile>
    </profiles>

    <build>
        <resources>
            <resource>
                <directory>src/main/resources</directory>
                <excludes>
                    <exclude>dev_conf/*</exclude>
                    <exclude>qa_conf/*</exclude>
                </excludes>
                <filtering>true</filtering>
            </resource>
            <resource>
                <directory>src/main/resources/${profileActive}_conf</directory>
            </resource>
        </resources>

        <plugins>
            <plugin>
                <groupId>org.springframework.boot</groupId>
                <artifactId>spring-boot-maven-plugin</artifactId>
                <configuration>
                    <!-- 如果没有这个, 不生效 -->
                    <fork>true</fork>
                </configuration>
            </plugin>
        </plugins>
    </build>

</project>
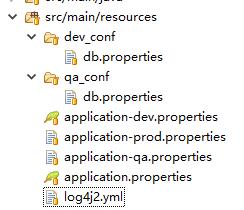
2, src/main/resources/文件夹下放置不同环境的配置文件:

这儿使用application.properites, 使用yml就用上面那种方式
application.properties
spring.profiles.active=@profileActive@
applicatio-dev.properties
profile=dev_enviroment
server.port=9000

my.properties.abc=devdevdev
application-prod.properties
profile=prod_enviroment
server.port=8000
my.properties.abc=prodprodprod
application-qa.properties
profile=qa_enviroment
server.port=7000
my.properties.abc=qaqaqaqa
3, 放置不同的 conf 下
--- dev_conf/db.properties
--- qa_conf/db.properties
qwer=123
4, 接下来是程序编码
App.java, 在这儿为了区分, 在日志中将 使用的配置文件信息打印出来
package com.wenbronk.profile;

import org.springframework.boot.SpringApplication;
import org.springframework.boot.autoconfigure.SpringBootApplication;
import org.springframework.boot.builder.SpringApplicationBuilder;
import org.springframework.boot.web.support.SpringBootServletInitializer;
import org.springframework.context.ConfigurableApplicationContext;

@SpringBootApplication
public class App extends SpringBootServletInitializer {

    /**
     * war使用
     */
    @Override
    protected SpringApplicationBuilder configure(SpringApplicationBuilder application) {
        return application.sources(App.class);
    }

    /**
     * jar使用
     * @param args
     * @throws Exception
     * @time 2017年5月15日
     */
    public static void main(String[] args) throws Exception {
        ConfigurableApplicationContext context = SpringApplication.run(App.class, args);
        String[] activeProfiles = context.getEnvironment().getActiveProfiles();
        for (String profile : activeProfiles) {
            System.out.println("Spring Boot 使用profile为:" + profile);
        }
    }
}
TestConfig.java , 用于读取application-xxx.properties中的信息
package com.wenbronk.profile.config;

import org.springframework.boot.context.properties.ConfigurationProperties;
import org.springframework.stereotype.Component;

@Component
@ConfigurationProperties(prefix = "my.properties")
public class TestConfig {
    private String abc;

    public String getAbc() {
        return abc;
    }

    public void setAbc(String abc) {
        this.abc = abc;
    }
}
ResourceLoader.java, 读取外部资源文件
package com.wenbronk.profile.resource;

import org.springframework.context.ResourceLoaderAware;
import org.springframework.core.io.Resource;
import org.springframework.core.io.ResourceLoader;
import org.springframework.stereotype.Component;

/**
 * 实现resourceLoaderAware , 加载外部资源文件
 *
 * @author wenbronk
 * @time 2017年5月15日
 */
@Component
public class MyResourceLoader implements ResourceLoaderAware{

    private ResourceLoader resourceLoader;


    public Resource getresourceLoader(String path) {
        return resourceLoader.getResource("classpath:" + path);
    }

    @Override
    public void setResourceLoader(ResourceLoader resourceLoader) {
        this.resourceLoader = resourceLoader;
    }

}
controller.java测试
package com.wenbronk.profile.controller;

import java.io.IOException;

import org.apache.commons.io.IOUtils;
import org.springframework.beans.factory.annotation.Autowired;
import org.springframework.core.env.Environment;
import org.springframework.core.io.Resource;
import org.springframework.web.bind.annotation.RequestMapping;
import org.springframework.web.bind.annotation.RestController;

import com.wenbronk.profile.config.TestConfig;
import com.wenbronk.profile.resource.MyResourceLoader;

/**
 * 测试springboot-maven 分环境打包
 *
 * @author wenbronk
 * @time 2017年5月15日
 */
@RestController
public class TestController {

    /**
     * 可直接使用environment来配置
     */
     @Autowired
     private Environment env;

    @Autowired
    private TestConfig testConfig;

    @Autowired
    private MyResourceLoader resourceLoader;

    @RequestMapping("/test")
    public String test() throws IOException {
        String abc = testConfig.getAbc();
        System.out.println(abc);

        String property = env.getProperty("profile");
        System.out.println("property   " + property);

        Resource resource = resourceLoader.getresourceLoader("db.properties");
        String string = IOUtils.toString(resource.getInputStream(), "utf-8");
        System.out.println(string);
        return abc;
    }

}
运行后可以根据输入命令更改配置
为了进一步验证, 我们分别打 了war包和jar包, 可以看到根据输入的maven指令不同而替换不通的配置文件
在springboot测试中使用多环境:
@RunWith(SpringJUnit4ClassRunner.class)
@SpringBootTest(webEnvironment = WebEnvironment.RANDOM_PORT)
@ActiveProfiles("prod")
原创地址: http://www.cnblogs.com/wenbronk/p/6855973.html, 转载请注明出处, 谢谢
以上是关于springboot-21-maven多环境打包的主要内容,如果未能解决你的问题,请参考以下文章