烧录OpenStLinux到Stm32mp157上
Posted 17岁boy想当攻城狮
tags:
篇首语:本文由小常识网(cha138.com)小编为大家整理,主要介绍了烧录OpenStLinux到Stm32mp157上相关的知识,希望对你有一定的参考价值。
STM32CubeProgrammer是ST官方专门为Corex-A stm32mp157这样高端系列开发的烧录工具
你需要到ST官方网站上下载STM32CubeProgrammer
ST官方下载地址:https://www.st.com/zh/development-tools/stm32cubeprog.html
注意下载的系统版本,下载完成之后默认安装就可以了
本文使用的Linux版本的STM32CubeProgrammer
在你生成镜像的文件夹tmp-glibc/deploy/images/stm32mp1中会生成一个flashlayout_你生成的镜像名,例如我生成的镜像名是st-image-core,那么对应的文件夹就是flashlayout_st-image-core
这个文件夹下有四个文件夹:
deleteall
extensible
optee
trusted
这几个都是flashlayout文件存放目录,每个目录里flashlayout布局使用的固件都不同,这些是ST根据不同的信息生成的不同固件的配置方法,其中optee和trusted是我们常用的,flashlayout以tsv文件格式作为存储,可以看到trusted目录下的内容
FlashLayout_emmc_stm32mp157a-ev1-trusted.tsv        FlashLayout_nor-sdcard_stm32mp157d-ev1-trusted.tsv
FlashLayout_emmc_stm32mp157c-ed1-trusted.tsv        FlashLayout_nor-sdcard_stm32mp157f-ev1-trusted.tsv
FlashLayout_emmc_stm32mp157c-ev1-trusted.tsv        FlashLayout_sdcard_stm32mp157a-dk1-trusted.tsv
FlashLayout_emmc_stm32mp157d-ev1-trusted.tsv        FlashLayout_sdcard_stm32mp157a-ev1-trusted.tsv
FlashLayout_emmc_stm32mp157f-ed1-trusted.tsv        FlashLayout_sdcard_stm32mp157c-dk2-trusted.tsv
FlashLayout_emmc_stm32mp157f-ev1-trusted.tsv        FlashLayout_sdcard_stm32mp157c-ed1-trusted.tsv
FlashLayout_nand-4-256_stm32mp157a-ev1-trusted.tsv  FlashLayout_sdcard_stm32mp157c-ev1-trusted.tsv
FlashLayout_nand-4-256_stm32mp157c-ev1-trusted.tsv  FlashLayout_sdcard_stm32mp157d-dk1-trusted.tsv
FlashLayout_nand-4-256_stm32mp157d-ev1-trusted.tsv  FlashLayout_sdcard_stm32mp157d-ev1-trusted.tsv
FlashLayout_nand-4-256_stm32mp157f-ev1-trusted.tsv  FlashLayout_sdcard_stm32mp157f-dk2-trusted.tsv
FlashLayout_nor-sdcard_stm32mp157a-ev1-trusted.tsv  FlashLayout_sdcard_stm32mp157f-ed1-trusted.tsv
FlashLayout_nor-sdcard_stm32mp157c-ev1-trusted.tsv  FlashLayout_sdcard_stm32mp157f-ev1-trusted.tsv
这些文件就是STM32CubeProgrammer烧写文件,STM32CubeProgrammer会读取文件里的内容进行烧写,这里emmc、nand这些是flash的型号
在刷写之前根据你的板子拨码开关拨码到指定位置,这里我使用的是usb下载模式


我的flash是emmc的,所以我使用的是flash_emmc*的配置文件,这里打开配置文件看一下,如果你的是定制板那么可以向厂商索要这个文件
可以看到内容如下:
#Opt   Id      Name    Type    IP      Offset  Binary
-       0x01    fsbl1-boot      Binary  none    0x0     arm-trusted-firmware/tf-a-stm32mp157f-ev1-serialboot.stm32
-       0x03    ssbl-boot       Binary  none    0x0     bootloader/u-boot-stm32mp157f-ev1-trusted.stm32
P       0x04    fsbl1   Binary  mmc1    boot1   arm-trusted-firmware/tf-a-stm32mp157f-ed1-trusted.stm32
P       0x05    fsbl2   Binary  mmc1    boot2   arm-trusted-firmware/tf-a-stm32mp157f-ed1-trusted.stm32
PD      0x06    ssbl    Binary  mmc1    0x00080000      bootloader/u-boot-stm32mp157f-ed1-trusted.stm32
P       0x21    boot    System  mmc1    0x00280000      st-image-bootfs-openstlinux-eglfs-stm32mp1.ext4
P       0x22    vendorfs        FileSystem      mmc1    0x04280000      st-image-vendorfs-openstlinux-eglfs-stm32mp1.ext4
P       0x23    rootfs  FileSystem      mmc1    0x05280000      st-image-core-openstlinux-eglfs-stm32mp1.ext4
P       0x24    userfs  FileSystem      mmc1    0x33C80000      st-image-userfs-openstlinux-eglfs-stm32mp1.ext4
意义:
Opt:烧写状态标识符
Id:烧写ID
Name:分区名称
Type:分区类型
IP:那个存储设备
Offset:烧写到磁盘那个位置
Binary:烧写的文件
其中FileSystem里存储的就是具有根文件系统的内核文件
ST官方参考wiki:https://wiki.st.com/stm32mpu/wiki/STM32CubeProgrammer_flashlayout
将你的下载线插入到Host主机上并确保拨码开关正确,使用lsusb查看设备
$ lsusb
Bus 002 Device 001: ID 1d6b:0003 Linux Foundation 3.0 root hub
Bus 001 Device 008: ID 8087:0aaa Intel Corp.
Bus 001 Device 006: ID 048d:5702 Integrated Technology Express, Inc. ITE Device
Bus 001 Device 004: ID 05e3:0608 Genesys Logic, Inc. Hub
Bus 001 Device 020: ID 0483:df11 STMicroelectronics STM Device in DFU Mode
Bus 001 Device 003: ID 05e3:0608 Genesys Logic, Inc. Hub
Bus 001 Device 001: ID 1d6b:0002 Linux Foundation 2.0 root hub
可以看到Bus 001 Device 020: ID 0483:df11 STMicroelectronics STM Device in DFU Mode的字样,这个就是STM32的otg usb下载设备
接下来就可以进行烧录了,使用STM32_Programmer_CLI这个工具进行烧录,在STM32CubeProgrammer安装目录下的bin文件夹下,这个是CUI工具你也可以使用STM32CubeProgrammer是GUI工具,需要Java的支持
注意需要使用sudo,因为要访问usb设备
sudo STM32_Programmer_CLI -c port=usb1 -w ./flashlayout_st-image-core/trusted/FlashLayout_emmc_stm32mp157c-ed1-trusted.tsv这里解释一下命令:-c是指定usb设备,-w是指定flash_layout文件路径
第一次烧录卡在了这里:
Memory Programming ...
Opening and parsing file: tf-a-stm32mp157d-ev1-serialboot.stm32
  File          : tf-a-stm32mp157d-ev1-serialboot.stm32
  Size          : 232.32 KB
  Partition ID  : 0x01

Download in Progress:
[==================================================] 100%

File download complete
Time elapsed during download operation: 00:00:01.033

RUNNING Program ...
  PartID:      :0x01
Error: Start operation failed at partition 0x01
Error: TSV flashing service failed
这个原因是因为我的板子是定制板,我联系了厂商获得了tf-a-serialboot的固件文件替换后就可以了,替换之后烧录u-boot卡在了这个地方:
File download complete
Time elapsed during download operation: 00:00:01.007

RUNNING Program ...
  PartID:      :0x01
Start operation done successfully at partition 0x01

Flashlayout Programming ...
[==================================================] 100%
Running Flashlayout Partition ...
Flashlayout partition started successfully


Memory Programming ...
Opening and parsing file: u-boot-stm32mp157d-ev1-trusted.stm32
  File          : u-boot-stm32mp157d-ev1-trusted.stm32
  Size          : 888.06 KB
  Partition ID  : 0x03

Download in Progress:
[==================================================] 100%

File download complete
Time elapsed during download operation: 00:00:00.964

RUNNING Program ...
  PartID:      :0x03

Reconnecting the device ...
一直卡在Reconnecting the device,最后过一会就失败了,联系厂商之后换了新的u-boot固件仍然如此,这个问题产生的原因是因为STM32CubeProgrammer使用u-boot来初始化emmc_flash和下载内核与根文件系统到flash里
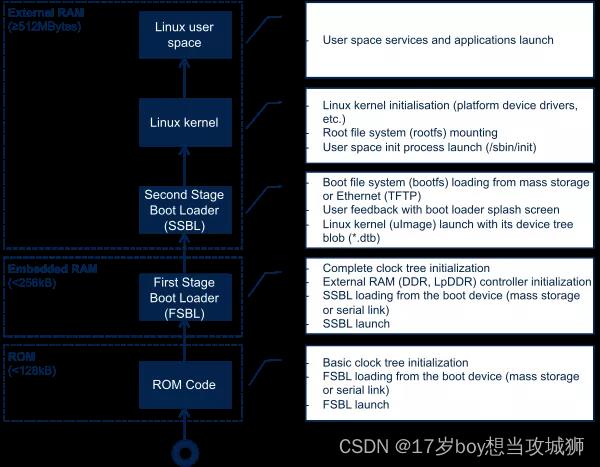
下图为stm32 corx-a7系列的启动过程

可以通过ROM方面的启动流程发现它做的事情只有初始化DDR、网络、USB等基础设施,并不会去初始化flash与启动内核
所以烧录内核方面的工作就要由u-boot来完成
你可以在u-boot的源代码里看到如下的code:
static int abortboot_normal(int bootdelay)

int abort = 0;
unsigned long ts;

#ifdef CONFIG_MENUPROMPT
printf(CONFIG_MENUPROMPT);
#else
if (bootdelay >= 0)
printf("Hit any key to stop autoboot: %2d ", bootdelay);
#endif

#if defined CONFIG_ZERO_BOOTDELAY_CHECK
/*
* Check if key already pressed
* Don't check if bootdelay < 0
*/
if (bootdelay >= 0)
if (tstc())  /* we got a key press */
(void) getc(); /* consume input */
puts("\\b\\b\\b 0");
abort = 1; /* don't auto boot */


#endif

while ((bootdelay > 0) && (!abort))
--bootdelay;
/* delay 1000 ms */
ts = get_timer(0);
do
if (tstc())  /* we got a key press */
abort = 1; /* don't auto boot */
bootdelay = 0; /* no more delay */
# ifdef CONFIG_MENUKEY
menukey = getc();
# else
(void) getc(); /* consume input */
# endif
break;

udelay(10000);
 while (!abort && get_timer(ts) < 1000);

printf("\\b\\b\\b%2d ", bootdelay);


putc('\\n');

#ifdef CONFIG_SILENT_CONSOLE
if (abort)
gd->flags &= ~GD_FLG_SILENT;
#endif

return abort;
这段code位于u-boot/common/autoboot.c文件之中,它的作用就是u-boot启动时等待1000毫秒,在这个过程中如果串口有任意输入则进入命令模式
STM32CubeProgrammer就是利用u-boot命令功能来下载内核与根文件系统的,所以你的开发板需要接入串口到PC上才能完成下载,当我将串口接入以后就可以正常下载了,下图为正常下载的过程:

等待几分钟刷写完成之后会输出如下内容:

随后将拨码开关拨到EMMC启动并板子
重启后串口输出:

以上是关于烧录OpenStLinux到Stm32mp157上的主要内容,如果未能解决你的问题,请参考以下文章