maven 搭建私服
Posted
tags:
篇首语:本文由小常识网(cha138.com)小编为大家整理,主要介绍了maven 搭建私服相关的知识,希望对你有一定的参考价值。
前言:
公司一般都有个自己的私服来管理各种jar包,原因大概有这么3个,分别是:
1、有的公司不能访问外网,只能通过私服来管理jar包和插件;
2、公司网速比较慢,通过公司的私服来获取jar包比较快;
3、内部的的一些jar包放在私服上,比较方便的大家使用。
1 . 私服简介
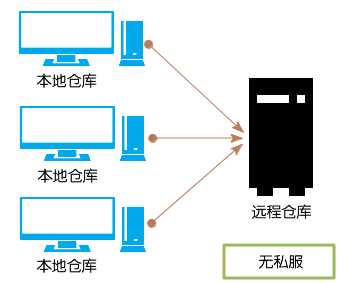
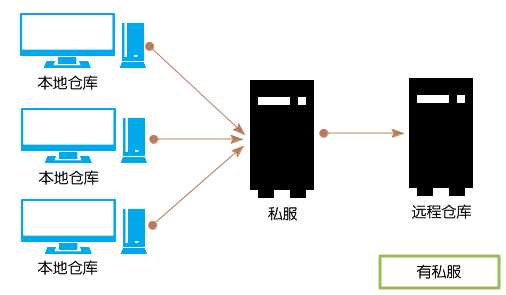
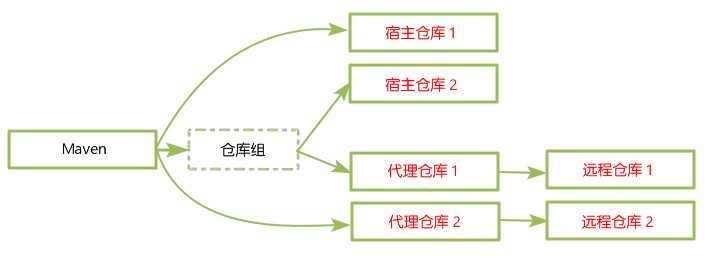
私服是架设在局域网的一种特殊的远程仓库,目的是代理远程仓库及部署第三方构件。有了私服之后,当 Maven 需要下载构件时,直接请求私服,私服上存在则下载到本地仓库;
否则,私服请求外部的远程仓库,将构件下载到私服,再提供给本地仓库下载。
2 . 安装Nexus
2.1 :Nexus 专业版是需要付费的,这里我们下载开源版 Nexus OSS。Nexus 提供两种安装包,一种是包含 Jetty 容器的 bundle 包,另一种是不包含容器的 war 包(本人下载的是包含jetty容器的)。下载地址:http://www.sonatype.org/nexus/go。
2.2:解压安装包

2.3:进入D:\\Program Files\\nexus-2.14.4-03-bundle\\nexus-2.14.4-03\\bin\\jsw;根据自己的系统选择
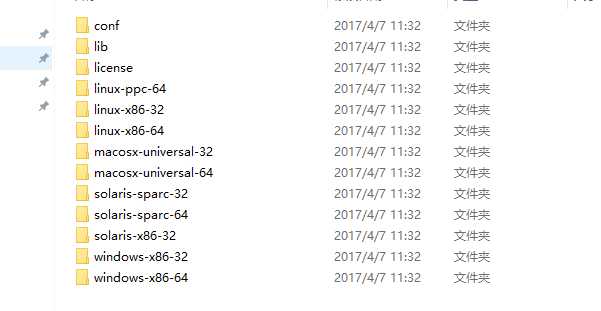
2.4: 执行console-nexus.bat,(注:console-nexus.bat仅启动,install-nexus.bat 将Nexus安装为Windows服务。可将服务启动方式设为手动,以后通过 nexus start 即可启动Nexus ,通过 nexus stop 退出Nexus:)

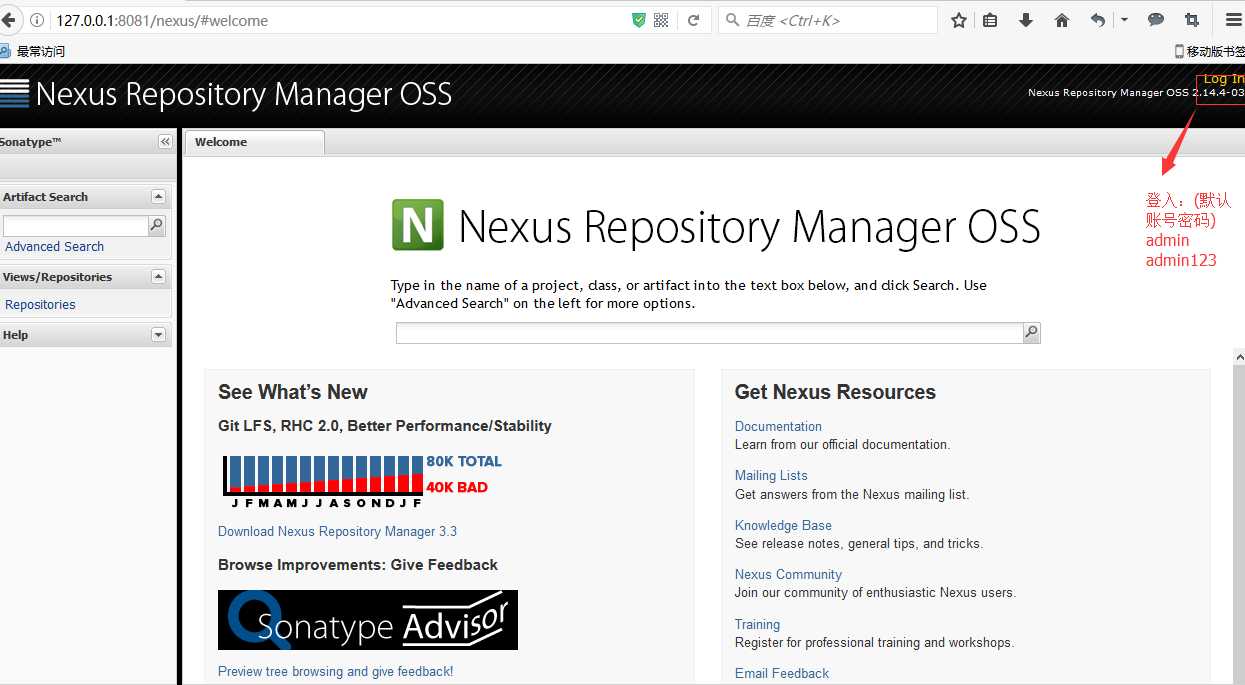
2.5:打开浏览器,访问:http://127.0.0.1:8081/nexus/ (Jetty 默认端口号:8081):
3 . Nexus预置的仓库
点击左侧菜单 Repositories 链接,查看 Nexus 内置的仓库:
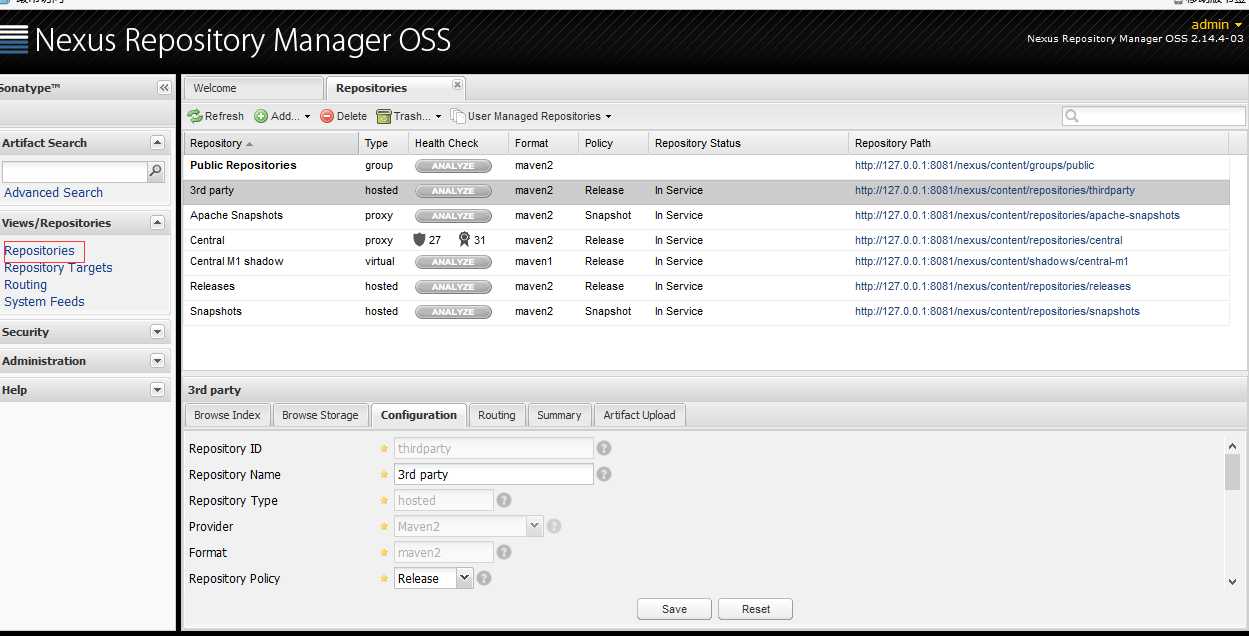
Nexus 的仓库分为这么几类:
- hosted 宿主仓库:主要用于部署无法从公共仓库获取的构件以及自己或第三方的项目构件( 3rd party 放置无法从中央仓库获取的构件,如:oracle 的 JDBC 驱动;Releases 仓库 放置自己开发一些不稳定的项目版本;Snapshots 仓库放置自己开发的稳定项目版本 );
- proxy 代理仓库:代理公共的远程仓库;
- virtual 虚拟仓库:用于适配 Maven 1;
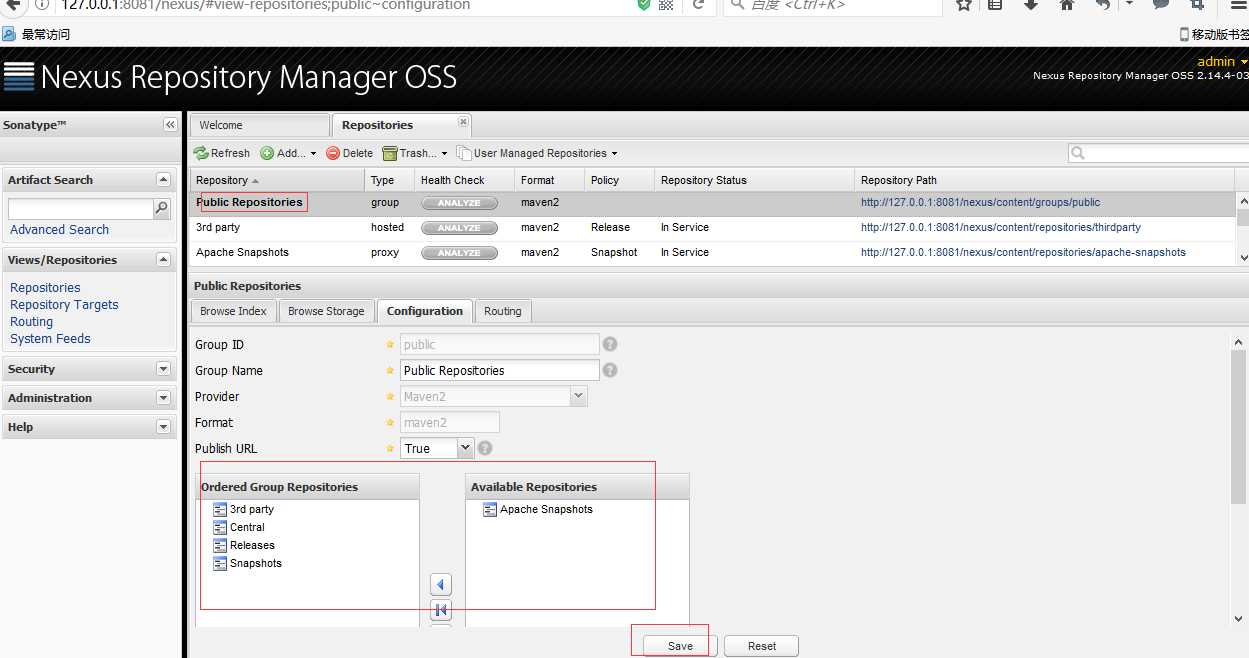
- group 仓库组:Nexus 通过仓库组的概念统一管理多个仓库,这样我们在项目中直接请求仓库组即可请求到仓库组管理的多个仓库
3.2:添加仓库到仓库组
4:eclipse 配置私服并使用
4.1:setting.xml文件添加如下设置
<?xml version="1.0" encoding="UTF-8"?>
<settings xmlns="http://maven.apache.org/SETTINGS/1.0.0"
    xmlns:xsi="http://www.w3.org/2001/XMLSchema-instance"
    xsi:schemaLocation="http://maven.apache.org/SETTINGS/1.0.0 http://maven.apache.org/xsd/settings-1.0.0.xsd">
        <localRepository>E:\\maventenst</localRepository>
        <!--配置服务端的一些设置。一些设置如安全证书不应该和pom.xml一起分发。这种类型的信息应该存在于构建服务器上的settings.xml文件中。 -->
    <servers>
        <server>
            <!--该id与distributionManagement中repository元素的id相匹配。 -->
            <id>test-repository</id>
            <username>deployment</username>
            <password>deployment123</password>
        </server>
        <server>
            <!--该id与distributionManagement中repository元素的id相匹配。 -->
            <id>test-snapshotRepository</id>
            <username>deployment</username>
            <password>deployment123</password>
        </server>
    </servers>
     <!--为仓库列表配置的下载镜像列表。高级设置请参阅镜像设置页面 -->
    <mirrors>
        <mirror>
            <!--唯一标识符,区分不同的mirror元素 -->
            <id>nexus</id>
            <!--被镜像的服务器的id。例如,如果我们要设置了一个Maven中央仓库(http://repo.maven.apache.org/maven2/)的镜像,就需要将该元素设置成central。这必须和中央仓库的id central完全一致。 -->
            <mirrorOf>central</mirrorOf>
            <!--镜像名称 -->
            <name>test-center</name>
            <!--该镜像的URL。构建系统会优先考虑使用该URL,而非使用默认的服务器URL,就是下载jar包的路径 -->
            <url>http://127.0.0.1:8081/nexus/content/groups/public</url>
        </mirror>
    </mirrors>
    <!--根据环境参数来调整构建配置的列表。settings.xml中的profile元素是pom.xml中profile元素的裁剪版本。这里的profile元素只关心构建系统这个整体,而非单独的项目对象模型设置。
        如果一个settings中的profile被激活,它的值会覆盖任何其它定义在POM中或者profile.xml中的带有相同id的profile。 -->
    <profiles>
        <profile>
            <id>test-profile</id>
            <!--远程仓库列表,它是Maven用来填充构建系统本地仓库所使用的一组远程项目。 -->
            <repositories>
                <!--包含需要连接到远程仓库的信息 -->
                <repository>
                    <!--远程仓库唯一标识 -->
                    <id>public-snapshots-nexus</id>
                    <!--远程仓库名称 -->
                    <name>public-snapshots</name>
                    <!--如何处理远程仓库里发布版本的下载 -->
                    <releases>
                        <!--true或者false表示该仓库是否开启下载 -->
                        <enabled>true</enabled>
                        <!--该元素指定更新发生的频率。Maven会比较本地POM和远程POM的时间戳。这里的选项是:always(一直),daily(默认,每日),interval:X(这里X是以分钟为单位的时间间隔),never(从不)。 -->
                        <updatePolicy>always</updatePolicy>
                        <!--当Maven验证构件校验文件失败时该怎么做-ignore(忽略),fail(失败),或者warn(警告)。 -->
                        <checksumPolicy>warn</checksumPolicy>
                    </releases>
                    <!--如何处理远程仓库里快照版本的下载。有了releases和snapshots这两组配置,POM就可以在每个单独的仓库中,为每种类型的构件采取不同的策略。例如,可能有人会决定只为开发目的开启对快照版本下载的支持。 -->
                        <snapshots>
                            <enabled>true</enabled>
                        </snapshots>
                    <!--远程仓库URL,按protocol://hostname/path形式 -->
                    <url>http://127.0.0.1:8081/nexus/content/groups/public</url>
                    <!--用于定位和排序构件的仓库布局类型-可以是default(默认)或者legacy(遗留)。Maven2为其仓库提供了一个默认的布局;Maven1.x有一种遗留布局。我们可以使用该元素指定布局是default还是legacy -->
                    <layout>default</layout>
                </repository>
            </repositories>
            <!-- 插件开发库(和上面仓库差不多) -->
            <pluginRepositories>
                <pluginRepository>
                    <id>public-snapshots-nexus</id>
                    <name>public-snapshots</name>
                    <url>http://127.0.0.1:8081/nexus/content/groups/public</url>
                    <releases>
                        <enabled>true</enabled>
                    </releases>
                    <snapshots>
                        <enabled>true</enabled>
                    </snapshots>
                </pluginRepository>
            </pluginRepositories>
        </profile>
    </profiles>
    <!-- 表示激活的profile -->
    <activeProfiles>
    <activeProfile>test-profile</activeProfile>
    </activeProfiles>
</settings>
4.2:项目发布 pom设置如下,执行clean deploy 命令发布
<project xmlns="http://maven.apache.org/POM/4.0.0" xmlns:xsi="http://www.w3.org/2001/XMLSchema-instance"
    xsi:schemaLocation="http://maven.apache.org/POM/4.0.0 http://maven.apache.org/xsd/maven-4.0.0.xsd">
    <modelVersion>4.0.0</modelVersion>

    <groupId>com.pqq.maven</groupId>
    <artifactId>ssm-api</artifactId>
    <version>0.0.1-SNAPSHOT</version>
    <packaging>jar</packaging>
    <name>ssm-api</name>
    <url>http://maven.apache.org</url>
    <distributionManagement>
    <!-- 发布 发布版 -->
        <repository>
            <id>test-repository</id>
            <name>test repository name</name>
            <url>http://127.0.0.1:8081/nexus/content/repositories/releases/</url>
        </repository>
        <!-- 发布 快照版 -->
        <snapshotRepository>
            <id>test-snapshotRepository</id>
            <name>test snapshotRepository name</name>
            <url>http://127.0.0.1:8081/nexus/content/repositories/snapshots/</url>
        </snapshotRepository>
    </distributionManagement>

    <properties>
        <project.build.sourceEncoding>UTF-8</project.build.sourceEncoding>
    </properties>

    <dependencies>
        <dependency>
            <groupId>junit</groupId>
            <artifactId>junit</artifactId>
            <version>3.8.1</version>
            <scope>test</scope>
        </dependency>
    </dependencies>

</project>
以上是关于maven 搭建私服的主要内容,如果未能解决你的问题,请参考以下文章