Hibernate之HelloWorld
Posted
tags:
篇首语:本文由小常识网(cha138.com)小编为大家整理,主要介绍了Hibernate之HelloWorld相关的知识,希望对你有一定的参考价值。
1. 步骤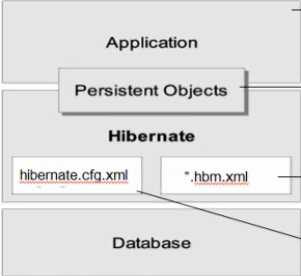
0. 导入相关Jar包。
1. 编写Hibernate的持久化文件 (默认为hibernate.cfg.xml)。
2. 编写持久化类。
3. 创建对象 - 关系文件(.htm.xml文件)。
4. 通过hibernate的API 编写访问数据库的代码。
2. 具体代码实现
1. 创建hibernate的配置文件 - hibernate.cfg.xml文件
1)项目-右键-new-other-hibernate下-cfg.xml
 1 <?xml version="1.0" encoding="UTF-8"?>
 2 <!DOCTYPE hibernate-configuration PUBLIC
 3         "-//Hibernate/Hibernate Configuration DTD 3.0//EN"
 4         "http://www.hibernate.org/dtd/hibernate-configuration-3.0.dtd">
 5 <hibernate-configuration>
 6     <session-factory>
 7         <!-- 配置连接数据库的基本信息 -->
 8         <!-- 数据库的用户名 密码 驱动 URL -->
 9         <property name="connection.username">root</property>
10         <property name="connection.password">960105</property>
11         <property name="connection.driver_class">com.mysql.jdbc.Driver</property>
12         <property name="connection.url">jdbc:mysql:///hibernate</property>
13         <!-- 配置hibernate的基本方法 -->
14         <!-- hibernate所使用的数据库方言 -->
15         <property name="dialect">org.hibernate.dialect.MySQL5InnoDBDialect</property>
16
17         <!-- 执行操作时是否在控制台打印 SQL -->
18         <property name="show_sql">true</property>
19
20         <!-- 是否对 SQL 进行格式化 -->
21         <property name="format_sql">true</property>
22
23         <!-- 指定自动生成数据表的策略 -->
24         <property name="hbm2ddl.auto">update</property>
25
26         <!-- 指定关联的hbm.xml文件 -->
27         <mapping resource="com/tk/hibernate/News.hbm.xml"/>
28     </session-factory>
29 </hibernate-configuration>
2.编写持久化类
1. 必须提供一个无参数的构造器(反射)。
2. 提供一个唯一的标识属性(主键)。
3. 为类的持久化字段提供访问方法(即get/set)。
4. 重写equal和hashCode方法(非必须)。
 1 package com.tk.hibernate;
 2
 3 import java.sql.Date;
 4
 5 public class News {
 6     private Integer id; //field
 7     private String title;
 8     private String author;
 9     private Date date;
10     public Integer getId() {
11         return id;
12     }
13     public void setId(Integer id) {
14         this.id = id;
15     }
16     public String getTitle() {
17         return title;
18     }
19     public void setTitle(String title) {
20         this.title = title;
21     }
22     public String getAuthor() {
23         return author;
24     }
25     public void setAuthor(String author) {
26         this.author = author;
27     }
28     public Date getDate() {
29         return date;
30     }
31     public void setDate(Date date) {
32         this.date = date;
33     }
34     public News(String title, String author, Date date) {
35         super();
36         this.title = title;
37         this.author = author;
38         this.date = date;
39     }
40     public News() {
41         // TODO Auto-generated constructor stub
42     }
43 }
3. 创建关系 - 对象映射文件 - 项目-右键-new-other-hibernate下-hbm.xml
注:主键的生成方式暂为native,采用数据库本地生成的方式。
 1 <?xml version="1.0"?>
 2 <!DOCTYPE hibernate-mapping PUBLIC "-//Hibernate/Hibernate Mapping DTD 3.0//EN"
 3 "http://hibernate.sourceforge.net/hibernate-mapping-3.0.dtd">
 4 <!-- Generated 2017-4-18 20:03:06 by Hibernate Tools 3.5.0.Final -->
 5 <hibernate-mapping>
 6     <class name="com.tk.hibernate.News" table="NEWS">
 7         <!--name 类里面的名字  -->
 8         <id name="id" type="java.lang.Integer">
 9             <!--column 对应数据表中的列名  -->
10             <column name="ID" />
11             <!-- 指定主键的生成方式 ,native使用数据库本地的生成方式-->
12             <generator class="native" />
13         </id>
14         <property name="title" type="java.lang.String">
15             <column name="TITLE" />
16         </property>
17         <property name="author" type="java.lang.String">
18             <column name="AUTHOR" />
19         </property>
20         <property name="date" type="java.sql.Date">
21             <column name="DATE" />
22         </property>
23     </class>
24 </hibernate-mapping>
4.创建测试类(Junit)
具体步骤-在代码部分
 1 package com.tk.hibernate;
 2
 3 import static org.junit.Assert.*;
 4
 5 import java.sql.Date;
 6
 7 import org.hibernate.Session;
 8 import org.hibernate.SessionFactory;
 9 import org.hibernate.Transaction;
10 import org.hibernate.cfg.Configuration;
11 import org.hibernate.service.ServiceRegistry;
12 import org.hibernate.service.ServiceRegistryBuilder;
13 import org.junit.Test;
14
15 public class HibernateTest {
16 @Test
17     public void test() {
18         //1. 创建sessionFactory 对象
19         SessionFactory sessionFactory=null;
20         //1) 创建一个configuration 对象:对应hibernate的基本配置信息和对象关系映射信息
21         Configuration configuration=new Configuration().configure();
23         //4.0 之前这样创建
25       //sessionFactory = configuration.buildSessionFactory();
26         //2). 创建一个 ServiceRegistry 对象: hibernate 4.x 新添加的对象
28           //hibernate 的任何配置和服务都需要在该对象中注册后才能有效.
29         ServiceRegistry serviceRegistry = new ServiceRegistryBuilder().applySettings(configuration.getProperties())
30                                                     .buildServiceRegistry();
31         sessionFactory = configuration.buildSessionFactory(serviceRegistry);
33         //2. 创建一个 Session 对象
35         Session session = sessionFactory.openSession();
36         //3. 开启事务
38         Transaction transaction = session.beginTransaction();
39         //4. 执行保存操作
41         News news = new News("Java12345", "ATGUIGU", new Date(new java.util.Date().getTime()));
42         session.save(news);
43         //5. 提交事务
45         transaction.commit();
46         //6. 关闭 Session
48         session.close();
49         //7. 关闭 SessionFactory 对象
51         sessionFactory.close();
52
53     }
54
55 }
以上是关于Hibernate之HelloWorld的主要内容,如果未能解决你的问题,请参考以下文章