Spring学习九----------Bean的配置之Bean的定义及作用域的注解实现
Posted 禁忌夜色153
tags:
篇首语:本文由小常识网(cha138.com)小编为大家整理,主要介绍了Spring学习九----------Bean的配置之Bean的定义及作用域的注解实现相关的知识,希望对你有一定的参考价值。
© 版权声明:本文为博主原创文章,转载请注明出处
Spring Bean常用注解
@Component:通常注解,可用于任何Bean
@Repository:通常用于注解DAO层,即持久层
@Service:通常用于注解Service层,即服务层
@Controller:通常用于注解Controller层,即控制层
类的自动检测及Bean的注册
<context:component-scan base-package=""/>:自动扫描base-package定义的包或其子包下的类,并将带有@Component,@Controller,@Service,@Repository等注解的类自动注册到IOC容器中。
<context:annotation-config/>:隐式的向Spring容器中注册AutowiredAnnotationBeanPostProcessor、CommonAnnotationBeanPostProcessor、PersistenceAnnotationBeanPostProcessor 和RequiredAnnotationBeanPostProcessor 这四个BeanPostProcessor。
<context:component-scan/>包含了<context:annotation-config/>,因此使用<context:component-scan/>就不用再使用<context:annotation-config/>
定义Bean
Bean名称由BeanNameGenerator生成(@Component,@Controller,@Service,@Repository都有个name属性用于显示的指定Bean Name;默认是类名首字母小写)
也可使用<context:component-scan/>中的name-generator自定义Bean的命名策略,但是要实现BeanNameGenerator接口并且包含一个无参构造器
作用域
@Scope注解标识Bean的作用域。默认是singleton。
实例
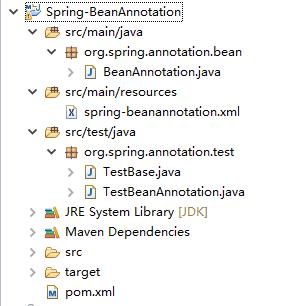
1.项目结构

2.pom.xml
<project xmlns="http://maven.apache.org/POM/4.0.0" xmlns:xsi="http://www.w3.org/2001/XMLSchema-instance"
  xsi:schemaLocation="http://maven.apache.org/POM/4.0.0 http://maven.apache.org/maven-v4_0_0.xsd">

	<modelVersion>4.0.0</modelVersion>

	<groupId>org.spring</groupId>
	<artifactId>Spring-BeanAnnotation</artifactId>
	<packaging>jar</packaging>
	<version>0.0.1-SNAPSHOT</version>
	<name>Spring-BeanAnnotation Maven Webapp</name>
	<url>http://maven.apache.org</url>

	<properties>
		<spring.version>4.3.7.RELEASE</spring.version>
	</properties>

	<dependencies>
		<!-- junit依赖 -->
		<dependency>
			<groupId>junit</groupId>
			<artifactId>junit</artifactId>
			<version>4.12</version>
			<scope>test</scope>
		</dependency>
		<!-- spring核心依赖 -->
		<dependency>
		    <groupId>org.springframework</groupId>
		    <artifactId>spring-core</artifactId>
		    <version>${spring.version}</version>
		</dependency>
		<dependency>
		    <groupId>org.springframework</groupId>
		    <artifactId>spring-beans</artifactId>
		    <version>${spring.version}</version>
		</dependency>
		<dependency>
		    <groupId>org.springframework</groupId>
		    <artifactId>spring-context</artifactId>
		    <version>${spring.version}</version>
		</dependency>
	</dependencies>

	<build>
		<finalName>Spring-BeanAnnotation</finalName>
	</build>

</project>
3.spring-beanannotation.xml
<?xml version="1.0" encoding="UTF-8"?>
<beans xmlns="http://www.springframework.org/schema/beans"
    xmlns:xsi="http://www.w3.org/2001/XMLSchema-instance"
    xmlns:context="http://www.springframework.org/schema/context"
    xsi:schemaLocation="http://www.springframework.org/schema/beans
        http://www.springframework.org/schema/beans/spring-beans.xsd
        http://www.springframework.org/schema/context
        http://www.springframework.org/schema/context/spring-context.xsd">

    <!-- 自动扫描包下的Bean并注册到IOC容器中 -->
    <context:component-scan base-package="org.spring.annotation.bean"/>

</beans>
4.BeanAnnotation.java
package org.spring.annotation.bean;

import org.springframework.context.annotation.Scope;
import org.springframework.stereotype.Component;

@Scope("prototype")
@Component
public class BeanAnnotation {

	public void say() {

		System.out.println("注解方式获取成功");

	}

	public void hasCode() {

		System.out.println("BeanAnnotation:" + this.hashCode());

	}

}
5.TestBase.java
package org.spring.annotation.test;

import org.junit.After;
import org.junit.Before;
import org.springframework.context.support.ClassPathXmlApplicationContext;
import org.springframework.util.StringUtils;

public class TestBase {

	private ClassPathXmlApplicationContext context;
	private String xmlPath;

	/**
	 * 无参构造器
	 */
	public TestBase() {

	}

	/**
	 * 含参构造器,初始化配置文件路径
	 *
	 * @param xmlPath
	 * 					配置文件路径
	 */
	public TestBase(String xmlPath) {

		this.xmlPath = xmlPath;

	}

	/**
	 * 初始化spring的IOC容器
	 */
	@Before
	public void before() {

		if(StringUtils.isEmpty(xmlPath)) {//配置文件默认路径
			xmlPath = "classpath:spring-*.xml";
		}
		//加载配置文件到spring容器中
		context = new ClassPathXmlApplicationContext(xmlPath.split("[,\\\\s]+"));
		//启动IOC容器s
		context.start();

	}

	/**
	 * 销毁容器
	 */
	@After
	public void after() {

		if(context != null){
			context.destroy();
		}

	}

	/**
	 * 根据bean id获取bean对象
	 */
	public Object getBean(String id) {

		return context.getBean(id);

	}

}
6.TestBeanAnnotation.java
package org.spring.annotation.test;

import org.junit.Test;
import org.spring.annotation.bean.BeanAnnotation;

public class TestBeanAnnotation extends TestBase {

	/**
	 * 构造器传入spring配置文件路径
	 */
	public TestBeanAnnotation() {

		super("classpath:spring-beanannotation.xml");

	}

	/**
	 * 测试注解方式获取bean对象
	 */
	@Test
	public void testBeanAnnotation() {

		BeanAnnotation bean = (BeanAnnotation) super.getBean("beanAnnotation");
		bean.say();

	}

	/**
	 * 测试注解方式的Bean的作用域
	 */
	@Test
	public void testBeanScope() {

		BeanAnnotation bean = (BeanAnnotation) super.getBean("beanAnnotation");
		bean.hasCode();

		BeanAnnotation bean2 = (BeanAnnotation) super.getBean("beanAnnotation");
		bean2.hasCode();

	}

}
7.效果预览

以上是关于Spring学习九----------Bean的配置之Bean的定义及作用域的注解实现的主要内容,如果未能解决你的问题,请参考以下文章