VggNet架构重现与解析
Posted mini梁翊洲MAX
tags:
篇首语:本文由小常识网(cha138.com)小编为大家整理,主要介绍了VggNet架构重现与解析相关的知识,希望对你有一定的参考价值。
VggNet其实整体参考了上一篇的Alexnet,所以很多东西都是一样的,这里我就不对那些重复的东西进行赘述。我们主要看一下作者做了哪些改动,添加了些什么新东西,以及探索背后的原因。
我们直接看下模型的代码:
class Vgg16:
def build(width,height,depth,classes):
model=Sequential()
weight_decay=0.0005
inputShape=(height,width,depth)
if K.image_data_format()=="channels_first":
inputShape=(depth,height,width)
model.add(Conv2D(64,(3,3),padding="same",
input_shape=inputShape,kernel_initializer='he_normal',
kernel_regularizer=l2(weight_decay)))
model.add(Activation("relu"))
model.add(Conv2D(64,(3,3),padding="same",
kernel_initializer='he_normal',
kernel_regularizer=l2(weight_decay)))
model.add(Activation("relu"))
model.add(MaxPooling2D(pool_size=(2,2),strides=(2,2)))
model.add(Conv2D(128,(3,3),padding="same"
,kernel_initializer='he_normal'
,kernel_regularizer=l2(weight_decay)))
model.add(Activation("relu"))
model.add(Conv2D(128,(3,3),padding="same"
,kernel_initializer='he_normal'
,kernel_regularizer=l2(weight_decay)))
model.add(Activation("relu"))
model.add(MaxPooling2D(pool_size=(2,2),strides=(2,2)))
model.add(Conv2D(256,(3,3),padding="same"
,kernel_initializer='he_normal'
,kernel_regularizer=l2(weight_decay)))
model.add(Activation("relu"))
model.add(Conv2D(256,(3,3),padding="same"
,kernel_initializer='he_normal'
,kernel_regularizer=l2(weight_decay)))
model.add(Activation("relu"))
model.add(Conv2D(256,(1,1)
,kernel_initializer='he_normal'
,kernel_regularizer=l2(weight_decay)))
model.add(Activation("relu"))
model.add(MaxPooling2D(pool_size=(2,2),strides=(2,2)))
model.add(Conv2D(512,(3,3),padding="same"
,kernel_initializer='he_normal'
,kernel_regularizer=l2(weight_decay)))
model.add(Activation("relu"))
model.add(Conv2D(512,(3,3),padding="same"
,kernel_initializer='he_normal'
,kernel_regularizer=l2(weight_decay)))
model.add(Activation("relu"))
model.add(Conv2D(512,(1,1)
,kernel_initializer='he_normal'
,kernel_regularizer=l2(weight_decay)))
model.add(Activation("relu"))
model.add(MaxPooling2D(pool_size=(2,2),strides=(2,2)))
model.add(Flatten())
model.add(Dense(4096,kernel_initializer='he_normal'
,kernel_regularizer=l2(weight_decay)))
model.add(Activation("relu"))
model.add(Dropout(0.5))
model.add(Dense(2048,kernel_initializer='he_normal'
,kernel_regularizer=l2(weight_decay)))
model.add(Activation("relu"))
model.add(Dropout(0.5))
model.add(Dense(classes))
model.add(Activation("softmax"))
return model
卷积核
我们可以很清晰地看到卷积核基本全变成了3 * 3的以及小部分1 * 1的。
It is easy to see that a stack of two 3 × 3 conv. layers (without spatial pooling in between) has an effective receptive field of 5 × 5; three such layers have a 7 × 7 effective receptive field.
关于这个做法的解释我们在Alexnet中卷积核大小选择的时候也有谈到,多个小的卷积核感受到的视野和一个大的卷积核感受到的视野是相同的,而且其计算复杂度还更低,需要的参数更少,即意味着能一定程度上避免过拟合。
So what have we gained by using, for instance, a stack of three 3 × 3 conv. layers instead of a single 7 × 7 layer? First, we incorporate three non-linear rectification layers instead of a single one, which makes the decision function more discriminative. Second, we decrease the number of parameters: assuming that both the input and the output of a three-layer 3 × 3 convolution stack has C channels, the stack is parametrised by 3(32C2)=27C2 weights; at the same time, a single 7 × 7 conv. layer would require 72C2=49C2 parameters, i.e. 81% more. This can be seen as imposing a regularisation on the 7 × 7 conv. filters, forcing them to have a decomposition through the 3 × 3 filters (with non-linearity injected in between).
同时,在每一个小卷积核之间都加上了非线性的激活函数。同样的视野但拥有更多的非线性修正,这会使决策函数更具判别性。
The incorporation of 1 × 1 conv. layers (configuration C, Table 1) is a way to increase the non-linearity of the decision function without affecting the receptive fields of the conv. layers.
1×1卷积层是增加决策函数非线性而不影响卷积层感受野的一种方式。
Notably, in spite of the same depth, the configuration C (which contains three 1 × 1 conv. layers), performs worse than the configuration D, which uses 3 × 3 conv. layers throughout the network. This indicates that while the additional non-linearity does help (C is better than B), it is also important to capture spatial context by using conv.filters with non-trivial receptive fields (D is better than C).
虽然额外的非线性确实有帮助,但也可以通过使用更多的具有非平凡感受野的卷积滤波器来捕获空间上下文。
The error rate of our architecture saturates when the depth reaches 19 layers, but even deeper models might be beneficial for larger datasets.
当深度达到19层时,我们架构的错误率饱和。所以我们可以得知在传统CNN网络中,并不是越深越好,如何选择其实取决于你的数据集和对比试验的结果。
正则化L2
The training was regularised by weight decay (the L2 penalty multiplier set to 5⋅10−4)
L2其实就是权重的平方和。在我们实际训练的过程中,我们为了避免过拟合,会在损失函数后面加上惩罚因子L2 。为了降低我们的损失函数结果,我们会尽可能地选择小的权重。为什么小的权重就代表避免过拟合呢?过拟合即意味着泛化能力,如果某一个权重过大,那么我输入数据稍微发生了一点变化,就会导致结果发生很大的变化,所以我们要避免这种情况。
池化层
作者并没有沿用Alexnet的重叠池化层,而选择了传统的池化层。其实重叠池化层的效果存疑,有的表现得好,有的表现得一般。在后期,其实池化层也会被卷积层替代,所以不用过于纠结。
参数初始化
权值初始化我并没有采用作者的建议,而是采用了上一篇提及的He初始化,因为我们用ReLU激活函数。
图像RGB去均值
they were randomly cropped from rescaled training images (one crop per image per SGD iteration).
这里给我们解释了Alexnet中提到的数据增强的第二种方法(我之前没看懂的那个),其实就是计算训练数据集RGB三个通道的均值,并在每张图片的对应通道上减去对应均值。
train_imagePaths=sorted(list(paths.list_images(train_dataset)))
B_mean=0
G_mean=0
R_mean=0
count=0
for imagepath in train_imagePaths:
    image=cv2.imread(imagepath)
    image=cv2.resize(image,(224,224))
    B_mean+=np.mean(image[:,:,0])
    G_mean+=np.mean(image[:,:,1])
    R_mean+=np.mean(image[:,:,2])
    count+=1
B_mean/=count
G_mean/=count
R_mean/=count
mean=[B_mean,G_mean,R_mean]

train_data=[]
train_label=[]
random.shuffle(train_imagePaths)

for imagepath in train_imagePaths:
    image=cv2.imread(imagepath)
    image=cv2.resize(image,(224,224))
    image=img_to_array(image)
    image-=mean
    train_data.append(image)

    label=imagepath.split(os.path.sep)[-2]
    train_label.append(label)

train_data=np.array(train_data,dtype="float")/255.0
train_label=np.array(train_label)
train_label=train_label.flatten()
le = LabelEncoder()
train_label = le.fit_transform(train_label)
trainY=to_categorical(train_label,num_classes=7)

del train_label,train_imagePaths
gc.collect()

test_data=[]
test_label=[]
test_imagePaths=sorted(list(paths.list_images(test_dataset)))
random.shuffle(test_imagePaths)

for imagepath in test_imagePaths:
    image=cv2.imread(imagepath)
    image=cv2.resize(image,(224,224))
    image=img_to_array(image)
    image-=mean
    test_data.append(image)

    label=imagepath.split(os.path.sep)[-2]
    test_label.append(label)

test_data=np.array(test_data,dtype="float")/255.0
test_label=np.array(test_label)
test_label=test_label.flatten()
le = LabelEncoder()
test_label = le.fit_transform(test_label)
testY=to_categorical(test_label,num_classes=7)

del test_label,test_imagePaths
gc.collect()
根据广播机制,要实现也不难,以上就是代码。
为什么要去均值呢?从视觉的角度来讲,人眼感受到的亮度其实不影响物体本身的轮廓。即使你照相得出来的相片是一片黑蒙蒙的,但经过曝光或者直方图均衡化,是能显现出原本物体的形状的。从数据的角度讲,我们希望它呈现零分布的特征,这样可以加快神经网络的收敛速度。
值得一提的是,我们还进行了数值缩放的工作。这是因为我在实际训练只去均值的数据的过程中,从一开始就导致了大量的神经元死亡。
多尺度训练
The second approach to setting S is multi-scale training, where each training image is individually rescaled by randomly sampling S from a certain range [Smin,Smax] (we used Smin=256 and Smax =512). Since objects in images can be of different size, it is beneficial to take this into account during training. This can also be seen as training set augmentation by scale jittering, where a single model is trained to recognise objects over a wide range of scales.
这个对我现阶段来说,用不太上。等后面再研究吧。
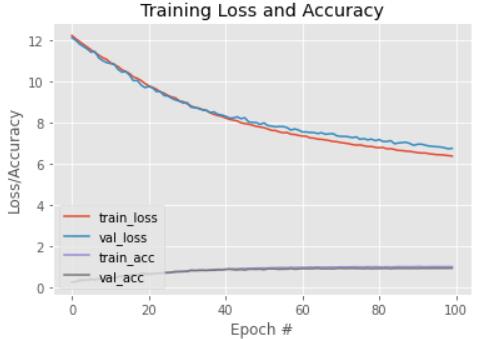
训练结果
数据集是车分类,7种车,3000多张图片(训练集和验证集)。
训练正确率在90次后就在0.99波动,验证正确率在65次后就在0.9波动。

以上是关于VggNet架构重现与解析的主要内容,如果未能解决你的问题,请参考以下文章