PyTorch基础(17)-- hooks机制※
Posted 奋斗の博客
tags:
篇首语:本文由小常识网(cha138.com)小编为大家整理,主要介绍了PyTorch基础(17)-- hooks机制※相关的知识,希望对你有一定的参考价值。
前言
网络上关于PyTorch如何使用Hook机制的教程良莠不齐,大多是开门见山直接扔给你一个案例讲解如何使用Hook的,而为什么使用Hook,引入Hook的原因并没有说清。最后决定从0开始学习Hook机制,并尝试写一篇详细的适合入门的文章。让我们继续看下去吧!Let’s go!
一、Hook机制
Hook译文为钩子。对钩子的初理解为用钩子把一个东西给勾出来,那么恭喜你,你已经了解了hook是用来干什么的了。用专业点的话讲:hook能够让用户可以往计算流中的某些部分注入某些代码,而无需更改原始代码。一般来说,这些部分无法直接从外部访问,也很难接触到。
hooks分为2种,一种是添加至Tensors上的hook;一种是添加至Module上的hook。添加至Module上的hook又分为3种,分别为register_forward_pre_hook、register_forward_hook、register_backward_hook。
从字面理解hook的运行机制非常困难,我们可以通过大量的案例对hook做一个理解。

二、添加至Tensor上的Hook
2.1 AutoGrad
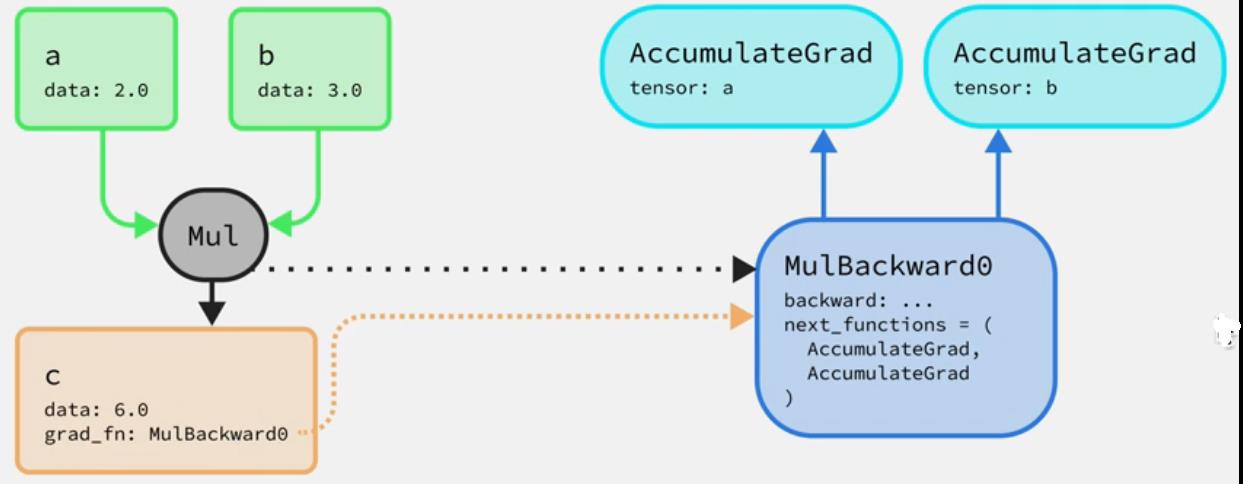
首先,我们先复习一下PyTorch的AutoGrad功能。假设有三个tensor,分别为a=2.0、b=3.0、c=ab,a、b为叶子节点,c为中间节点,叶子节点是没有grad_fn属性的。当我们将ab相乘时,得到c的值为6.0,同时也在创建一个后向图,即创建了MulBackward0的节点,同时也会创建2个AccumulatedGrad节点,分别对应tensor a和b,并将c的grad_fn指向MulBackward0节点。AccumulatedGrad节点会把反向传播过程中对应tensor的梯度做加。
注:关于AutoGrad机制,后续会单独写一篇文章来详解。
import torch
a = torch.tensor(2.0, requires_grad=True)
b = torch.tensor(3.0, requires_grad=True)
c = a * b
c.backward()
print(c)

2.2 引入hook的原因
我们将2.1的例子升级,我们添加tensor d = 4.0, 同时将c与d进行相乘,得到结果e,然后e作backward。
import torch
a = torch.tensor(2.0, requires_grad=True)
b = torch.tensor(3.0, requires_grad=True)
c = a * b
d = torch.tensor(4.0, requires_grad=True)
e = c * d
e.backward()
print(a.grad)
print(b.grad)
print(c.grad)
print(d.grad)
但当我们尝试获得tensor c的梯度时,出问题了,明明计算了tensor c的梯度,但当我们使用c.grad尝试获得tensor c的梯度时,报错了。如下:

报错的原因是什么呢?
可以看到,上图中既包含前向图和后向图,如果你想改变前向图,比如改动tensor a、b或c,打印tensor a、b、c的值,都是没问题的;但一旦调用backward() function,后向传播过程中产生的中间节点的梯度是无法保存的,所产生的梯度张量都是无法访问的,这就是为什么试图获取中间节点c的梯度时报错的原因。
2.3 Tensor hook的引入 - 基础版案例
这时候,hook就可以大展身手的,利用hook机制,将c的梯度从中勾出来。
首先,我们需要自己定义一个hook,hook的名字可以随便命名,但应符合逻辑。
import torch
if __name__ == '__main__':
    a = torch.tensor(2.0, requires_grad=True)
    b = torch.tensor(3.0, requires_grad=True)
    c = a * b
    print(c)
    # define a hook function
    def c_hook(grad):
        print(grad)
    # 为tensor c注册了hook函数
    c.register_hook(c_hook)
    c.retain_grad()
    d = torch.tensor(4.0, requires_grad=True)
    e = c * d
    e.backward()

2.4 Tensor hook的引入 - 进阶版案例
当然,我们也可以对中间节点的梯度进行改动。
import torch
if __name__ == '__main__':
    a = torch.tensor(2.0, requires_grad=True)
    b = torch.tensor(3.0, requires_grad=True)
    c = a * b
    print('c:', c)
    # define a hook function
    def c_hook(grad):
        print('before:', grad)
        return grad + 2
    # 为tensor注册了3个hook函数
    c.register_hook(c_hook)
    c.register_hook(lambda grad: print(grad))
    c.retain_grad()

    d = torch.tensor(4.0, requires_grad=True)
    d.register_hook(lambda grad: grad+100)

    e = c * d

    e.register_hook(c_hook)
    e.register_hook(lambda grad: grad * 2)
    e.retain_grad()

    e.backward()
    print(e)
三、添加至Module上的Hook
如果你已经看完了添加至Tensor上的hook的相关内容,恭喜你已经成功60%了,添加Module上的Hook较于添加Tensor上的Hook更为简单,更容易理解,继续往下看吧,阅读完,你一定会有所收获的。
在Module上添加hook的用途有2个,一是为了获取某一层的梯度,二是为了获取中间层的特征。本文中重点说明第二个用途,即获取中间层的特征。
添加至Module上的hook主要有3种,register_forward_pre_hook 、register_forward_hook 和register_backward_hook。register_backward_hook目前还有bug,也不常用,在这里就不进行详细讲解(如果以后有机会用到的话,会单独更新register_backward_hook)。只针对 register_forward_pre_hook 和 register_forward_hook 做相应的讲解。
| methods | 释义 | 函数声明 |
|---|---|---|
| register_forward_pre_hook | The hook will be called every time before forward() is invoked. 该hook将在每次调用forward()之前被调用。 |  |
| register_forward_hook | The hook will be called every time after forward() has computed an output. 该hook将在forward()计算出一个输出后,每次都会被调用。 |  |
3.1 引入hook的契机
3.1.1 求中间层的梯度
假设,我们定义一个相加的网络,如下:
import torch
import torch.nn as nn

class SumNet(nn.Module):
    def __init__(self):
        super(SumNet, self).__init__()

    @staticmethod
    def forward(a, b, c):
        return a+b+c
def main():
    sum_net = SumNet()
    a = torch.tensor(1.0, requires_grad=True)
    b = torch.tensor(2.0, requires_grad=True)
    c = torch.tensor(3.0, requires_grad=True)
    d = sum_net(a, b, c=c)
    print(d)
3.1.2 求中间层的特征输出
class convNet(nn.Module):
    def __init__(self, in_dim=3, out_dim=10):
        super(convNet, self).__init__()
        self.conv = nn.Conv2d(in_dim, out_dim, 2, stride=2)
        self.relu = nn.ReLU()
        self.flatten = lambda x: x.view(-1)
        self.fc1 = nn.Linear(160, 5)

    def forward(self, x):
        x = self.relu(self.conv(x))
        return self.fc1(self.flatten(x))
当我们尝试获取conv层的输出的时候,你或许会这么干:引入一个新的变量,并将它指向conv层的输出,无可厚非,这样做是可以的。先记住这个点,让我们继续往下看!如果像下面这种情况呢?你还会继续这么做吗?
class convNet(nn.Module):
    def __init__(self, in_dim=3, out_dim=10):
        super(convNet, self).__init__()
        self.conv = nn.Sequential(
            nn.Conv2d(in_dim, out_dim, 2, stride=2),
            nn.ReLU(),
        )
        # self.conv = nn.Conv2d(in_dim, out_dim, 2, stride=2)
        # self.relu = nn.ReLU()
        self.flatten = lambda x: x.view(-1)
        self.fc1 = nn.Linear(160, 5)

    def forward(self, x):
        # x = self.relu(self.conv(x))
        x = self.conv(x)
        return self.fc1(self.flatten(x))
当你要提取的conv层包含在nn.Sequential中呢,显然引入一个中间变量是不合适的。因为我们不想因为这个而破坏我们的网络结构。这个时候Hook就派上用场了,我们可以给conv层注册一个hook,利用该hook得到conv层的输出,而不破坏网络的结构。具体时怎么做的呢?让我们继续往下看。
3.2 引入hook – 基础版
若我们要获取convNet中conv层的输出特征,大致步骤如下:
- 1.定义一个hook,用来提取conv层的特征输出。
- 2.获取conv层在网络结构的名字,然后为该层注册一个hook
import torch
class convNet(nn.Module):
    def __init__(self, in_dim=3, out_dim=10):
        super(convNet, self).__init__()
        self.conv = nn.Sequential(
            nn.Conv2d(in_dim, out_dim, 2, stride=2),
            nn.ReLU(),
        )
        # self.conv = nn.Conv2d(in_dim, out_dim, 2, stride=2)
        # self.relu = nn.ReLU()
        self.flatten = lambda x: x.view(-1)
        self.fc1 = nn.Linear(160, 5)

    def forward(self, x):
        # x = self.relu(self.conv(x))
        x = self.conv(x)
        return self.fc1(self.flatten(x))
# define a hook
feature_map = []
def feature_hook(module, input, output):
	feature_map.append(output)
# define a network
net = convNet()
for (name, module) in net.named_modules():
    print(name) # 打印出各层的名称
    if name == 'conv.0':
    	# register a hook for hook
        module.register_forward_hook(feature_hook)
input_image = torch.rand(1,3,8,8)
output = net(input_image)
print(feature_map[0].shape)
现存网络上大多的hook教程写到这里已经结束了。但从上例中可以看到,这时我们输入的是一张图片,但我们在实际的项目中,图片不止一张,甚至多达上千张,一般要进行for循环。大家可能会理所当然的以为在最外层加个for循环不久行了吗,但这样做带来的结果是feature_map这个列表一直在append不同图像的在conv层的输出特征,这是我们不想看到的,那该如何操作呢?
3.3 引入hook – 进阶版
原理与上例基本相同,不同之处在于我们将feature_map由列表变为了字典,这样做的好处在于,每次循环后,feature_map中只包含当前输入图像的conv层的输出特征,不会出现列表一直叠加。这是因为字典的key具有唯一性,因为我们要提取的特征为conv层,因此key是相同的,每次循环后,后一张图像conv层产生的特征输出覆盖了前一张图像的conv层的特征输出。
import torch
import torch.nn as nn


class convNet(nn.Module):
    def __init__(self, in_dim=3, out_dim=10):
        super(convNet, self).__init__()
        self.conv = nn.Sequential(
            nn.Conv2d(in_dim, out_dim, 2, stride=2),
            nn.ReLU(),
        )
        self.flatten = lambda x: x.view(-1)
        self.fc1 = nn.Linear(160, 5)

    def forward(self, x):
        # x = self.relu(self.conv(x))
        x = self.conv(x)
        return self.fc1(self.flatten(x))

if __name__ == '__main__':
    # define a hook for conv
    feature_map =
    def feature_hook(modeul, input, output):
        feature_map[modeul] = output
    net = convNet()
    for (name, module) in net.named_modules():
        print(name)
        if name == 'conv.0':
            module.register_forward_hook(feature_hook)
    lst = []
    image_1 = torch.rand(1, 3, 8, 8)
    image_2 = torch.rand(1, 3, 8, 8)
    image_3 = torch.rand(1, 3, 8, 8)
    image_4 = torch.rand(1, 3, 8, 8)
    image_5 = torch.rand(1, 3, 8, 8)
    lst.append(image_1)
    lst.append(image_2)
    lst.append(image_3)
    lst.append(image_4)
    lst.append(image_5)
    for img in lst:
        output = net(img)
        print(feature_map.values())
Note:
以后内容的讲解大致分为2部分:
- 理论部分的交流会继续在CSDN社区https://dongjinkun.blog.csdn.net/。
- 实战代码部分放在我的github(https://github.com/dongjinkun/deep-learning-for-medical-image-segmentation)中,有兴趣的可以一起来交流学习呀!
以上是关于PyTorch基础(17)-- hooks机制※的主要内容,如果未能解决你的问题,请参考以下文章