kubeadm和kubectl管理
Posted LK丶旋律
tags:
篇首语:本文由小常识网(cha138.com)小编为大家整理,主要介绍了kubeadm和kubectl管理相关的知识,希望对你有一定的参考价值。
kubadm重新生成token(默认24小时就过期)
[root@k8s-server1 m44]# kubeadm token create
3vfu2y.0k9l3yma5a77c23e
范例:列出token
[root@k8s-server1 m44]# kubeadm token list
TOKEN                     TTL         EXPIRES                USAGES                   DESCRIPTION                                                EXTRA GROUPS
3vfu2y.0k9l3yma5a77c23e   23h         2021-07-27T12:17:59Z   authentication,signing   <none>                                                     system:bootstrappers:kubeadm:default-node-token
范例:添加其他任意节点,需要换新的token,其他不用修改
[root@k8s-node1 m44]# kubeadm join 172.18.8.168:6443 --token 3vfu2y.0k9l3yma5a77c23e \\
    --discovery-token-ca-cert-hash sha256:2da81f9ac3deb6a236c61fb3240ee86f3eadbd0e07c62e7301a9a96350e700be
重置
[root@k8s-server1 ~]# kubeadm reset
查看证书有效期
[root@k8s-server1 ~]# kubeadm certs check-expiration
[check-expiration] Reading configuration from the cluster...
[check-expiration] FYI: You can look at this config file with 'kubectl -n kube-system get cm kubeadm-config -o yaml'

CERTIFICATE                EXPIRES                  RESIDUAL TIME   CERTIFICATE AUTHORITY   EXTERNALLY MANAGED
admin.conf                 Jul 25, 2022 03:31 UTC   363d                                    no
apiserver                  Jul 25, 2022 03:31 UTC   363d            ca                      no
apiserver-etcd-client      Jul 25, 2022 03:31 UTC   363d            etcd-ca                 no
apiserver-kubelet-client   Jul 25, 2022 03:31 UTC   363d            ca                      no
controller-manager.conf    Jul 25, 2022 03:32 UTC   363d                                    no
etcd-healthcheck-client    Jul 25, 2022 03:31 UTC   363d            etcd-ca                 no
etcd-peer                  Jul 25, 2022 03:31 UTC   363d            etcd-ca                 no
etcd-server                Jul 25, 2022 03:31 UTC   363d            etcd-ca                 no
front-proxy-client         Jul 25, 2022 03:31 UTC   363d            front-proxy-ca          no
scheduler.conf             Jul 25, 2022 03:32 UTC   363d                                    no

CERTIFICATE AUTHORITY   EXPIRES                  RESIDUAL TIME   EXTERNALLY MANAGED
ca                      Jul 23, 2031 03:31 UTC   9y              no
etcd-ca                 Jul 23, 2031 03:31 UTC   9y              no
front-proxy-ca          Jul 23, 2031 03:31 UTC   9y              no
查看更新证书有效期
[root@k8s-server1 ~]# kubeadm certs renew --help
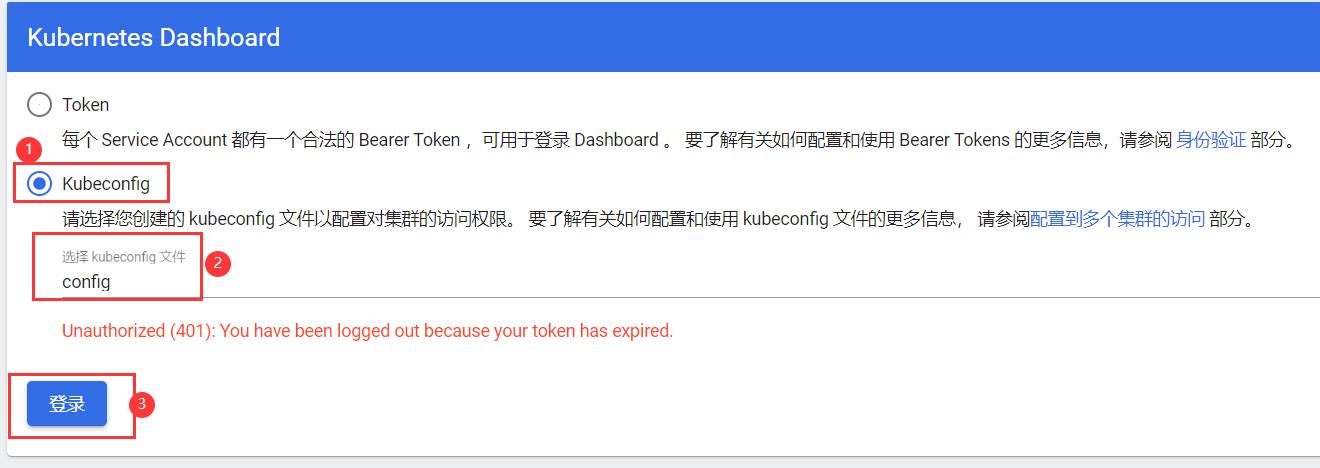
把dashboard登录制作成配置文件登录
# 找出admin-user的token
[root@k8s-server1 m44]# kubectl get secrets -A

[root@k8s-server1 m44]# kubectl describe secrets admin-user-token-5x4ml -n kubernetes-dashboard

[root@k8s-server1 m44]# cp /root/.kube/config /opt/config
[root@k8s-server1 m44]# vim /opt/config
[root@k8s-server1 m44]# cd /opt/
[root@k8s-server1 opt]# sz config
# 把token哪行复制到/root/.kube/config文件中,注意缩进
(跟client-key-data:平级),在把config文件拷贝到电脑桌面(方便测试)或者其他地方,同时要保存好,因为拥有这个文件相当于拥有k8s的最高admin权限,可以增删改查等操作,在桌面的dashboard登录时选择config文件即可
kubectl
创建
[root@k8s-server1 m44]# kubectl create -f kube-flannel.yaml
删除
[root@k8s-server1 m44]# kubectl delete -f kube-flannel.yaml
动态配置
[root@k8s-server1 m44]# kubectl apply -f kube-flannel.yaml
编辑
[root@k8s-server1 m44]# kubectl edit pod etcd-k8s-server1 -n kube-system
查看是否有什么事件发生
[root@k8s-server1 m44]# kubectl describe pod kube-proxy-57h6k -n kube-system
查看日志
[root@k8s-server1 m44]# kubectl logs -f kube-apiserver-k8s-server1 -n kube-system
进入容器
[root@k8s-server1 m44]# kubectl get pod
NAME        READY   STATUS    RESTARTS   AGE
net-test1   1/1     Running   0          13m
net-test3   1/1     Running   1          31h
net-test4   1/1     Running   1          31h
net-test5   1/1     Running   1          31h
net-test6   1/1     Running   1          26h
net-test7   1/1     Running   1          25h

[root@k8s-server1 m44]# kubectl exec -it net-test6 sh
命令行临时调整控制器的副本数
# 先查出来有哪些控制器
[root@k8s-server1 m44]# kubectl get deployment

# 命令行执行
[root@k8s-server1 m44]# kubectl scale deployment nginx-deployment --replicas=3 -n default
控制器文件使用说明??
[root@k8s-server1 m44]# kubectl explain --help
使用方法:(小写)
# 查看deployment的api版本
[root@k8s-server1 m44]# kubectl explain deployment.apiVersion
KIND:     Deployment
VERSION:  apps/v1

FIELD:    apiVersion <string>

DESCRIPTION:
     APIVersion defines the versioned schema of this representation of an
     object. Servers should convert recognized schemas to the latest internal
     value, and may reject unrecognized values. More info:
     https://git.k8s.io/community/contributors/devel/sig-architecture/api-conventions.md#resources
deployment控制器文件写法
# 这里的在文件里面都是顶格写
[root@k8s-server1 m44]# kubectl explain deployment
KIND:     Deployment
VERSION:  apps/v1

DESCRIPTION:
     Deployment enables declarative updates for Pods and ReplicaSets.

FIELDS:
   apiVersion	<string>
     APIVersion defines the versioned schema of this representation of an
     object. Servers should convert recognized schemas to the latest internal
     value, and may reject unrecognized values. More info:
     https://git.k8s.io/community/contributors/devel/sig-architecture/api-conventions.md#resources

   kind	<string>
     Kind is a string value representing the REST resource this object
     represents. Servers may infer this from the endpoint the client submits
     requests to. Cannot be updated. In CamelCase. More info:
     https://git.k8s.io/community/contributors/devel/sig-architecture/api-conventions.md#types-kinds

   metadata	<Object>
     Standard object metadata.

   spec	<Object>
     Specification of the desired behavior of the Deployment.

   status	<Object>
     Most recently observed status of the Deployment.
控制器文件查询时是以点为分隔层级
查看api等信息的当前版本
[root@k8s-server1 ~]# kubectl api-resources
NAME                              SHORTNAMES   APIVERSION                             NAMESPACED   KIND
bindings                                       v1                                     true         Binding
componentstatuses                 cs           v1                                     false        ComponentStatus
configmaps                        cm           v1                                     true         ConfigMap
endpoints                         ep           v1                                     true         Endpoints
...
创建目录
[root@k8s-server1 ~]# mkdir /opt/k8s-data/dockerfile,yaml -p
查看目录结构
[root@k8s-server1 ~]# tree /opt/k8s-data/
/opt/k8s-data/
├── dockerfile
└── yaml

2 directories, 0 files
范例:
[root@k8s-server1 ~]# cat nginx.yaml
kind: Deployment  #类型,是deployment控制器,kubectl explain  Deployment
apiVersion: extensions/v1beta1  #API版本,# kubectl explain  Deployment.apiVersion
metadata: #pod的元数据信息,kubectl explain  Deployment.metadata
  labels: #自定义pod的标签,# kubectl explain  Deployment.metadata.labels
    app: linux66-nginx-deployment-label #标签名称为app值为linux36-nginx-deployment-label,后面会用到此标签
  name: linux66-nginx-deployment #pod的名称
  namespace: linux66 #pod的namespace,默认是defaule
spec: #定义deployment中容器的详细信息,kubectl explain  Deployment.spec
  replicas: 3 #创建出的pod的副本数,即多少个pod,默认值为1
  selector: #定义标签选择器
    matchLabels: #定义匹配的标签,必须要设置
      app: linux66-nginx-selector #匹配的目标标签,
  template: #定义模板,必须定义,模板是起到描述要创建的pod的作用
    metadata: #定义模板元数据
      labels: #定义模板label,Deployment.spec.template.metadata.labels
        app: linux66-nginx-selector #定义标签,等于Deployment.spec.selector.matchLabels
    spec: #定义pod信息
      containers:#定义pod中容器列表,可以多个至少一个,pod不能动态增减容器
      - name: linux66-nginx-container1 #容器名称
        image: harbor.longxuan.net/m44/nginx-web1:v1 #镜像地址
        #command: ["/apps/tomcat/bin/run_tomcat.sh"] #容器启动执行的命令或脚本
        #imagePullPolicy: IfNotPresent #如果node有镜像就使用本地的,如果没有再下载镜像,适合用于镜像tag每次都不一样
        #imagePullPolicy: none #从不下载镜像
        imagePullPolicy: Always #拉取镜像策略
        ports: #定义容器端口列表
        - containerPort: 80 #定义一个端口
          protocol: TCP #端口协议
          name: http #端口名称
        - containerPort: 443 #定义一个端口
          protocol: TCP #端口协议
          name: https #端口名称
        env: #配置环境变量
        - name: "password" #变量名称。必须要用引号引起来
          value: "123456" #当前变量的值
        - name: "age" #另一个变量名称
          value: "18" #另一个变量的值
        resources: #对资源的请求设置和限制设置
          limits: #资源限制设置,上限
            cpu: 500m  #cpu的限制,单位为core数,可以写0.5或者500m等CPU压缩值
            memory: 2Gi #内存限制,单位可以为Mib/Gib,将用于docker run --memory参数
          requests: #资源请求的设置,# kubectl  explain deployment.spec.template.spec.containers.resources.
            cpu: 200m #cpu请求数,容器启动的初始可用数量,可以写0.5或者500m等CPU压缩值
            memory: 512Mi #内存请求大小,容器启动的初始可用数量,用于调度pod时候使用

---
kind: Service #类型为service
apiVersion: v1 #service API版本, service.apiVersion
metadata: #定义service元数据,service.metadata
  labels: #自定义标签,service.metadata.labels
    app: linux66-nginx-label #定义service标签的内容
  name: linux66-nginx-service #定义service的名称,此名称会被DNS解析
  namespace: linux66 #该service隶属于的namespaces名称,即把service创建到哪个namespace里面
spec: #定义service的详细信息,service.spec
  type: NodePort #service的类型,定义服务的访问方式,默认为ClusterIP, service.spec.type
  ports: #定义访问端口, service.spec.ports
  - name: http #定义一个端口名称
    port: 80 #service 80端口
    protocol: TCP #协议类型
    targetPort: 8080 #目标pod的端口
    nodePort: 30001 #node节点暴露的端口
  - name: https #SSL 端口
    port: 443 #service 443端口
    protocol: TCP #端口协议
    targetPort: 443 #目标pod端口
    nodePort: 30043 #node节点暴露的SSL端口
  selector: #service的标签选择器,定义要访问的目标pod
    app: linux66-nginx-selector #将流量路到选择的pod上,须等于Deployment.spec.selector.matchLabels
案例:通过Deployment创建nginx并外网可以访问
创建 (如果Deployment文件没有这个namespace名称,要么使用默认的default,要么自己创建)
[root@k8s-server1 yaml]# mkdir namespaces
[root@k8s-server1 yaml]# cd namespaces/
创建linux66namespace文件
[root@k8s-server1 namespaces]# cat nginx-namespaces.yaml
apiVersion: v1
kind: Namespace
metadata:
  name: linux66
执行
[root@k8s-server1 namespaces]# kubectl apply -f nginx-namespaces.yaml
namespace/linux66 created
查看
[root@k8s-server1 namespaces]# kubectl get ns
NAME                   STATUS   AGE
default                Active   2d9h
kube-node-lease        Active   2d9h
kube-public            Active   2d9h
kube-system            Active   2d9h
kubernetes-dashboard   Active   11h
linux66                Active   94s
创建nginx的deployment文件
[root@k8s-server1 linux66]# cat nginx-deployment.yaml
kind: Deployment
apiVersion: apps/v1
metadata:
  labels:
    app: linux66-nginx-deployment-label
  name: linux66-nginx-deployment
  namespace: linux66
spec:
  replicas: 2
  selector:
    matchLabels:
      app: linux66-nginx-selector
  template:
    metadata:
      labels:
        app: linux66-nginx-selector
    spec:
      containers:
      - name: linux66-nginx-container1
        image: harbor.longxuan.net/n520/nginx:1.18.0
        #command: ["/apps/tomcat/bin/run_tomcat.sh"] #容器启动执行的命令或脚本
        #imagePullPolicy: IfNotPresent #如果node有镜像就使用本地的,如果没有再下载镜像,适合用于镜像tag每次都不一样
        #imagePullPolicy: none #从不下载镜像
        imagePullPolicy: Always
        ports:
        - containerPort: 80
          protocol: TCP
          name: http
        - containerPort: 443
          protocol: TCP
          name: https
        env:
        - name: "password"
          value: "123456"
        - name: "age"
          value: "18"
        resources:
          limits:
            cpu: 500m
            memory: 1Gi
          requests:
            cpu: 200m
            memory: 512Mi
执行
[root@k8s-server1 linux66]# kubectl apply -f nginx-deployment.yaml
deployment.apps/linux66-nginx-deployment created
查看
[root@k8s-server1 linux66]# kubectl get pod -n linux66
NAME                                        READY   STATUS    RESTARTS   AGE
linux66-nginx-deployment-5fd697457d-h4g5w   1/1     Running   0          3m40s
linux66-nginx-deployment-5fd697457d-pgb2n   1/1     Running   0          3m40s
查看没有添加service文件的时候的ep
[root@k8s-server1 linux66]# kubectl get ep -n linux66
No resources found in linux66 namespace.
查看没有添加service文件的时候的svc
[root@k8s-server1 linux66]# kubectl get svc -n linux66
No resources found in linux66 namespace.
创建nginx的service
[root@k8s-server1 linux66]# cat nginx-service.yaml
kind: Service
apiVersion: v1
metadata:
  labels:
    app: linux66-nginx-label
  name: linux66-nginx-service
  namespace: linux66
spec:
  type: NodePort
  ports:
  - name: http
    port: 81
    protocol: TCP
    targetPort: 80
    nodePort: 30013
  - name: https
    port: 443
    protocol: TCP
    targetPort: 443
    nodePort: 30043
  selector:
    app: linux66-nginx-selector
执行
[root@k8s-server1 linux66]# kubectl apply -f nginx-service.yaml
service/linux66-nginx-service created
再查看ep
[root@k8s-server1 linux66]# kubectl get ep -n linux66
NAME                    ENDPOINTS                                                   AGE
linux66-nginx-service   10.100.1.14:443,10.100.5.5:443,10.100.1.14:80 + 1 more...   71s
查看svc
[root@k8s-server1 linux66]# kubectl get svc -n linux66
NAME                    TYPE       CLUSTER-IP    EXTERNAL-IP   PORT(S)                      AGE
linux66-nginx-service   NodePort   10.200.24.3   <none>        81:30013/TCP,443:30043/TCP   91s
浏览器访问测试172.18.8.169:30013
范例:控制器:rc,rs,Deploy
Replication Controller:(第一代)
控制器管理pod只能写等于和不等于(= !=)

当 Pod 数量过多时,ReplicationController 会终止多余的 Pod。当 Pod 数量太少时,ReplicationController 将会启动新的 Pod。 与手动创建的 Pod 不同,由 ReplicationController 创建的 Pod 在失败、被删除或被终止时会被自动替换。 例如,在中断性维护(如内核升级)之后,你的 Pod 会在节点上重新创建。 因此,即使你的应用程序只需要一个 Pod,你也应该使用 ReplicationController 创建 Pod。 ReplicationController 类似于进程管理器,但是 ReplicationController 不是监控单个节点上的单个进程,而是监控跨多个节点的多个 Pod。
创建:
[root@k8s-server1 case1]# cat rc.yaml
apiVersion: v1
kind: ReplicationController
metadata:
  name: ng-rc
spec:
  replicas: 2
  selector:
    app: ng-rc-80
  template:
    metadata:
      labels:
        app: ng-rc-80
    spec:
      containers:
      - name: nginx-rc-80
        image: harbor.longxuan.net/n520/nginx:1.18.0
        ports:
        - containerPort: 80
执行
[root@k8s-server1 case1]# kubectl apply -f rc.yaml
replicationcontroller/ng-rc created
查看
[root@k8s-server1 case1]# kubectl get pod
NAME          READY   STATUS    RESTARTS   AGE
net-test1     1/1     Running   1          23h
ng-rc-58srb   1/1     Running   0          9s
ng-rc-vlqp8   1/1     Running   0          9s
ReplicaSet(第二代)
ReplicaSet 的目的是维护一组在任何时候都处于运行状态的 Pod 副本的稳定集合。 因此,它通常用来保证给定数量的、完全相同的 Pod 的可用性

RepicaSet 是通过一组字段来定义的,包括一个用来识别可获得的 Pod 的集合的选择算符、一个用来标明应该维护的副本个数的数值、一个用来指定应该创建新 Pod 以满足副本个数条件时要使用的 Pod 模板等等。 每个 ReplicaSet 都通过根据需要创建和 删除 Pod 以使得副本个数达到期望值, 进而实现其存在价值。当 ReplicaSet 需要创建新的 Pod 时,会使用所提供的 Pod 模板。

ReplicaSet 通过 Pod 上的 metadata.ownerReferences 字段连接到附属 Pod,该字段给出当前对象的属主资源。 ReplicaSet 所获得的 Pod 都在其 ownerReferences 字段中包含了属主 ReplicaSet 的标识信息。正是通过这一连接,ReplicaSet 知道它所维护的 Pod 集合的状态, 并据此计划其操作行为。

ReplicaSet 使用其选择算符来辨识要获得的 Pod 集合。如果某个 Pod 没有 OwnerReference 或者其 OwnerReference 不是一个 控制器,且其匹配到 某 ReplicaSet 的选择算符,则该 Pod 立即被此 ReplicaSet 获得。
创建
[root@k8s-server1 case1]# cat rs.yaml
apiVersion: apps/v1
kind: ReplicaSet
metadata:
  name: frontend
  namespace: linux66
spec:
  replicas: 2
  selector:
    matchExpressions:
      - key: app, operator: In, values: [ng-rs-81,ng-rs-82]
  template:
    metadata:
      labels:
        app: ng-rs-81
    spec:
      containers:
      - name: ng-rs-81
        image: nginx:1.16.1
        ports:
        - containerPort: 80
执行
[root@k8s-server1 case1]# kubectl apply -f rs.yaml
replicaset.apps/frontend created
查看
[root@k8s-server1 case1]# kubectl get pod -n linux66
NAME                                        READY   STATUS    RESTARTS   AGE
frontend-7fh7c                              1/1     Running   0          56s
frontend-mvdqd                              1/1     Running   0          56s
linux66-nginx-deployment-5fd697457d-h4g5w   1/1     Running   0          44m
linux66-nginx-deployment-5fd697457d-twpw6   1/1     Running   0          30m
Deployment(第三代是目前主流使用)
比rs更高一级的控制器,除了有rs的功能之外,还有很多高级功能,比如最重要的滚动升级,回滚等

一个 Deployment 为 Pods 和 ReplicaSets 提供声明式的更新能力。

你负责描述 Deployment 中的 目标状态,而 Deployment 控制器(Controller) 以受控速率更改实际状态, 使其变为期望状态。你可以定义 Deployment 以创建新的 ReplicaSet,或删除现有 Deployment, 并通过新的 Deployment 收养其资源。
Deployment案例在上面
service
实现外网访问k8s
将运行在一组 Pods 上的应用程序公开为网络服务的抽象方法。
使用 Kubernetes,你无需修改应用程序即可使用不熟悉的服务发现机制。 Kubernetes 为 Pods 提供自己的 IP 地址,并为一组 Pod 提供相同的 DNS 名, 并且可以在它们之间进行负载均衡
访问流程:
外网访问k8s:比如nginx做动静分离的,同时nginx又是我们的访问入口,在service文件中类型改成nodeport,在宿主机指定端口,客户端---》防火墙---》haproxy(负载均衡器)---》nodeport---》nginx的service---》基于label匹配后端的pod---》然后到nginx,这样用户的请求就到了k8s里面的nginx上了,---》通过location,server_name或者url,然后判断是处理静态还是动态资源,如果是静态请求,直接nginx响应请求,如果是动态就转发Tomcat,---》Tomcat的service

内网访问:service文件中类型就不用nodeport,直接使用ClusterIP,也只有访问入口需要需要添加nodeport
范例:volume挂载
Container 中的文件在磁盘上是临时存放的,这给 Container 中运行的较重要的应用 程序带来一些问题。问题之一是当容器崩溃时文件丢失。kubelet 会重新启动容器, 但容器会以干净的状态重启。 第二个问题会在同一 Pod 中运行多个容器并共享文件时出现。 Kubernetes 卷(Volume) 这一抽象概念能够解决这两个问题。
emptyDir
当Pod被分配给节点时,首先创建emptyDir卷,并且只要该Pod在该节点上运行,该卷就会存在。正如卷的名字所述,它最初是
空的。Pod中的容器可以读取和写入emptyDir卷中的相同文件,尽管该卷可以挂载到每个容器中的相同或不同路径上。当出于任
何原因从节点中删除Pod时,emptyDir中的数据将被永久删除。

/var/lib/kubelet/pods/$lD/volumes/kubernetes.io"empty-dir/cache-vo lume/$FILE
hostPath
hostPath 卷将主机节点的文件系统中的文件或目录挂载到集群中,pod删除的时候,卷不会被删除
案例:安装nfs
[root@harbor ~]# apt install nfs-server
创建
[root@harbor ~]# mkdir -p /data/k8sdata/m44
设置挂载目录
[root@harbor ~]# vim /etc/exports
/data/k8sdata *(rw,no_root_squash)
测试
[root@harbor ~]# exportfs -av
exportfs: /etc/exports [1]: Neither 'subtree_check' or 'no_subtree_check' specified for export "*:/data/k8sdata".
  Assuming default behaviour ('no_subtree_check').
  NOTE: this default has changed since nfs-utils version 1.0.x

exporting *:/data/k8sdata
[root@harbor ~]# showmount -e 172.18.8.139
Export list for 172.18.8.139:
/data/k8sdata *
nfs服务查看
[root@harbor ~]# ll /data/k8sdata/m44/wc.js
-rw-r--r-- 1 root root 685 Jul 27 14:30 /data/k8sdata/m44/wc.js
k8s单个nfs节点以及挂载单个文件目录
[root@k8s-server1 case1]# cat deploy_nfs.yml
#apiVersion: extensions/v1beta1
apiVersion: apps/v1
kind: Deployment
metadata:
  name: nginx-deployment
spec:
  replicas: 2
  selector:
    matchLabels:
      app: ng-deploy-80
  template:
    metadata:
      labels:
        app: ng-deploy-80
    spec:
      containers:
      - name: ng-deploy-80
        image: harbor.longxuan.net/n520/nginx:1.18.0
        ports:
        - containerPort: 80
        volumeMounts:
        - mountPath: /usr/share/nginx/html/mysite
          name: my-nfs-volume
#        - mountPath: /usr/share/nginx/html/static
#          name: static-dir
      - name: ng-tomcat-8080
        image: harbor.longxuan.net/n520/tomcat:v1
        ports:
        - containerPort: 8080
        volumeMounts:
        - mountPath: /data/tomcat/static
          name: my-nfs-volume
      volumes:
      - name: my-nfs-volume
        nfs:
          server: 172.18.8.139
          path: /data/k8sdata/m44
#      - name: static-dir
#        nfs:
#          server: 172.18.8.149
#          path: /data/m44/static

---
apiVersion: v1
kind: Service
metadata:
  name: ng-deploy-80
spec:
  ports:
  - name: http
    port: 81
    targetPort: 80
    nodePort: 30066
    protocol: TCP
  type: NodePort
  selector:
    app: ng-deploy-80
执行
[root@k8s-server1 case1]# kubectl apply -f deploy_nfs.yml
deployment.apps/nginx-deployment created
service/ng-deploy-80 created
查看
[root@k8s-server1 case1]# kubectl get pod
NAME                                READY   STATUS    RESTARTS   AGE
net-test1                           1/1     Running   2          2d
net-test3                           1/1     Running   4          3d7h
net-test4                           1/1     Running   4          3d7h
net-test5                           1/1     Running   4          3d7h
net-test6                           1/1     Running   4          3d1h
net-test7                           1/1     Running   4          3d1h
ng-rc-58srb                         1/1     Running   0          24h
ng-rc-vlqp8                         1/1     Running   0          24h
nginx-deployment-7c698f5b64-9k8n2   2/2     Running   0          2m24s
nginx-deployment-7c698f5b64-ndlzm   2/2     Running   0          8m33s
登录Tomcat的容器,上传图片到
root@nginx-deployment-7c698f5b64-ndlzm:/data/tomcat/static# pwd
/data/tomcat/static
测试登陆:http://172.18.8.169:30066 这是访问nginx默认页面
http://172.18.8.169:30066/mysite/wc.js 这是访问Tomcat页面,其实这是已经上传到存储上面的图片
configMap
可以给k8s提供容器配置文件

可以给k8s提供系统级别的环境变量

ConfigMap 是一种 API 对象,用来将非机密性的数据保存到键值对中。使用时, Pods 可以将其用作环境变量、命令行参数或者存储卷中的配置文件。
创建
[root@k8s-server1 case1]# cat nginx-configmap.yaml
apiVersion: v1
kind: ConfigMap
metadata:
  name: nginx-config
data:
  default: |
     server
         listen 80;
         server_name www.longxuan.net;
         index  index.html;

         location /
             root /data/nginx/html;
             if (!-e $request_filename)
                 rewrite ^/(.*) /index.html last;


---
apiVersion: apps/v1
kind: Deployment
metadata:
  name: nginx-deployment
spec:
  replicas: 1
  selector:
    matchLabels:
      app: ng-deploy-80
  template:
    metadata:
      labels:
        app: ng-deploy-80
    spec:
      containers:
      - name: ng-deploy-80
        image: harbor.longxuan.net/n520/nginx:1.18.0
        ports:
        - containerPort: 80
        volumeMounts:
        - name: nginx-config
          mountPath: /etc/nginx/conf.d
      volumes:
      - name: nginx-config
        configMap:
          name: nginx-config
          items:
            - key: default
              path: mysite.conf

---
apiVersion: v1
kind: Service
metadata:
  name: ng-deploy-80
spec:
  ports:
  - name: http
    port: 88
    targetPort: 80
    nodePort: 30023
    protocol: TCP
  type: NodePort
  selector:
    app: ng-deploy-80
执行(指定namespace)
[root@k8s-server1 case1]# kubectl apply -f nginx-configmap.yaml -n linux66
configmap/nginx-config unchanged
deployment.apps/nginx-deployment unchanged
service/ng-deploy-80 created
查看
[root@k8s-server1 case1]# kubectl get pod -n linux66
NAME                                        READY   STATUS    RESTARTS   AGE
frontend-7fh7c                              1/1     Running   0          36h
frontend-mvdqd                              1/1     Running   0          36h
linux66-nginx-deployment-5fd697457d-h4g5w   1/1     Running   0          37h
linux66-nginx-deployment-5fd697457d-twpw6   1/1     Running   0          36h
nginx-deployment-6cc855df9c-lr9lx           1/1     Running   0          26s
进入nginx-deployment-xxx容器查看
root@nginx-deployment-6cc855df9c-lr9lx:/# ls /etc/nginx/conf.d/mysite.conf
/etc/nginx/conf.d/mysite.conf

root@nginx-deployment-6cc855df9c-lr9lx:/# cat /etc/nginx/conf.d/mysite.conf
server
    listen 80;
    server_name www.longxuan.net;
    index  index.html;

    location /
        root /data/nginx/html;
        if (!-e $request_filename)
            rewrite ^/(.*) /index.html last;
StatefulSets
StatefulSet 是用来管理有状态应用的工作负载 API 对象。

StatefulSet 用来管理 Deployment 和扩展一组 Pod,并且能为这些 Pod 提供序号和唯一性保证。

和 Deployment 相同的是,StatefulSet 管理了基于相同容器定义的一组 Pod。但和 Deployment 不同的是,StatefulSet 为它们的每个 Pod 维护了一个固定的 ID。这些 Pod 是基于相同的声明来创建的,但是不能相互替换:无论怎么调度,每个 Pod 都有一个永久不变的 ID。

StatefulSet 和其他控制器使用相同的工作模式。你在 StatefulSet 对象 中定义你期望的状态,然后 StatefulSet 的 控制器 就会通过各种更新来达到那种你想要的状态。
DaemonSet
DaemonSet 确保全部(或者某些)节点上运行一个 Pod 的副本。 当有节点加入集群时, 也会为他们新增一个 Pod 。 当有节点从集群移除时,这些 Pod 也会被回收。删除 DaemonSet 将会删除它创建的所有 Pod。

DaemonSet 的一些典型用法:

在每个节点上运行集群守护进程
在每个节点上运行日志收集守护进程
在每个节点上运行监控守护进程
一种简单的用法是为每种类型的守护进程在所有的节点上都启动一个 DaemonSet。 一个稍微复杂的用法是为同一种守护进程部署多个 DaemonSet;每个具有不同的标志, 并且对不同硬件类型具有不同的内存、CPU 要求。
以上是关于kubeadm和kubectl管理的主要内容,如果未能解决你的问题,请参考以下文章