CS61A 2022 fall lab0
Posted 临风而眠
tags:
篇首语:本文由小常识网(cha138.com)小编为大家整理,主要介绍了CS61A 2022 fall lab0相关的知识,希望对你有一定的参考价值。
CS61A 2022 fall lab0:Getting Started
不得不感叹实验网站是真的高级…
我打算用ubuntu做实验
文章目录
- CS61A 2022 fall lab0:Getting Started
- Introduction
- Setup
- Walkthrough:Using the terminal
- Walkthrough:Organizing your files
- Review:Python basics
- Required: Doing the assignment
- Required:Submitting the assignment (无账号的局外人 看看热闹罢了
- Appendix:Useful Python command line options
- 一些总结
- 参考资源
Introduction
emmm 还有个顺带的目的是学英语,所以复制过来让自己也看一看一些地道的表达
This lab explains how to setup your computer to complete assignments and introduces some of the basics of Python.
This lab is required. The setup is necessary in completing all other assignments in the course.
This lab looks really long, but it’s mostly setup and learning how to use the essential tools for this class. These may seem a bit difficult now, but will quickly become second nature as we move further into the course.
become second nature 好地道的用法~
Here’s a breakdown of the major parts of the lab:
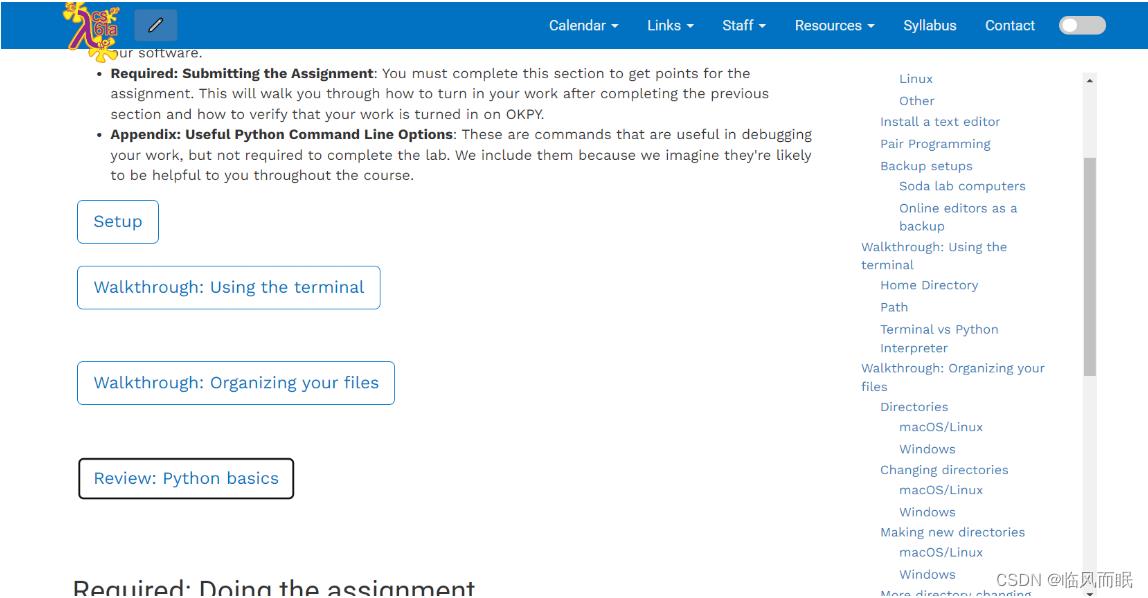
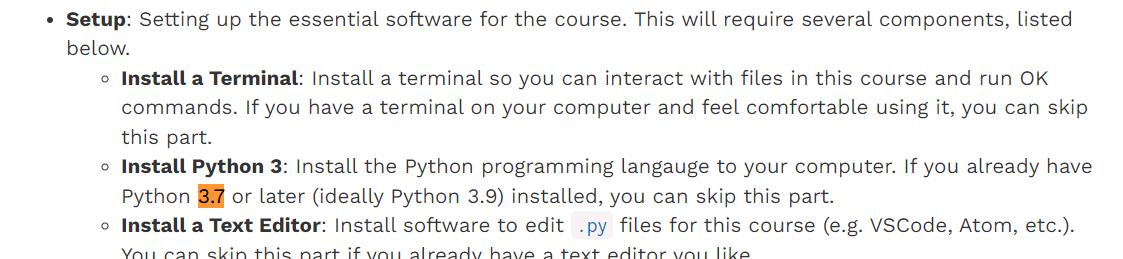
- Setup: Setting up the essential software for the course. This will require several components, listed below.
- Install a Terminal: Install a terminal so you can interact with files in this course and run OK commands. If you have a terminal on your computer and feel comfortable using it, you can skip this part.
- Install Python 3: Install the Python programming langauge to your computer. If you already have Python 3.7 or later (ideally Python 3.9) installed, you can skip this part.
- Install a Text Editor: Install software to edit
.pyfiles for this course (e.g. VSCode, Atom, etc.). You can skip this part if you already have a text editor you like.
- Walkthrough: Using the Terminal: This walks you through(walk sb through,耐心地给某人示范) how to use the terminal and Python interpreter. If you already feel comfortable with both of these you do not need to read this section.
- Walkthrough: Organizing your Files: This section walks you through how to use your terminal to organize and navigate files for this course. Everyone should at least skim(浏览) this section, as it has important information specific to this class, but if you are already comfortable navigating directory structures with a terminal much of this will feel familar.
- Review: Python Basics: This is a review on many of the basic components of Python introduced in lecture. You should have already seen this material, but we like to include a brief review of relevant content on each lab in case you need a refresher (你需要复习一下)on anything.
- Required: Doing the Assignment: You must complete this section to get points for the assignment. Here you will practice the different types of problems you will be asked to do in lab, homework, and project assignments for this course. The main goal of this assignment is to give you practice using our software.
- Required: Submitting the Assignment: You must complete this section to get points for the assignment. This will walk you through how to turn in your work after completing the previous section and how to verify that your work is turned in on OKPY.
- Appendix: Useful Python Command Line Options: These are commands that are useful in debugging your work, but not required to complete the lab. We include them because we imagine they’re likely to be helpful to you throughout the course.
Setup
lab教程真的是循序渐进,十分详实啊
1.Install a terminal
-
macOS/Linux:already have a program called
Terminal打算拿阿里云上搞的一个ubuntu来试试
-
Windows
-
Option1:WSL(the Windows subsystem for Linux)
感觉推荐这个,足见课程的先进…
-
Alternative option:Windows Powershell
-
2.Install Python 3
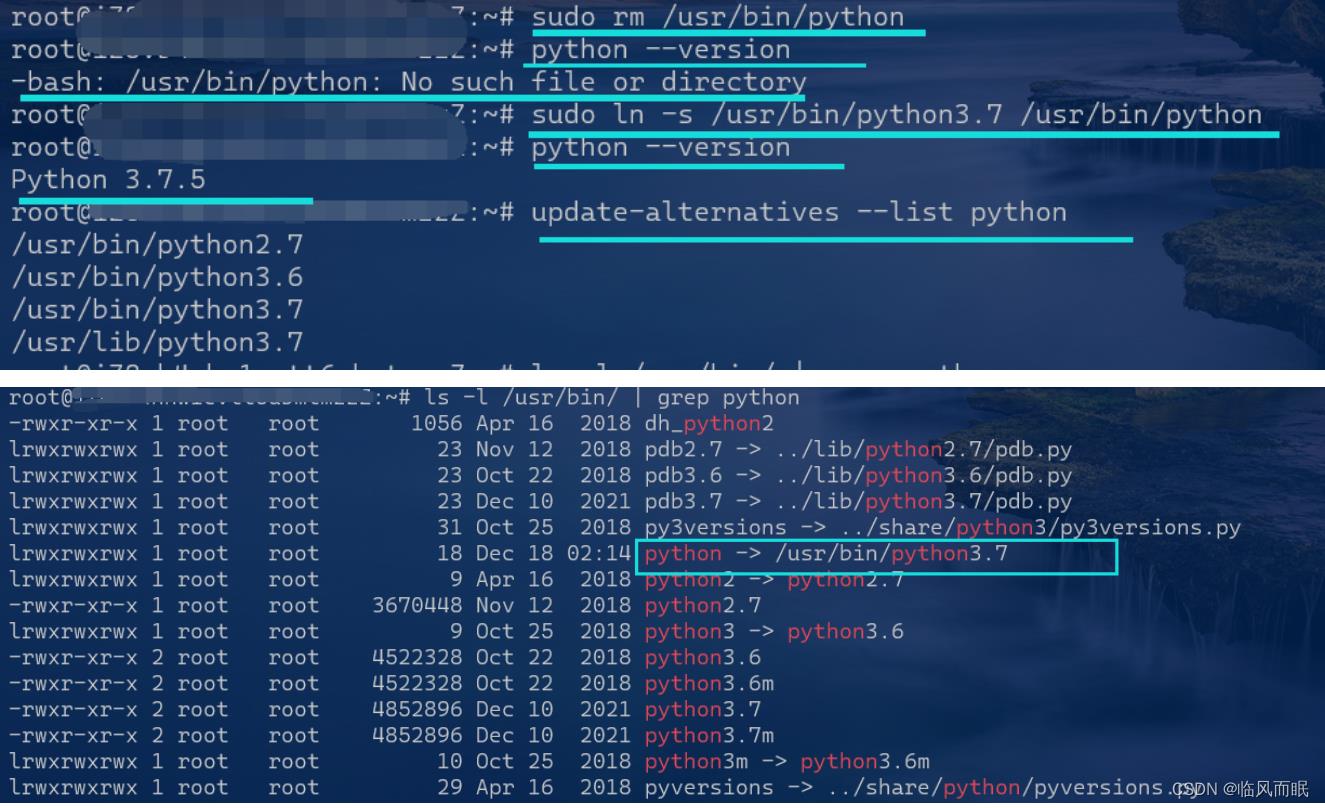
Python3.7
- 看到这里以为装3.7就行,没想到后面还得装个3.9
基于update-alternatives的Python默认版本系统级修改:屡试屡败…
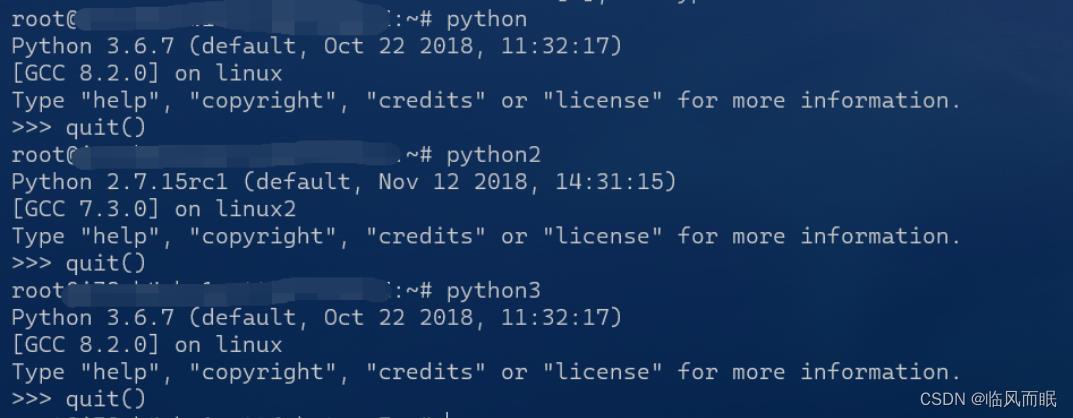
Ubuntu 18.04默认已经安装Python 2.7与Python 3.6,
-
Installing Python3
针对每种操作系统都给出了教程
-
Linux:
sudo apt install python3 -
我的阿里云服务器已经自带了,但是默认python2是python2.7.15rcl,默认的python3是python3.6

-
于是我参照这篇博客折腾了一下,将默认的设置为了3.7
-
首先看看python在哪
whereis python python: /usr/bin/python /usr/bin/python3.6m /usr/bin/python3.6 /usr/bin/python2.7 /usr/lib/python3.6 /usr/lib/python2.7 /usr/lib/python3.7 /etc/python /etc/python3.6 /etc/python2.7 /usr/local/lib/python3.6 /usr/local/lib/python2.7 /usr/share/python /usr/share/man/man1/python.1.gz -
可使用
update-alternatives来为整个系统更改 Python 版本。-
首先罗列出所有可用的 python 替代版本信息:
update-alternatives --list python
update-alternatives: error: no alternatives for python
出现以上所示的错误信息,表示 Python 的替代版本尚未被
update-alternatives命令识别 -
我们需要更新一下替代列表,将
python2.7和python3.6和python3.7放入其中update-alternatives --install /usr/bin/python python /usr/bin/python2.7 1 update-alternatives: using /usr/bin/python2.7 to provide /usr/bin/python (python) in auto mode update-alternatives --install /usr/bin/python python /usr/bin/python3.6 2 update-alternatives: using /usr/bin/python3.6 to provide /usr/bin/python (python) in auto mode update-alternatives --install /usr/bin/python python /usr/lib/python3.7 3 update-alternatives: using /usr/lib/python3.7 to provide /usr/bin/python (python) in auto mode -
我们再list一下

-
再配置一下
sudo update-alternatives --config python
There are 3 choices for the alternative python (providing /usr/bin/python).

  Selection    Path                Priority   Status
------------------------------------------------------------
* 0            /usr/lib/python3.7   3         auto mode
  1            /usr/bin/python2.7   1         manual mode
  2            /usr/bin/python3.6   2         manual mode
  3            /usr/lib/python3.7   3         manual mode

Press <enter> to keep the current choice[*], or type selection number: 3
-
-
原以为配置大功告成了,结果…麻了

-
-
python居然变成了directory…我猜是因为我的python3.7是在usr/lib/目录下,而不是在usr/bin目录下,于是去做了一些尝试
把配置调为usr/bin/python3.6,再试试

接下来分别尝试python2、python3、python指令,结果如下
去看看那个python3.7到底咋回事…

呃不知道为啥一堆乱码
再去usr/bin目录下看到了python和python3.6

-
-
得重新整理下思路了…
- 一方面python3.7得重装一下,先贴几个可能的参考资料在这
- 另一方面那个config得再研究研究
-
继续干
尝试安装python3.7失败

-
emmm 肿么办
当我转头求助这个教程的时候
试着安装
sudo apt-get install software-properties-common,如下

于是我去google这个问题:
Package 'software-properties-common' has no installation candidate,看到了一个解答

- 于是
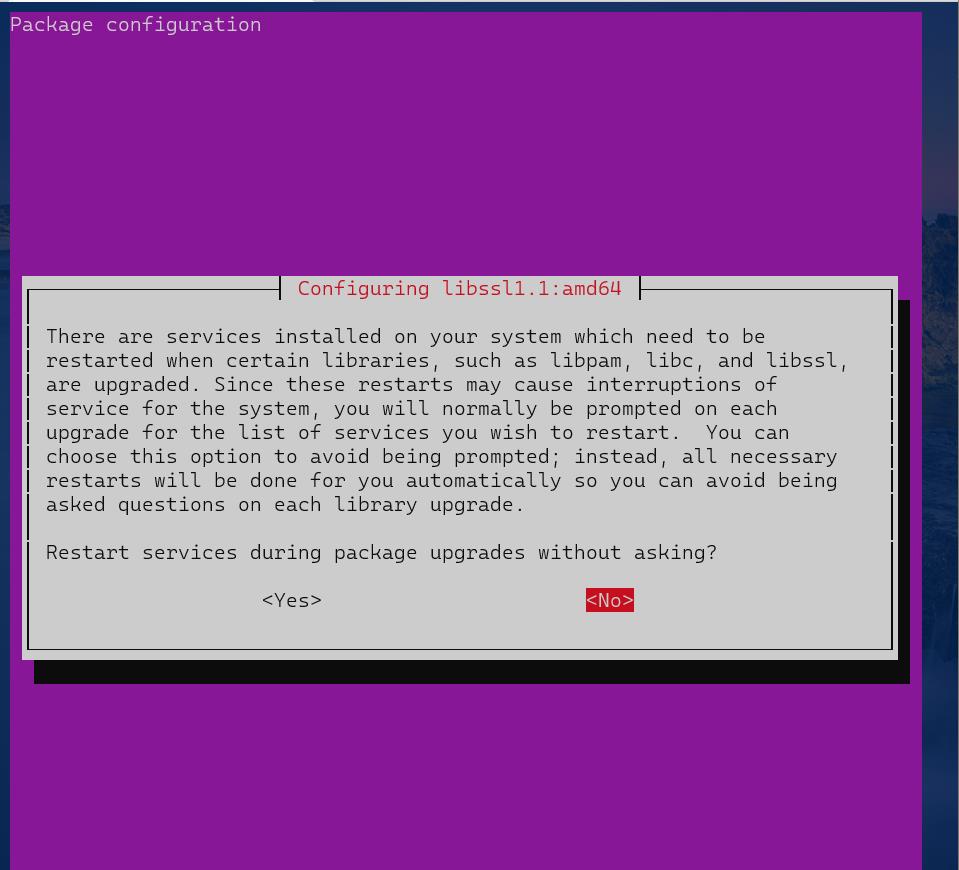
sudo apt-get update,好耶! - 然后选择yes
-
然后接着试试能不能装py3.7了
-
直接
sudo apt-get install python3.7,没有利用那个software-properties-common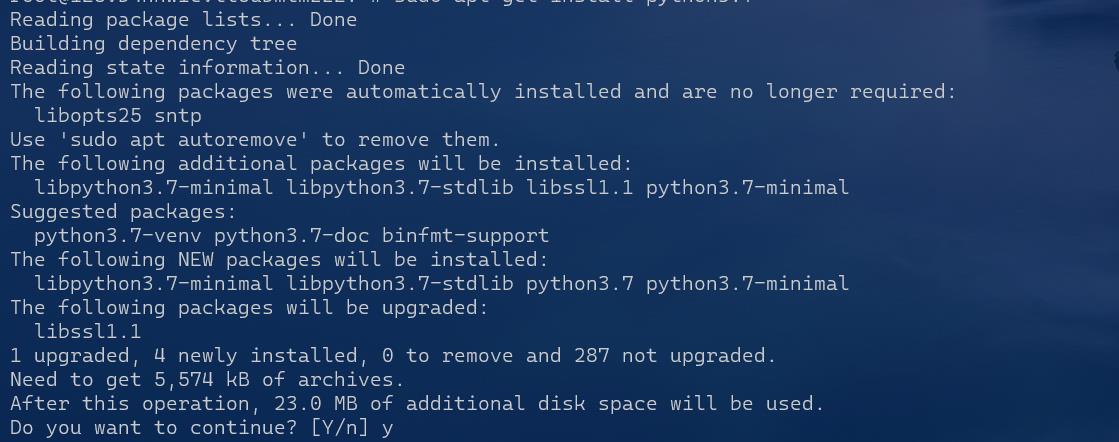
-
好耶
-
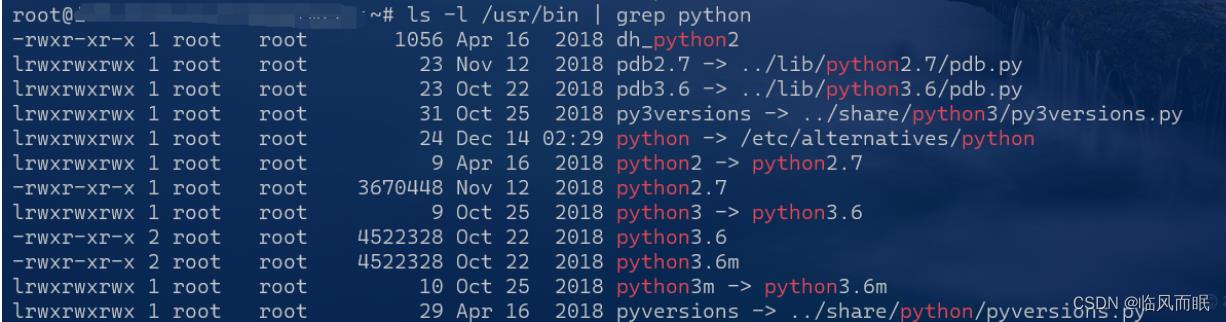
再来grep看看
ls -l /usr/bin | grep python
有python3.7了
-
有py3.7了,那么再来试试那个config
update-alternatives --list python
sudo update-alternatives --install /usr/bin/python python /usr/bin/python3.7 4
update-alternatives --list python
sudo update-alternatives --config python
选择4 : python3.7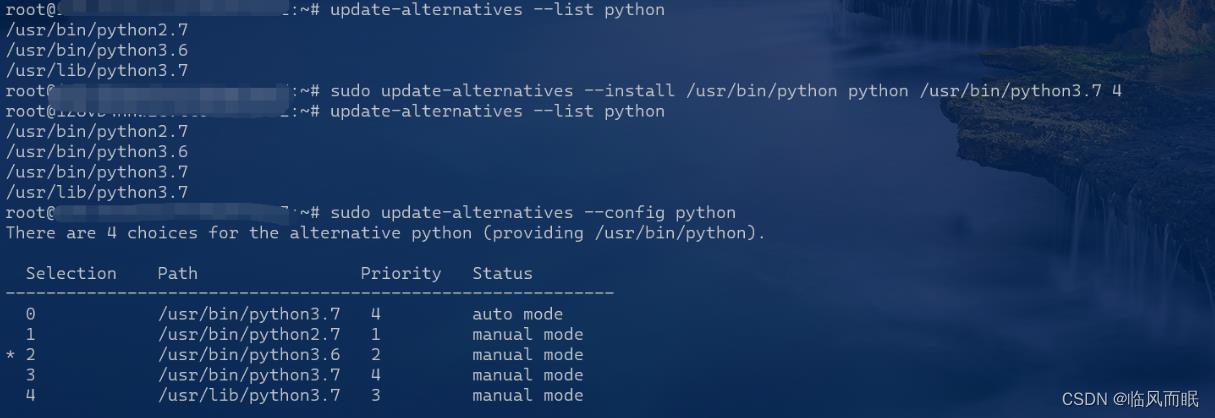
本来以为这回稳了啊…结果🐀🐀我啊👇
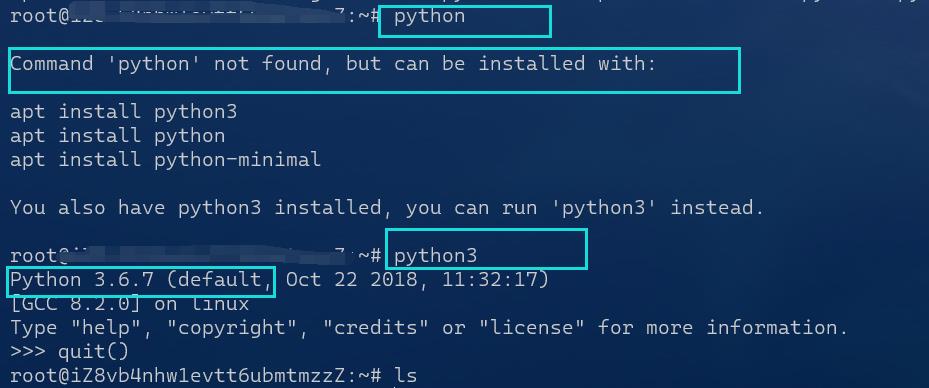
然后又去试了试设置默认为python2.7和python3.6,使用python指令的时候都没问题
-
-
人麻了
-
暂时先不去探索具体原因了呜呜
基于软链接的Python版本系统级修改
-
OTZ 感谢这个教程:https://www.linuxidc.com/Linux/2019-12/161629.htm
-
呜呜呜就照着他这个做,奇迹出现了

-
好了呜呜
Python3.9
呃好像最好还是得用3.9

-
结果
sudo apt-get install python3.9一上来就报错啦和stackoverflow上面这个问题一模一样
-
How to install python3.9 on linux ubuntu terminal?
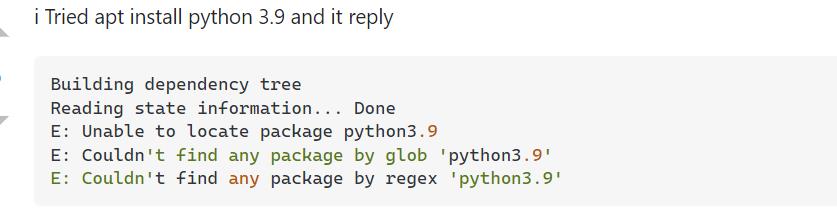
-
下面的第二个回答让我想起来前面那个提到software-properties-common的教程
sudo apt-get install software-properties-common

sudo add-apt-repository ppa:deadsnakes/ppa
sudo apt update
sudo apt install -y python3.9
然后就🆗啦

-
-
再来一遍软链接
芜湖,熟练了捏
rm /usr/bin/python
ln -s /usr/bin/python3.9 /usr/bin/python
python --version

3.Install a text editor
(1)试试vscode的 remote development
-
lab官网强推vscode
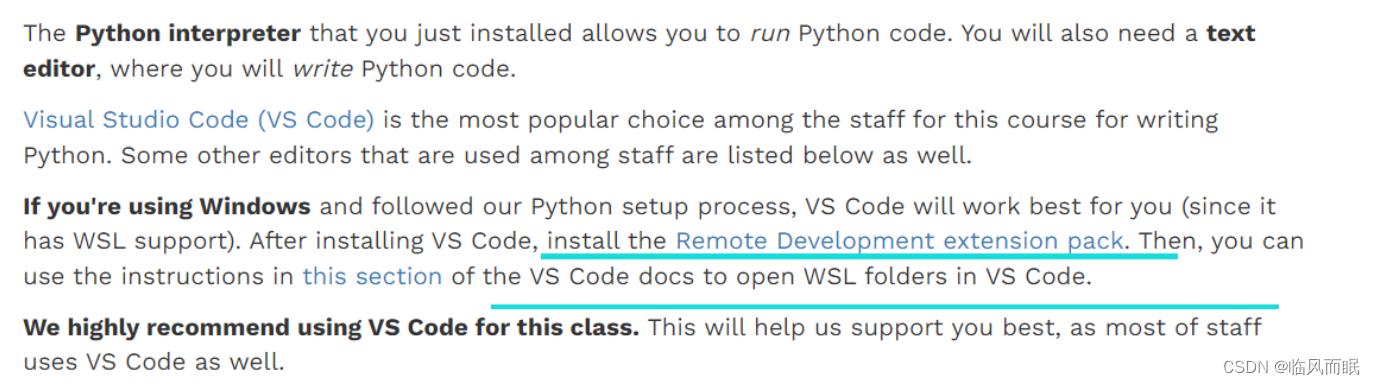
呃 vmware装上之后,我的WSL2就不能用了
它这里强推说是可以win上连接WSL,那连接我的服务器应该也可以嘿嘿
去试一试
- Another nice feature of VS Code is that it features an “embedded terminal”. So, when running terminal commands for this class, you can manage everything in VS Code rather than navigating back and forth between VS Code and a separate terminal application. You can open an embedded terminal by going to
Terminal > New Terminalin VS Code’s navigation bar.
- Another nice feature of VS Code is that it features an “embedded terminal”. So, when running terminal commands for this class, you can manage everything in VS Code rather than navigating back and forth between VS Code and a separate terminal application. You can open an embedded terminal by going to
-
可以参考VSCODE使用Remote-SSH连接远程服务器并调试_vivid_blog的博客-CSDN博客和「效率」使用VScode连接远程服务器进行开发 - 知乎 (zhihu.com)
发现edge浏览器复制网址直接带上标题
连上我的code文件夹啦
(2)学学Vim
-
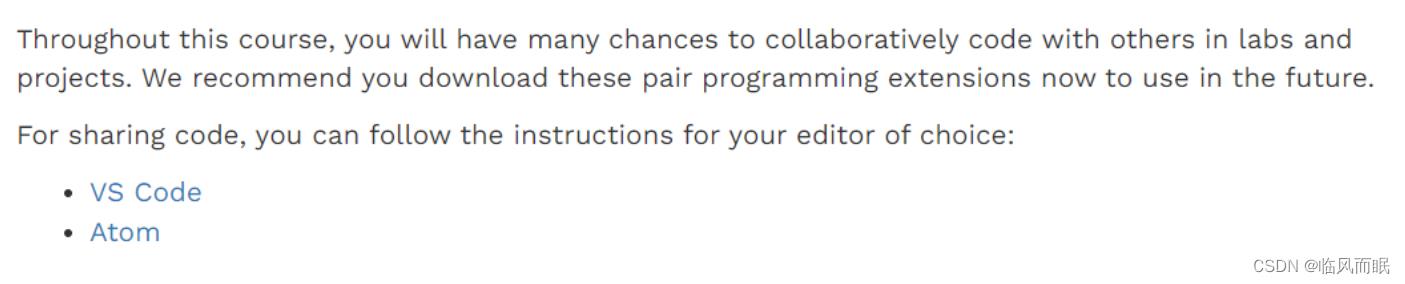
For your reference, we’ve also written some guides on using popular text editors. After you’re done with lab, you can take a look if you’re interested:
好家伙,居然这些都有写教程,打算学学vim
- Visual Studio Code: A full-featured desktop editor with many extensions available to support different languages.
- Atom: A more lightweight desktop editor.
- Vim: A command-line editor.
- Emacs: A command-line editor.
A few other editors:
- PyCharm: A desktop editor designed for Python.
- Sublime Text: A text editor that works with code.
-
CS61A官网给的VIM教程:https://cs61a.org/articles/vim/
①Introduction
Vim is a text editor known for its variety of keyboard shortcuts(快捷键) and its different editing modes. Vim is very customizable(可定制的), and there are many plugins on the internet that allow you to extend Vim’s functionality.
This guide will walk you through the basics of using Vim, but it only scratches the surface – if you like Vim, there are plenty of neat things to learn!
That being said, Vim takes some time getting used to. Chances are, you will be frustrated more than once at the beginning. If you decide to use another text editor for now, feel free to give Vim another try later.
②Goals
After reading this guide, you should be able to do the following:
- Use Vim’s normal mode, insert mode, and command mode
- Open and edit a file
- Save a file
- Quit Vim (not as straightforward as you might think)
- Use some basic Vim commands
③Getting Vim on your own computer
这里还是介绍了三种系统的,我还是用ubuntu
Ubuntu: You can install Vim by opening a terminal and typing the following:
sudo apt-get install vim
上面的已经有了,下面的vim-gtk还没装,装装看
This will install the terminal version of Vim. You can also install GVim, a graphical version of Vim, by using this command:
sudo apt-get install vim-gtk
To start GVim, type gvim into the terminal.
之后还是去我的有图形界面的vmware试试gvim吧
-
emm但是,没有图形界面好像就是不行,我使用
gvim打开的还是vim
We can also start Vim without specifying a particular file by simply typing
vim👇,直接输入vim的情况
The tildes (
~) just mean there is no text on those lines. Also, if you are greeted with some text (“VIM - Vi IMproved”), don’t worry – once we start typing, that text will go away.
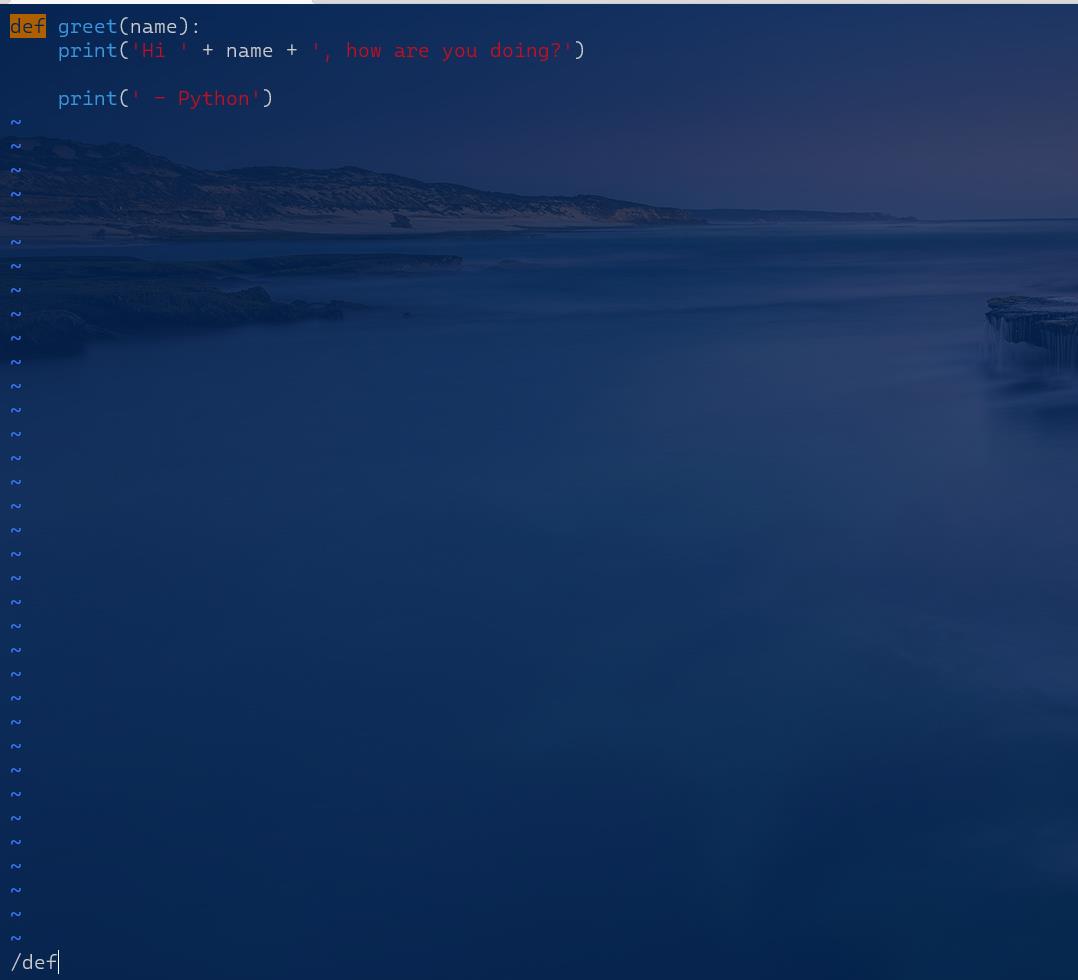
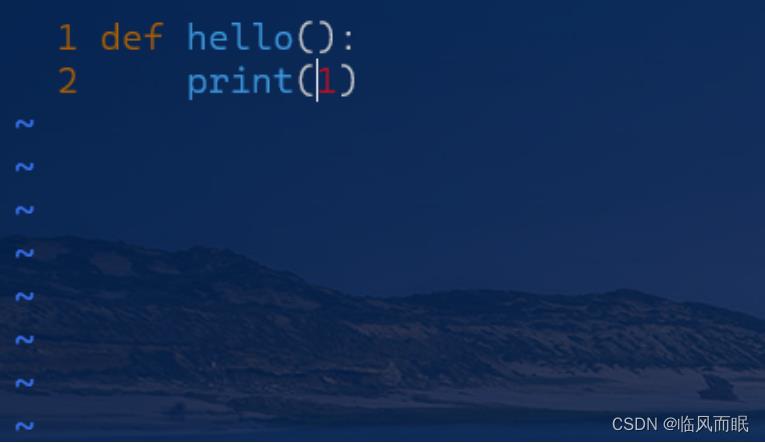
④Example: greet.py
Opening files
We can type the follwing command to open a file with Vim:
vim greet.py
Here, greet.py is the name of the file we want to edit.
- Since
greet.pydoesn’t exist , Vim will create the file for us. - If we already had a file called
greet.py, Vim would open up the existing file.
Normal mode and Insert mode
-
第一次打开vim的时候,会发现和别的text editors不一样,输入不了东西,(in fact, depending on what you pressed, a variety of things could happen).What’s going on?
-
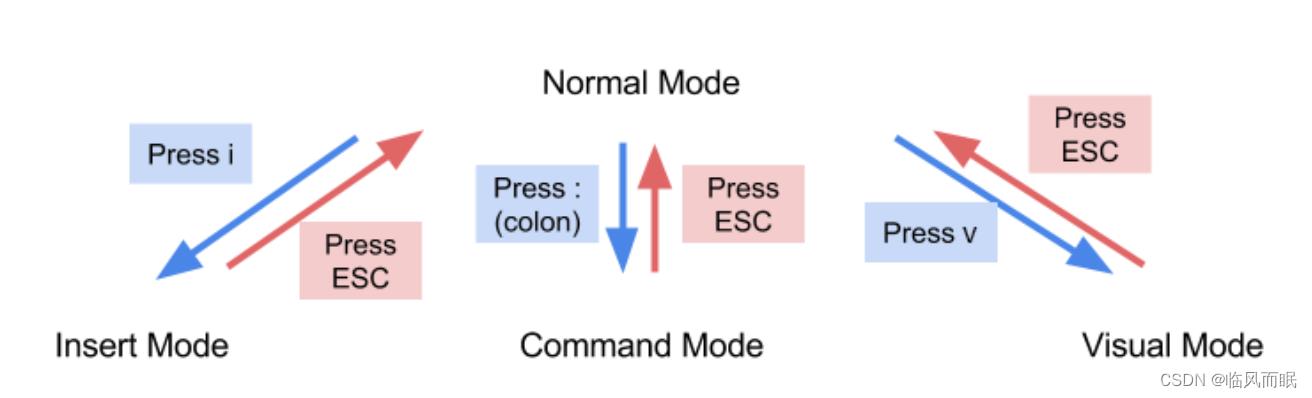
Vim has different modes,each of which allow us to do different things.
-
Normal mode allows you to use keyboard shortcuts for navigation, file manipulation(文件操作), etc. Ironically(出乎意料地,讽刺地), the one thing it doesn’t allow you to do is type normally.
哈哈哈哈,Note: Every time you open Vim, we will start in normal mode. 确实,这个模式下我们可以上下左右键移动,但是输入不了啥东西
-
Vim also has insert mode, which allows you to use Vim like a regular text editor – you press keys, and the corresponding characters will show up on the screen.
-
How to enter insert mode? Press the letter
i. -
You should see text that says
-- INSERT --This tells us we are now in insert mode! Try typing a few things to verify that the keys you press are showing up.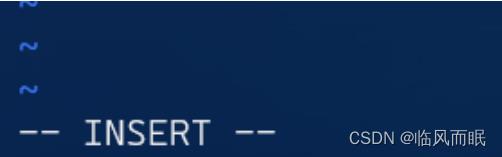
-
How to get back to normal mode? press the
ESCkey. The-- INSERT --label at the bottom should disappear.
-
-
Recap(回顾): From normal mode, you can enter insert mode by pressing
i. From insert mode, you can enter normal mode by pressingESC.
Editing files
-
Go to the insert mode and write the follwing code
def greet(name):
    print('Hi ' + name + ', how are you doing?')
    print(' - Python')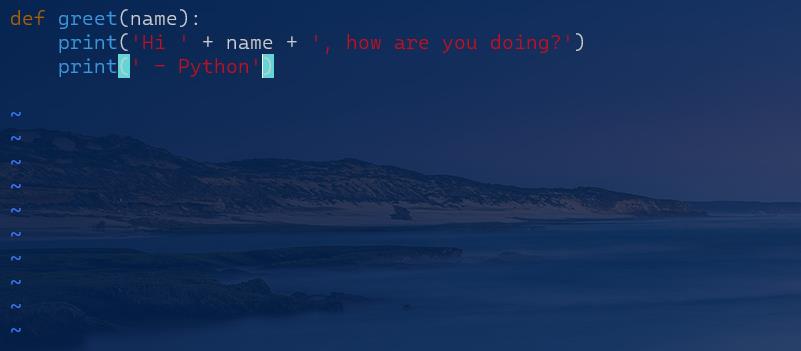
Saving files
-
To save files, we need to introduce a third Vim mode called command mode.
- 先进入 normal mode (if you are in insert mode, press
ESC). - Type in a colon (the
:key)【输入冒号】. Make sure it is not a semicolon (;)【分号】
- 先进入 normal mode (if you are in insert mode, press
-
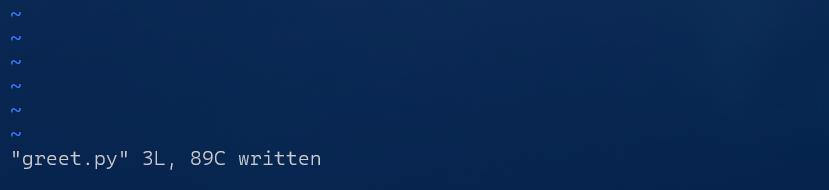
You should now see a colon appear at the bottom left of your terminal – that tells us we are in command mode!
To save the file, type the letter w and then press Enter. You should see a w show up next to the colon (make sure it is not a capital(不要搞成大写的) W). Once you press Enter, the file will be saved.
This seems like a lot of effort just to save a file, but after practicing a few times, saving a file will take (literally) just a second. Here are the steps, in full:
- Enter normal mode (press
ESC)- Enter command mode (press
:)- Press
w- Press
Enter
Running Python
-
Let’s play around with our code, strat by typing the following in terminal
python3 -i greet.pyThis command does the following:
-
python3is the command that starts Pythonemmm 我还没有把python3的默认软链接改成3.9,目前python默认是3.9,python3默认是3.6
-
The
-iflag tells Python to start in interactive mode, which allows you to type in Python commands from your terminal -
greet.pyis the name of the Python file we want to load
Notice that the Python interpreter says
>>>. This means Python is ready to take a command.Recall that we defined a function called
greet. Let’s see what it does! Type in the following:greet('chatbot')Python will then print out
Hi chatbot, how are you doing?
 - Python
Let’s close Python by typing in
exit()orquit()orctrl-d -
Closing Vim
once you are ready to exit Vim, you can quit from command mode:
- Enter command mode (by first entering normal mode, then pressing
:) - Type
q(for “quit”) - Press enter.
If you have unsaved changes, Vim will prevent you from quitting. You can either save the file first with
:w, or you can add an exclamation mark (在q后面添加一个感叹号)to theq::q!if you don’t want to save the changes. In addition, you can save and quit all in one go:(一口气保存并退出)
:wq
Once Vim exits, you will be taken back to the UNIX command line.
Summary
Here is a recap of what we’ve learned from this example
- Opening files: type
vim file_name - The difference between normal mode and insert mode
- Editing files: press
ito enter insert mode, and start typing - Saving files: enter command mode (press
:after entering normal mode) and typew - Using Python: in another terminal, type
python3 -i file_name - Closing Vim: enter command mode and type
q
Vim also has a built-in interactive guide, which you can start from the terminal by typing:
vimtutor
⑤Keyboard Shortcuts
One of the primary features of Vim is its extensive range of keyboard shortcuts. We will only describe the most basic commands here (there are too many commands to list them all out here). You can also find a more detailed list of shortcuts here, though it also only scratches the surface.
Different modes
-
a diagram that explains how to get between different Vim modes👇
-
Notice that normal mode is connected to all the other modes. This means you’ll need to switch back to normal mode – by using
ESC– a lot.
Navigating
-
In normal mode, instead of using the arrow keys(上下左右方向键) to move around, you can use the following keys:
h: leftj: downk: upl: right
Why would you want to use these instead of the arrow keys? All four of these keys are on the home row of the keyboard – you don’t even have to lift your hand! After you get used to using
hjkl, you’ll wonder how you ever had the patience to use arrow keys.Here are some other keys used for navigation:
- word:
w: moves forward to the beginning of the next wordb: moves backward to the beginning of the previous word
- lines:
0: moves to the beginning of the line$: moves to the end of the line
- document:
gg: moves to the top of the fileG: moves to the bottom of the file
这些确实方便诶,不过那个o好像会自动进入insert模式
Entering Insert mode
We’ve already seen how to enter insert mode by pressing i. There are many different ways to reach insert mode from normal mode. Here are just a few:
i: start inserting text where the cursor isa: start inserting text right after the cursorI: start inserting text at the beginning of the lineA: start inserting text at the end of the lineo: insert a new line after the current line and enter insert modeO: insert a new line before the current line and enter insert mode
Undo and redo 实用芜湖!
很好记 undo - u redo - r + Ctrl
哈哈这里不是ctrl-z
We all make mistakes. To undo a change in Vim, enter normal mode and press u. Vim remembers several levels of modifications, so you can keep pressing u to undo further and further back.
To redo a change, enter normal mode and press Ctrl-r. Again, Vim will remember multiple changes, so you can redo multiple times.
Deleting text (like cut,删了可以复制回来,相当于剪切)
好像x在normal和insert mode都可以,d还是在normal mode下面用?
The x command deletes a single character:
xdeletes the character right underneath the cursorXdeletes the character right before the cursor.
Using d provides more flexibility and range:
dddeletes the entire linedwdeletes the rest of the current word, starting from the cursorDdeletes from the cursor to the end of the line
Note: Vim’s delete functionality acts like cut – Vim remembers what you deleted, and you can immediately paste the deleted text.
Copying text
-
In Vim, copying is called “yanking.” The primary operator to yank text is
y:yy: copy the entire lineyw: copy the rest of the current word, starting from the cursor
Note: Yanking and deleting use the same buffer to store text, so they will overwrite each other.
Pasting text
- The primary key for pasting (or putting) is
p:p: pastes copied text right after cursorP(i.e.Shift-p): pastes copied text right before the cursor
Searching
There are two useful ways to search. The first is by pattern – this is done by pressing the forward slash: /. For example, if you want to search for the word def, you would type
/def
You can move through all the matches by pressing
n: moves forward through all matchesN: moves backwards through all matches
The second way is to search by line number. This is done by pressing the colon :, followed by a line number. For example, if you want to jump to line 42, you would type
:42
Note: Technically, searching by line number is a command mode option, not a normal mode option.
Visual mode
Another useful Vim mode is called visual mode. In visual mode, you can highlight multiple letters or lines and manipulate them. There are several ways to enter visual mode from normal mode:
-
v: enters regular visual mode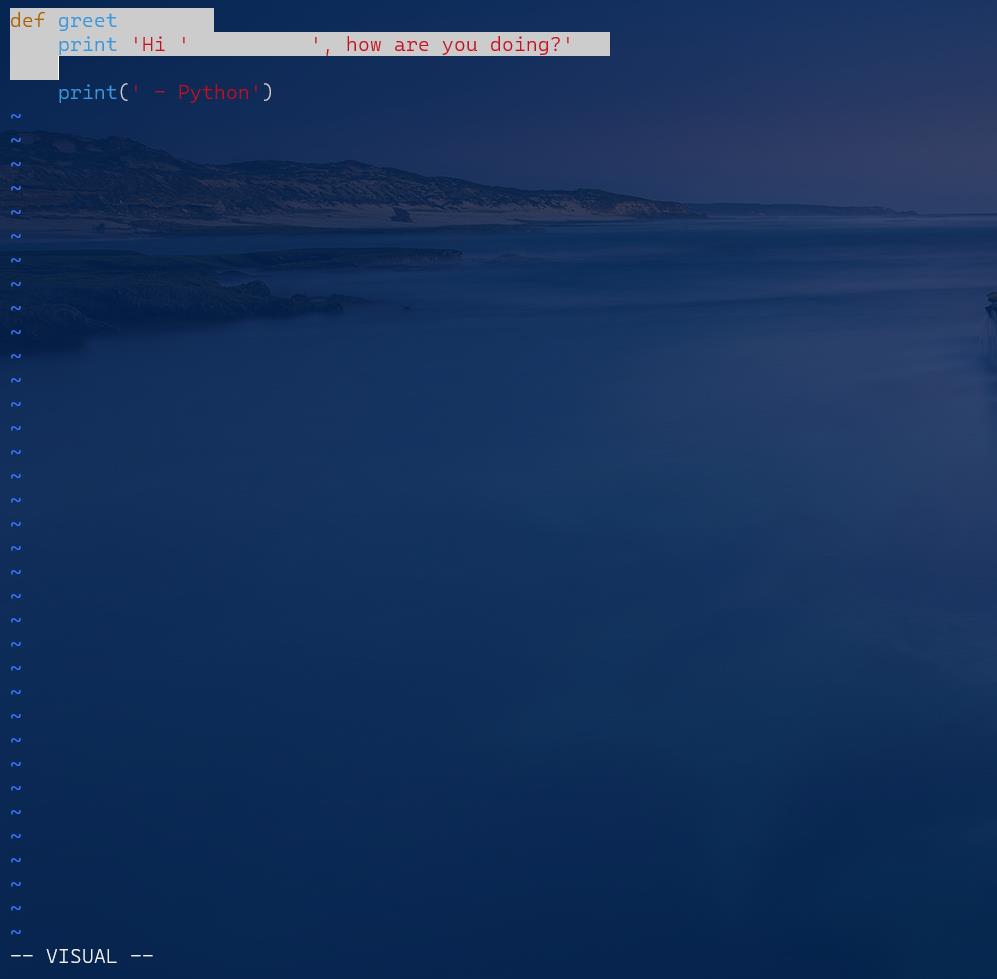
-
V(i.e.Shift-v): highlights entire lines at a time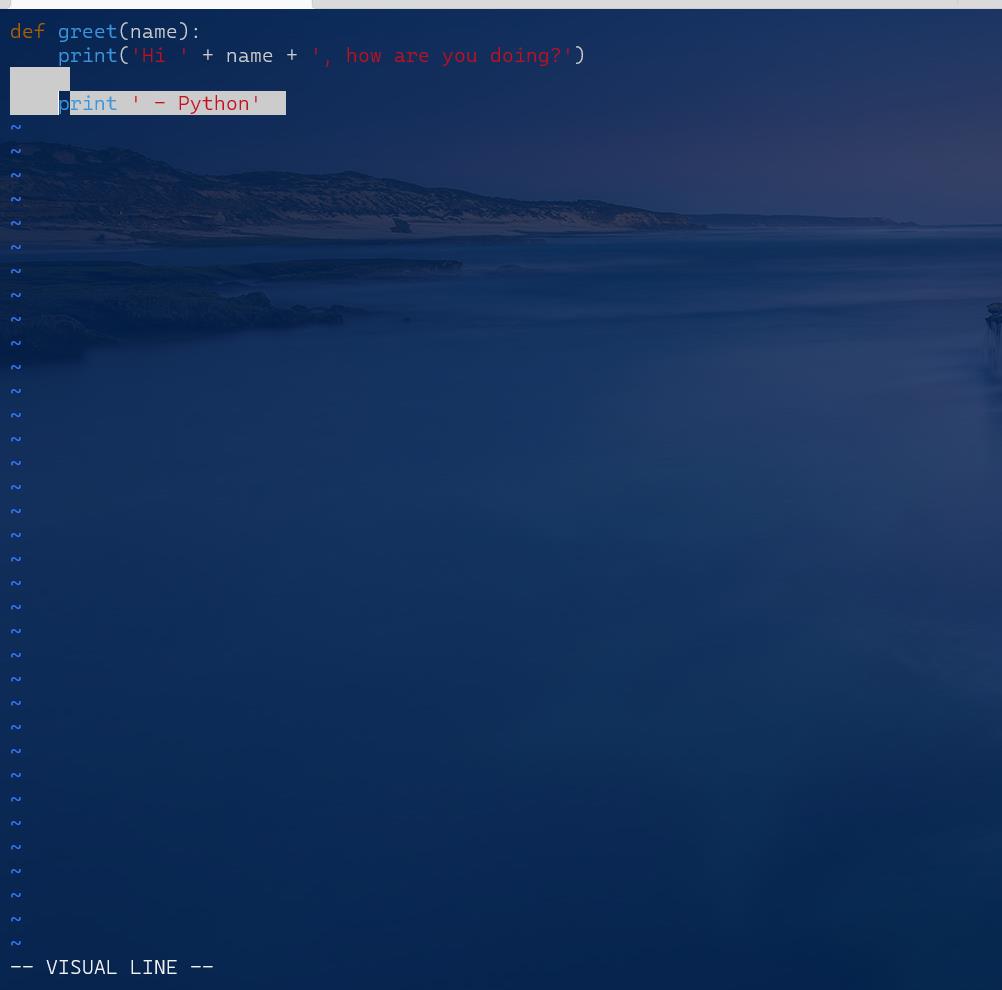
In each visual mode, you can use normal commands for various things:
- navigation (
hjkl,w, etc.) - deleting and yanking:
dwill delete all highlighted text;ywill yank all highlighted text. Both then return to normal mode
⑥Customizing Vim
Another great feature of Vim is that it allows users to easily customize it. All customizations can be saved in a file called .vimrc in your home directory. Since .vimrc is just another file, you can edit it using Vim:
vim ~/.vimrc
Syntax highlighting
All great text editors have syntax highlighting(语法高亮) to make it easier to write code. To turn on syntax highlighting for Vim, write the following line:
syntax on
You can specify the colorscheme with this command:
colorscheme default
This uses the default colorscheme, but there are many others that you can find online.
Indentation rules(缩进规则) for different file types can be turned on with:
filetype plugin indent on
Line numbers
To turn on line numbers, include the following line:
set nu
Tabs
Python is very picky about whitespace (indentation, spaces, and newlines). Here are common settings that work well with Python:
set expandtab     " Uses spaces instead of tabs
set tabstop=4     " Each tab is 4 spaces
set autoindent
Key bindings
In addition to settings, Vim allows users to define custom keyboard shortcuts. Here are some useful ones:
nnoremap ; :      " Enter command mode by typing semicolon
nnoremap j gj     " Move along rows,
nnoremap k gk     " not lines
For more help on customizing the .vimrc file, see this link.
真的太棒了CS61A OTZ Orz Or2!
4.Pair Programming
- 挺好玩的
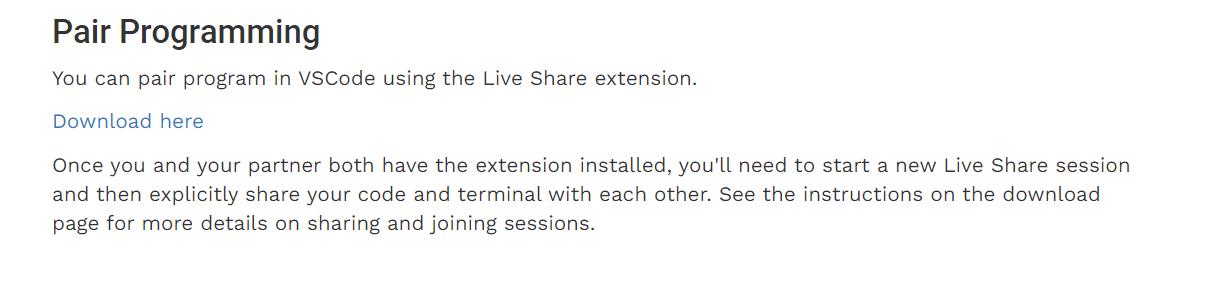
哈哈这个Live Share暑假和同学玩过,有点子卡
5.Backup setups
In case you had troubles installing a Python interpreter, text editor, and terminal, or if you are using something that does not allow you to install software, like an iPad, you can as a temporary measure do the assignments in using some of the following steps while you acquire more appropriate hardware.
-
介绍了三个在线环境,尽显高级orz
-
Soda lab computers
-
Online editors as a backup
-
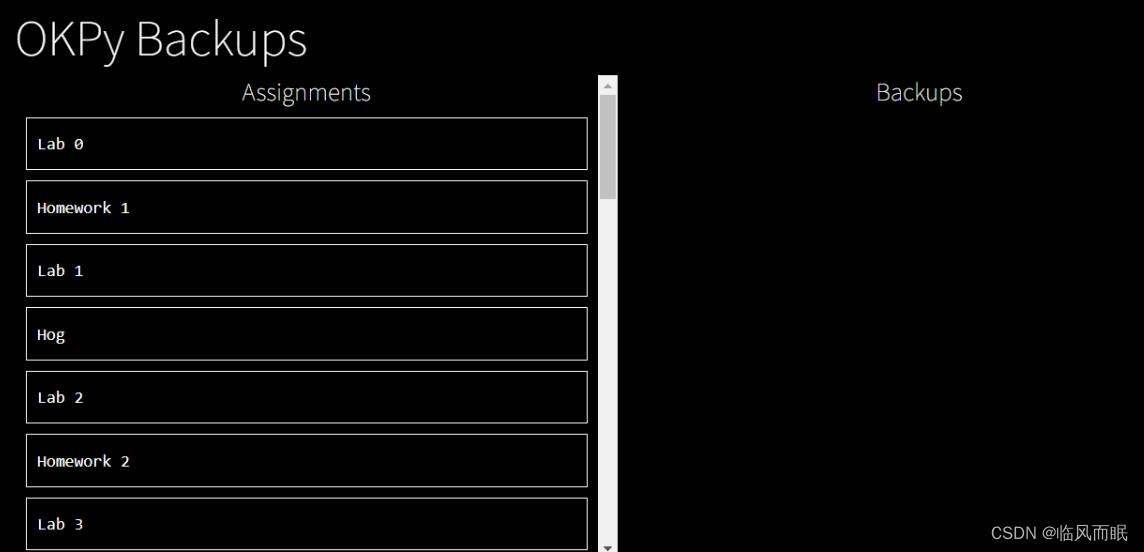
61A Code:https://code.cs61a.org/
用谷歌账号就能获得review权限orz
-
Datahub
- UC Berkeley的jupyter,搞不到权限
-
-
Walkthrough:Using the terminal
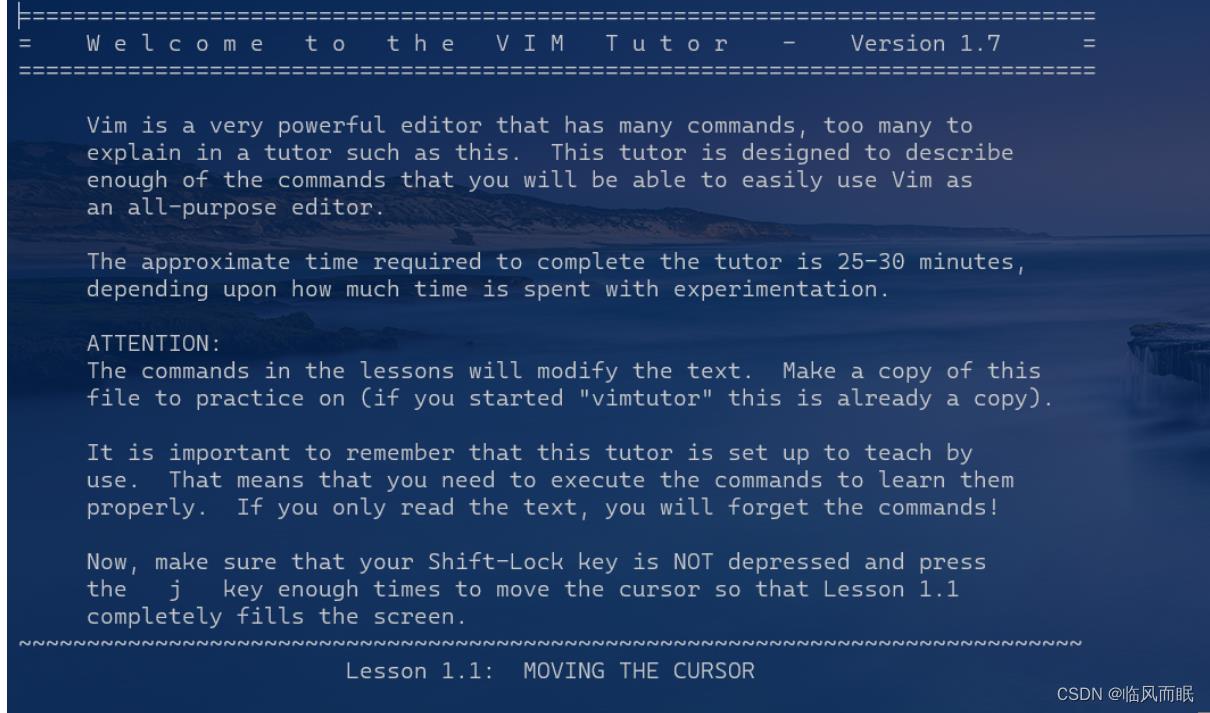
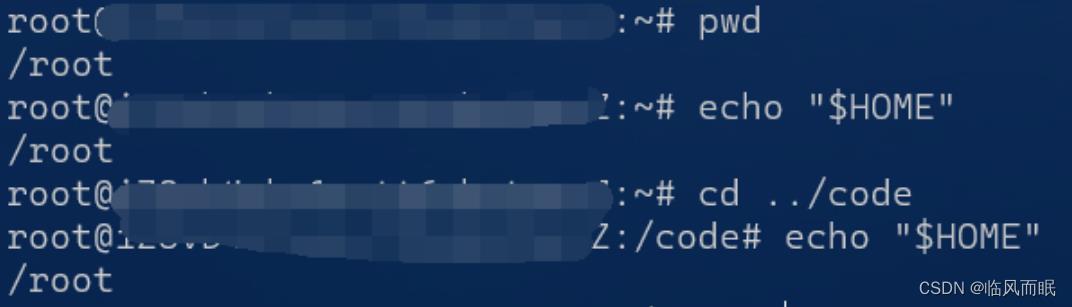
1.Home Directory
When you first open your terminal, you will start in the “home directory”. The home directory is represented by the ~ symbol, which you might see at the prompt(提示符).

Don’t worry if your terminal window doesn’t look exactly the same. The important part is that the prompt shows
$(indicating Bash) or%(indicating zsh).
Try running echo "$HOME". That command should display the full PATH to your home directory. It should look something like this:
我的服务器登录默认在root
2.Path
- A PATH is like an address: it tells both you and the computer the full path (or route) to a certain folder.
- Remember that you can access the files and directories (folders) on your computer in two different ways.
- command line interface or CLI
- graphics user interface (or GUI).
3.Terminal vs Python Interpreter
- 注意区分 别在
>>>里面输入bash命令
Walkthrough:Organizing your files
In this section, you will learn how to manage files using terminal commands.
Make sure your prompt contains a
$somewhere in it and does not begin with>>>. If it begins with>>>you are still in a Python shell, and you need to exit. See above for how.
感觉有必要转战我的ubuntu虚拟机了,没有图形界面很多东西还是不太好操作诶, 不过应该也是可以搞图形界面的吧,之前用过VNC Viewer
https://help.aliyun.com/document_detail/59330.html,说干就干,那就来吧
给阿里云轻量应用服务器配置图形界面
-
参考
-
神奇

-
芜湖
- 记得vnc viewer连的时候输入的是vnc viewer设置的密码,而不是系统密码
- 记得去控制台配置防火墙规则!
-
芜湖芜湖芜湖!!!
Directories
The first command you’ll use is ls. Try typing it in your terminal:
ls
The ls command lists all the files and folders in the current directory. A directory is another name for a folder (such as the Documents folder).
Changing directories
To move into another directory, use the cd command (change directory).
macOS/Linux
Let’s try moving into your Desktop directory. First, make sure you’re in your home directory (check for the ~ on your command line) and use ls to see if the Desktop directory is present.
Try typing the following command into your terminal, which should move you into that directory:
cd Desktop
If you’re not already in your home directory, try cd ~/Desktop. This is telling the terminal the PATH where you want to go.

Making new directories
太棒了这个教程 这个粗体标注 orz
The next command is called mkdir, which makes a new directory. Let’s make a directory called cs61a in your Desktop directory to store all of the assignments for this class:
mkdir cs61a
A folder named cs61a will appear on your Desktop. You can verify this by using the ls command again or by checking your Desktop using Explorer (Windows) or Finder (Mac).
At this point, let’s create some more directories. First, make sure you are in the cs61a directory (mac: ~/Desktop/cs61a, Windows: /mnt/c/Users/Desktop/cs61a). Then, create two new folders, one called projects and the other called lab. Both should be inside of your cs61a folder:
macOS/Linux
cd ~/Desktop/cs61a
mkdir projects
mkdir lab
Now if you list the contents of the directory (using ls), you’ll see two folders, projects and lab.
More directory changing
There are a few ways to return to the home directory:
cd ..(two dots). The..means “the parent directory”, or one directory above your current directory.cd ~(the tilde). Remember that~means home directory, so this command will always change to your home directory.cd(cdon its own). Typing justcdis a shortcut for typingcd ~.
You do not have to keep your files on your Desktop if you prefer otherwise. Where you keep your files locally will not affect your grade. Do whatever is easiest and most convenient for you!
Downloading the assignment
If you haven’t already, download the zip archive, lab00.zip, which contains all the files that you’ll need for this lab. Once you’ve done that, let’s find the downloaded file. On most computers, lab00.zip is probably located in a directory called Downloads in your home directory. Use the ls command to check:
ls ~/Downloads
将文件从windows上传到Linux上面
方法1 scp指令
scp 文件名 用户名@IP:目标路径
scp .\\lab00.zip root@我的服务器IP:/root/Desktop/cs61a/lab
- 参考:runoob scp命令
注意公网IP和ifconfig查看的不是一个:Mac/Linux查看内网ip与访问公网的ip地址
方法2 xftp 7

Extracting starter files
You must expand the zip archive before you can work on the lab files. Different operating systems and different browsers have different ways of unzipping.
-
Clicking on a .zip file in Mac will automatically unzip.
-
On Windows, you need to first click on the .zip file, then choose “Extract all”.
-
Here’s a way to unzip using the terminal:
Using a terminal, you can unzip the zip file from the command line. First,
cdinto the directory that contains the zip file:cd ~/DownloadsNow, run the
unzipcommand with the name of the zip file:unzip lab00.zip
You only need to unzip the files once.
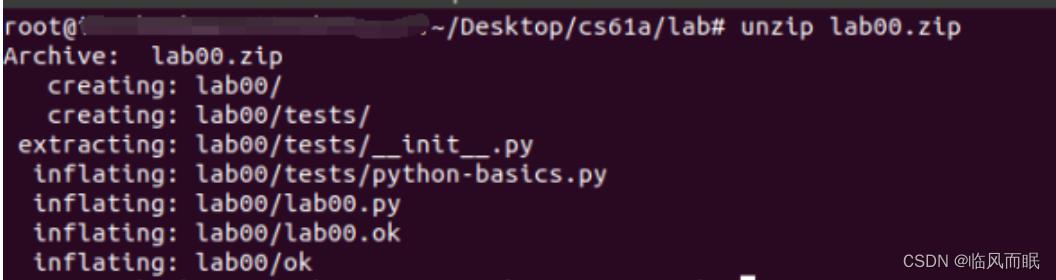
Once you unzip lab00.zip, you’ll have a new folder called lab00 which contains the following files (check it out with cd lab00 and ls):
lab00.py: The template file you’ll be adding your code took: A program used to test and submit assignmentslab00.ok: A configuration file forok

Moving files
Move the lab files to the lab folder you created earlier:
macOS/Linux
mv ~/Downloads/lab00 ~/Desktop/cs61a/lab
Windows
mv /mnt/c/Users/Desktop/lab00 /mnt/c/Users/Desktop/cs61a/lab
The mv command will move the ~/Downloads/lab00 folder into the ~/Desktop/cs61a/lab folder. If you prefer, you can also move the file by dragging and dropping it into the correct folder in your graphic file explorer, which is probably more familar and will have exactly the same result.
Now, go to the lab00 folder that you just moved. Try using cd to navigate your own way! If you get stuck, you can use the following command:
macOS/Linux
cd ~/Desktop/cs61a/lab/lab00
Windows
cd /mnt/c/Users/Desktop/cs61a/lab/lab00
Summary
Here is a summary of the commands we just went over for your reference:
ls: lists all files in the current directorycd <path to directory>: change into the specified directorymkdir <directory name>: make a new directory with the given namemv <source path> <destination path>: move the file at the given source to the given destination
Finally, you’re ready to start editing the lab files! Don’t worry if this seems complicated—it will get much easier over time. Just keep practicing! You can also take a look at our UNIX tutorial for a more detailed explanation of terminal commands.
Review:Python basics
安装vscode
虽然给阿里云那个服务器配置了一个图形界面,但是好像装不了vscode,感觉还是用我那个虚拟机做实验吧要不然
-
于是我重新配置了一个虚拟机,想把lab00.zip传过去,但是遇到了WINscp连接被拒绝的问题,参考这篇博客 解决了
-
先是看ip地址,发现用不了ifconfig
~$ ifconfig Command 'ifconfig' not found, but can be installed with: sudo apt install net-tools -
于是安装
net-toolssudo apt install net-tools -
然后查到了ip,我在Windows上面使用scp命令来传文件,结果吃瘪👇
-

-
是虚拟机没有设置ssh的问题
~$ service sshd start Failed to start sshd.service: Unit sshd.service not found. ~$ ssh localhost ssh ssh: connect to host localhost port 22: Connection refused -
于是安装
openssh-server~$ sudo apt-get install openssh-server ~$ sudo /etc/init.d/ssh start Starting ssh (via systemctl): ssh.service.
-
对于无法cd进入root路径的问题,需要给root设置一个密码
-
若要ssh scp等连接root用户,则需要再配置一下ssh
-
参考:https://blog.csdn.net/fengting1995/article/details/106131540
-
vim /etc/ssh/sshd_config
卡在里面一直出不来,一直按u返回到初始状态再按
:q才出来得先切换到root
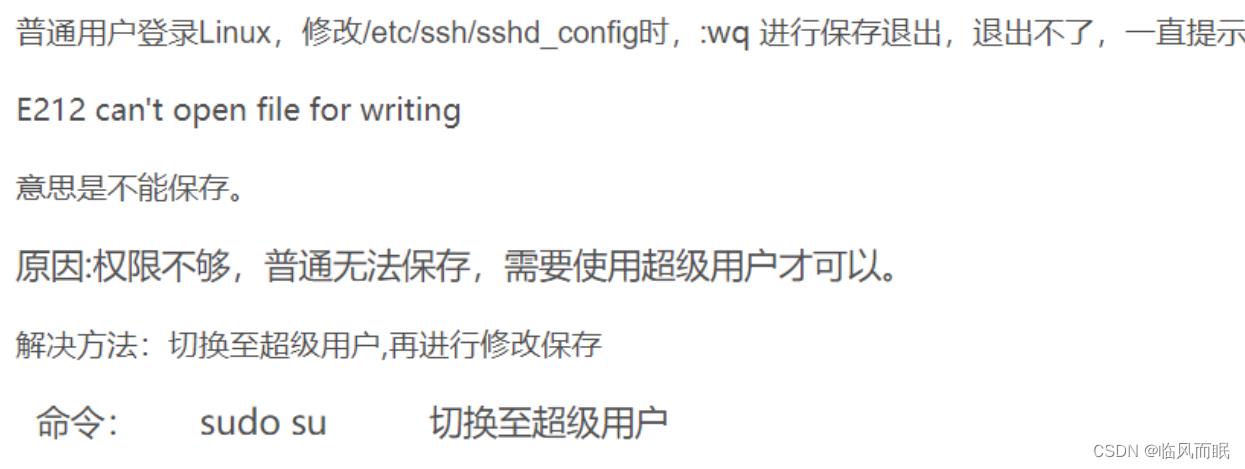
在
PermitRootLogin Prohibit-password这句话下新添加:PermitRootLogin yes

service sshd restart重启ssh服务
上面这波没切换到root,无效
下面这个切换到root vim那个文件进行修改,然后重启ssh服务,有效

xftp7连上啦

-
-
我打算直接在软件商店安装,但是当我打开软件商店的时候
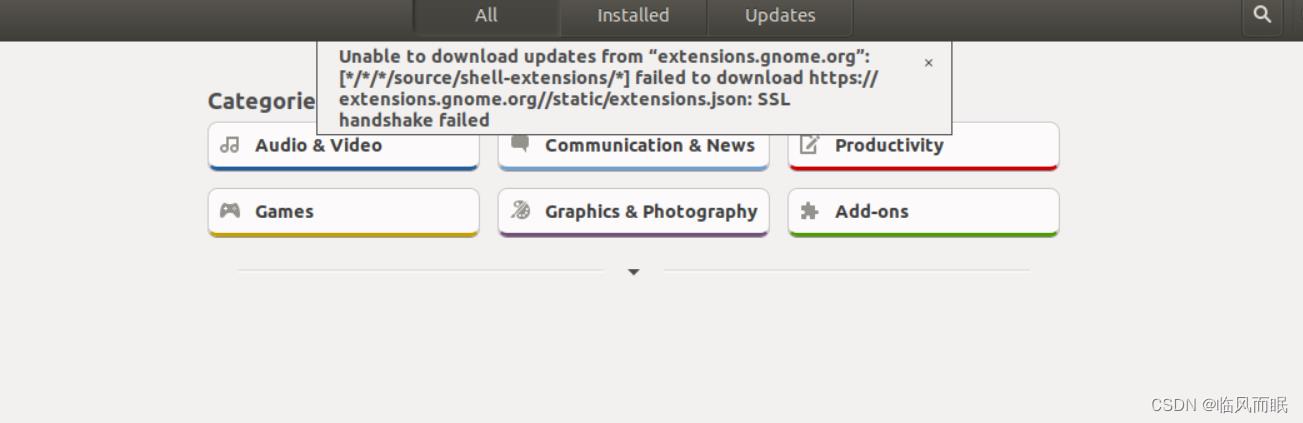
还有这个

嘶,重启了一下虚拟机 还是没用
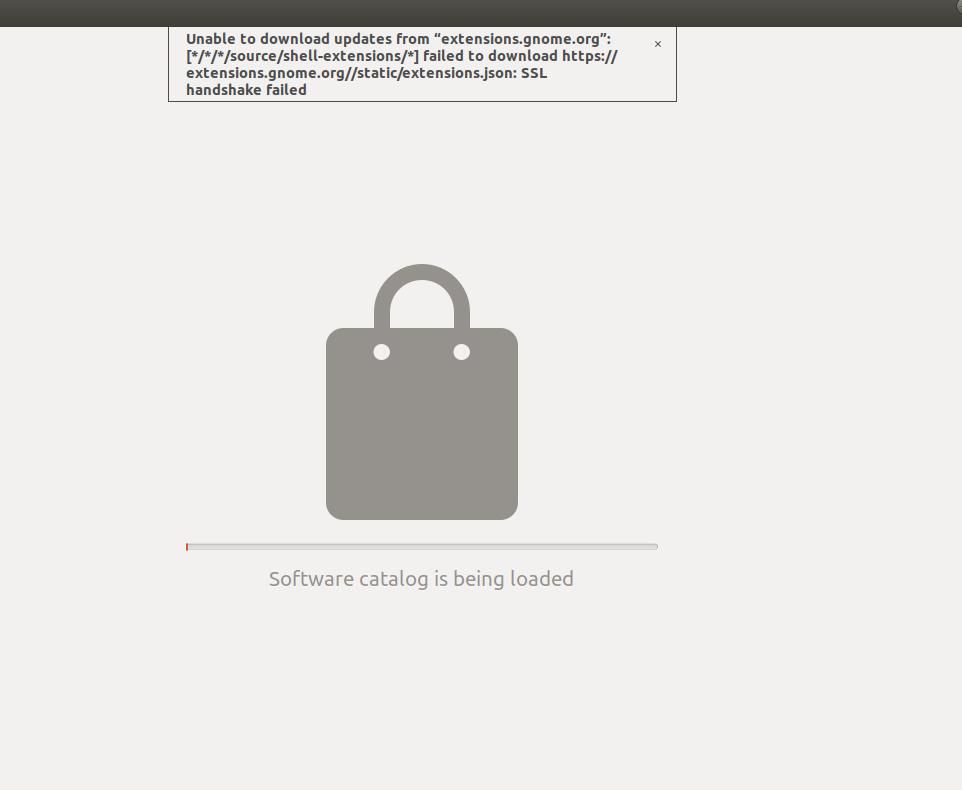
-
针对extensions.gone.org