笔记13:配置ShardingSphere
Posted Lossdate
tags:
篇首语:本文由小常识网(cha138.com)小编为大家整理,主要介绍了笔记13:配置ShardingSphere相关的知识,希望对你有一定的参考价值。
一、简介
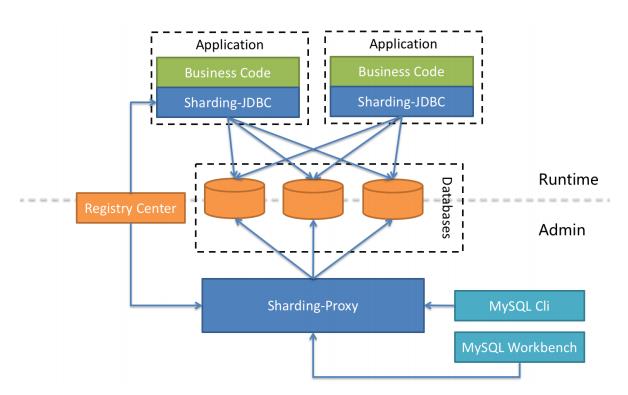
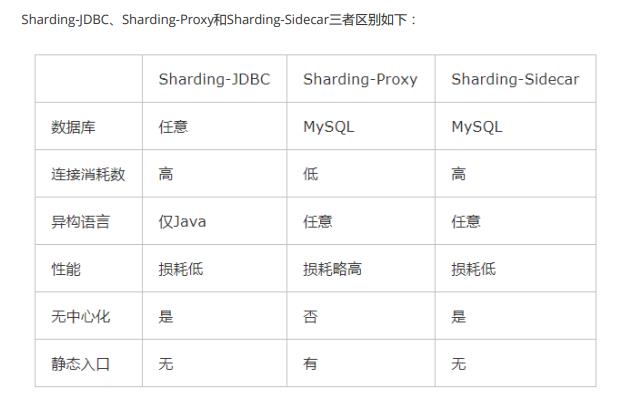
- Apache ShardingSphere是一款开源的分布式数据库中间件组成的生态圈。它由Sharding-JDBC、 Sharding-Proxy和Sharding-Sidecar(规划中)这3款相互独立的产品组成。 他们均提供标准化的数据分片、分布式事务和数据库治理功能,可适用于如Java同构、异构语言、容器、云原生等各种多样化的应用场景。


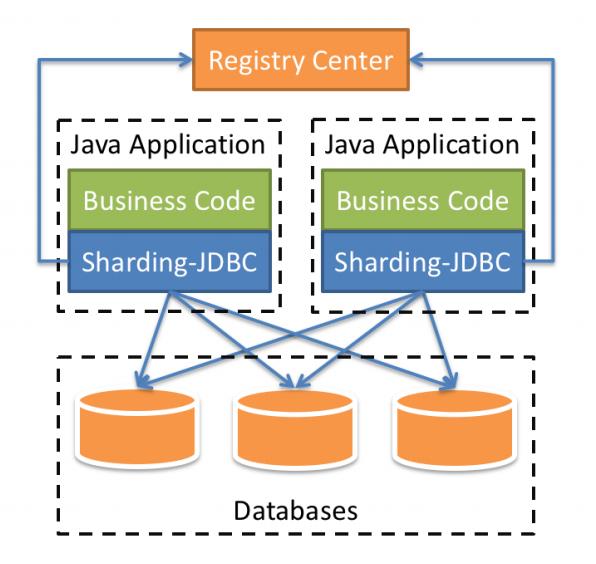
- Sharding-JDBC定位为轻量级Java框架,在Java的JDBC层提供的额外服务。 它使用客户端直连数据库, 以jar包形式提供服务,无需额外部署和依赖,可理解为增强版的JDBC驱动,完全兼容JDBC和各种ORM 框架的使用。

二、Sharding-JDBC 分库分表
- 库:ds0(test1) 、 ds1(test2) ;表:b_order0 、 b_order1 ; 环境:springboot
- 依赖
1)父
2)子<properties> <project.build.sourceEncoding>UTF-8</project.build.sourceEncoding> <project.compile.sourceEncoding>UTF-8</project.compile.sourceEncoding> <shardingsphere.version>4.1.0</shardingsphere.version> <springboot.version>2.4.1</springboot.version> </properties> <dependencyManagement> <dependencies> <dependency> <groupId>org.springframework.boot</groupId> <artifactId>spring-boot-starter-jdbc</artifactId> <version>$springboot.version</version> </dependency> <dependency> <groupId>org.springframework.boot</groupId> <artifactId>spring-boot-starter-data-jpa</artifactId> <version>$springboot.version</version> </dependency> <dependency> <groupId>org.springframework.boot</groupId> <artifactId>spring-boot-starter-test</artifactId> <version>$springboot.version</version> <scope>test</scope> </dependency> <dependency> <groupId>mysql</groupId> <artifactId>mysql-connector-java</artifactId> <version>5.1.48</version> </dependency> <dependency> <groupId>org.apache.shardingsphere</groupId> <artifactId>sharding-jdbc-spring-boot-starter</artifactId> <version>$shardingsphere.version</version> </dependency> </dependencies> </dependencyManagement> <build> <plugins> <plugin> <groupId>org.apache.maven.plugins</groupId> <artifactId>maven-compiler-plugin</artifactId> <version>3.8.1</version> <configuration> <source>11</source> <target>11</target> <testSource>11</testSource> <testTarget>11</testTarget> </configuration> </plugin> </plugins> </build><dependency> <groupId>org.springframework.boot</groupId> <artifactId>spring-boot-starter-jdbc</artifactId> </dependency> <dependency> <groupId>org.springframework.boot</groupId> <artifactId>spring-boot-starter-data-jpa</artifactId> </dependency> <dependency> <groupId>org.springframework.boot</groupId> <artifactId>spring-boot-starter-test</artifactId> <scope>test</scope> </dependency> <dependency> <groupId>mysql</groupId> <artifactId>mysql-connector-java</artifactId> </dependency> <dependency> <groupId>org.apache.shardingsphere</groupId> <artifactId>sharding-jdbc-spring-boot-starter</artifactId> </dependency> <dependency> <groupId>junit</groupId> <artifactId>junit</artifactId> <version>4.13.1</version> <scope>test</scope> </dependency> - 采用JPA,创建dao
public interface BOrderRepository extends JpaRepository<BOrder, Long> - 创建springboot启动类
@SpringBootApplication public class RunBoot - 新建application.properties
#指定生效配置 spring.profiles.active=sharding-database spring.shardingsphere.props.sql.show=true - 新建application-sharding-database.properties
#datasource #指定数据库 spring.shardingsphere.datasource.names=ds0,ds1 #数据库的配置 spring.shardingsphere.datasource.ds0.type=com.zaxxer.hikari.HikariDataSource spring.shardingsphere.datasource.ds0.driver-class-name=com.mysql.jdbc.Driver spring.shardingsphere.datasource.ds0.jdbc-url=jdbc:mysql://localhost:3306/test1 spring.shardingsphere.datasource.ds0.username=root spring.shardingsphere.datasource.ds0.password=123456 spring.shardingsphere.datasource.ds1.type=com.zaxxer.hikari.HikariDataSource spring.shardingsphere.datasource.ds1.driver-class-name=com.mysql.jdbc.Driver spring.shardingsphere.datasource.ds1.jdbc-url=jdbc:mysql://localhost:3306/test2 spring.shardingsphere.datasource.ds1.username=root spring.shardingsphere.datasource.ds1.password=123456 #sharding-database-table -> 分库分表 #按company_id分库 spring.shardingsphere.sharding.tables.b_order.database-strategy.inline.sharding-column=company_id spring.shardingsphere.sharding.tables.b_order.database-strategy.inline.algorithm-expression=ds$company_id % 2 #按id分表 spring.shardingsphere.sharding.tables.b_order.table-strategy.inline.sharding-column=id spring.shardingsphere.sharding.tables.b_order.table-strategy.inline.algorithm-expression=b_order$id % 2 #指定库和表(0..1表示0到1) spring.shardingsphere.sharding.tables.b_order.actual-data-nodes=ds$0..1.b_order$0..1 #主键和算法 spring.shardingsphere.sharding.tables.b_order.key-generator.column=id spring.shardingsphere.sharding.tables.b_order.key-gener.type=SNOWFLAKE - 广播 (这里在每个库都创建一个city表做测试)
#broadcast 每个库都插入
spring.shardingsphere.sharding.broadcast-tables=city
spring.shardingsphere.sharding.tables.city.key-generator.column=id
spring.shardingsphere.sharding.tables.city.key-generator.type=SNOWFLAKE
三、ShardingSphere读写分离
- 在分库分表的基础上进行读写分离配置
- application.properties修改
#指定生效配置 #spring.profiles.active=sharding-database spring.profiles.active=master-slave spring.shardingsphere.props.sql.show=true - 新建application-master-slave.properties
#datasource
#指定数据库
spring.shardingsphere.datasource.names=master,slave0

#数据库的配置
spring.shardingsphere.datasource.master.type=com.zaxxer.hikari.HikariDataSource
spring.shardingsphere.datasource.master.driver-class-name=com.mysql.jdbc.Driver
spring.shardingsphere.datasource.master.jdbc-url=jdbc:mysql://localhost:3306/test1
spring.shardingsphere.datasource.master.username=root
spring.shardingsphere.datasource.master.password=123456

spring.shardingsphere.datasource.slave0.type=com.zaxxer.hikari.HikariDataSource
spring.shardingsphere.datasource.slave0.driver-class-name=com.mysql.jdbc.Driver
spring.shardingsphere.datasource.slave0.jdbc-url=jdbc:mysql://localhost:3306/test2
spring.shardingsphere.datasource.slave0.username=root
spring.shardingsphere.datasource.slave0.password=123456

#master-slave主从读写分离配置 主写从读
spring.shardingsphere.masterslave.name=datasource
spring.shardingsphere.masterslave.master-data-source-name=master
spring.shardingsphere.masterslave.slave-data-source-names=slave0
#负载均衡
spring.shardingsphere.masterslave.load-balance-algorithm-type=ROUND_ROBIN

#id和id生成算法(雪花算法)
spring.shardingsphere.sharding.tables.city.key-generator.column=id
spring.shardingsphere.sharding.tables.city.key-generator.type=SNOWFLAKE
四、ShardingSphere强制路由
- 强制路由类(实现ShardingSphere的HintShardingAlgorithm)
public class MyHintShardingAlgorithm implements HintShardingAlgorithm<Long> @Override public Collection<String> doSharding(Collection<String> collection, HintShardingValue<Long> hintShardingValue) Collection<String> result = new ArrayList<>(); collection.forEach(database -> hintShardingValue.getValues().forEach(value -> //value -> 强制路由指定的值 if(database.endsWith(String.valueOf(value % 2))) result.add(database); ); ); return result; - application.properties修改
#指定生效配置 #spring.profiles.active=sharding-database #spring.profiles.active=master-slave spring.profiles.active=hint-database spring.shardingsphere.props.sql.show=true - 新增application-hint-database.properties
#datasource #指定数据库 spring.shardingsphere.datasource.names=ds0,ds1 #数据库的配置 spring.shardingsphere.datasource.ds0.type=com.zaxxer.hikari.HikariDataSource spring.shardingsphere.datasource.ds0.driver-class-name=com.mysql.jdbc.Driver spring.shardingsphere.datasource.ds0.jdbc-url=jdbc:mysql://localhost:3306/test1 spring.shardingsphere.datasource.ds0.username=root spring.shardingsphere.datasource.ds0.password=123456 spring.shardingsphere.datasource.ds1.type=com.zaxxer.hikari.HikariDataSource spring.shardingsphere.datasource.ds1.driver-class-name=com.mysql.jdbc.Driver spring.shardingsphere.datasource.ds1.jdbc-url=jdbc:mysql://localhost:3306/test2 spring.shardingsphere.datasource.ds1.username=root spring.shardingsphere.datasource.ds1.password=123456 # hint -> 强制路由 spring.shardingsphere.sharding.tables.city.database-strategy.hint.algorithm-class-name=com.lossdate.hint.MyHintShardingAlgorithm - 实现测试
@RunWith(SpringRunner.class)
@SpringBootTest(classes = RunBoot.class)
public class TestHintAlgorithm

    @Resource
    private CityRepository cityRepository;

    @Test
    public void test()
        HintManager hintManager = HintManager.getInstance();
        //强制路由到库ds$xx%2
        hintManager.setDatabaseShardingValue(0L);
        List<City> list = cityRepository.findAll();
        list.forEach(city -> System.out.println(city.getId()+" "+city.getName()+" "+city.getProvince()));
五、ShardingSphere数据脱敏
- 即自动对指定数据库字段(如密码等敏感字段)进行加密解密
- 新建表my_user
CREATE TABLE `my_user` ( `id` bigint(11) NOT NULL AUTO_INCREMENT, `name` varchar(256) DEFAULT NULL, `pwd_plain` varchar(256) DEFAULT NULL, `pwd_cipher` varchar(256) DEFAULT NULL, PRIMARY KEY (`id`) ) ENGINE=InnoDB DEFAULT CHARSET=utf8mb4; - 新建实体
@Entity @Table(name = "my_user") public class MyUser implements Serializable @Id @Column(name = "id") @GeneratedValue(strategy = GenerationType.IDENTITY) private long id; @Column(name = "name") private String name; //逻辑列名 @Column(name = "pwd") private String pwd; //getter and setter ... - 新建MyUserRepository
public interface MyUserRepositoryextends JpaRepository<MyUser, Long> List<MyUser> findByPwd(String pwd); - 修改application.properties
#指定生效配置 #spring.profiles.active=sharding-database #spring.profiles.active=master-slave #spring.profiles.active=hint-database spring.profiles.active=encryptor spring.shardingsphere.props.sql.show=true - 新建application-encryptor.properties
#datasource
#指定数据库
spring.shardingsphere.datasource.names=ds0

#数据库的配置
spring.shardingsphere.datasource.ds0.type=com.zaxxer.hikari.HikariDataSource
spring.shardingsphere.datasource.ds0.driver-class-name=com.mysql.jdbc.Driver
spring.shardingsphere.datasource.ds0.jdbc-url=jdbc:mysql://localhost:3306/test1
spring.shardingsphere.datasource.ds0.username=root
spring.shardingsphere.datasource.ds0.password=123456

# encrypt -> 数据脱敏
#指定需要加密字段对应的数据库明文字段(非必填)
spring.shardingsphere.encrypt.tables.my_user.columns.pwd.plain-column=pwd_plain
#指定需要加密字段对应的数据库密文字段
spring.shardingsphere.encrypt.tables.my_user.columns.pwd.cipher-column=pwd_cipher
#设定算法my_pwd
spring.shardingsphere.encrypt.encryptors.my_pwd.type=aes
#设定算法密钥(加盐)
spring.shardingsphere.encrypt.encryptors.my_pwd.props.aes.key.value=asdfg
#绑定算法my_pwd
spring.shardingsphere.encrypt.tab以上是关于笔记13:配置ShardingSphere的主要内容,如果未能解决你的问题,请参考以下文章