Android 手动实现热更新
Posted zhuliyuan丶
tags:
篇首语:本文由小常识网(cha138.com)小编为大家整理,主要介绍了Android 手动实现热更新相关的知识,希望对你有一定的参考价值。
前言
在上篇Android ClassLoader浅析中我们分析了安卓ClassLoader和热更新的原理,这篇我们在上篇热更新分析的基础上写个简单的demo实践一下。
概述
我们先回顾下热更新的原理
PathClassLoader是安卓中默认的类加载器,加载类是通过findClass()方法,而这个方法最终是通过遍历DexPathList中的Element[]数组加载我们需要的类,那么要想实现热更新只需要在出问题的类还没加载前,把补丁的Element插入到数组前面,这样加载的时候就会优先加载已经修复的类,从而实现了bug的修复。
原理知道了再来屡一下实现思路。
- 通过
DexClassLoader加载补丁,然后通过反射拿到生成的Element[]数组。 - 拿到安卓中默认的类加载器
PathClassLoader,然后通过反射拿到Element[]数组。 - 将补丁
Element[]和系统的Element[]数组合并(补丁元素放在合并数组前面),并重新赋值给PathClassLoader。
Show Code
在showcode之前我们还有个重要的事情要做就是贴出类加载中相关的源码,因为等会反射会用到。DexClassLoader和PathClassLoader只是调用了BaseDexClassLoader构造方法这里就不贴了。
public class BaseDexClassLoader extends ClassLoader
    private final DexPathList pathList;

    public BaseDexClassLoader(String dexPath, File optimizedDirectory,
            String librarySearchPath, ClassLoader parent, boolean isTrusted)
        super(parent);
        this.pathList = new DexPathList(this, dexPath, librarySearchPath, null, isTrusted);


    @Override
    protected Class<?> findClass(String name) throws ClassNotFoundException
        List<Throwable> suppressedExceptions = new ArrayList<Throwable>();
        Class c = pathList.findClass(name, suppressedExceptions);
        return c;


final class DexPathList
	private Element[] dexElements;
    DexPathList(ClassLoader definingContext, String dexPath,
            String librarySearchPath, File optimizedDirectory, boolean isTrusted)
        this.dexElements = makeDexElements(splitDexPath(dexPath), optimizedDirectory,
                                           suppressedExceptions, definingContext, isTrusted);


    public Class<?> findClass(String name, List<Throwable> suppressed)
        for (Element element : dexElements)
            Class<?> clazz = element.findClass(name, definingContext, suppressed);
            if (clazz != null)
                return clazz;


        if (dexElementsSuppressedExceptions != null)
            suppressed.addAll(Arrays.asList(dexElementsSuppressedExceptions));

        return null;
好了接下来就是热更新的核心代码了
public class HotFixUtil

    private final String TAG = "zhuliyuan";
    private final String FIELD_DEX_ELEMENTS = "dexElements";
    private final String FIELD_PATH_LIST = "pathList";
    private final String CLASS_NAME = "dalvik.system.BaseDexClassLoader";

    private final String DEX_SUFFIX = ".dex";
    private final String JAR_SUFFIX = ".jar";
    private final String APK_SUFFIX = ".apk";
    private final String SOURCE_DIR = "patch";
    private final String OPTIMIZE_DIR = "odex";

    public void startFix() throws IllegalAccessException, NoSuchFieldException, ClassNotFoundException
        // 默认补丁目录  /storage/emulated/0/android/data/rocketly.hotfixdemo/files/patch
        File sourceFile = MyApplication.getContext().getExternalFilesDir(SOURCE_DIR);
        if (!sourceFile.exists())
            Log.i(TAG, "补丁目录不存在");
            return;

        // 默认 dex优化存放目录  /data/data/rocketly.hotfixdemo/app_odex
        File optFile = MyApplication.getContext().getDir(OPTIMIZE_DIR, Context.MODE_PRIVATE);
        if (!optFile.exists())
            optFile.mkdir();

        StringBuilder sb = new StringBuilder();
        File[] listFiles = sourceFile.listFiles();
        for (int i = 0; i < listFiles.length; i++) //遍历查找文件中patch开头, .dex .jar .apk结尾的文件
            File file = listFiles[i];
            if (file.getName().startsWith("patch") && file.getName().endsWith(DEX_SUFFIX)//这里我默认的补丁文件名是patch
                    || file.getName().endsWith(JAR_SUFFIX)
                    || file.getName().endsWith(APK_SUFFIX))
                if (i != 0)
                    sb.append(File.pathSeparator);//多个dex路径 添加默认分隔符 :

                sb.append(file.getAbsolutePath());


        String dexPath = sb.toString();
        String optPath = optFile.getAbsolutePath();

        ClassLoader pathClassLoader = MyApplication.getContext().getClassLoader();//拿到系统默认的PathClassLoader加载器
        DexClassLoader dexClassLoader = new DexClassLoader(dexPath, optPath, null, MyApplication.getContext().getClassLoader());//加载我们自己的补丁dex
        Object pathElements = getElements(pathClassLoader);//获取PathClassLoader Element[]
        Object dexElements = getElements(dexClassLoader);//获取DexClassLoader Element[]
        Object combineArray = combineArray(pathElements, dexElements);//合并数组
        setDexElements(pathClassLoader, combineArray);//将合并后Element[]数组设置回PathClassLoader pathList变量


    /**
     * 获取Element[]数组
     */
    private Object getElements(ClassLoader classLoader) throws ClassNotFoundException, NoSuchFieldException, IllegalAccessException
        Class<?> BaseDexClassLoaderClazz = Class.forName(CLASS_NAME);//拿到BaseDexClassLoader Class
        Field pathListField = BaseDexClassLoaderClazz.getDeclaredField(FIELD_PATH_LIST);//拿到pathList字段
        pathListField.setAccessible(true);
        Object DexPathList = pathListField.get(classLoader);//拿到DexPathList对象
        Field dexElementsField = DexPathList.getClass().getDeclaredField(FIELD_DEX_ELEMENTS);//拿到dexElements字段
        dexElementsField.setAccessible(true);
        return dexElementsField.get(DexPathList);//拿到Element[]数组


    /**
     * 合并Element[]数组 将补丁的放在前面
     */
    private Object combineArray(Object pathElements, Object dexElements)
        Class<?> componentType = pathElements.getClass().getComponentType();
        int i = Array.getLength(pathElements);
        int j = Array.getLength(dexElements);
        int k = i + j;
        Object result = Array.newInstance(componentType, k);// 创建一个类型为componentType,长度为k的新数组
        System.arraycopy(dexElements, 0, result, 0, j);
        System.arraycopy(pathElements, 0, result, j, i);
        return result;


    /**
     * 将Element[]数组 设置回PathClassLoader
     */
    private void setDexElements(ClassLoader classLoader, Object value) throws ClassNotFoundException, NoSuchFieldException, IllegalAccessException
        Class<?> BaseDexClassLoaderClazz = Class.forName(CLASS_NAME);
        Field pathListField = BaseDexClassLoaderClazz.getDeclaredField(FIELD_PATH_LIST);
        pathListField.setAccessible(true);
        Object dexPathList = pathListField.get(classLoader);
        Field dexElementsField = dexPathList.getClass().getDeclaredField(FIELD_DEX_ELEMENTS);
        dexElementsField.setAccessible(true);
        dexElementsField.set(dexPathList, value);
主要就是通过反射获取字段然后数组合并在设置回去,我基本都贴上了注释比较容易看懂就不过多说明了。
不过有两点需要注意
- 我默认是加载名称为patch的文件
- 因为有文件读写这里别忘了加上读写权限并且授予权限,我之前在target27上测试的,搞了好久才发现权限没打开。建议target低于23测试,不然demo中没做权限申请得手动授予。
    <uses-permission android:name="android.permission.WRITE_EXTERNAL_STORAGE" />
    <uses-permission android:name="android.permission.READ_EXTERNAL_STORAGE" />
这里贴上demo地址HotFixDemo
测试
加载补丁
demo中是在MainActivity中有两个按钮,点击加载补丁按钮默认加载/storage/emulated/0/Android/data/rocketly.hotfixdemo/files/patch目录下的补丁,然后测试按钮是调用Function的test()方法默认会抛出一个运行时异常。
public class MainActivity extends AppCompatActivity

    @Override
    protected void onCreate(Bundle savedInstanceState)
        super.onCreate(savedInstanceState);
        setContentView(R.layout.activity_main);

        findViewById(R.id.loadPatch).setOnClickListener(new View.OnClickListener()
            @Override
            public void onClick(View v)
                try
                    new HotFixUtil().startFix();//加载补丁
                 catch (IllegalAccessException e)
                    e.printStackTrace();
                 catch (NoSuchFieldException e)
                    e.printStackTrace();
                 catch (ClassNotFoundException e)
                    e.printStackTrace();


        );

        findViewById(R.id.test).setOnClickListener(new View.OnClickListener()
            @Override
            public void onClick(View v)
                new Function().test();//测试

        );


public class Function

    public void test()
        throw new RuntimeException();
        //        Toast.makeText(MyApplication.getContext(),"补丁加载成功",Toast.LENGTH_LONG).show();
那么我们先将这个有bug的apk安装到手机这个时候点击测试是会崩溃的。
生成class文件
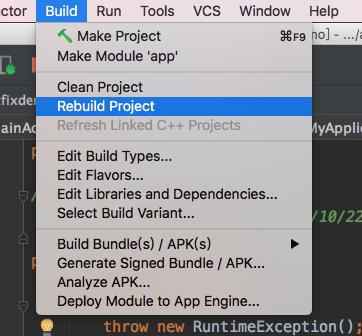
将Function的test()方法异常代码注释了打开Toast代码注释,点击AS的Rebuild Project

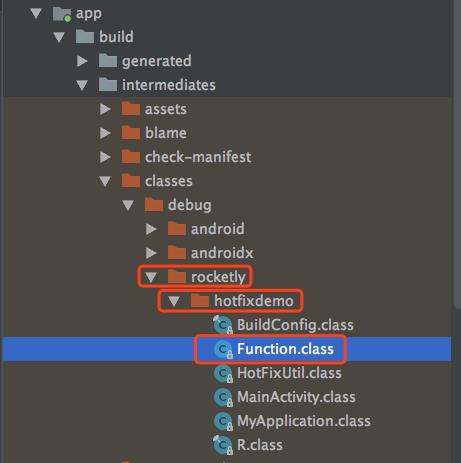
然后在app的build/intermediates/classes/debug/rocketly/hotfixdemo/ 目录下可以找到编译好的Function.class文件

生成Dex文件
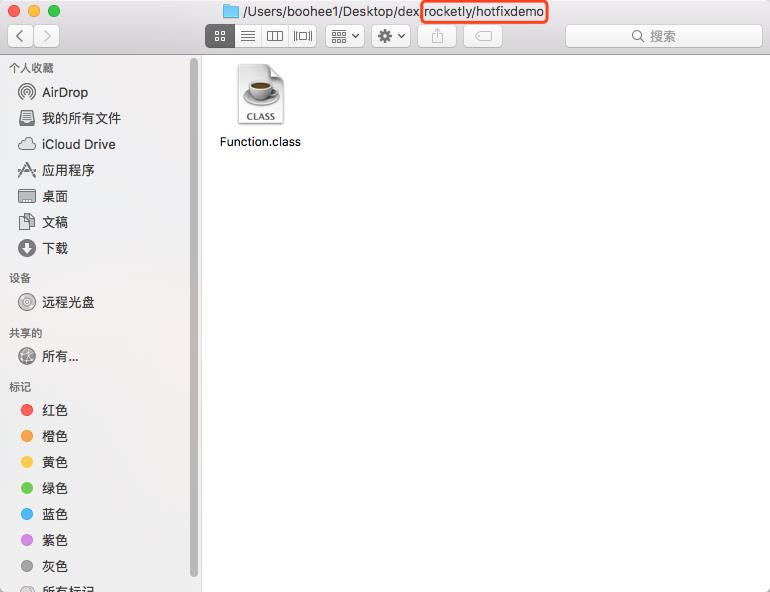
接下来将Function.class文件连带包目录复制到一个自己指定的目录,我这里复制到桌面dex文件夹下

然后通过dx指令生成dex文件
dx指令的使用跟java指令的使用条件一样,有2种选择:
- 配置环境变量(添加到classpath),然后命令行窗口(终端)可以在任意位置使用。
- 不配环境变量,直接在build-tools/安卓版本 目录下使用命令行窗口(终端)使用。
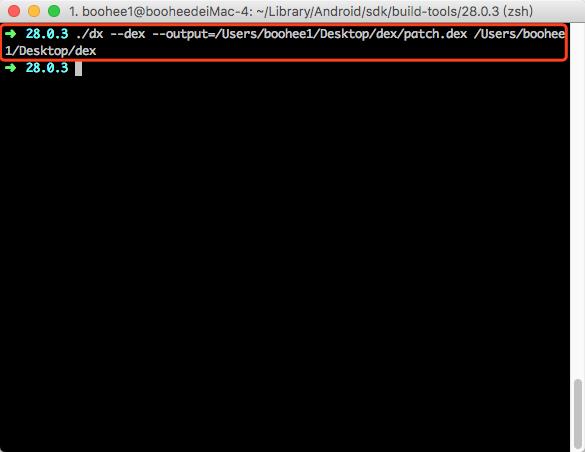
由于这个指令不常使用所以我直接切换到目录下运行命令为:
dx --dex --output=输出的dex文件完整路径 (空格) 要打包的完整class文件所在目录

把Dex文件推到SD卡上
在通过adb命令adb push <local> <remote>将dex文件推到手机指定目录,我demo中是推到/storage/emulated/0/Android/data/rocketly.hotfixdemo/files/patch目录下。

重启app,点击测试可以发现还是崩溃,然后再次启动app点击加载补丁再点击测试弹出补丁加载成功的toast代表补丁加载成功,这里就大功告成了。
以上是关于Android 手动实现热更新的主要内容,如果未能解决你的问题,请参考以下文章