使用设备检测(Device detection)的 JS 服务端渲染(SSR)
Posted YITA90
tags:
篇首语:本文由小常识网(cha138.com)小编为大家整理,主要介绍了使用设备检测(Device detection)的 JS 服务端渲染(SSR)相关的知识,希望对你有一定的参考价值。
原文链接:https://mobiforge.com/design-development/javascript-server-side-rendering-with-device-detection
服务器端渲染有何优势?
自从由 javascript 框架负责页面渲染后,就出现了在生成页面之前,需要下载和执行一大堆 JavaScript 来获取资源的问题。
在移动设备处于弱网情况下的时候,或者老旧的硬件,性能不好的硬件上运行的时候,这种方式就会出现问题。
介绍一下服务器端渲染(SSR)。SSR 可以解决这些框架在移动端面临的挑战。简单来说,SSR 将在客户端执行的 Javascript 放在服务器端运行。生成 html 页面后,将其发送给客户端,使得客户端根本不需要做太多的工作,就可以将页面呈现给用户。需要给大家提个醒,SSR 并不是一个完美的,添加 SSR 到您的应用程序后,将增加代码的复杂性。
服务器端渲染的常见用例是在用户首次发出请求时,初次渲染页面。当服务器接收到请求时,它将页面组件呈现为 HTML 字符串,然后将其作为响应发送给客户端。之后,客户端只管渲染。
设备检测有何帮助?
过去,批评添加设备检测,因为将服务器端代码添加到 Web 项目中,使得事情变得复杂了。但是,如果您正打算通过 SSR 优化页面加载性能,那么再优化下设备,您肯定不会介意的。既然您已经克服了服务器端解决问题的困难,为什么不能继续追求完美呢?
服务器端设备可以通过使用 User-Agent 字符串来唯一标识客户端设备类型。通过将其与设备功能的数据库进行匹配,可以了解有关用户设备的相关详细信息,并可用于为该设备定制响应优化。
那么,为什么不在 JavaScript 框架中尝试使用有设备检测的服务器端渲染?我能想到的最简单的例子,就是做一个移动和 PC 间的模板切换。示例使用Vue.js,这个框架针对 SSR 的文档最全,易上手。
使用 Vue.js 实现简单的服务器端呈现
我们将从 Chris Fritz 的“ 最简单的Vue 2.0 SSR演示 ”开始。
首先,我们先把例子下载下来,运行起来。从git仓库中把文件下载到本地,运行 npm install 安装依赖。除此之外,应该引入 Vue 框架和 Vue 服务器端渲染程序包。
您可以通过运行下面命令,来检查所有设置是否正确:
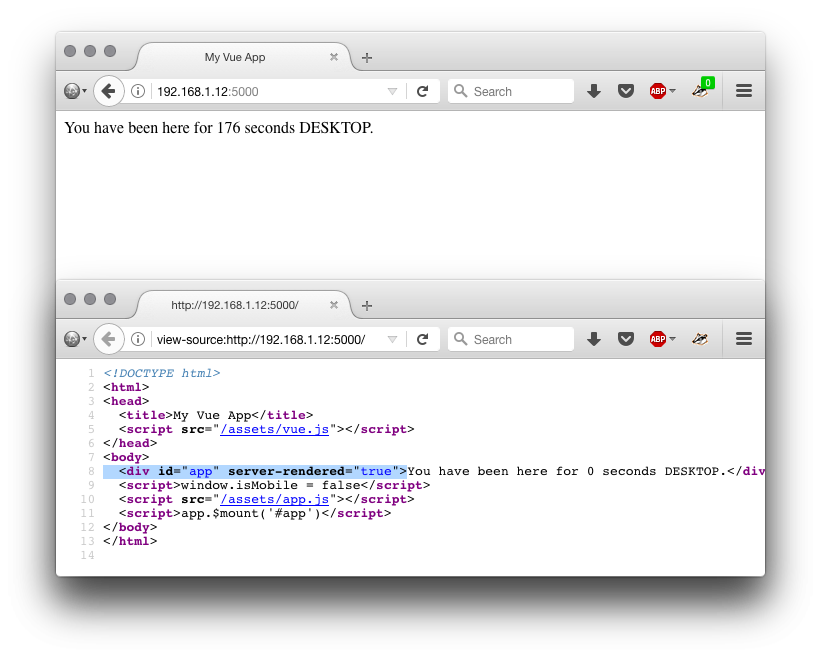
npm run dev现在可以看到你本地起了一个5000端口的服务,浏览器 http://localhost:5000,您可以看到下图:

用开发者工具中的 DOM 检查器,检查页面源(查看源),你会看到好玩的事情发生。在原始来源中,您可以看到 id="app" 具有属性的div server-rendered="true"。恭喜!使用 Vue 的服务器端渲染已经成功运行。
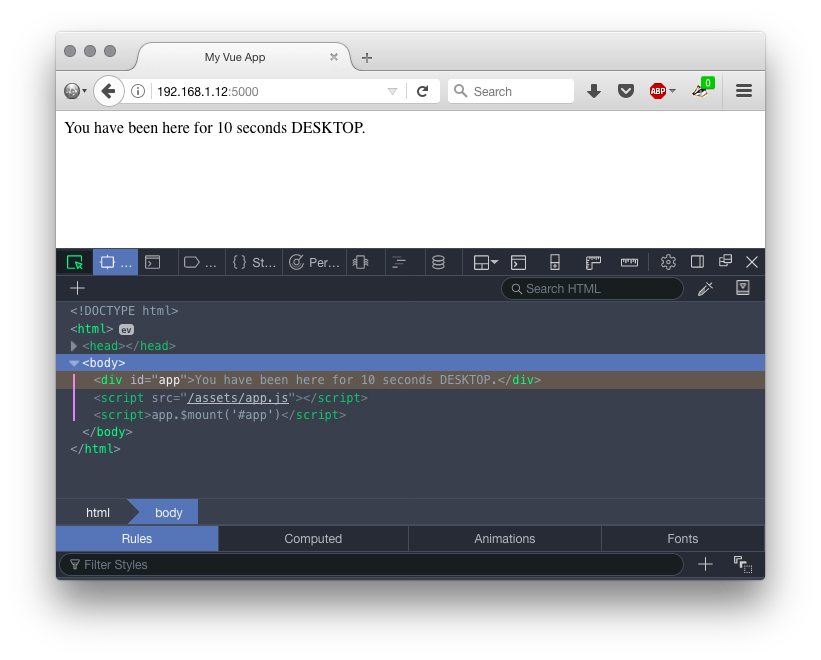
在开发者工具检查器中,该 server-rendered 属性不存在。

我们来看看这是怎么回事,我们的主页面看起来像这样。
<!DOCTYPE html>
<html>
<head>
  <title>My Vue App</title>
  <script src="/assets/vue.js"></script>
</head>
<body>
  <div></div>
  <script src="/assets/app.js"></script>
  <script>app.$mount('#app')</script>
</body>
</html>
Vue.js 初次渲染,将<div id="app"></div>替换,客户端接管并更新DOM。这就是为什么当您检查 DOM 的时候已更改,并且不再具有 server-rendered 属性。
如果您想进一步探索Vue SSR,您可以从Vue.js SSR文档开始。
使用DeviceAtlas添加服务器端设备检测
接下来就是让DeviceAtlas node.js客户端启动并运行。你可以从这里获取源码 tarball:https://deviceatlas.com/resources/download-enterprise-api#nodejs。安装方法:npm install deviceatlas-deviceapi-2.1.0.tgz
我们现在可以使用以下代码,在我们的应用程序中导入和设置 DeviceAtlas:
var DeviceApiWeb = require('deviceatlas-deviceapi').DeviceApiWeb;
var deviceApi = new DeviceApiWeb();接下来,我们需要加载DeviceAtlas数据文件,其中包含设备数据。DeviceAtlas是用来确定用户代理的功能的。您需要在这里单独下载此文件。
  try
      deviceApi.loadDataFromFile('47722_20170307.json');
   catch(e)
      //json could not load! do something!
      console.log('couldnt load data');
接下来,我们传一个请求对象给DeviceAtlas,以便它检查请求中的User-Agent字符串,提供设备的属性。对于这个简单示例,我们只对 mobileDevice 属性感兴趣,根据特性的不同,使用不同的Vue模板。您可以在DeviceAtlas站点上查看全部属性。可用的属性包括屏幕宽度、高度、用于优化图像,isTouchscreen等可以优化的目标。
检查一下是否是移动设备?简单!
var properties = deviceApi.getPropertiesFromRequest(request);
var isMobile = properties.contains('mobileDevice', true);
把 DeviceAtlas 代码添加到我们的 server.js 文件。路由用Express.js。将刚刚看到设备检测代码添加到Express路由代码中,效果如下,新的代码突出显示:
server.get('*', function (request, response)
  // Render our Vue app to a string
  var DeviceApiWeb = require('./deviceatlas-deviceapi').DeviceApiWeb;
  /* Create an instance of DeviceApiWeb with default config */
  var deviceApi = new DeviceApiWeb();
  /* Load data. */
  try
      deviceApi.loadDataFromFile('./26732_20170308.json');
   catch(e)
      //json could not load! do something!
      console.log('couldn\\'t load DA data');

  var properties = deviceApi.getPropertiesFromRequest(request);
  var isMobile = properties.contains('mobileDevice', true);

  renderer.renderToString(
    // Create an app instance
    require('./assets/app')(isMobile),
    // Handle the rendered result
    function (error, html)
      // If an error occurred while rendering...
      if (error)
        // Log the error in the console
        console.error(error)
        // Tell the client something went wrong
        return response
          .status(500)
          .send('Server Error')

      // Send the layout with the rendered app's HTML
      response.send(
        layout.replace('<div></div>', html)
        )

  )
)接下来,我们需要为Vue选择正确的模板来使用,我们必须确保当渲染被传递给客户端以供将来的请求时,模板是一致的。
这可以通过几种不同的方式实现。
基于设备类型的切换模板
我们的SSR示例是从/assets/app.js返回单个模板开始的,使用代码如下:
(function ()  'use strict'
  var createApp = function ()
    // ---------------------
    // BEGIN NORMAL APP CODE
    // ---------------------

    // Main Vue instance must be returned and have a root
    // node with the id "app", so that the client-side
    // version can take over once it loads.
    return new Vue(
      template: '<div>You have been here for  counter  seconds.</div>',
      data:
        counter: 0
      ,
      created: function ()
        var vm = this
        setInterval(function ()
          vm.counter += 1
        , 1000)

    )

    // -------------------
    // END NORMAL APP CODE
    // -------------------

  if (typeof module !== 'undefined' && module.exports)
    module.exports = createApp
   else
    this.app = createApp()

).call(this)
为了支持设备切换,我们修改代码,写了两个可以返回的模板:一个用于桌面,一个用于移动设备:
  var desktopPage =
        template: '<div>You have been here for  counter  seconds DESKTOP.</div>',
        data:
          counter: 0
        ,
        created: function ()
          var vm = this
          setInterval(function ()
            vm.counter += 1
          , 1000)


  var mobilePage =
    template: '<div>You have been here for  counter  seconds MOBILE.</div>',
    data:
      counter: 0
    ,
    created: function ()
      var vm = this
      setInterval(function ()
        vm.counter += 1
      , 1000)
我们这两个模板只是更改一些文本显示,但在实际的应用中,您可能会根据需要,向移动端和PC端用户代理发送完全不同的组件。
那么我们如何触发选择哪个模板呢?将isMobile当变量传入server.js文件传入,然后使用它来选择正确的模板。
将下面这行代码:
require('./assets/app')(),修改为
require('./assets/app')(isMobile),现在我们可以决定要返回哪个模板app.js:
  var createApp = function (isMobile)
    return new Vue(isMobile ? mobilePage : desktopPage)


  if (typeof module !== 'undefined' && module.exports)
    module.exports = createApp
   else
    this.app = createApp(this.isMobile)

).call(this)
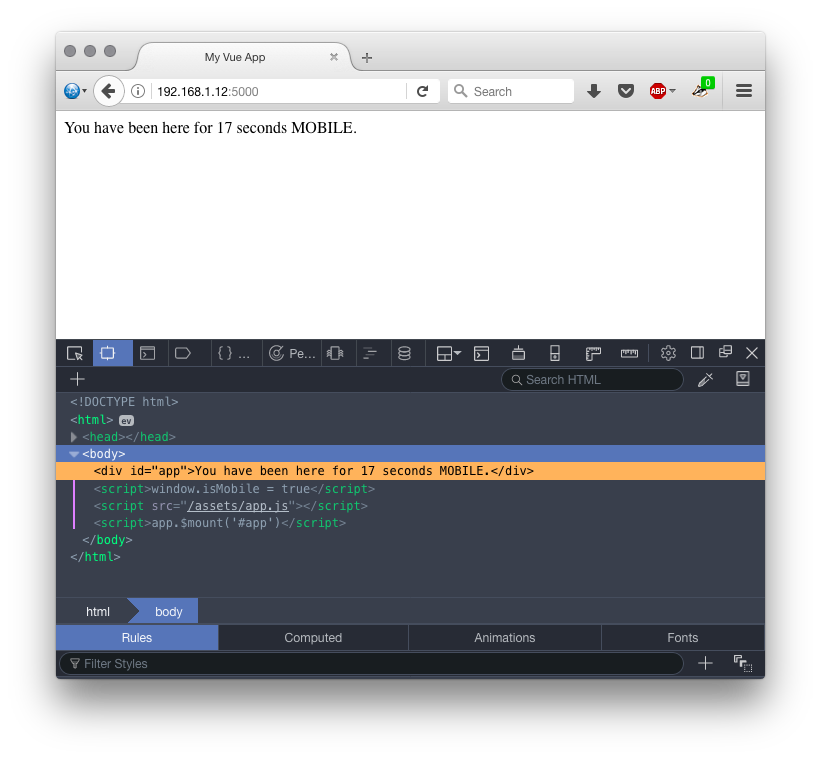
如果您重新加载这个应用程序,就会看到服务器正确显示了移动用户代理的移动模板。但之后,客户端接管,服务器端检测不到客户端的改变,因此在首次渲染后,它始终默认为桌面模板。
我们可以通过将Vue模板写入DOM的同时,将设备类型传递给客户端应用来解决这个问题。所以我们添加一个isMobile属性到我们的index.html应用程序 shell:
<!DOCTYPE html>
<html>
<head>
  <title>My Vue App</title>
  <script src="/assets/vue.js"></script>
</head>
<body>
  <div></div>
  <script>window.isMobile = false</script>
  <script src="/assets/app.js"></script>
  <script>app.$mount('#app')</script>
</body>
</html>
当在服务器端运行的时候,我们可以更改这个值:
    response.send(
      layout.replace('<div></div>', html).replace('window.isMobile = false', 'window.isMobile = ' + isMobile)
      )
重新加载,一切都应该按预期工作,客户端和服务器端都会为用户呈现正确的模板。(完整的代码可以在文章的最后下载)。

基于设备类型的路由
例子中,迄今为止只区分了移动用户和非移动用户,并且基于在桌面或移动设备app.js上返回合适的模板。这是一个不错的解决方案,都运行在一个相同的URL上。
但这不是唯一的解决方案。在下面的示例中,我们将展示如何根据使用Express路由实现更细致的设备检测。这种细粒度的设备分割是自适应网页设计的基础,是Alexa百强网站80%应用的技术。
例如,我们会将ios用户代理重定向到一个页面/ios。请注意,我们不是说必须要这样做,只是表明有多种方法可以实现基于设备的流量分割。
我们继续修改我们的案例。
首先,在我们的server.js文件中,我们读取了iOS设备的HTML布局:
var layoutiOS = fs.readFileSync('./ios/index.html', 'utf8')接下来,我们设置了一个用于iOS设备的新路由:
server.get('/ios', function (request, response)
  renderer.renderToString(
    // Create an app instance
    require('./assets/ios')(),
    // Handle the rendered result
    function (error, html)
      // If an error occurred while rendering...
      if (error)
        // Log the error in the console
        console.error(error)
        // Tell the client something went wrong
        return response
          .status(500)
          .send('Server Error')

      // Send the layout with the rendered app's HTML
      response.send(
        layoutiOS.replace('<div></div>', html)
        )

  )
)
更新我们的设备检测代码来处理iOS的情况:
      var isiOs = properties.contains('osiOs', true);
      if (isiOs)
        response.redirect('/ios');
        return;
这就是针对服务器端进行的所有的更改。
现在,我们创建iOS目录并添加HTML页面。大体上和我们以前的HTML相同,具体的iOS特定差别,高亮显示:
<!doctype html>
<html>
<head>
  <title>My Vue App - iOS</title>
  <script src="/assets/vue.js"></script>
</head>
<body>
  <div></div>
  <script src="/assets/ios.js"></script>
  <script>iOSWebApp.$mount('#app')</script>
</body>
</html>最后,我们还必须创建一个iOS特定的应用程序文件。和之前的文件写法也很类似:
(function ()  'use strict'
  var iOSPage =
    template: '<div><h1>iOS Page</h1> You have been here for  counter  seconds.</div>',
    data:
      counter: 0
    ,
    created: function ()
      var vm = this
      setInterval(function ()
        vm.counter += 1
      , 1000)


  var createApp = function ()
    return new Vue(iOSPage)

  if (typeof module !== 'undefined' && module.exports)
    module.exports = createApp
   else
    this.iOSWebApp = createApp()

).call(this)
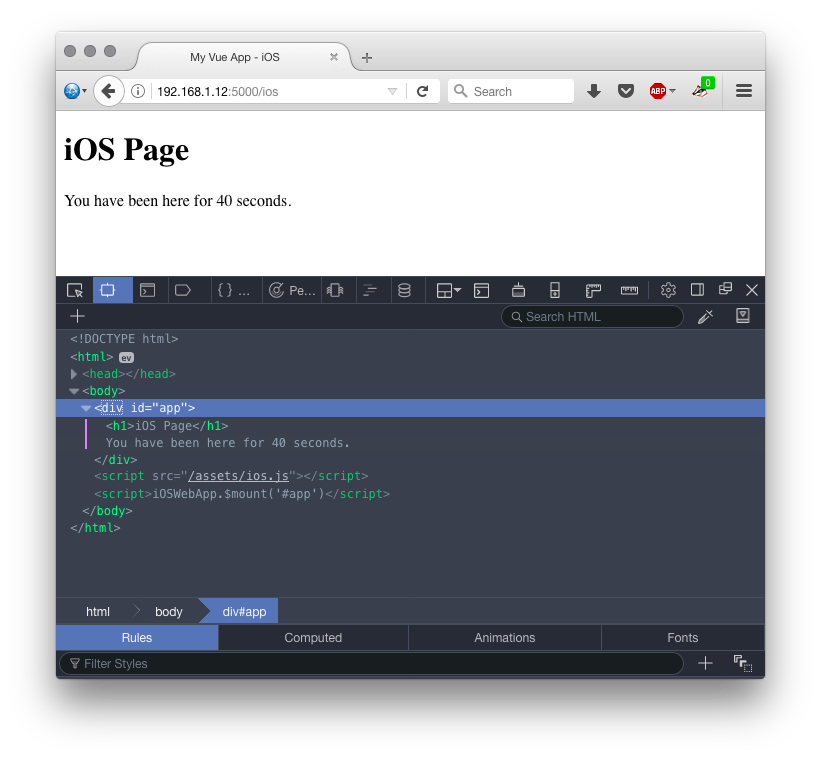
完成了。重新启动服务器,如果您访问了许多不同的用户代理(Firefox用户代理切换器添加对此很有用),您应该会看到:
1.桌面UA - >桌面模板
2.移动(非iOS)UA - >移动模板
3.iOS UA - >新的iOS模板

结束语
在本文中,我们探索了针对移动端优化的方法,使用设备检测(Device detection)的 JS 服务端渲染。服务器端设备检测,有时被批判,是因为服务器端代码比纯客户端特性检测更难实现。但如果您已经克服了服务端渲染的困难,为什么不优化一下设备检测?您已经克服了将应用程序添加到服务器组件的麻烦,为什么不尽全力地优化您的应用程序?
这里的例子不是最佳的,只是为了认证观点。Vue.js被选为示例,因为它似乎是提供服务器端渲染和运行的最简单方法。毫无疑问,可能还有更有效的方法达到目的。
非常感谢Hasnat Ullah(@hasnatullah)在我被卡住的时候,告诉我使用 Vue.js 的例子。
下载
以上是关于使用设备检测(Device detection)的 JS 服务端渲染(SSR)的主要内容,如果未能解决你的问题,请参考以下文章