Java牛客项目课_仿牛客网讨论区_第八章
Posted 夜中听雪
tags:
篇首语:本文由小常识网(cha138.com)小编为大家整理,主要介绍了Java牛客项目课_仿牛客网讨论区_第八章相关的知识,希望对你有一定的参考价值。
文章目录
- 第八章、项目发布与总结
- 8.1、 单元测试
- 8.2、项目监控
- 8.3、项目部署
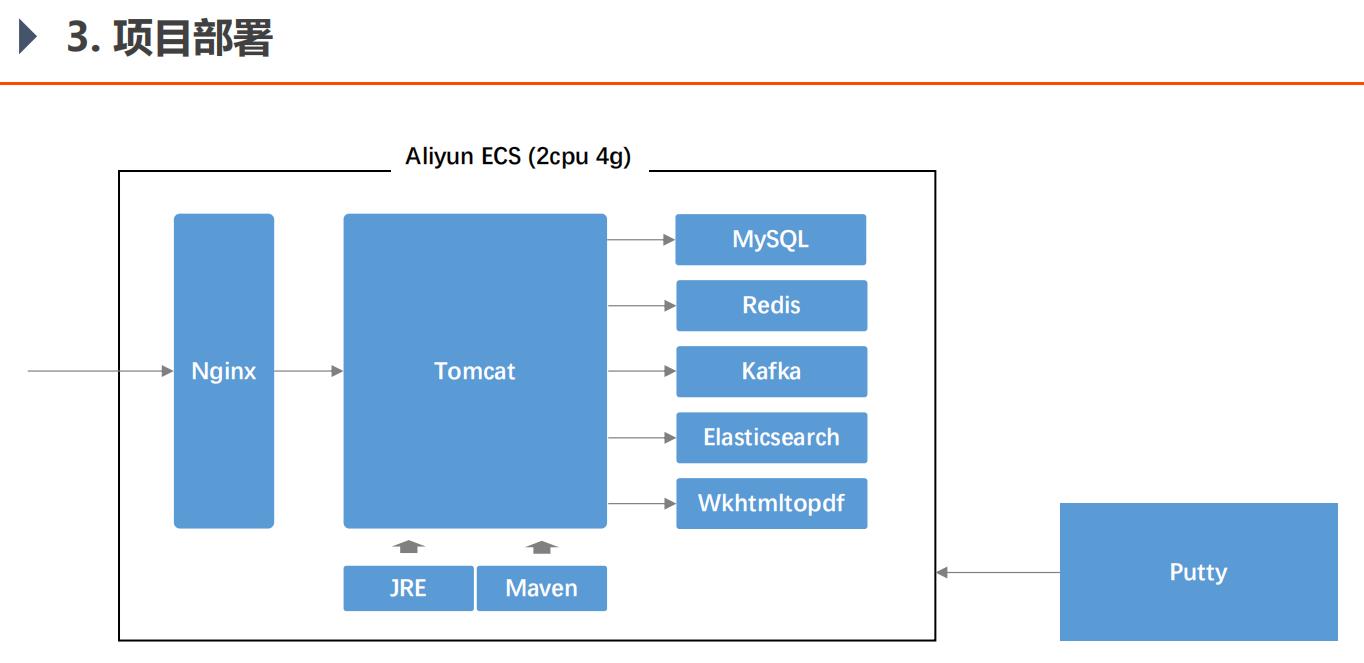
- 宝塔面板、yum、rpm、压缩包 安装 unzip、Java1.8、Maven、MySQL、Redis、Kafka、ElasticSearch和ik分词器、wkhtmltopdf、xvfb、Tomcat、Nginx。
- 如何访问到我们的项目:浏览器->Nginx->Tomcat。如何一个Tomcat部署多个项目。
- 把能在Windows上运行的项目改为能在Linux服务器上运行。然后把项目丢到服务器上,用服务器上的Maven编译打包,再把ROOT.war丢到Tomcat的wabapp目录下,启动Tomcat。
- 为了部署到服务器,我在视频课项目外额外加的代码。
- 遇到的错误和解决:
- 1、Maven编译打包项目报错:Failed to execute goal org.apache.maven.plugins:maven-resources-plugin:3.2.0:resources
- 2、Tomcat启动时的启动日志中的报错:Caused by: java.net.BindException: Address already in use
- 3、`/tmp/community/log_error.log`日志中关于Kafka的报错:Exception thrown when sending a message with key='null'
- 4、服务器上的MySQL启动失败:Starting MySQL...The server quit without updating PID file
- 5、重启Linux服务器上的elasticsearch时,需要做的步骤
- nginx报错:worker process 6610 exited on signal 11 ngx_http_fastdfs_process_init pid=6614
- 8.4、项目总结
- 8.5、常见面试题
第八章、项目发布与总结
8.1、 单元测试
Spring Boot Testing
- 依赖:spring-boot-starter-test
- 包括:Junit、Spring Test、AssertJ、…
Test Case - 要求:保证测试方法的独立性。
-
步骤:初始化数据、执行测试代码、验证测试结果、清理测试数据。
-
常用注解:@BeforeClass、@AfterClass、@Before、@After。
@BeforeClass:注解的方法在该类加载前运行
@AfterClass:注解的方法在该类销毁后运行
@Before:注解的方法在该类中的任何测试方法执行前运行
@After:注解的方法在该类中的任何测试方法执行后运行
后两个注解,方便我们在没有条件时,创造条件来进行测试。比如测试数据库的增删改查,那么每个方法测试前,先在用@Before注解的方法里新建一条数据库中的数据,运行完测试方法后,再在用@After注解的方法里销毁测试的数据。
执行测试类时,会依次执行测试类的所有测试方法。
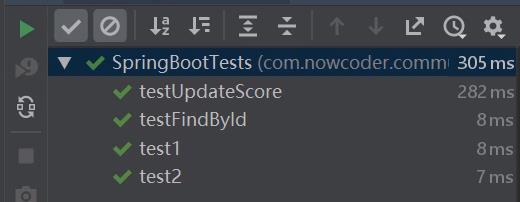
于是,在一个测试类中写好测试数据库中某张表的增删改查的方法后,可以直接执行这个测试类,用断言Assert比较测试结果和预期结果是否一致,一致就程序执行成功,不一致就会抛出异常。于是,只要执行这个测试类,就可以把数据库这张表的所有业务service方法测试完成,如果没有报错,就说明数据库这张表的所有业务service方法都正确,如果有某个测试方法抛异常,就说明该测试方法测试的方法有错误。
package com.nowcoder.community;

import com.nowcoder.community.entity.DiscussPost;
import com.nowcoder.community.service.DiscussPostService;
import org.junit.*;
import org.junit.runner.RunWith;
import org.springframework.beans.factory.annotation.Autowired;
import org.springframework.boot.test.context.SpringBootTest;
import org.springframework.test.context.ContextConfiguration;
import org.springframework.test.context.junit4.SpringRunner;

import java.util.Date;

@RunWith(SpringRunner.class)
@SpringBootTest
@ContextConfiguration(classes = CommunityApplication.class)
public class SpringBootTests

    @Autowired
    private DiscussPostService discussPostService;

    private DiscussPost data;

    //@BeforeClass和@AfterClass修饰的方法都必须用static修饰
    @BeforeClass
    public static void beforeClass()
        System.out.println("beforeClass");


    @AfterClass
    public static void afterClass()
        System.out.println("afterClass");


    @Before
    public void before()
        System.out.println("before");

        // 初始化测试数据
        data = new DiscussPost();
        data.setUserId(111);
        data.setTitle("Test Title");
        data.setContent("Test Content");
        data.setCreateTime(new Date());
        discussPostService.addDiscussPost(data);


    @After
    public void after()
        System.out.println("after");

        // 删除测试数据
        discussPostService.updateStatus(data.getId(), 2);


    @Test
    public void test1()
        System.out.println("test1");


    @Test
    public void test2()
        System.out.println("test2");


    @Test
    public void testFindById()
        DiscussPost post = discussPostService.findDiscussPostById(data.getId());
        Assert.assertNotNull(post);
        Assert.assertEquals(data.getTitle(), post.getTitle());
        Assert.assertEquals(data.getContent(), post.getContent());


    @Test
    public void testUpdateScore()
        int rows = discussPostService.updateScore(data.getId(), 2000.00);
        Assert.assertEquals(1, rows);

        DiscussPost post = discussPostService.findDiscussPostById(data.getId());
        Assert.assertEquals(2000.00, post.getScore(), 2);
8.2、项目监控
Spring Boot Actuator
- Endpoints:监控应用的入口,Spring Boot内置了很多端点,也支持自定义端点。
- 监控方式:HTTP 或 JMX。
- 访问路径:例如“/actuator/health”。
- 注意事项:按需配置暴露的端点,并对所有端点进行权限控制。
访问:http://localhost:8080/community/actuator/端点名字(如health、info、loggers,也可以是自定义端点的名字,如database)
返回:JSON字符串。
例子:
| 访问路径 | 用处 |
|---|---|
| http://localhost:8080/community/actuator/health | 当前服务的健康状况。返回:“status”:“DOWN” |
| http://localhost:8080/community/actuator/info | 返回服务端的一些相关信息。如果没有,返回: |
| http://localhost:8080/community/actuator/beans | 返回应用中所有的bean。返回的内容太多,建议写个程序来分析,或者安装和actuator有关的工具来分析。 |
| http://localhost:8080/community/actuator/loggers | 所有日志 |
pom.xml
		<dependency>
			<groupId>org.springframework.boot</groupId>
			<artifactId>spring-boot-starter-actuator</artifactId>
		</dependency>
application.propertise
# actuator
management.endpoints.web.exposure.include=*	# 暴露哪些端点,'*'代表全部。
management.endpoints.web.exposure.exclude=info,caches	# 排除哪些端点,就是哪些端点不暴露。
DatabaseEndpoint.java
package com.nowcoder.community.actuator;

import com.nowcoder.community.util.CommunityUtil;
import org.slf4j.Logger;
import org.slf4j.LoggerFactory;
import org.springframework.beans.factory.annotation.Autowired;
import org.springframework.boot.actuate.endpoint.annotation.Endpoint;
import org.springframework.boot.actuate.endpoint.annotation.ReadOperation;
import org.springframework.stereotype.Component;

import javax.sql.DataSource;
import java.sql.Connection;
import java.sql.SQLException;

//这个自定义端点用来监控数据库的连接是否正常
@Component
@Endpoint(id = "database")//自定义端点的id为database,好通过id访问它。即访问路径:http://localhost:8080/community/actuator/database。
public class DatabaseEndpoint

    private static final Logger logger = LoggerFactory.getLogger(DatabaseEndpoint.class);

    @Autowired
    private DataSource dataSource;

    @ReadOperation  //@ReadOperation表明这个方法只能通过get请求来访问。@WriteOperation注释的方法只能通过post/put请求来访问
    public String checkConnection()
        try (
                Connection conn = dataSource.getConnection();
        )
            return CommunityUtil.getJSONString(0, "获取连接成功!");
            // 返回:"msg":"获取连接成功!","code":0
         catch (SQLException e)
            logger.error("获取连接失败:" + e.getMessage());
            return CommunityUtil.getJSONString(1, "获取连接失败!");
8.3、项目部署
正向代理即是客户端代理, 代理客户端, 服务端不知道实际发起请求的客户端。
反向代理即是服务端代理, 代理服务端, 客户端不知道实际提供服务的服务端。
一句话总结:正向代理隐藏真实客户端,反向代理隐藏真实服务端。
老师想的压缩包安装部分。
宝塔面板、yum、rpm、压缩包 安装 unzip、Java1.8、Maven、mysql、Redis、Kafka、ElasticSearch和ik分词器、wkhtmltopdf、xvfb、Tomcat、nginx。
yum安装unzip
# 安装unzip,用于解压zip包
[root@wu1 /]# yum list unzip*		# yum list xx*,该命令在根目录"/"下才有效果
[root@wu1 /]# yum install -y unzip.x86_64
rpm安装Java1.8(狂神说)
视频课:【狂神说Java】Linux最通俗易懂的教程阿里云真实环境学习_哔哩哔哩 (゜-゜)つロ 干杯~-bilibili
视频课中的环境变量有错,按下面这个环境变量。
[root@wu1 apache-maven-3.8.1]# vim /etc/profile		# 环境变量,在最后追加
JAVA_HOME=/usr/java/jdk1.8.0_281-amd64
CLASSPATH=%JAVA_HOME%/lib:%JAVA_HOME%/jre/lib
PATH=$PATH:$JAVA_HOME/bin:$JAVA_HOME/jre/bin
export PATH CLASSPATH JAVA_HOME

[root@wu1 apache-maven-3.8.1]# source /etc/profile	# 让配置文件/etc/profile生效
[root@wu1 /]# java -version	# 狂神说的Java
java version "1.8.0_281"
Java(TM) SE Runtime Environment (build 1.8.0_281-b09)
Java HotSpot(TM) 64-Bit Server VM (build 25.281-b09, mixed mode)
yum安装Java环境(牛客项目课)
# 安装Java环境。这个安装完,Java在云服务器上就装了两个,一个是狂神说的,一个是牛客网项目课的,就下面这个。
[root@wu1 /]# yum list java*
[root@wu1 /]# yum install -y java-latest-openjdk.x86_64

# 此时,我用命令`java -version`还是显示"1.8.0_281",我也只需要一个Java环境,就把牛客项目课的openJDK删掉了。就是云服务器上只有狂神说的1.8的Java环境。
[root@wu1 community]# rpm -qa|grep java	# 查询服务器中是否有openJDK
java-latest-openjdk-16.0.0.0.36-1.rolling.el7.x86_64
python-javapackages-3.4.1-11.el7.noarch
javapackages-tools-3.4.1-11.el7.noarch
tzdata-java-2021a-1.el7.noarch
java-latest-openjdk-headless-16.0.0.0.36-1.rolling.el7.x86_64
[root@wu1 community]# rpm -ev java-latest-openjdk-16.0.0.0.36-1.rolling.el7.x86_64	# 删除openJDK
Preparing packages...
java-latest-openjdk-1:16.0.0.0.36-1.rolling.el7.x86_64
[root@wu1 community]# rpm -ev java-latest-openjdk-headless-16.0.0.0.36-1.rolling.el7.x86_64
Preparing packages...
java-latest-openjdk-headless-1:16.0.0.0.36-1.rolling.el7.x86_64
压缩包安装Maven
# 安装Maven
[root@wu1 ~]# ll
total 9356
-rw-r--r-- 1 root root 9536838 Apr 28 16:57 apache-maven-3.8.1-bin.tar.gz
-rw-r--r-- 1 root root      92 Apr 11 20:48 dump.rdb
-rw-r--r-- 1 root root      12 Apr 16 17:19 hi.html
-rw-r--r-- 1 root root   25386 Jan  9 12:00 install.sh
-rw-r--r-- 1 root root    2740 Aug 23  2020 update.sh
[root@wu1 ~]# tar -zxvf apache-maven-3.8.1-bin.tar.gz -C /opt
[root@wu1 ~]# cd /opt
[root@wu1 opt]# cd apache-maven-3.8.1/
[root@wu1 apache-maven-3.8.1]# pwd
/opt/apache-maven-3.8.1
[root@wu1 apache-maven-3.8.1]# vim /etc/profile		# 在最后追加一行
export PATH=$PATH:/opt/apache-maven-3.8.1/bin

[root@wu1 apache-maven-3.8.1]# source /etc/profile	# 让配置文件/etc/profile生效
[root@wu1 apache-maven-3.8.1]# echo $PATH		# 打印出环境变量看一下
/usr/local/sbin:/usr/local/bin:/usr/sbin:/usr/bin:/usr/java/jdk1.8.0_281-amd64/bin:/usr/java/jdk1.8.0_281-amd64/jre/bin:/usr/java/jdk1.8.0_281-amd64/bin:/usr/java/jdk1.8.0_281-amd64/jre/bin:/root/bin:/usr/java/jdk1.8.0_281-amd64/bin:/usr/java/jdk1.8.0_281-amd64/jre/bin:/opt/apache-maven-3.8.1:/usr/java/jdk1.8.0_281-amd64/bin:/usr/java/jdk1.8.0_281-amd64/jre/bin:/opt/apache-maven-3.8.1/bin
[root@wu1 apache-maven-3.8.1]# mvn -version	# 安装好maven了
Apache Maven 3.8.1 (05c21c65bdfed0f71a2f2ada8b84da59348c4c5d)
Maven home: /opt/apache-maven-3.8.1
Java version: 1.8.0_281, vendor: Oracle Corporation, runtime: /usr/java/jdk1.8.0_281-amd64/jre
Default locale: en_US, platform encoding: UTF-8
OS name: "linux", version: "3.10.0-1062.18.1.el7.x86_64", arch: "amd64", family: "unix"

# 配置Maven
[root@wu1 conf]# vim /opt/apache-maven-3.8.1/conf/settings.xml	# 下方复制到两个mirrors里

        <mirror>
   			 <id>alimaven</id>
  			  <name>aliyun maven</name>
    		  <url>http://maven.aliyun.com/nexus/content/groups/public/</url>
    		  <mirrorOf>central</mirrorOf>
        </mirror>

宝塔面板安装MySQL
MySQL :: Download MySQL Yum Repository

# 安装mysql
[root@wu1 ~]# yum install -y mysql80-community-release-el8-1.noarch.rpm
[root@wu1 ~]# cd /
[root@wu1 /]# yum list mysql*
[root@wu1 /]# yum install -y mysql-community-server.x86_64
或者
宝塔面板一键安装。我用的宝塔面板安装的mysql8

[root@wu1 /]# systemctl start mysqld
[root@wu1 /]# systemctl status mysqld
[root@wu1 ~]# cd /www/server/panel && python tools.py root a1b2c3	# 强制修改MySQL管理(root)密码,如要改成a1b2c3
[root@wu1 panel]# mysql -u root -p
Enter password:
Welcome to the MySQL monitor.  Commands end with ; or \\g.
Your MySQL connection id is 8
Server version: 8.0.23 Source distribution
。。。
mysql> create database community;
mysql> use community
mysql> source /root/init_sql/init_schema.sql
mysql> source /root/init_sql/init_data.sql
mysql> source /root/init_sql/tables_mysql_innodb.sql
mysql> show tables;
mysql> select id,username,header_url from user;
mysql> update user set header_url ='http://images.nowcoder.com/head/666t.png' where header_url like '%localhost%';
mysql> exit
Bye
yum安装Redis
# 安装redis。安装完这个redis,我电脑上总共安装了两个redis,一个是狂神说的redis,一个是按以下方法安装的redis。可以启动这个关闭那个,两个Redis里的数据是不一样的。
[root@wu1 panel]# cd /
[root@wu1 /]# yum list redis*
Loaded plugins: fastestmirror
Loading mirror speeds from cached hostfile
 * centos-sclo-rh: mirrors.aliyun.com
Available Packages
redis.x86_64                                            3.2.12-2.el7                                       epel
redis-trib.noarch                                       3.2.12-2.el7                                       epel
[root@wu1 /]# yum install -y redis.x86_64
[root@wu1 bin]# systemctl start redis
[root@wu1 bin]# systemctl status redis
[root@wu1 bin]# redis-cli
127.0.0.1:6379> exit
压缩包安装Kafka
# 安装Kafka
[root@wu1 ~]# tar -zvxf kafka_2.13-2.7.0.tgz -C /opt
[root@wu1 ~]# /opt/kafka_2.13-2.7.0/bin/zookeeper-server-start.sh -daemon /opt/kafka_2.13-2.7.0/config/zookeeper.properties 	# 后台启动zookeeper
[root@wu1 ~]# nohup /opt/kafka_2.13-2.7.0/bin/kafka-server-start.sh /opt/kafka_2.13-2.7.0/config/server.properties 1>/dev/null 2>&1 &	# 后台启动Kafka
[1] 4408
[root@wu1 ~]# /opt/kafka_2.13-2.7.0/bin/kafka-topics.sh --list --bootstrap-server localhost:9092	# 没报错就说明启动成功
压缩包安装ElasticSearch和ik分词器
# 安装elasticsearch和ik分词器
[root@wu1 ~]# tar -zvxf /root/elasticsearch-7.12.0-linux-x86_64.tar.gz -C /opt
[root@wu1 ~]# unzip -d /opt/elasticsearch-7.12.0/plugins/ik /root/elasticsearch-analysis-ik-7.12.0.zip
[root@wu1 ~]# vim /opt/elasticsearch-7.12.0/config/elasticsearch.yml 	# 取消下方内容的注释,修改以下内容
cluster.name: nowcoder
path.data: /tmp/elastic/data
path.logs: /tmp/elastic/logs

[root@wu1 ~]# vim /opt/elasticsearch-7.12.0/config/jvm.options	# 取消下方内容的注释,修改以下内容,这两个参数要顶格写。
-Xms256m
-Xmx512m

[root@wu1 ~]# groupadd nowcoder
[root@wu1 ~]# useradd nowcoder1 -p 123456 -g nowcoder
[root@wu1 ~]# cd /opt
[root@wu1 opt]# chown -R nowcoder1:nowcoder *
[root@wu1 opt]# cd /tmp
[root@wu1 tmp]# chown -R nowcoder1:nowcoder *
[root@wu1 tmp]# su - nowcoder1
[nowcoder1@wu1 ~]$ /opt/elasticsearch-7.12.0/bin/elasticsearch -d	# 后台启动es
[nowcoder1@wu1 ~]$ su -
Password:
[root@wu1 ~]# curl -X GET "localhost:9200/_cat/health?v"	# 测试es是否成功启动
epoch      timestamp cluster  status node.total node.data shards pri relo init unassign pending_tasks max_task_wait_time active_shards_percent
1619627359 16:29:19  nowcoder green           1         1      0   0    0    0        0             0                  -                100.0%
yum安装wkhtmltopdf
# yum安装wkhtmltopdf
[root@wu1 ~]# cd /
[root@wu1 /]# yum list wkhtmltopdf*
Loaded plugins: fastestmirror
Loading mirror speeds from cached hostfile
 * centos-sclo-rh: mirrors.aliyun.com
Available Packages
wkhtmltopdf.x86_64                                                0.12.4-1.el7
wkhtmltopdf-devel.x86_64                                          0.12.4-1.el7
[root@wu1 /]# yum install -y wkhtmltopdf.x86_64
yum安装xvfb,让Linux可视化。因为wkhtmltopdf会生成图片,图片是可视化的。
# yum安装xvfb,让Linux可视化。因为wkhtmltopdf会生成图片,图片是可视化的。
[root@wu1 /]# yum list *xvfb*
Loaded plugins: fastestmirror
Loading mirror speeds from cached hostfile
 * centos-sclo-rh: mirrors.aliyun.com
Available Packages
python-xvfbwrapper.noarch                         0.2.4-2.el7                            epel
xorg-x11-server-Xvfb.x86_64                       1.20.4-15.el7_9                        updates
[root@wu1 /]# yum install -y xorg-x11-server-Xvfb.x86_64
测试用wkhtmltopdf生成图片
# 测试用wkhtmltopdf生成图片
[root@wu1 /]# cd /root/test
[root@wu1 test]# ll
total 0
[root@wu1 test]# xvfb-run --server-args="-screen 0, 1024x768x24" wkhtmltoimage https://www.baidu.com 1.png
Loading page (1/2)
Rendering (2/2)
Warning: Received createRequest signal on a disposed ResourceObject's NetworkAccessManager. This might be an indication of an iframe taking too long to load.
Done
[root@wu1 test]# ll
total 2952
-rw-r--r-- 1 root root 3019976 Apr 29 00:37 1.png
[root@wu1 test]# cd /opt
[root@wu1 opt]# vim wkhtmltoimage.sh		# /opt/wkhtmltoimage.sh文件里只有这一句话
xvfb-run --server-args="-screen 0, 1024x768x24" wkhtmltoimage "$@"
[root@wu1 opt]# ll
total 2412
drwxr-xr-x 6 nowcoder1 nowcoder    4096 Apr 28 17:01 apache-maven-3.8.1
drwx--x--x 4 nowcoder1 nowcoder    4096 Mar 19 11:15 containerd
drwxr-xr-x 9 nowcoder1 nowcoder    4096 Mar 18 14:21 elasticsearch-7.12.0
drwxr-xr-x 7 nowcoder1 nowcoder    4096 Apr 28 23:12 kafka_2.13-2.7.0
drwxrwxr-x 7 nowcoder1 nowcoder    4096 Mar  2 14:14 redis-6.2.1
-rw-r--r-- 1 nowcoder1 nowcoder 2438367 Mar 25 10:35 redis-6.2.1.tar.gz
drwxr-xr-x 3 nowcoder1 nowcoder    4096 Mar 13 11:11 rh
-rw-r--r-- 1 root      root          67 Apr 29 00:39 wkhtmltoimage.sh
[root@wu1 opt]# chmod +x wkhtmltoimage.sh
[root@wu1 opt]# cd /root/test
[root@wu1 test]# /opt/wkhtmltoimage.sh https://www.baidu.com 2.png
Loading page (1/2)
Rendering (2/2)
Warning: Received createRequest signal on a disposed ResourceObject's NetworkAccessManager. This might be an indication of an iframe taking too long to load.
Done
[root@wu1 test]# ll
total 5904
-rw-r--r-- 1 root root 3019976 Apr 29 00:37 1.png
-rw-r--r-- 1 root root 3019976 Apr 29 00:40 2.png
[root@wu1 test]#
宝塔面板安装Tomcat
# 宝塔面板安装tomcat
[root@wu1 test]# vim /etc/profile	# 最下方写一句这个
export PATH=$PATH:/www/server/tomcat/bin
[root@wu1 test]# source /etc/profile
[root@wu1 test]# echo $PATH
/usr/local/sbin:/usr/local/bin:/sbin:/bin:/usr/sbin:/usr/bin:/usr/java/jdk1.8.0_281-amd64/bin:/usr/java/jdk1.8.0_281-amd64/jre/bin:/opt/apache-maven-3.8.1/bin:/www/server/tomcat/bin:/usr/java/jdk1.8.0_281-amd64/bin:/usr/java/jdk1.8.0_281-amd64/jre/bin:/opt/apache-maven-3.8.1/bin:/www/server/tomcat/bin:/root/bin:/usr/java/jdk1.8.0_281-amd64/bin:/usr/java/jdk1.8.0_281-amd64/jre/bin:/opt/apache-maven-3.8.1/bin:/www/server/tomcat/bin
压缩包安装Nginx
# 压缩包安装nginx(下方为yum安装nginx失败)
[root@wu1 ~]# cd /
[root@wu1 /]# yum list nginx*
Loaded plugins: fastestmirror
Loading mirror speeds from cached hostfile
 * centos-sclo-rh: mirrors.aliyun.com
Available Packages
nginx-all-modules.noarch                     1:1.16.1-3.el7            epel
nginx-filesystem.noarch                      1:1.16.1-3.el7            epel
nginx-mod-http-image-filter.x86_64           1:1.16.1-3.el7            epel
nginx-mod-http-perl.x86_64                   1:1.16.1-3.el7            epel
nginx-mod-http-xslt-filter.x86_64            1:1.16.1-3.el7            epel
nginx-mod-mail.x86_64                        1:1.16.1-3.el7            epel
nginx-mod-stream.x86_64                      1:1.16.1-3.el7            epel
[root@wu1 /]# yum install -y nginx.x86_64
。。。
No package nginx.x86_64 available.
Error: Nothing to do

# 压缩包安装nginx后
[root@wu1 ~]# vim /usr/local/nginx/conf/nginx.conf	# http的大括号里,去掉原先的server,加上下面这个
# http是80端口,https是443端口。默认是80端口,于是访问120.77.151.233会变为120.77.151.233:80,然后被服务器中的nginx映射到120.77.151.233:8080。
	upstream myserver
		server 127.0.0.1:8080 max_fails=3 fail_timeout=30s;

	server
		listen 80;
		server_name 120.77.151.233;
		location /
			proxy_pass http://myserver;


[root@wu1 ~]# /usr/local/nginx/sbin/nginx
nginx: [emerg] "upstream" directive is not allowed here in /usr/local/nginx/conf/nginx.conf:88
[root@wu1 ~]# vim /usr/local/nginx/conf/nginx.conf
[root@wu1 ~]# /usr/local/nginx/sbin/nginx
nginx: [emerg] "server" directive is not allowed here in /usr/local/nginx/conf/nginx.conf:93
[root@wu1 ~]# vim /usr/local/nginx/conf/nginx.conf
[root@wu1 ~]# /usr/local/nginx/sbin/nginx
nginx: [emerg] bind() to 0.0.0.0:80 failed (98: Address already in use)
nginx: [emerg] bind() to 0.0.0.0:80 failed (98: Address already in use)
nginx: [emerg] bind() to 0.0.0.0:80 failed (98: Address already in use)
nginx: [emerg] bind() to 0.0.0.0:80 failed (98: Address already in use)
nginx: [emerg] bind() to 0.0.0.0:80 failed (98: Address already in use)
nginx: [emerg] still could not bind()
[root@wu1 ~]# killall -9 nginx
[root@wu1 ~]# /usr/local/nginx/sbin/nginx	# 没输出东西,nginx/logs目录下的error.log文件输出worker process 6610 exited on signal 11 ngx_http_fastdfs_process_init pid=6614,需要打开fastdfs的tracker
[root@wu1 ~]# fdfs_trackerd /etc/fdfs/tracker.conf start
[root@wu1 ~]# killall -9 nginx
[root@wu1 ~]# /usr/local/nginx/sbin/nginx
如何访问到我们的项目:浏览器->Nginx->Tomcat。如何一个Tomcat部署多个项目。
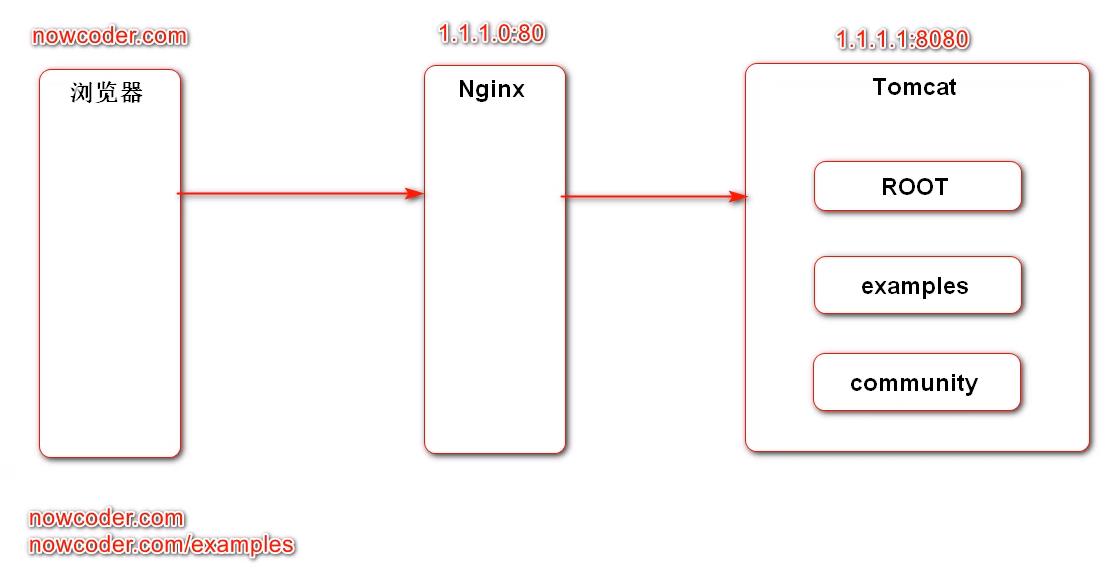
如果访问1.1.1.1,会访问1.1.1.1:80,然后被服务器中的nginx映射到1.1.1.1:8080,即访问tomcat中的ROOT项目的首页。如果想访问tomcat下的其他项目,需要用1.1.1.1/community这种形式来访问,如果1.1.1.1有域名nowcoder.com,那么需要用nowcoder.com/community来访问我们自己的项目。
补充知识点:一个tomcat部署多个项目
~~
【狂神说Java】JavaWeb入门到实战_哔哩哔哩 (゜-゜)つロ 干杯~-bilibili。这个视频课是关于tomcat的,讲了,直接把软件放在tomcat的webapp目录下,他默认是localhost:8080/会访问到webapp/ROOT项目;而localhost:8080/hello会访问到webapp/hello项目;而localhost:8080/hello2会访问到webapp/hello2项目。
~~
1.1.1.1默认为1.1.1.1:80,nginx把其映射到1.1.1.1:8080,然后我们可以在tomcat的webapp目录下部署两个war包,一个是ROOT,一个是scau-community。然后一启动tomcat,就会把这两个war包打开为两个文件夹,然后,可以用1.1.1.1访问ROOT,可以用1.1.1.1/scau-community访问scau-community
~~
1.1.1.1是假设的IP,改成你的服务器的IP。

通过删掉ROOT,然后把我们自己的项目打包成ROOT.war来解决,到时候访问1.1.1.1,会访问到我们自己的项目。
把能在Windows上运行的项目改为能在Linux服务器上运行。然后把项目丢到服务器上,用服务器上的Maven编译打包,再把ROOT.war丢到Tomcat的wabapp目录下,启动Tomcat。
接下来,1、去掉/community,2、访问"/“时要访问”/index"。
[root@wu1 ~]# shutdown.sh	# 关掉tomcat
Using CATALINA_BASE:   /www/server/tomcat
Using CATALINA_HOME:   /www/server/tomcat
Using CATALINA_TMPDIR: /www/server/tomcat/temp
Using JRE_HOME:        /usr/java/jdk1.8.0_281-amd64
Using CLASSPATH:       /www/server/tomcat/bin/bootstrap.jar:/www/server/tomcat/bin/tomcat-juli.jar

# 可以修改/www/server/tomcat/webapps/ROOT文件夹为ROOT_bak文件夹。
# 但建议直接删除原先的webapp目录下的所有文件。
IDEA项目8.3修改
1、去掉/community
# application.properties
server.servlet.context-path=

# global.js
var CONTEXT_PATH = "";
2、访问"/“时要访问”/index"
# HomeController.java加一个方法
    @RequestMapping(path = "/", method = RequestMethod.GET)
    public String root()
        return "forward:/index";
3、默认会打成jar包,要使得打包时打成war包
# pom.xml增加<packaging>和<finalName>两行
	<name>community</name>
	<description>nowcoder community</description>
	<packaging>war</packaging>

	<build>
		<finalName>ROOT</finalName>
		<plugins>
			<plugin>
				<groupId>org.springframework.boot</groupId>
				<artifactId>spring-boot-maven-plugin</artifactId>
			</plugin>
		</plugins>
	</build>
4、Windows上日志文件的存放地址和Linux服务器上的日志文件存放地址不一样,其他的一些路径也都不一样。又不方便测试时xx路径,上线时改为yy路径。于是SpringBoot允许一个项目有多套配置文件,开发时一套,上线时一套,也可以有其他的。然后通过一个开关,决定用哪套配置文件。
这里搞两套配置文件,开发一套,生产(上线)一套。
application.properties
application-develop.properties
application-produce.properties
logback-spring.xml
logback-spring-develop.xml
logback-spring-produce.xml
开关为application.properties,修改时只需要spring.profiles.active=produce/develop,即可。
# profile
spring.profiles.active=produce

# logback
logging.config=classpath:logback-spring-$spring.profiles.active.xml
5、因为tomcat本身就有启动方法,而我们的项目也有启动的方法,于是需要一个两者间的桥梁,就是下面这个。继承一个类,用来实现该类的父接口的configure方法。
加一个类,CommunityServletInitializer.java
package com.nowcoder.community;

import org.springframework.boot.builder.SpringApplicationBuilder;
import org.springframework.boot.web.servlet.support.SpringBootServletInitializer;

public class CommunityServletInitializer extends SpringBootServletInitializer

    //tomcat访问该方法作为入口来运行该项目
    @Override
    protected SpringApplicationBuilder configure(SpringApplicationBuilder builder)
        return builder.sources(CommunityApplication.class); //这里指出该项目的main方法所在的类
6、application-develop.properties和application-produce.properties相比,后者修改的地方。
# ServerProperties
server.servlet.context-path=

# ThymeleafProperties
spring.thymeleaf.cache=true

# DataSourceProperties	# 因为访问的是你自己电脑上的mysql->服务器的mysql,可能两个mysql你设置的用户名密码不一致。
spring.datasource.username=root
spring.datasource.password=a1b2c3

# community
community.path.domain=http://120.77.151.233		# 你的要部署的服务器的IP地址
community.path.upload=/tmp/uploads

# wk
wk.image.command=/opt/wkhtmltoimage.sh
wk.image.storage=/tmp/wk-images
7、logback-spring-produce.xml相对于logback-spring-develop.xml修改的地方
    <contextName>community</contextName>
    <property name="LOG_PATH" value="/tmp"/> <!--只改了这里"/tmp"-->
    <property name="APPDIR" value="community"/>
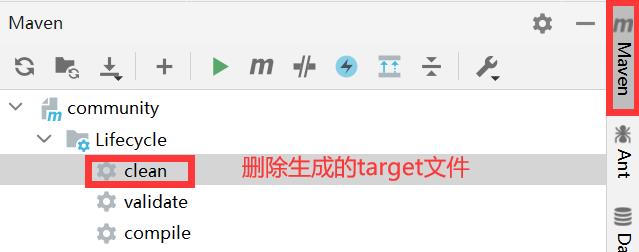
8、删除生成的target文件
删除target文件遇到的问题和解决方法:IDEA 踩坑之:maven 打包提示 [ERROR] The specified user settings file does not exist…_小白一个-CSDN博客
9、把项目丢到服务器上,用服务器上的Maven编译打包,再把ROOT.war丢到Tomcat的wabapp目录下,启动Tomcat。
把项目打包为zip压缩包,然后上传到服务器的root目录下。
[root@wu1 ~]# unzip -d /root community.zip	# -d后面跟放到哪个目录下。
[root@wu1 ~]# cd community
[root@wu1 community]# mvn clean package -Dmaven.test.skip=true	# 用maven把项目编译并且打包,跳过测试,因为我们前面的测试类写的都不标准,最后单独讲的那个测试才是标准的测试。耗时较长。
[root@wu1 community]# cd target	# 来到/root/community/target目录
[root@wu1 target]# ll	# 看到ROOT.war文件
[root@wu1 target]# mv ROOT.war /www/server/tomcat/webapps/
[root@wu1 target]# startup.sh		# 启动tomcat。虽然立刻返回了信息,但实际上过了一会才启动
Using CATALINA_BASE:   /www/server/tomcat
Using CATALINA_HOME:   /www/server/tomcat
Using CATALINA_TMPDIR: /www/server/tomcat/temp
Using JRE_HOME:        /usr/java/jdk1.8.0_281-amd64
Using CLASSPATH:       /www/server/tomcat/bin/bootstrap.jar:/www/server/tomcat/bin/tomcat-juli.jar
Tomcat started.
[root@wu1 target]# vim /www/server/tomcat/logs/catalina.2021-05-16.log	# 查看tomcat的日志,是否启动成功。
tomcat启动日志/www/server/tomcat/logs/catalina.2021-05-16.log启动成功时提示:
。。。
18-May-2021 23:50:42.348 INFO [main] org.apache.catalina.startup.Catalina.load Initialization processed in 575 ms
18-May-2021 23:50:42.382 INFO [main] org.apache.catalina.core.StandardService.startInternal Starting service Catalina
18-May-2021 23:50:42.383 INFO [main] org.apache.catalina.core.StandardEngine.startInternal Starting Servlet Engine: Apache Tomcat/9.0.0.M18
18-May-2021 23:50:42.402 INFO [main] org.apache.catalina.startup.HostConfig.deployWAR Deploying web application archive /www/server/tomcat/webapps/ROOT.war
18-May-2021 23:50:47.297 INFO [main] org.apache.jasper.servlet.TldScanner.scanJars At least one JAR was scanned for TLDs yet contained no TLDs. Enable debug logging for this logger for a complete list of JARs that were scanned but no TLDs were found in them. Skipping unneeded JARs during scanning can improve startup time and JSP compilation time.
18-May-2021 23:50:58.085 INFO [main] org.apache.catalina.startup.HostConfig.deployWAR Deployment of web application archive /www/server/tomcat/webapps/ROOT.war has finished in 15,682 ms
18-May-2021 23:50:58.100 INFO [main] org.apache.coyote.AbstractProtocol.start Starting ProtocolHandler [http-nio-8080]
18-May-2021 23:50:58.138 INFO [main] org.apache.coyote.AbstractProtocol.start Starting ProtocolHandler [ajp-nio-8009]
18-May-2021 23:50:58.154 INFO [main] org.apache.catalina.startup.Catalina.start Server startup in 15806 ms
部署到服务器上以后,我们就没有办法用工具来调试了,一切都要看日志,所以要习惯于看日志。
为了部署到服务器,我在视频课项目外额外加的代码。
1、项目的启动初始化代码,使得服务器上的项目启动时,从数据库取到所有帖子数据,同步到ElasticSearch中。
package com.nowcoder.community.config;
import com.nowcoder.community.dao.DiscussPostMapper;
import com.nowcoder.community.dao.elasticsearch.DiscussPostRepository;
import org.elasticsearch.action.admin.indices.delete.DeleteIndexRequest;
import org.elasticsearch.action.support.master.AcknowledgedResponse;
import org.elasticsearch.client.RequestOptions;
import org.elasticsearch.client.RestHighLevelClient;
import org.elasticsearch.client.indices.CreateIndexRequest;
import org.elasticsearch.client.indices.CreateIndexResponse;
import org.elasticsearch.client.indices.