属性动画(PropertyAnimation)好玩的粘性控件
Posted 花花young
tags:
篇首语:本文由小常识网(cha138.com)小编为大家整理,主要介绍了属性动画(PropertyAnimation)好玩的粘性控件相关的知识,希望对你有一定的参考价值。
前言
从补间动画、帧动画到属性动画,动画效果越来越丰富、越来越完善。
补间动画(Tween Animation)
a、渐变动画支持的类型:平移(Translate)、旋转(Rotate)、缩放(Scale)、透明度(Alpha)
b、只是显示位置的变动,View的实际位置并没有改变,当View移动之后但点击事件只有在原处才能进行响应
c、组合使用非常的复杂
帧动画(Frame Animation)
a、用于生成连续的Gif效果图
b、DrawableAnimation指此动画
属性动画(Property Animation)
a、支持对所有的View能更新的属性动画(需要属性的set和get方法)
b、更改的是View实际的属性,所以点击事件是在动画结束的最终位置
c、android3.0(API11),3.0之前可以使用第三方开源库nineoldandroids.jar进行支持效果~

Part 1、贝塞尔曲线
贝塞尔曲线(The Bézier Curves),是一种在计算机图形学中相当重要的参数曲线(2D,3D的称为曲面)。贝塞尔曲线于1962年,由法国工程师皮埃尔·贝塞尔(Pierre Bézier)所发表,他运用贝塞尔曲线来为汽车的主体进行设计。
线性曲线
一次直线:

二次曲线:


Part 2、粘性控件
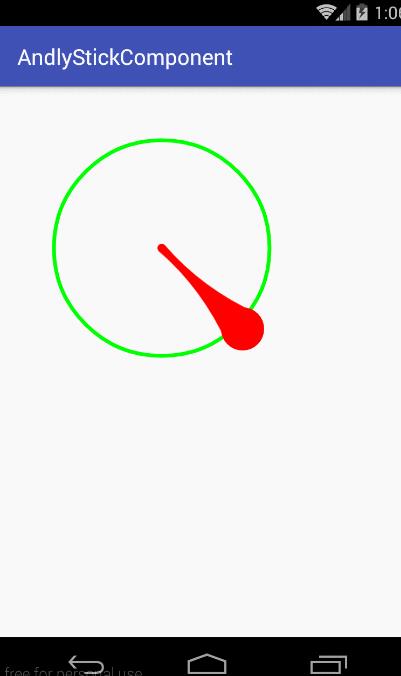
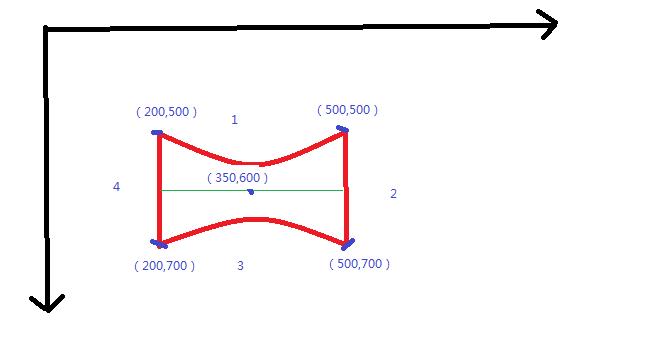
先画出两个圆之间的黏着部分

                //画出黏着部分
                Path path = new Path();
                //绘制线段1
                path.moveTo(mDragPoints[0].x, mDragPoints[0].y);
                path.quadTo(controllPoint.x, controllPoint.y, mStickPoints[0].x, mStickPoints[0].y);
                //绘制线段2
                path.lineTo(mStickPoints[1].x, mStickPoints[1].y);
                //绘制线段3
                path.quadTo(controllPoint.x, controllPoint.y, mDragPoints[1].x, mDragPoints[1].y);
                //绘制线段4
                path.close();
                canvas.drawPath(path, mpaint);
tips:
1、moveTo():移动到该位置
2、quadTo():三次贝塞尔曲线(附着点、拖拽点、控制点)
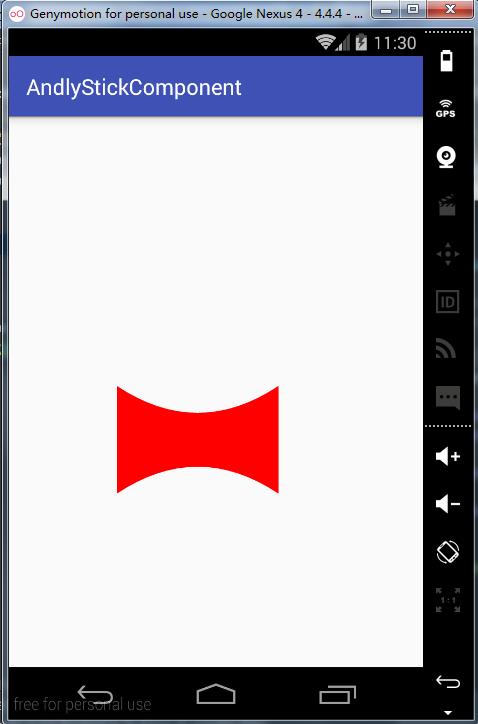
效果~

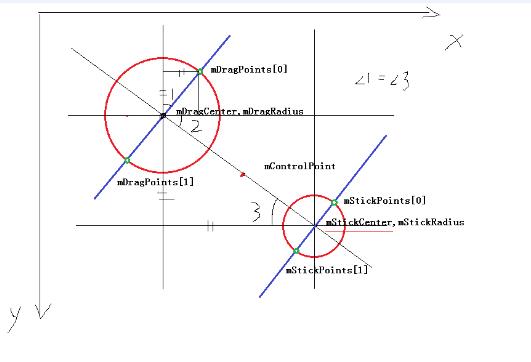
然后将两边加入到两个圆上

                //更新固定点和拖拽点
                double k = 0;
                float offsetX = stickCenter.x - dragCenter.x;
                float offsetY = stickCenter.y - dragCenter.y;
                if (offsetX != 0) //分母不能为0
                    k = offsetY / offsetX;

                mStickPoints = GeometryUtil.getIntersectionPoints(stickCenter, stickRadius, k);//得到附着点
                mDragPoints = GeometryUtil.getIntersectionPoints(dragCenter, dragRadius, k);//得到拖拽点
                controllPoint = GeometryUtil.getMiddlePoint(stickCenter, dragCenter);//得到控制点
tips:
1、根据x/y的差值来计算出tan值为offsetY/offSetX=tan(3)
2、GeometryUtil.getIntersectionPoints(stickCenter,stickRadus,k)
	/**
	 * Get the point of intersection between circle and line.
	 * 获取 通过指定圆心,斜率为lineK的直线与圆的交点。
	 *
	 * @param pMiddle The circle center point.
	 * @param radius The circle radius.
	 * @param lineK The slope of line which cross the pMiddle.
	 * @return
	 */
	public static PointF[] getIntersectionPoints(PointF pMiddle, float radius, Double lineK)
		PointF[] points = new PointF[2];
		float radian, xOffset = 0, yOffset = 0;
		if(lineK != null)
			radian= (float) Math.atan(lineK);
			xOffset = (float) (Math.sin(radian) * radius);
			yOffset = (float) (Math.cos(radian) * radius);
		else
			xOffset = radius;
			yOffset = 0;

		points[0] = new PointF(pMiddle.x + xOffset, pMiddle.y - yOffset);
		points[1] = new PointF(pMiddle.x - xOffset, pMiddle.y + yOffset);

		return points;
3、GeometryUtil.getIntersectionPoints(stickCenter,stickRadus,k)
	/**
	 * Get middle point between p1 and p2.
	 * 获得两点连线的中点
	 * @param p1
	 * @param p2
	 * @return
	 */
	public static PointF getMiddlePoint(PointF p1, PointF p2)
		return new PointF((p1.x + p2.x) / 2.0f, (p1.y + p2.y) / 2.0f);
    @Override
    public boolean onTouchEvent(MotionEvent event)
        switch (event.getAction())
            case MotionEvent.ACTION_DOWN:
                break;
            case MotionEvent.ACTION_MOVE:
                float distance = GeometryUtil.getDistanceBetween2Points(new PointF(event.getX(), event.getY()), stickCenter);
                updateStickCenter(event.getX(), event.getY());
                if (distance <= MAX_DISTANCE)
                    isOut = false;
                 else
                    //取消中间的附着
                    isOut = true;

                break;
            case MotionEvent.ACTION_UP:
                break;

        return true;
                    final PointF tempDragCenter = new PointF(dragCenter.x, dragCenter.y);//注意这里要重新为拖拽圆心生成一个对象
                    ValueAnimator mAnim = ValueAnimator.ofFloat(1.0f);
                    mAnim.addUpdateListener(new ValueAnimator.AnimatorUpdateListener()
                        @Override
                        public void onAnimationUpdate(ValueAnimator mAnim)
                            float percent = mAnim.getAnimatedFraction();
                            PointF p = GeometryUtil.getPointByPercent(tempDragCenter, stickCenter, percent);
                            updateStickCenter(p.x, p.y);

                    );
                    mAnim.setInterpolator(new OvershootInterpolator(4));
                    mAnim.setDuration(500);
                    mAnim.start();
以上是关于属性动画(PropertyAnimation)好玩的粘性控件的主要内容,如果未能解决你的问题,请参考以下文章
结合使用 Animators 和 PropertyAnimation 的 QML 过渡动画
属性动画-Property Animation之ViewPropertyAnimator 你应该知道的一切