Service Android
Posted Andy__Wu
tags:
篇首语:本文由小常识网(cha138.com)小编为大家整理,主要介绍了Service Android相关的知识,希望对你有一定的参考价值。
引言
Service 服务是 android 系统最常用的四大部件之一,Android 支持 Service 服务的原因主要目的有两个,一是简化后台任务的实现,二是实现在同一台设备当中跨进程的远程信息通信。
Service 服务主要分为 Local Service 本地服务与 Remote Service 远程服务两种,本地服务只支持同一进程内的应用程序进行访问,远程服务可通过AIDL(Android Interface Definition Language)技术支持跨进程访问。服务可以通过Context.startService()和Context.bindService()进行启动,一般Local Service本地服务可使用其中一种方法启动,但Remote Service远程服务只能使用Context.bindService()启动,而两种调用方式在使用场景与活动流程中都存在差异。还有通过多线程技术处理 Service 服务的延时操作等技术,下文将针对Android 系统的 Service 服务的一系列操作进行深入探讨。
目录
一、Android Service的概念与说明
1.1 Service 服务的定义
Android Service 是 Android 平台最常用的部件之一,其概念与 Windows Service 类似,熟悉Windows开发的朋友应该对此概念会有所了解。当 Android 系统需要对现有的程序数据进行监听,或者对现有 Actitvity 提供数据服务支撑时,就会使用到 Android Service 。例如:对用户地理位置的检测,对SD卡定时扫描,对当地气候的定期检测都会使用到 Service 服务,Service 一般都是运行于后台,不需要用户界面支撑。Service 服务不会自动创建线程,如果开发人员没有为Service服务添加异步操作,那Service服务将运行于主线程当中。
1.2 Service 服务的类型
1.2.1 按照 Service 的生命周期模型一共分为两种类型
第一类是直接通过Context.startService()启动,通过Context.stopService() 结束Service,其特点在于调用简单,方便控制。缺点在于一旦启动了 Service 服务,除了再次调用或结束服务外就再无法对服务内部状态进行操控,缺乏灵活性。
第二类是通过Context.bindService()启动,通过Context.unbindService() 结束,相对其特点在运用灵活,可以通过 IBinder 接口中获取 Service 的句柄,对 Service 状态进行检测。
从 Android 系统设计的架构上看,startService() 是用于启动本地服务,bindService() 更多是用于对远程服务进行绑定。当然,也可以结合两者进行混合式应用,先通过startService()启动服务,然后通过 bindService() 、unbindService()方法进行多次绑定,以获取 Service 服务在不同状态下的信息,最后通过stopService()方法结束Service运行,在下面文章里将举例一一说明。
1.2.2 按照 Service 的寄存方式分为两种类型
本地服务 (Local Service) 寄存于当前的进程当中,当前进程结束后 Service 也会随之结束,Service 可以随时与 Activity 等多个部件进行信息交换。Service服务不会自动启动线程,如果没有人工调用多线程方式进行启动,Service将寄存于主线程当中。
远程服务 (Remote Service ) 独立寄存于另一进程中, 通过 AIDL (Android Interface Definition Language)接口定义语言,实现Android设备上的两个进程间通信(IPC)。AIDL 的 IPC 机制是基于 RPC (Remote Proceduce Call) 远程过程调用协议建立的,用于约束两个进程间的通讯规则,供编译器生成代码。进程之间的通信信息,首先会被转换成AIDL协议消息,然后发送给对方,对方收到AIDL协议消息后再转换成相应的对象,其使用方法在下文将会详细说明。
二、Android Service 的生命周期
2.1 Service 服务的常用方法
| 方法 | 说明 |
| void onCreate() | 当Service被启动时被触发,无论使用Context.startServcie还是Context.bindService启动服务,在Service整个生命周期内只会被触发一次 |
| int onStartCommand(Intent intent, int flags, int startId) | 当通过Context.startService启动服务时将触发此方法,但当使用 Context.bindService 方法时不会触发此方法,其中参数 intent 是 startCommand 的输入对象,参数 flags 代表 service 的启动方式,参数 startId 当前启动 service 的唯一标式符。返回值决定服务结束后的处理方式,下文将再作详细说明。 |
| void onStart(Intent intent,int startId) | 2.0旧版本的方法,已被Android抛弃,不推荐使用,默认在onStartCommand 执行中会调用此方法 |
| IBinder onBind(Intent intent) | 使用 Context.bindService 触发服务时将调用此方法,返回一个IBinder 对象,在远程服务时可用于对 Service 对象进行远程操控 |
| void onRebind(Intent intent) | 当使用startService启动Service,调用bindService启动Service,且 onUnbind 返回值为 true 时,下次再次调用 Context.bindService 将触发方法 |
| boolean onUnbind(Intent intent) | 调用 Context.unbindService 触发此方法,默认返回 false, 当返回值 true 后,再次调用 Context.bindService 时将触发 onRebind 方法 |
| void onDestory() | 分三种情况:1.以Context.startService启动service,调用Context.stopService结束时触发此方法;2.以Context.bindService启动service,以Context.unbindService结束时触发此方法;3.先以Context.startService 启动服务,再用Context.bindService绑定服务,结束时必须先调用Context.unbindService解绑再使用Context.stopService结束service才会触发此方法。 |
表2.1
- 细说onStartCommand 方法
由于手机的RAM、内部资源有限,所以很多Service都会因为资源不足而被Kill掉,这时候返回值就决定了Service被Kill后的处理方式,一般 int onStartCommand(intent,flags,startId)的返回值分为以下几种:
START_STICKY
如果service进程被kill掉,系统会尝试重新创建Service,如果在此期间没有任何启动命令被传递到Service,那么参数intent将为null。
START_NOT_STICKY
使用这个返回值时,如果在执行完onStartCommand()后,服务被异常kill掉,系统不会自动重启该服务。
START_REDELIVER_INTENT
使用这个返回值时,如果在执行完onStartCommand()后,服务被异常kill掉,系统会自动重启该服务,并将intent的值传入。
而输入参数flags正是代表此次onStartCommand()方法的启动方式,正常启动时,flags默认为0,被kill后重新启动,参数分为以下两种:
START_FLAG_RETRY
代表service被kill后重新启动,由于上次返回值为START_STICKY,所以参数 intent 为null
START_FLAG_REDELIVERY
代表service被kill后重新启动,由于上次返回值为START_REDELIVER_INTENT,所以带输入参数intent
2.2 Service 的运作流程
上文曾经提到 Service 的启动方法有Context.startService(intent),Context.bindService(intent,serviceConnection,int) 两种,下面详细介绍一下它们工作流程。
当系统调用Context.startService()方法时,先会触发Service的onCreate()方法,这一般用于对Service的运行条件作初始化处理,且在Service的生命周期内只会被触发一次。然后系统将触发Service的onStartCommand()方法,用户每次调用startService()方法,都会触发onStartCommand()方法。之后,Service 除非在资源不足的情况下被系统 kill 掉,否则Service不会自动结束,直至系统调用Context.stopService()方法时,Service 才会结束。在Service结束时将自动启动onDestory()方法对运转中的Service作最后处理。
注意:即使系统多次调用 startService()或 bindService()方法, onCreate() 方法只会在第一次调用时被触发。同理 onDestory () 方法也只会在服务完结时被触发,其原理可看第2.1节该方法的详细说明。
当系统调用Context.bindService()方法时,也会触发Service的onCreate()方法对Service对象的运行条件作初始化处理,然后触发Service 的 onBind ()方法对服务进行绑定,成功获取Service的句柄后,系统就会通过用户自定义的serviceConnection对象onServiceConnected(ComponentName name, IBinder service)方法,对 Service 对象作出处理。最后当系统调用Context.unbindService()结束服务时,就会激发Service的onDestory()方法对运转中的 Service 作最后的处理。
注意:系统调用 Context.bindService()方法,完成 Service.onBind() 绑定后就会触发 serviceConnection对象的 onServiceConnected()方法,但只要系统未使用 Context.unbindService()方法对 service 服务进行解绑,即使多次调用 bindService(),系统也只会在第一次绑定时调用 onBind() 和 onServiceConnected方()法一次。这正是 startService()与 bindService()方法其中的区别,单从字面上理解 startService () 启动服务是可以多次执行,所以多次调用 startService()方法都会触发 onStartCommand()事件,而 bindService() 是绑定服务,所以只要服务已经被绑定,在未解绑时也不会多次执行onServiceConnected()绑定后的操作,这也是两者在使用场景上的区别所在。
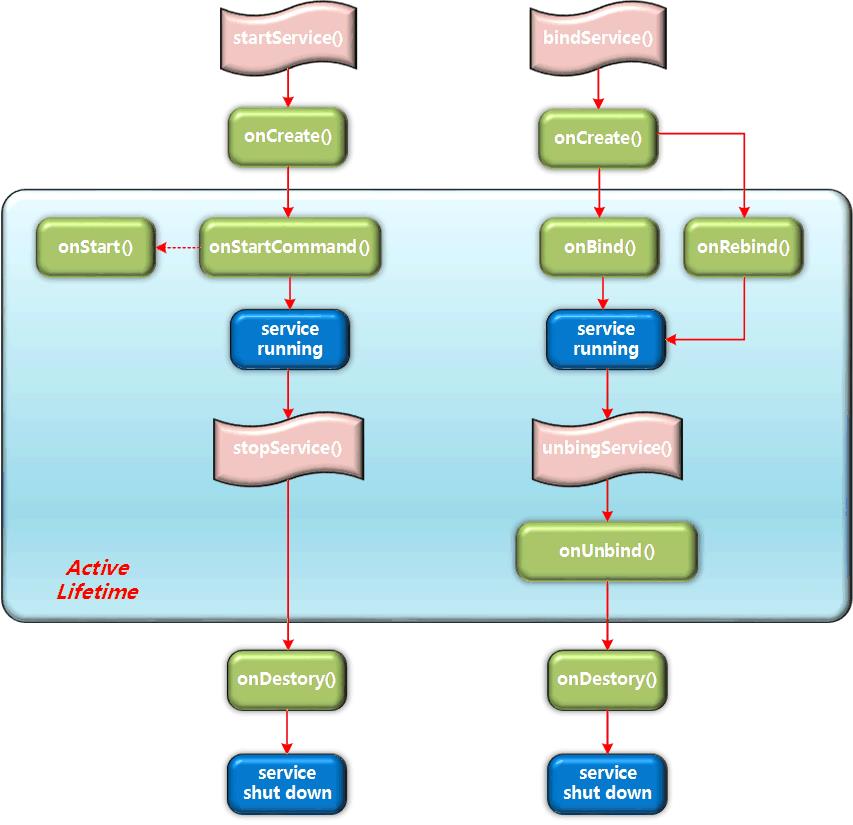
Service 生命周期 图2.2
Service 的运转流程就先介绍到这里,具体的使用方法将在下面的章节中详细介绍。
三、Local Service 应用原理与开发实例
3.1 通过 Context.startService 启动 Service 服务
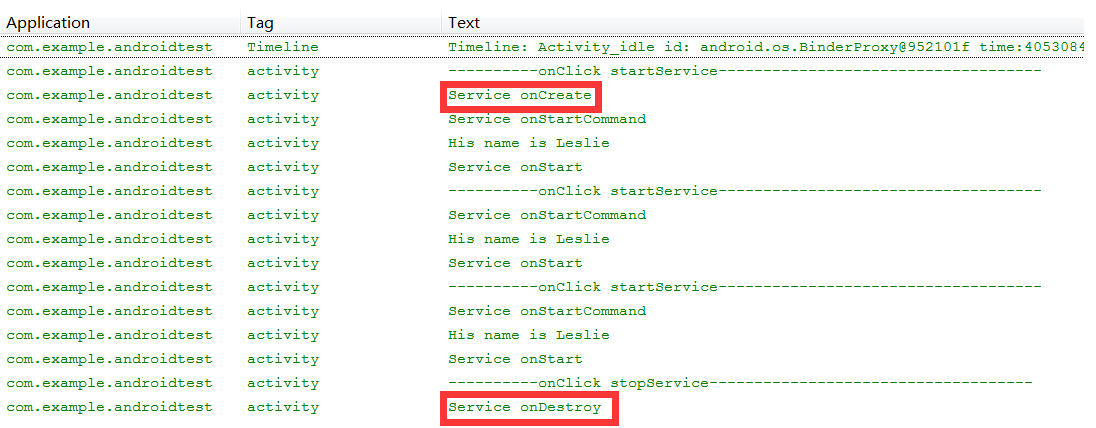
首先建立MyService继承Service,实现onCreate()、onDestory()、onStartCommand()、onStart()等几个方法,使用日志记录其运作信息。在Activity中通过Intent绑定Service服务,通过Context.startService()启动服务,通过Context.stopService()结束服务。

 1 public class MainActivity extends Activity
 2
 3     @Override
 4     protected void onCreate(Bundle savedInstanceState)
 5         super.onCreate(savedInstanceState);
 6         setContentView(R.layout.activity_main);
 7
 8
 9     public void btnStart_onclick(View view)
10         //通过Intent绑定MyService,加入输入参数
11         Intent intent=new Intent(MainActivity.this,MyService.class);
12         intent.putExtra("Name", "Leslie");
13         Log.i(Context.ACTIVITY_SERVICE, "----------onClick startService-----------");
14         //启动MyService
15         startService(intent);
16
17
18     public void btnStop_onclick(View view)
19         Intent intent=new Intent(MainActivity.this,MyService.class);
20         Log.i(Context.ACTIVITY_SERVICE, "----------onClick stopService------------");
21         //停止MyService
22         stopService(intent);
23
24
25
26 public class MyService extends Service
27
28     @Override
29     public void onCreate()
30         Log.i(Context.ACTIVITY_SERVICE,"Service onCreate");
31         super.onCreate();
33
34
35     @Override
36     public void onDestroy()
37         Log.i(Context.ACTIVITY_SERVICE, "Service onDestroy");
38         super.onDestroy();
39
40
41     @Override
42     public void onStart(Intent intent, int startId)
43         Log.i(Context.ACTIVITY_SERVICE,"Service onStart");
44         super.onStart(intent, startId);
45
46
47     @Override
48     public int onStartCommand(Intent intent, int flags, int startId)
49         Log.i(Context.ACTIVITY_SERVICE, "Service onStartCommand");
50         String name=intent.getStringExtra("Name");
51         Log.i(Context.ACTIVITY_SERVICE,"His name is "+name);
52         return super.onStartCommand(intent, flags, startId);
53
54
AndroidManifest.xml 文件绑定
 1         <activity
 2             android:name=".MainActivity"
 3             android:label="@string/title_activity_main" >
 4             <intent-filter>
 5                 <action android:name="android.intent.action.MAIN" />
 6                 <category android:name="android.intent.category.LAUNCHER" />
 7             </intent-filter>
 8         </activity>
 9         <service
10             android:name="android.services.MyService"
11             android:enabled="true">
12         </service>
Service 配置说明:
- android:name 服务类名,注意如果Service与Activity不在同一个包中,在android:name上必须写上Service的全路径
- android:label 服务的名字,如果为空,默认显示的服务名为类名
- android:icon 服务的图标
- android:permission 申明此服务的权限,这意味着只有提供了该权限的应用才能控制或连接此服务
- android:process 表示该服务是否运行在另外一个进程,如果设置了此项,那么将会在包名后面加上这段字符串表示另一进程的名字
- android:enabled 如果此项设置为 true,那么 Service 将会默认被系统启动,默认值为 false
- android:exported 表示该服务是否能够被其他应用程序所控制或连接,默认值为 false
查看处理结果可清楚看到,多次调用startService()后,使用stopService()结束Service服务,onCreate()、onDestory()只会在Service启动和结束时被调用一次。只有Service中的onStartCommand()方法会被多次调用。而Android 2.0以下旧版的方法onStart()会在onStartCommand()调用过程中被激发。
3.2 通过Context.bindService启动Service服务
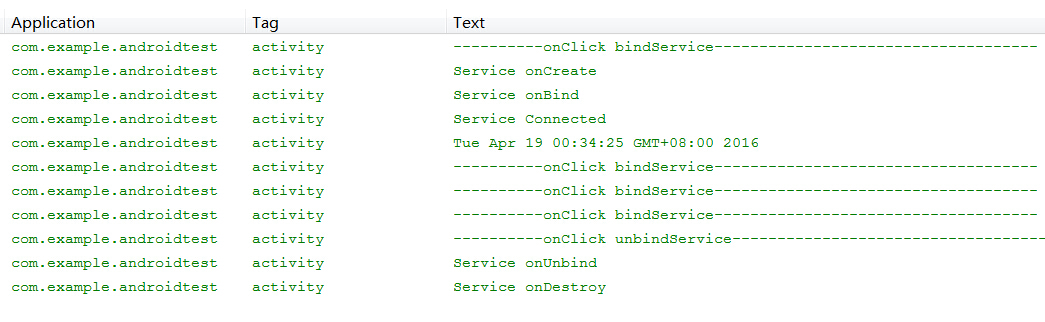
在介绍Context.bindService()前,先讲解一下与此相关的常用类 Binder、ServiceConnection,首先 IBinder 是 Binder 远程对象的基本接口,是为高性能而设计的轻量级远程调用机制的核心部分。这个接口定义了与远程对象交互的协议,但它不仅用于远程调用,也用于进程内调用。系统可以通过它以获取Service的句柄,在此先简单介绍它的基本用法,在下面关于Remote Service远程服务对象时再详细讲述IBinder的主体功能。ServiceConnection主要用于通过Binder绑定Service句柄后,对Service对象进行处理,它主要有两个方法void onServiceConnected(ComponentName name, IBinder service)和void onServiceDisconnected(ComponentName name)。在Context.bindService()完成绑定后,系统就会调用 onServiceConnected() 方法,用户可以通过 IBinder 参数获取Service句柄,对Service进行处理。而 onServiceDisconnected() 方法一般不会被调用,只有Service被绑定后,由于内存不足等问题被意外 kill 时才会被调用。下面举个例子说明一下bindService()的用法。
 1 public class MainActivity extends Activity
 2     private MyServiceConnection serviceConnection;
 3
 4     @Override
 5     protected void onCreate(Bundle savedInstanceState)
 6         super.onCreate(savedInstanceState);
 7         setContentView(R.layout.activity_main);
 8
 9         serviceConnection=new MyServiceConnection();
10
11
12     public void btnBind_onclick(View view)
13         //绑定 MyService
14         Intent intent=new Intent(this,MyService.class);
15
16         Log.i(Context.ACTIVITY_SERVICE, "----------onClick bindService-----------");
17         //通过bindService(intent,serviceConnection,int)方式启动Service
18         bindService(intent,this.serviceConnection,Context.BIND_AUTO_CREATE);
19
20
21     public void btnUnbind_onclick(View view)
22         Log.i(Context.ACTIVITY_SERVICE, "----------onClick unbindService----------");
23         unbindService(serviceConnection);
24
25
26
27 public class MyService extends Service
28     private MyBinder myBinder;
29
30     @Override
31     public IBinder onBind(Intent intent)
32         Log.i(Context.ACTIVITY_SERVICE,"Service onBind");
33         return this.myBinder;
34
35
36     @Override
37     public boolean onUnbind(Intent intent)
38         Log.i(Context.ACTIVITY_SERVICE,"Service onUnbind");
39         return super.onUnbind(intent);
40
41
42     @Override
43     public void onCreate()
44         super.onCreate();
45         Log.i(Context.ACTIVITY_SERVICE,"Service onCreate");
46         myBinder=new MyBinder();
47
48
49     @Override
50     public void onDestroy()
51         Log.i(Context.ACTIVITY_SERVICE, "Service onDestroy");
52         super.onDestroy();
53
54
55     public String getDate()
56         Calendar calendar = Calendar.getInstance();
57         return calendar.getTime().toString();
58
59
60     public class MyBinder extends Binder
61         public MyService getService()
62             return MyService.this;
63
64
65
66
67 public class MyServiceConnection implements ServiceConnection
68
69     @Override
70     public void onServiceConnected(ComponentName name, IBinder service)
71         Log.i(Context.ACTIVITY_SERVICE, "Service Connected");
72         String data=null;
73         //通过IBinder获取Service句柄
74         MyService.MyBinder myBinder=(MyService.MyBinder)service;
75         MyService myService=myBinder.getService();
76         data=myService.getDate();
77
78         Log.i(Context.ACTIVITY_SERVICE,data);
79
80
81     @Override
82     public void onServiceDisconnected(ComponentName name)
83         Log.i(Context.ACTIVITY_SERVICE, "Service Disconnected");
84
85
在运行时多次点击按钮激发btnBind_onclick(View view)方法后再使用btnUnbind_onclick(View view)结束服务,请留意处理结果。当系统调用Context .bindService()后,Service将跟随onCreate()、onBind()、onUnbind()、onDestory()的流程走下去。在成功完成onBind()绑定后,就会激发ServiceConnection对象的onServiceConnected()方法,在此用户可对Service进行处理。记得第2.2节所提过的问题,即使多次调用Context.bindService()方法,只要没有调用unbindService()结束绑定,系统只会在第一次调用时激发Service.onBind()和onServiceConnected()方法,这点从运行结果中可得到证实。
注意:调用 Context .bindService() 启动 Service 后 ,只能调用 unbindService() 一次,如重复多次调用此方法系统将会抛出错误异常。所以最简单的处理方式是设置一个静态变量 boolean connected,在调用 unbindService() 前先作出判断
1 public class MainActivity extends Activity 2 private MyServiceConnection serviceConnection; 3 private static boolean connected; 4 5 @Override 6 protected void onCreate(Bundle savedInstanceState) 7 super.onCreate(savedInstanceState); 8 setContentView(R.layout.activity_main); 9 10 serviceConnection=new MyServiceConnection(); 11 12 13 public void btnBind_onclick(View view) 14 connected=true; 15 //绑定 MyService 16 Intent intent=new Intent(this,MyService.class); 17 18 Log.i(Context.ACTIVITY_SERVICE, "----------onClick bindService-----------"); 19 //通过bindService(intent,serviceConnection,int)方式启动Service 20 bindService(intent,this.serviceConnection,Context.BIND_AUTO_CREATE); 21 22 23 public void btnUnbind_onclick(View view) 24 Log.i(Context.ACTIVITY_SERVICE, "----------onClick unbindService----------"); 25 if(connected) 26 unbindService(serviceConnection);