SystemUI 剖析
Posted Nipuream
tags:
篇首语:本文由小常识网(cha138.com)小编为大家整理,主要介绍了SystemUI 剖析相关的知识,希望对你有一定的参考价值。
序言
17年上半年主要做车机项目SystemUI的工作,一般的来说可以选择在源码的基础上定制,也可以重新编写。具体选择哪种方案,也要根据自身项目的需求和工作量来考虑,但是不管选择哪种,都需要对SystemUI源码有一定的了解。本文主要先从大体上了解整个SystemUI的运行机制,然后再从状态栏的图标如何显示,下拉菜单是如何的实现,来剖析这个模块的运行原理,最后用一个需求来深入的了解SystemUI模块。希望能够帮助有这方面需求的同学,当然了,本文都是笔者自己对代码的理解,如果有不正确的地方,欢迎留言指出!
整体架构
相信很多没有了解过SystemUI的同学都觉得它很神秘,因为这个Application很特殊,它和系统的联系很紧密,而且需要在源码的环境下编译,所以这也是和应用开发者关系比较疏远的原因之一。下图是SystemUI的整体架构图,我看过android 4.4和6.0的代码,虽然代码变化很大,但是原理和核心代码都是差不多的。

SystemUI的启动是由SystemServer进程来操作的,在整个系统资源,服务加载完成差不多的时候,调用了startSystemUI() 来启动一个服务SystemUIService ,此时就进入了SystemUI的应用程序世界了。
    static final void startSystemUi(Context context)
        Intent intent = new Intent();
        intent.setComponent(new ComponentName("com.android.systemui",
                    "com.android.systemui.SystemUIService"));
        //Slog.d(TAG, "Starting service: " + intent);
        context.startServiceAsUser(intent, UserHandle.OWNER);
首先来说下一个aidl文件,叫做IStatusBar.aidl,它的路径在frameworks/base/core/java/com/android/internal/statusbar 下。它是framework和SystemUI的通信接口,包括我们的StatusBarManagerService封装的也是这个接口。我们的SystemUI主要是显示系统状态的改变,一般的由内部和外部导致,比如系统电量的改变,SystemUI会接收系统广播来修改,这种一般不会暴露给外部使用,不然就导致显示异常,还有种是外部导致SystemUI显示的变化,像其他应用发来通知,隐藏状态栏等,这个就需要我们的IStatusBar.aidl来承担之间的通信规则了。当我们的SystemSever进程来启动我们的SystemUIService,我们SystemUIService会启动很多的类,而这些类都是继承SystemUI接口的,并且都是有自己的职责所在。
   /**
     * Makes sure that all the SystemUI services are running. If they are already running, this is a
     * no-op. This is needed to conditinally start all the services, as we only need to have it in
     * the main process.
     *
     * <p>This method must only be called from the main thread.</p>
     */
    public void startServicesIfNeeded()
        if (mServicesStarted)
            return;


        if (!mBootCompleted)
            // check to see if maybe it was already completed long before we began
            // see ActivityManagerService.finishBooting()
            if ("1".equals(SystemProperties.get("sys.boot_completed")))
                mBootCompleted = true;
                if (DEBUG) Log.v(TAG, "BOOT_COMPLETED was already sent");


        Log.v(TAG, "Starting SystemUI services.");
        final int N = SERVICES.length;
        for (int i=0; i<N; i++)
            Class<?> cl = SERVICES[i];
            if (DEBUG) Log.d(TAG, "loading: " + cl);
            try
                mServices[i] = (SystemUI)cl.newInstance();
             catch (IllegalAccessException ex)
                throw new RuntimeException(ex);
             catch (InstantiationException ex)
                throw new RuntimeException(ex);

            mServices[i].mContext = this;
            mServices[i].mComponents = mComponents;
            if (DEBUG) Log.d(TAG, "running: " + mServices[i]);
            mServices[i].start();

            if (mBootCompleted)
                mServices[i].onBootCompleted();


        mServicesStarted = true;
下面是启动的所有接口,
    /**
     * The classes of the stuff to start.
     */
    private final Class<?>[] SERVICES = new Class[]
            com.android.systemui.tuner.TunerService.class,
            com.android.systemui.keyguard.KeyguardViewMediator.class,
            com.android.systemui.recents.Recents.class,
            com.android.systemui.volume.VolumeUI.class,
            com.android.systemui.statusbar.SystemBars.class,
            com.android.systemui.usb.StorageNotification.class,
            com.android.systemui.power.PowerUI.class,
            com.android.systemui.media.RingtonePlayer.class,
            com.android.systemui.keyboard.KeyboardUI.class,
    ;
我们这里只研究下主要试图的部分,也就是我们的SystemBars,这个类主要的工作就是通过类加载器生成我们的PhoneStatusBar,然后调用它的start()方法,我们切换到PhoneStatusBar这个类来,PhoneStatusBar这个类承担了最主要的添加,移除,更新视图的重任,它负责解析状态栏,导航栏的布局文件,然后通过WindowManagerService来生成Window对象,它实现了IStatusBar的所有接口,负责接收外界所有的关于SystemUI视图更新的消息。
视图
视图这块主要有三个模块分别是状态栏,导航栏,还有下拉模块。状态栏主要显示系统的状态,导航栏一般提供了快捷Home,最近打开的应用,和回到上一层,下拉菜单提供了一些快捷操作,通知的显示,这里就不讲导航栏了,感兴趣可以自行了解。来看看状态栏吧,小小的一个区域,Google却把它封装成一层又一层的,整个statusbar布局可以说是非常复杂,不花点精力真的不知道哪对哪。

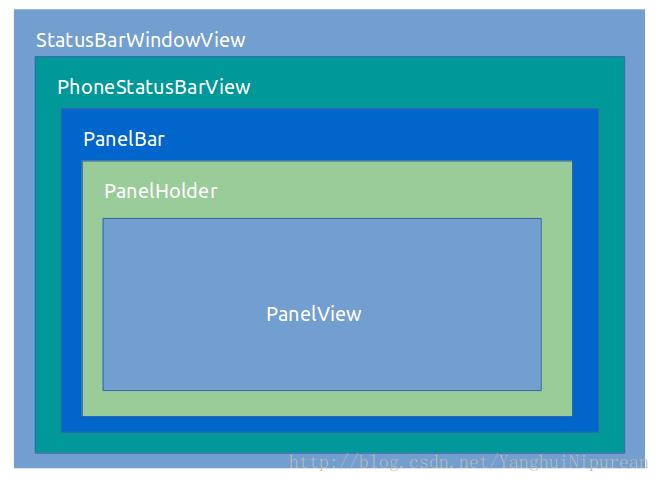
statusbar的整体结构可以简化如上图所示,statusbar的图标显示在PhoneStatusBarView 那一层,其中又包裹着moreIcons和notificationIcons,下面是6.0的布局文件。
<com.android.systemui.statusbar.phone.PhoneStatusBarView
    xmlns:android="http://schemas.android.com/apk/res/android"
    xmlns:systemui="http://schemas.android.com/apk/res/com.android.systemui"
    android:id="@+id/status_bar"
    android:background="@drawable/system_bar_background"
    android:orientation="vertical"
    android:focusable="false"
    android:descendantFocusability="afterDescendants"
    >

    <ImageView
        android:id="@+id/notification_lights_out"
        android:layout_width="@dimen/status_bar_icon_size"
        android:layout_height="match_parent"
        android:paddingStart="6dip"
        android:paddingBottom="2dip"
        android:src="@drawable/ic_sysbar_lights_out_dot_small"
        android:scaleType="center"
        android:visibility="gone"
        />

    <LinearLayout android:id="@+id/status_bar_contents"
        android:layout_width="match_parent"
        android:layout_height="match_parent"
        android:paddingStart="6dp"
        android:paddingEnd="8dp"
        android:orientation="horizontal"
        >

        <com.android.systemui.statusbar.AlphaOptimizedFrameLayout
            android:id="@+id/notification_icon_area"
            android:layout_width="0dip"
            android:layout_height="match_parent"
            android:layout_weight="1"
            android:orientation="horizontal"
            >
            <!-- The alpha of this area is both controlled from PhoneStatusBarTransitions and
                 PhoneStatusBar (DISABLE_NOTIFICATION_ICONS), so we need two views here. -->
            <com.android.keyguard.AlphaOptimizedLinearLayout
                android:id="@+id/notification_icon_area_inner"
                android:layout_width="match_parent"
                android:layout_height="match_parent"
                >
                <com.android.systemui.statusbar.StatusBarIconView android:id="@+id/moreIcon"
                    android:layout_width="@dimen/status_bar_icon_size"
                    android:layout_height="match_parent"
                    android:src="@drawable/stat_notify_more"
                    android:visibility="gone"
                    />
                <com.android.systemui.statusbar.phone.IconMerger android:id="@+id/notificationIcons"
                    android:layout_width="match_parent"
                    android:layout_height="match_parent"
                    android:layout_alignParentStart="true"
                    android:gravity="center_vertical"
                    android:orientation="horizontal"/>
            </com.android.keyguard.AlphaOptimizedLinearLayout>
        </com.android.systemui.statusbar.AlphaOptimizedFrameLayout>

        <com.android.keyguard.AlphaOptimizedLinearLayout android:id="@+id/system_icon_area"
            android:layout_width="wrap_content"
            android:layout_height="match_parent"
            android:orientation="horizontal"
            >

            <include layout="@layout/system_icons" />

            <com.android.systemui.statusbar.policy.Clock
                android:id="@+id/clock"
                android:textAppearance="@style/TextAppearance.StatusBar.Clock"
                android:layout_width="wrap_content"
                android:layout_height="match_parent"
                android:singleLine="true"
                android:paddingStart="7dp"
                android:gravity="center_vertical|start"
                />
        </com.android.keyguard.AlphaOptimizedLinearLayout>
    </LinearLayout>

</com.android.systemui.statusbar.phone.PhoneStatusBarView>
我们一般动态显示的图标在标签下system_icons布局中,
<LinearLayout xmlns:android="http://schemas.android.com/apk/res/android"
    android:id="@+id/system_icons"
    android:layout_width="wrap_content"
    android:layout_height="match_parent"
    android:gravity="center_vertical">

    <com.android.keyguard.AlphaOptimizedLinearLayout android:id="@+id/statusIcons"
        android:layout_width="wrap_content"
        android:layout_height="match_parent"
        android:gravity="center_vertical"
        android:orientation="horizontal"/>

    <include layout="@layout/signal_cluster_view"
        android:id="@+id/signal_cluster"
        android:layout_width="wrap_content"
        android:layout_height="wrap_content"
        android:layout_marginStart="2.5dp"/>

    <!-- battery must be padded below to match assets -->
    <com.android.systemui.BatteryMeterView android:id="@+id/battery"
        android:layout_height="14.5dp"
        android:layout_width="9.5dp"
        android:layout_marginBottom="@dimen/battery_margin_bottom"/>
</LinearLayout>
可以看到电池电量和信号是专门的控件去处理的,因为这块是一直显示在我们的状态栏上的,并且由系统去修改的,上面也提到了,这个是不提供外界修改的接口。其他的图标的更新是在id叫statusIcons的一个线性布局中,代码控制模块是通过CommandQueue将回调传递给PhoneStatusBar,然后PhoneStatusBar又交给StatusBarIconController中,以下是部分代码
    public void addSystemIcon(String slot, int index, int viewIndex, StatusBarIcon icon)
        boolean blocked = mIconBlacklist.contains(slot);
        StatusBarIconView view = new StatusBarIconView(mContext, slot, null, blocked);
        view.set(icon);
        mStatusIcons.addView(view, viewIndex, new LinearLayout.LayoutParams(
                ViewGroup.LayoutParams.WRAP_CONTENT, mIconSize));
        view = new StatusBarIconView(mContext, slot, null, blocked);
        view.set(icon);
        mStatusIconsKeyguard.addView(view, viewIndex, new LinearLayout.LayoutParams(
                ViewGroup.LayoutParams.WRAP_CONTENT, mIconSize));
        applyIconTint();


    public void updateSystemIcon(String slot, int index, int viewIndex,
            StatusBarIcon old, StatusBarIcon icon)
        StatusBarIconView view = (StatusBarIconView) mStatusIcons.getChildAt(viewIndex);
        view.set(icon);
        view = (StatusBarIconView) mStatusIconsKeyguard.getChildAt(viewIndex);
        view.set(icon);
        applyIconTint();


    public void removeSystemIcon(String slot, int index, int viewIndex)
        mStatusIcons.removeViewAt(viewIndex);
        mStatusIconsKeyguard.removeViewAt(viewIndex);
mStatusIcons对应的就是前面介绍的id为statusIcons的布局。我们再来分析下下拉菜单的原理机制,当我们触摸手机的状态栏的位置,下拉菜单会随着我们手势做相应的处理。还记得我们状态栏最外层布局节点是PhoneStatusBarView,
    @Override
    public boolean onTouchEvent(MotionEvent event)
        boolean barConsumedEvent = mBar.interceptTouchEvent(event);

        if (DEBUG_GESTURES)
            if (event.getActionMasked() != MotionEvent.ACTION_MOVE)
                EventLog.writeEvent(EventLogTags.SYSUI_PANELBAR_TOUCH,
                        event.getActionMasked(), (int) event.getX(), (int) event.getY(),
                        barConsumedEvent ? 1 : 0);


        return barConsumedEvent || super.onTouchEvent(event);
首先先看看mBar是否要拦截这个事件,如果没有拦截则调用父类的onTouchEvent()方法,这里的mBar其实就是PhoneStatusBar这个类,这个类相当于一个控制器的作用,再看看PhoneStatusBar什么时候会拦截这个事件,
    public boolean interceptTouchEvent(MotionEvent event)
        if (DEBUG_GESTURES)
            if (event.getActionMasked() != MotionEvent.ACTION_MOVE)
                EventLog.writeEvent(EventLogTags.SYSUI_STATUSBAR_TOUCH,
                        event.getActionMasked(), (int) event.getX(), (int) event.getY(),
                        mDisabled1, mDisabled2);


        if (SPEW)
            Log.d(TAG, "Touch: rawY=" + event.getRawY() + " event=" + event + " mDisabled1="
                + mDisabled1 + " mDisabled2=" + mDisabled2 + " mTracking=" + mTracking);
         else if (CHATTY)
            if (event.getAction() != MotionEvent.ACTION_MOVE)
                Log.d(TAG, String.format(
                            "panel: %s at (%f, %f) mDisabled1=0x%08x mDisabled2=0x%08x",
                            MotionEvent.actionToString(event.getAction()),
                            event.getRawX(), event.getRawY(), mDisabled1, mDisabled2));


        if (DEBUG_GESTURES)
            mGestureRec.add(event);


        if (mStatusBarWindowState == WINDOW_STATE_SHOWING)
            final boolean upOrCancel =
                    event.getAction() == MotionEvent.ACTION_UP ||
                    event.getAction() == MotionEvent.ACTION_CANCEL;
            if (upOrCancel && !mExpandedVisible)
                setInteracting(StatusBarManager.WINDOW_STATUS_BAR, false);
             else
                setInteracting(StatusBarManager.WINDOW_STATUS_BAR, true);


        return false;
从这里可以看出,最后return的是false,而其中执行的一个比较重要的方法是setInteracting(),它的作用隐藏和显示状态栏拓展出来的部分就是下拉菜单这块,不是很难理解,我们在着重分析下panelBar的onTouchEvent()方法,
    @Override
    public boolean onTouchEvent(MotionEvent event)
        // Allow subclasses to implement enable/disable semantics
        if (!panelsEnabled())
            if (event.getAction() == MotionEvent.ACTION_DOWN)
                Log.v(TAG, String.format("onTouch: all panels disabled, ignoring touch at (%d,%d)",
                        (int) event.getX(), (int) event.getY()));

            return false;


        // figure out which panel needs to be talked to here
        if (event.getAction() == MotionEvent.ACTION_DOWN)
            final PanelView panel = selectPanelForTouch(event);
            if (panel == null)
                // panel is not there, so we'll eat the gesture
                Log.v(TAG, String.format("onTouch: no panel for touch at (%d,%d)",
                        (int) event.getX(), (int) event.getY()));
                mTouchingPanel = null;
                return true;

            boolean enabled = panel.isEnabled();
            if (DEBUG) LOG("PanelBar.onTouch: state=%d ACTION_DOWN: panel %s %s", mState, panel,
                    (enabled ? "" : " (disabled)"));
            if (!enabled)
                // panel is disabled, so we'll eat the gesture
                Log.v(TAG, String.format(
                        "onTouch: panel (%s) is disabled, ignoring touch at (%d,%d)",
                        panel, (int) event.getX(), (int) event.getY()));
                mTouchingPanel = null;
                return true;

            startOpeningPanel(panel);

        final boolean result = mTouchingPanel != null
                ? mTouchingPanel.onTouchEvent(event)
                : true;
        return result;
一般的下拉菜单有两种,一种是SettingPanelView还有种 NotificationPanelView, panelBar的onTouchEvent主要寻找哪块PanelView消费了这个MotionEvent,所以,我们继续跟踪PanelView的onTouchEvent,
  @Override
    public boolean onTouchEvent(MotionEvent event)
        if (mInstantExpanding || mTouchDisabled
                || (mMotionAborted && event.getActionMasked() != MotionEvent.ACTION_DOWN))
            return false;


        /*
         * We capture touch events here and update the expand height here in case according to
         * the users fingers. This also handles multi-touch.
         *
         * If the user just clicks shortly, we give him a quick peek of the shade.
         *
         * Flinging is also enabled in order to open or close the shade.
         */

        int pointerIndex = event.findPointerIndex(mTrackingPointer);
        if (pointerIndex < 0)
            pointerIndex = 0;
            mTrackingPointer = event.getPointerId(pointerIndex);

        final float x = event.getX(pointerIndex);
        final float y = event.getY(pointerIndex);

        if (event.getActionMasked() == MotionEvent.ACTION_DOWN)
            mGestureWaitForTouchSlop = isFullyCollapsed() || hasConflictingGestures();
            mIgnoreXTouchSlop = isFullyCollapsed() || shouldGestureIgnoreXTouchSlop(x, y);


        switch (event.getActionMasked())
            case MotionEvent.ACTION_DOWN:
                startExpandMotion(x, y, false /* startTracking */, mExpandedHeight);
                mJustPeeked = false;
                mPanelClosedOnDown = isFullyCollapsed();
                mHasLayoutedSinceDown = false;
                mUpdateFlingOnLayout = false;
                mMotionAborted = false;
                mPeekTouching = mPanelClosedOnDown;
                mTouchAboveFalsingThreshold = false;
                mCollapsedAndHeadsUpOnDown = isFullyCollapsed()
                        && mHeadsUpManager.hasPinnedHeadsUp();
                if (mVelocityTracker == null)
                    initVelocityTracker();

                trackMovement(event);
                if (!mGestureWaitForTouchSlop || (mHeightAnimator != null && !mHintAnimationRunning) ||
                        mPeekPending || mPeekAnimator != null)
                    cancelHeightAnimator();
                    cancelPeek();
                    mTouchSlopExceeded = (mHeightAnimator != null && !mHintAnimationRunning)
                            || mPeekPending || mPeekAnimator != null;
                    onTrackingStarted();

                if (isFullyCollapsed() && !mHeadsUpManager.hasPinnedHeadsUp())
                    schedulePeek();

                break;

            case MotionEvent.ACTION_POINTER_UP:
                final int upPointer = event.getPointerId(event.getActionIndex());
                if (mTrackingPointer == upPointer)
                    // gesture is ongoing, find a new pointer to track
                    final int newIndex = event.getPointerId(0) != upPointer ? 0 : 1;
                    final float newY = event.getY(newIndex);
                    final float newX = event.getX(newIndex);
                    mTrackingPointer = event.getPointerId(newIndex);
                    startExpandMotion(newX, newY, true /* startTracking */, mExpandedHeight);

                break;
            case MotionEvent.ACTION_POINTER_DOWN:
                if (mStatusBar.getBarState() == StatusBarState.KEYGUARD)
                    mMotionAborted = true;
                    endMotionEvent(event, x, y, true /* forceCancel */);
                    return false;

                break;
            case MotionEvent.ACTION_MOVE:
                float h = y - mInitialTouchY;

                // If the panel was collapsed when touching, we only need to check for the
                // y-component of the gesture, as we have no conflicting horizontal gesture.
                if (Math.abs(h) > mTouchSlop
                        && (Math.abs(h) > Math.abs(x - mInitialTouchX)
                                || mIgnoreXTouchSlop))
                    mTouchSlopExceeded = true;
                    if (mGestureWaitForTouchSlop && !mTracking && !mCollapsedAndHeadsUpOnDown)
                        if (!mJustPeeked && mInitialOffsetOnTouch != 0f)
                            startExpandMotion(x, y, false /* startTracking */, mExpandedHeight);
                            h = 0;

                        cancelHeightAnimator();
                        removeCallbacks(mPeekRunnable);
                        mPeekPending = false;
                        onTrackingStarted();


                final float newHeight = Math.max(0, h + mInitialOffsetOnTouch);
                if (newHeight > mPeekHeight)
                    if (mPeekAnimator != null)
                        mPeekAnimator.cancel();

                    mJustPeeked = false;

                if (-h >= getFalsingThreshold())
                    mTouchAboveFalsingThreshold = true;
                    mUpwardsWhenTresholdReached = isDirectionUpwards(x, y);

                if (!mJustPeeked && (!mGestureWaitForTouchSlop || mTracking) && !isTrackingBlocked())
                    setExpandedHeightInternal(newHeight);


                trackMovement(event);
                break;

            case MotionEvent.ACTION_UP:
            case MotionEvent.ACTION_CANCEL:
                trackMovement(event);
                endMotionEvent(event, x, y, false /* forceCancel */);
                break;

        return !mGestureWaitForTouchSlop || mTracking;
PanelView的onTouchEvent()方法主要对手势的处理逻辑比较多,但是也是很常规的对自定义View的处理,和下拉刷新控件逻辑和用到的技术都差不多的东西,手一直下拉过程中,不断的刷新,重绘控件,如果在中途放手,那么会根据你放手的位置来决定到底是关闭or打开panelView。
动态更改状态栏高度
像一般的定制SystemUI,静态的修改状态栏高度是经常都会碰到的,我们会去修改frameworks/base/core/res/res/values/dimens.xml中的值,
    <dimen name="toast_y_offset">64dip</dimen>
    <!-- Height of the status bar -->
    <dimen name="status_bar_height">24dp</dimen>
    <!-- Height of the bottom navigation / system bar. -->
    <dimen name="navigation_bar_height">48dp</dimen>
然后将framework-res.jar push到/system/framework/底下重启机器就可以生效了,但是如何动态的修改状态的高度呢,我们知道在Android源码中,Window这个类非常的抽象,它会在Activity启动的时候附着在Activity中,然后承担着试图显示的职责,而PhoneWindow是Window的唯一实现类,PhoneWindowManager可以说是一个策略类,它实现了WindowManagerPolicy,从名字也可以看出,主要是处理一些和视图相关的逻辑部分,当然了整个Android的任何一个模块都是相当的复杂,我们这里并不去深究,我们知道PhoneWindowManager这个类做了很多初始化工作,包括从framework/res中获取状态栏的高度值
        mStatusBarHeight =
                res.getDimensionPixelSize(com.android.internal.R.dimen.status_bar_height);
然后PhoneWindowManager还要确定绘制的各个区域,然后进行测量,绘制的工作,所以我们只要动态的设置PhoneWindowManager中的mStatusBarHeight,然后在重新绘制系统的视图即可。具体的,我们该如何动态修改mStatusBarHeight的值,我们的好好的分析PhoneWindowManager这个类了,可以看到
 ...
 IStatusBarService mStatusBarService;
 ...
在PhoneWindowManager这个类中有mStatusBarService这个属性,这就意味着我们可以在这里直接操作SystemUI,StatusBarManagerService同样也实现了这个接口,而StatusBarManagerService内部有IStatusBar这个代理类,同样,SystemUI中CommandQueue也实现了IStatusBar(上文提到,这里SystemUI相当于服务端),这样在PhoneWindowManager就可以直接控制SystemUI的行为,那么我们怎么样能够修改PhoneWindowManager中的状态栏高度值呢,我们看到PhoneWindowManager实现了WindowPolicy接口,而在WindowManagerService是持有WindowPolicy这个引用的。
    ...
    final WindowManagerPolicy mPolicy = new PhoneWindowManager();
    ...
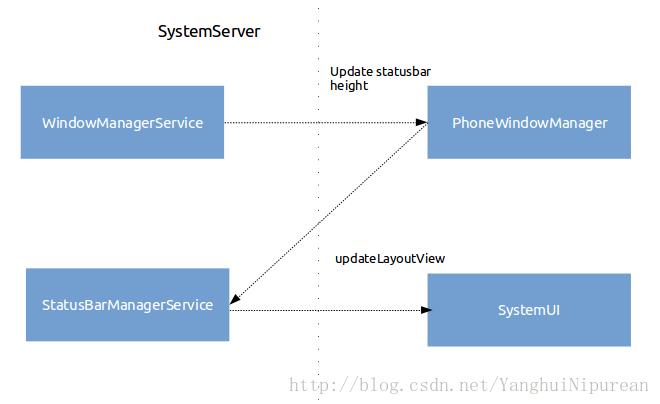
这样,我们只需要能够调用WindowManagerService里面的方法,就能直接控制PhoneWindowManager,从而控制SystemUI了,再看看我们的WindowManagerService是继承了IWindowManager.Stub这个通信借口,所以,所有问题都解决了,我们只需要在IWindowManager.aidl文件中,添加updateStatusBarHeight()方法,然后在之前我们提到的所有地方都添加方法实现,最终就会调用到PhoneWindowManager,修改状态栏的高度值,当SystemUI接受到回调之后,调用WindowManager的updateLayoutView()方法,就会重新绘制我们的系统UI。

上图是整个调用流程,这样就可以动态的修改我们的状态栏高度了。
以上是关于SystemUI 剖析的主要内容,如果未能解决你的问题,请参考以下文章