Clickhouse 集群安装(完整版)
Posted 羲凡丞相
tags:
篇首语:本文由小常识网(cha138.com)小编为大家整理,主要介绍了Clickhouse 集群安装(完整版)相关的知识,希望对你有一定的参考价值。
@羲凡——只为了更好的活着
Clickhouse 集群安装(完整版)
前期准备
集群步骤
1.先安装四个单机的clickhouse
2.在四台机器上新建 /etc/metrika.xml 文件,生成两分片两副本集群
一、安装单机clickhouse(四台都操作,以Centos为例)
1.1.在线安装
yum install yum-utils
rpm --import https://repo.clickhouse.tech/CLICKHOUSE-KEY.GPG
yum-config-manager --add-repo https://repo.clickhouse.tech/rpm/stable/x86_64
yum install clickhouse-server clickhouse-client
1.2.离线安装
下载地址换成  https://packages.clickhouse.com/rpm/stable/
下载地址换成  https://packages.clickhouse.com/rpm/stable/
下载地址换成  https://packages.clickhouse.com/rpm/stable/
wget https://repo.yandex.ru/clickhouse/rpm/stable/x86_64/clickhouse-common-static-20.12.5.14-2.x86_64.rpm
wget https://repo.yandex.ru/clickhouse/rpm/stable/x86_64/clickhouse-client-20.12.5.14-2.noarch.rpm
wget https://repo.yandex.ru/clickhouse/rpm/stable/x86_64/clickhouse-server-20.12.5.14-2.noarch.rpm
rpm -ivh clickhouse-common-static-20.12.5.14-2.x86_64.rpm
rpm -ivh clickhouse-server-20.12.4.5-2.noarch.rpm
rpm -ivh clickhouse-client-20.12.5.14-2.noarch.rpm
2.修改配置参数
# 修改配置文件路径权限
chmod -R 755 /etc/clickhouse-server/
# 修改config.xml,是本地和远程可登陆
vim /etc/clickhouse-server/config.xml
	<listen_host>0.0.0.0</listen_host>
# 修改users.xml,添加密码
vim /etc/clickhouse-server/users.xml
	<receive_timeout>800</receive_timeout>
	<send_timeout>800</send_timeout>
	<password>123456</password>
	<max_memory_usage>150000000000</max_memory_usage>
	<max_memory_usage_for_all_queries>170000000000</max_memory_usage_for_all_queries>
	<max_bytes_before_external_group_by>120000000000</max_bytes_before_external_group_by>
	<max_bytes_before_external_sort>120000000000</max_bytes_before_external_sort>
如果是只有一台机器想玩单机,现在已经装好了,启动就OK了
# 卸载及删除安装文件(需root权限)
yum list installed | grep clickhouse
yum remove -y clickhouse-common-static
yum remove -y clickhouse-server-common
rm -rf /var/lib/clickhouse
rm -rf /etc/clickhouse-*
rm -rf /var/log/clickhouse-server
二、生成 /etc/metrika.xml 配置文件
<?xml version="1.0"?>
<yandex>
    <!--ck集群节点-->
    <clickhouse_remote_servers>
        <!-- 集群名称 -->
        <test_ck_cluster>
            <!--分片1-->
            <shard>
                <weight>1</weight>
                <internal_replication>true</internal_replication>
                <replica>
                    <host>yc-nsg-h20</host>
                    <port>9000</port>
                    <user>default</user>
                    <password>123456</password>
                </replica>
                <!--复制集1-->
                <replica>
                    <host>yc-nsg-h21</host>
                    <port>9000</port>
                    <user>default</user>
                    <password>123456</password>
                </replica>
            </shard>
            <!--分片2-->
            <shard>
                <weight>1</weight>
                <internal_replication>true</internal_replication>
                <replica>
                    <host>yc-nsg-h22</host>
                    <port>9000</port>
                    <user>default</user>
                    <password>123456</password>
                </replica>
                <!--复制集2-->
                <replica>
                    <host>yc-nsg-h3</host>
                    <port>9000</port>
                    <user>default</user>
                    <password>123456</password>
                </replica>
            </shard>
        </test_ck_cluster>
    </clickhouse_remote_servers>
    <!--zookeeper相关配置-->
    <zookeeper-servers>
        <node index="1">
            <host>yc-nsg-h20</host>
            <port>2181</port>
        </node>
        <node index="2">
            <host>yc-nsg-h21</host>
            <port>2181</port>
        </node>
        <node index="3">
            <host>yc-nsg-h22</host>
            <port>2181</port>
        </node>
    </zookeeper-servers>
    <macros>
        <layer>01</layer>
        <shard>02</shard>
        <!--分片号,hostname-layer-shard -->
        <replica>yc-nsg-h22-01-02</replica>
        <!--当前节点IP-->
    </macros>
    <networks>
        <ip>::/0</ip>
    </networks>
    <!--压缩相关配置-->
    <clickhouse_compression>
        <case>
            <min_part_size>1073741824</min_part_size>
            <min_part_size_ratio>0.01</min_part_size_ratio>
            <method>lz4</method>
            <!--压缩算法lz4压缩比zstd快, 更占磁盘-->
        </case>
    </clickhouse_compression>
</yandex>
三、启动和验证
systemctl start clickhouse-server
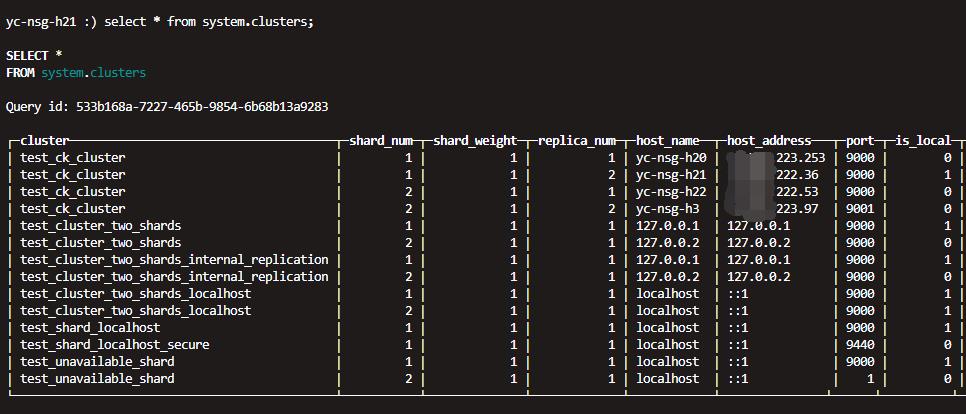
clickhouse-client -u default --password 123456 --port 9000 -h yc-nsg-h21 --multiquery
select * from system.clusters;

或者登陆一下8123界面试一下,看能不能用
http://yc-nsg-h21:8123/play

|
|
|
====================================================================
@羲凡——只为了更好的活着
若对博客中有任何问题,欢迎留言交流
以上是关于Clickhouse 集群安装(完整版)的主要内容,如果未能解决你的问题,请参考以下文章