arm处理器IO口驱动代码编写(bcm2835)
Posted 是光哥呀
tags:
篇首语:本文由小常识网(cha138.com)小编为大家整理,主要介绍了arm处理器IO口驱动代码编写(bcm2835)相关的知识,希望对你有一定的参考价值。
这里写目录标题
上层测试端代码:
#include <sys/types.h>
#include <sys/stat.h>
#include <fcntl.h>
#include <stdio.h>

int main()

        int fd;
        int cmd;
        int data;
        fd = open("/dev/pin4",O_RDWR);
        if(fd<0)
                printf("open failed\\n");
                perror("reson:");

         else
                printf("open success\\n");

        printf("input commnd : 1/0 \\n1:set pin4 high \\n0:set pin4 low\\n");
        scanf("%d",&cmd);
        if(cmd == 1)
                data = 1;

        if(cmd == 0)
                data = 0;

        printf("data = %d\\n",data);
        fd = write(fd,&data,1);
        close(fd);
        return 0;
要对I/O口操作,首先得把其对应的物理地址在代码中用变量表示出来,但内核和上层代码访问的都是虚拟地址,所以在驱动代码里不能直接写物理地址,需要把物理地址转化为虚拟地址。
GPFSEL0 = (volatile unsigned int *)ioremap(0x3f200000,4);//将一个IO地址空间映射到内核的虚拟地址空间上去
通过查看芯片手册发GPFSEL0寄存器VC CPU总线地址是0x7E200000,
相对基址(0x7E000000)偏移0x00200000,那么ARM物理地址也是偏移这
么多,所以GPIO的物理地址应该是从0x3f200000 开始 。
树莓派IO空间的起始地址是0x3f000000,加上GPIO的偏移量0x200000,所以GPIO的物理地址应该是从0x3f200000开始的,然后在这个基础上进行Linux系统的MMU内存虚拟化管理,映射到虚拟地址上。
驱动代码:
#include <linux/fs.h>
#include <linux/module.h>
#include <linux/init.h>
#include <linux/device.h>
#include <linux/uaccess.h>
#include <linux/types.h>
#include <asm/io.h>

static struct class *pin4_class;
static struct device *pin4_class_dev;

static dev_t devno;		//设备号
static int major = 231;		//主设备号
static int minor = 0;			//次设备号
static char *module_name = "pin4";		//模块名

volatile unsigned int* GPFSEL0 = NULL;
volatile unsigned int* GPSET0 = NULL;
volatile unsigned int* GPCLR0 = NULL;

static int pin4_read(struct file *file,char __user *buf,size_t count,loff_t *ppos)

	printk("pin4_read\\n");				//内核打印函数,和printf类似
	return 0;


static int pin4_open(struct inode *inode,struct file *file)

	printk("pin4_open\\n");
	//配置pin4引脚为输出引脚,bit为12-14配置成001
	*GPFSEL0 &= ~(0x6 << 12);		//把13,14 位配置成00
	*GPFSEL0 |= (0x1 << 12);			//把12 位配置成1
	return 0;


static ssize_t pin4_write(struct file *file,const char __user *buf,size_t count,loff_t *ppos)

	int userCmd;
	printk("pin4_write\\n");
	copy_from_user(&userCmd,buf,count);		//获取上层write函数的值
	//根据值来操作IO口,高电平或低电平
	if(userCmd == 1)
		printk("set 1\\n");
		*GPSET0 |= 0x1 << 4;			//高电平
	 else if(userCmd == 0)
		printk("set 0\\n");
		*GPCLR0 |= 0x1 << 4;			//低电平
	 else
		printk("undo\\n");


	return 0;


static struct file_operations pin4_fops =
	.owner = THIS_MODULE,
	.open = pin4_open,
	.write = pin4_write,
	.read = pin4_read,
;

int __init pin4_drv_init(void)						//真实驱动入口

	int ret;
	printk("insmod driver pin4 success\\n");
	devno = MKDEV(major,minor);					//创建设备号
	ret = register_chrdev(major,module_name,&pin4_fops);//注册驱动,告诉内核,把这个驱动加入到内核的链表中
	pin4_class = class_create(THIS_MODULE,"myfirstdemo");		//让代码在dev下自动生成设备
	pin4_class_dev = device_create(pin4_class,NULL,devno,NULL,module_name);		//创建设备文件

	GPFSEL0 = (volatile unsigned int *)ioremap(0x3f200000,4);//将一个IO地址空间映射到内核的虚拟地址空间上去
	GPSET0 = (volatile unsigned int *)ioremap(0x3f20001C,4);
	GPCLR0 = (volatile unsigned int *)ioremap(0x3f200028,4);


	return 0;


void __exit pin4_drv_exit(void)

	iounmap(GPFSEL0);//解除映射
	iounmap(GPSET0);
	iounmap(GPCLR0);

	device_destroy(pin4_class,devno);
	class_destroy(pin4_class);
	unregister_chrdev(major,module_name);//卸载驱动


module_init(pin4_drv_init);//入口,内核加载该驱动的时候,这个宏会被调用
module_exit(pin4_drv_exit);
MODULE_LICENSE("GPL v2");
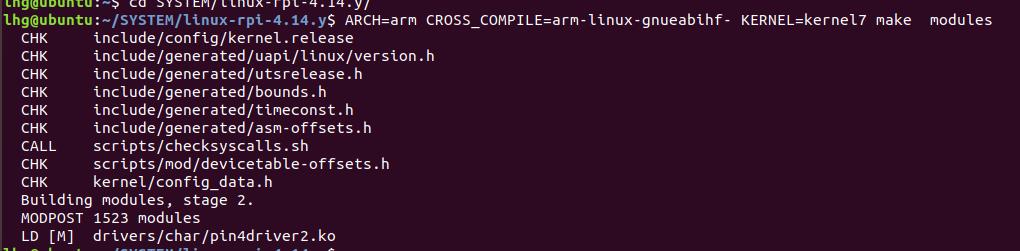
一、驱动模块编译
ARCH=arm CROSS_COMPILE=arm-linux-gnueabihf- KERNEL=kernel7 make modules
二、编译测试文件
arm-linux-gnueabihf-gcc pin4test.c -o realtest
三、将两个文件发送到树莓派上测试
scp ./drivers/char/pin4driver2.ko pi@192.168.109.8:/home/pi
scp realtest pi@192.168.109.8:/home/pi
四、载入驱动模块
sudo insmod pin4driver2.ko
sudo chmod 666 /dev/pin4
五、测试
./pin4test
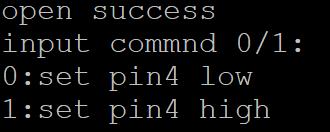
可输入1或0,令io口输出高低电平
以上是关于arm处理器IO口驱动代码编写(bcm2835)的主要内容,如果未能解决你的问题,请参考以下文章
树莓派高级开发——“IO口驱动代码的编写“ 包含总线地址物理_虚拟地址BCM2835芯片手册知识