SSM框架整合步骤详解
Posted 格子衫111
tags:
篇首语:本文由小常识网(cha138.com)小编为大家整理,主要介绍了SSM框架整合步骤详解相关的知识,希望对你有一定的参考价值。
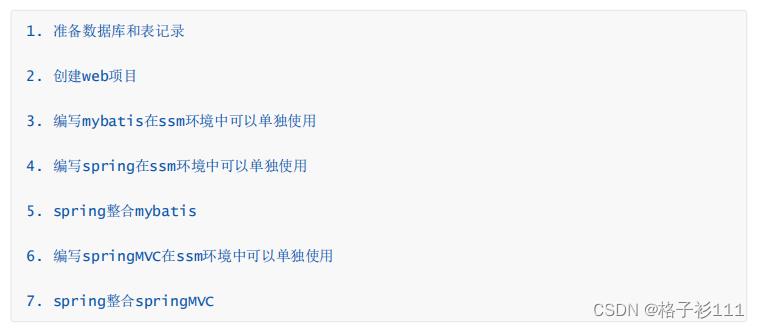
1.1 需求和步骤分析
需求
使用ssm框架完成对 account 表的增删改查操作。
步骤分析

1.2 环境搭建
1)准备数据库和表记录
CREATE TABLE `account` (
	`id` int(11) NOT NULL AUTO_INCREMENT,
	`name` varchar(32) DEFAULT NULL,
	`money` double DEFAULT NULL,
	PRIMARY KEY (`id`)
) ENGINE=InnoDB AUTO_INCREMENT=3 DEFAULT CHARSET=utf8;


insert into `account`(`id`,`name`,`money`) values (1,'tom',1000), (2,'jerry',1000);
2)创建web项目
创建步骤可参考这篇文章:https://blog.csdn.net/u012660464/article/details/126652568?spm=1001.2014.3001.5501
1.3 编写mybatis在ssm环境中可以单独使用
1)相关坐标
<!--mybatis坐标-->
        <dependency>
            <groupId>mysql</groupId>
            <artifactId>mysql-connector-java</artifactId>
            <version>5.1.47</version>
        </dependency>
        <dependency>
            <groupId>com.alibaba</groupId>
            <artifactId>druid</artifactId>
            <version>1.1.15</version>
        </dependency>
        <dependency>
            <groupId>org.mybatis</groupId>
            <artifactId>mybatis</artifactId>
            <version>3.5.1</version>
        </dependency>
        <dependency>
            <groupId>junit</groupId>
            <artifactId>junit</artifactId>
            <version>4.12</version>
        </dependency>
2)Account实体
public class Account

    private Integer id;
    private String name;
    private Double money;

    public Account()


    public Account(int id, String name, double money)
        this.id =id;
        this.name = name;
        this.money = money;


    public Account(String name, double money)
        this.name = name;
        this.money = money;


    @Override
    public String toString()
        return "Account" +
                "id=" + id +
                ", name='" + name + '\\'' +
                ", money=" + money +
                '';


    public Integer getId()
        return id;


    public void setId(Integer id)
        this.id = id;


    public String getName()
        return name;


    public void setName(String name)
        this.name = name;


    public Double getMoney()
        return money;


    public void setMoney(Double money)
        this.money = money;
3)AccountDao接口
public interface AccountDao

    /*
        查询所有账户
     */
    public List<Account> findAll();

    void save(Account account);

    Account findById(Integer id);

    void update(Account account);

    void deleteBatch(Integer[] ids);
4)AccountDao.xml映射
<?xml version="1.0" encoding="UTF-8" ?>
<!DOCTYPE mapper PUBLIC "-//mybatis.org//DTD Mapper 3.0//EN" "http://mybatis.org/dtd/mybatis-3-mapper.dtd">

<mapper namespace="com.zwt.dao.AccountDao">

    <!--查询所有账户-->
    <select id="findAll" resultType="account">
        select * from account
    </select>

    <!-- 添加账户  void save(Account account);-->
    <insert id="save" parameterType="account">
        insert into account(name,money)  values(#name,#money)
    </insert>

    <!--根据ID查询账户信息   Account findById(Integer id);-->
    <select id="findById" parameterType="int" resultType="account">
        select * from account where id = #id
    </select>

    <!--更新账户-->
    <update id="update" parameterType="account">
        update account set name = #name,money = #money where id = #id
    </update>

    <!--批量删除 void deleteBatch(Integer[] ids);  id in(1,2)-->
    <delete id="deleteBatch" parameterType="int">
        delete from account
        <where>
            <foreach collection="array" open="id in(" close=")" separator="," item="id">
                #id
            </foreach>
        </where>
    </delete>

</mapper>
注:xml 包名及结构需要和 java 文件一致
5)mybatis核心配置文件
jdbc.properties
jdbc.driver=com.mysql.jdbc.Driver
jdbc.url=jdbc:mysql:///test
jdbc.username=root
jdbc.password=zhangwt
注:一般 resourse 资源目录下,数据库信息需根据自身情况调整
SqlMapConfig.xml
<?xml version="1.0" encoding="UTF-8" ?>
<!DOCTYPE configuration PUBLIC "-//mybatis.org//DTD Config 3.0//EN" "http://mybatis.org/dtd/mybatis-3-config.dtd">

<configuration>

    <!--加载properties-->
    <properties resource="jdbc.properties"/>

    <!--类型别名配置-->
    <typeAliases> <package name="com.zwt.domain"/> </typeAliases>

    <!--环境配置-->
    <environments default="dev">

        <!--使用MySQL环境-->
        <environment id="dev">
            <transactionManager type="JDBC"/>
            <dataSource type="POOLED">
                <property name="driver" value="$jdbc.driver"/>
                <property name="url" value="$jdbc.url"/>
                <property name="username" value="$jdbc.username"/>
                <property name="password" value="$jdbc.password"/>
            </dataSource> </environment> </environments>

    <!--加载映射-->
    <mappers>
        <package name="com.zwt.dao"/>
    </mappers>

</configuration>
注:一般 resourse 资源目录下
6)测试代码
public class MybatisTest

    @Test
    public void  testMybatis() throws IOException

        InputStream resourceAsStream = Resources.getResourceAsStream("SqlMapConfig.xml");

        SqlSessionFactory sqlSessionFactory = new SqlSessionFactoryBuilder().build(resourceAsStream);

        SqlSession sqlSession = sqlSessionFactory.openSession();

        AccountDao mapper = sqlSession.getMapper(AccountDao.class);

        List<Account> all = mapper.findAll();

        for (Account account : all)
            System.out.println(account);


        sqlSession.close();
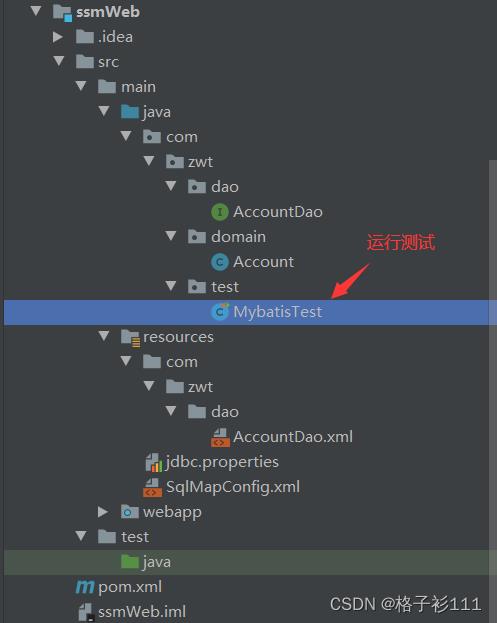
当前项目结构如下:

运行测试类,可以发现mybatis单独配置成功

1.4 编写spring在ssm环境中可以单独使用
1)相关坐标
  <!--spring坐标-->
        <dependency>
            <groupId>org.springframework</groupId>
            <artifactId>spring-context</artifactId>
            <version>5.1.5.RELEASE</version>
        </dependency>
        <dependency>
            <groupId>org.aspectj</groupId>
            <artifactId>aspectjweaver</artifactId>
            <version>1.8.13</version>
        </dependency>
        <dependency>
            <groupId>org.springframework</groupId>
            <artifactId>spring-jdbc</artifactId>
            <version>5.1.5.RELEASE</version>
        </dependency>
        <dependency>
            <groupId>org.springframework</groupId>
            <artifactId>spring-tx</artifactId>
            <version>5.1.5.RELEASE</version>
        </dependency>
        <dependency>
            <groupId>org.springframework</groupId>
            <artifactId>spring-test</artifactId>
            <version>5.1.5.RELEASE</version>
        </dependency>
2)AccountService接口
public interface AccountService


    public List<Account> findAll();

    void save(Account account);

    Account findById(Integer id);

    void update(Account account);

    void deleteBatch(Integer[] ids);
3)AccountServiceImpl实现
@Service
public class AccountServiceImpl implements AccountService

    /*
        测试spring在ssm环境中的单独使用
     */
    public List<Account> findAll()
        System.out.println("findAll执行了....");
        return null;


    public void save(Account account)


    public Account findById(Integer id)
        return null;


    public void update(Account account)


    public void deleteBatch(Integer[] ids)
4)spring核心配置文件
applicationContext.xml
<?xml version="1.0" encoding="UTF-8"?>
<beans xmlns="http://www.springframework.org/schema/beans"
       xmlns:xsi="http://www.w3.org/2001/XMLSchema-instance"
       xmlns:context="http://www.springframework.org/schema/context"
       xmlns:tx="http://www.springframework.org/schema/tx"
       xmlns:aop="http://www.springframework.org/schema/aop"
       xsi:schemaLocation="
       	http://www.springframework.org/schema/beans	http://www.springframework.org/schema/beans/spring-beans.xsd
       	http://www.springframework.org/schema/context http://www.springframework.org/schema/context/spring-context.xsd
       	http://www.springframework.org/schema/tx http://www.springframework.org/schema/tx/spring-tx.xsd
       	http://www.springframework.org/schema/aop http://www.springframework.org/schema/aop/spring-aop.xsd">


    <!--配置IOC相关操作:开启注解扫描-->
    <context:component-scan base-package="com.zwt.service"></context:component-scan>

</beans>
5)测试代码
//替换运行器,指定当前Junit的环境为Spring环境
@RunWith(SpringJUnit4ClassRunner.class)
//加载核心配置文件
@ContextConfiguration("classpath:applicationContext.xml")
public class SpringTest

    @Autowired
    private AccountService accountService;

    @Test
    public void testSpring()

        List<Account> all = accountService.findAll();
        for (Account account : all)
            System.out.println(account);
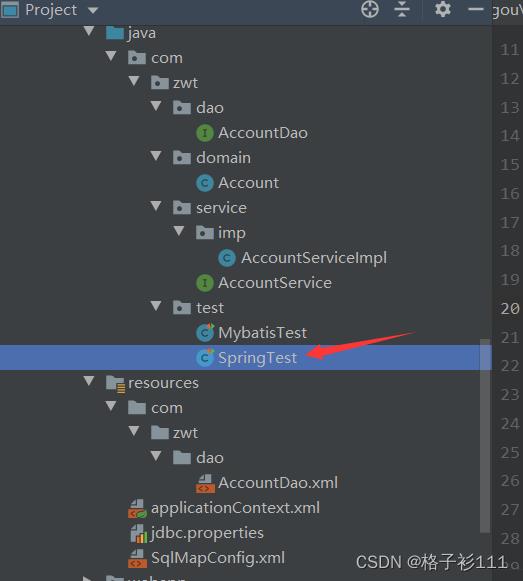
运行


至此,Spring单独配置完成
1.5 spring整合mybatis
1)整合思想
将mybatis接口代理对象的创建权交给spring管理,我们就可以把dao的代理对象注入到service中,此时也就完成了spring与mybatis的整合了。
2)导入整合包
  <!--mybatis整合spring坐标-->
        <dependency>
            <groupId>org.mybatis</groupId>
            <artifactId>mybatis-spring</artifactId>
            <version>1.3.1</version>
        </dependency>
3)spring配置文件管理mybatis
注意:此时可以将mybatis主配置文件 SqlMapConfig.xml 删除。
applicationContext.xml
<?xml version="1.0" encoding="UTF-8"?>
<beans xmlns="http://www.springframework.org/schema/beans"
xmlns:xsi="http://www.w3.org/2001/XMLSchema-instance"
xmlns:context="http://www.springframework.org/schema/context"
xmlns:tx="http://www.springframework.org/schema/tx"
xmlns:aop="http://www.springframework.org/schema/aop"
xsi:schemaLocation="
http://www.springframework.org/schema/beans http://www.springframework.org/schema/beans/spring-beans.xsd
http://www.springframework.org/schema/context http://www.springframework.org/schema/context/spring-context.xsd
http://www.springframework.org/schema/tx http://www.springframework.org/schema/tx/spring-tx.xsd
http://www.springframework.org/schema/aop http://www.springframework.org/schema/aop/spring-aop.xsd">
<!--配置IOC相关操作:开启注解扫描-->
<context:component-scan base-package="com.zwt.service"></context:component-scan>
<!--spring整合mybatis开始...................-->
<context:property-placeholder location="classpath:jdbc.properties"></context:property-placeholder>
<bean id="dataSource" class="com.alibaba.druid.pool.DruidDataSource">
<property name="driverClassName" value="$jdbc.driver"/>
<property