HOWTO: install Oracle 12c Database on Centos8
Posted yexianyi
tags:
篇首语:本文由小常识网(cha138.com)小编为大家整理,主要介绍了HOWTO: install Oracle 12c Database on Centos8相关的知识,希望对你有一定的参考价值。
Pre-install:
- Prepare CentOS Linux release 8.3.2011 with 4 core, 4G RAM and 40G DIsk space at least.
- Download Oracle 12c from https://edelivery.oracle.com/osdc/faces/SoftwareDelivery

- You will see several ZIP file, like following

- Unzip all the ZIP files to a custom folder or just unzip V839960-01.zip
Config System:
- Create user and groups
groupadd -g 54321 oinstall groupadd -g 54322 dba groupadd -g 54323 oper groupadd -g 54324 backupdba groupadd -g 54325 dgdba groupadd -g 54326 kmdba groupadd -g 54327 asmdba groupadd -g 54328 asmoper groupadd -g 54329 asmadmin groupadd -g 54330 racdba useradd -u 54321 -g oinstall -G dba,oper,backupdba,dgdba,kmdba,asmdba,asmoper,asmadmin,racdba oracle mkdir /u01 chown -R oracle:oinstall /u01 chmod -R 775 /u01/ -
Install essencial packages
yum update -y yum install libnsl -y yum install binutils -y yum install compat-libstdc++-33 -y yum install compat-libstdc++-33.i686 -y yum install gcc -y yum install gcc-c++ -y yum install glibc -y yum install glibc.i686 -y yum install glibc-devel -y yum install glibc-devel.i686 -y yum install ksh -y yum install libgcc -y yum install libgcc.i686 -y yum install libstdc++ -y yum install libstdc++.i686 -y yum install libstdc++-devel -y yum install libstdc++-devel.i686 -y yum install libaio -y yum install libaio.i686 -y yum install libaio-devel -y yum install libaio-devel.i686 -y yum install libXext -y yum install libXext.i686 -y yum install libXtst -y yum install libXtst.i686 -y yum install libX11 -y yum install libX11.i686 -y yum install libXau -y yum install libXau.i686 -y yum install libxcb -y yum install libxcb.i686 -y yum install libXi -y yum install libXi.i686 -y yum install make -y yum install sysstat -y yum install unixODBC -y yum install unixODBC-devel -y yum install zlib-devel -y yum install zlib-devel.i686 -y yum install java-1.8.0-openjdk.x86_64 -y -
add your host name resolution to /etc/hosts
sudo vi /etc/hosts
127.0.0.1 centos8 centos8.linuxvmimages.local #(centos8.linuxvmimages.local is my hostname)
Run Installer
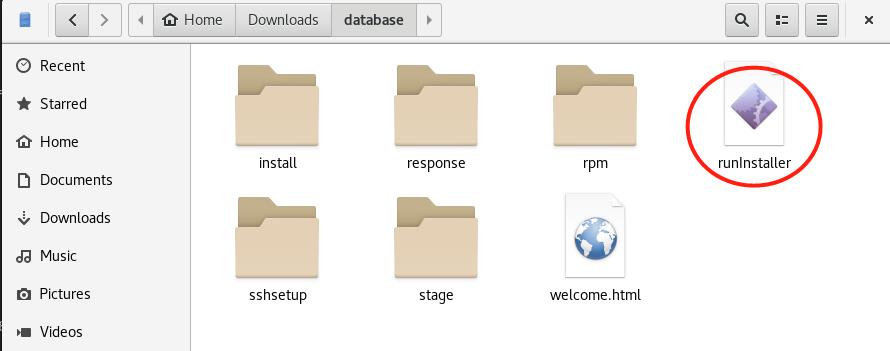
- Go to "database" folder which unziped in previous step and run install file
sudo ./runInstaller
- Follow the instructions of the installation guide, then Next, Next ... Next . Then you would succeeed at last.
After Installation:
- Login system as "oracle" and edit "/home/oracle/.bash_profile"
export ORACLE_HOSTNAME=centos8.linuxvmimages.local export ORACLE_UNQNAME=orcl export ORACLE_BASE=/u01/app/oracle export DB_HOME=$ORACLE_BASE/product/12.2.0/dbhome_1 export ORACLE_HOME=$DB_HOME export ORACLE_SID=orcl export ORACLE_TERM=xterm export BASE_PATH=/usr/sbin:$PATH export PATH=$ORACLE_HOME/bin:$ORACLE_HOME/OPatch:$ORACLE_HOME/perl/bin:$ORACLE_HOME/jdk/bin:$BASE_PATH export LD_LIBRARY_PATH=$ORACLE_HOME/lib:/lib:/usr/lib export CLASSPATH=$ORACLE_HOME/JRE:$ORACLE_HOME/jlib:$ORACLE_HOME/rdbms/jlib - source /home/oracle/.bash_profilez
- You can create demo schema follow this instruction.
create tablespace hr datafile '/u01/app/oracle/oradata/orcl/hr_datafile01.dbf' size 5M autoextend on next 1M ;SQL> @?/demo/schema/human_resources/hr_main.sql specify password for HR as parameter 1: Enter value for 1: Passw0rd specify default tablespeace for HR as parameter 2: Enter value for 2: hr specify temporary tablespace for HR as parameter 3: Enter value for 3: temp specify log path as parameter 4: Enter value for 4: $ORACLE_HOME/demo/schema/log/ PL/SQL procedure successfully completed.
Reference:
以上是关于HOWTO: install Oracle 12c Database on Centos8的主要内容,如果未能解决你的问题,请参考以下文章