UDP协议分析
Posted Y0n1an
tags:
篇首语:本文由小常识网(cha138.com)小编为大家整理,主要介绍了UDP协议分析相关的知识,希望对你有一定的参考价值。
步骤
建立网络拓扑
#!/bin/sh
set -x

sysctl -w net.ipv4.ip_forward=1#ip分组转发
systemctl stop firewalld.service#关闭linux防火墙
sysctl -w net.ipv4.conf.all.rp_filter=0#关闭linux反向校验
sysctl -w net.ipv4.conf.default.rp_filter=0
systemctl start iptables.service#开启iptable服务
sysctl -w net.ipv4.conf.all.accept_redirects=1#启用内核ICMP重定向响应

brctl addbr br56A #创建交换机bridge
ip netns add ns56A #创建了namespace主机
ip netns exec ns56A ip link set lo up #让网络适配器IO接口打开
ip link add tap56A type veth peer name tap56A_p #建立veth pair
ip link set tap56A netns ns56A #把tap建立到namespace
brctl addif br56A tap56A_p #把tap加入我们创建的bridge网桥中
ip netns exec ns56A ip addr add local 192.168.56.126/25 dev tap56A #配置IP
ip link set br56A up
ip link set tap56A_p up
ip netns exec ns56A ip link set tap56A up
#配置默认路由
ip netns exec ns56A route add default gw 192.168.56.1

#创建br57A及其相连的主机NS,配置IP和默认路由
#创建Bridge
brctl addbr br57A
#创建namespace
ip netns add ns57A
#将lo接口上线
ip netns exec ns57A ip link set lo up
#创建veth pair
ip link add tap57A type veth peer name tap57A_p
#把tap迁移到namespace
ip link set tap57A netns ns57A
#把相应tap添加到Bridge中
brctl addif br57A tap57A_p
#配置IP地址
ip netns exec ns57A ip addr add local 192.168.57.126/25 dev tap57A
#将Bridge及相关tap状态设置为up
ip link set br57A up
ip link set tap57A_p up
ip netns exec ns57A ip link set tap57A up
#配置默认路由
ip netns exec ns57A route add default gw 192.168.57.1
#为主机57A配置到192.168.57.128/26的路由(进行ICMP重定向实验时删除,以产生ICMP重定向报文)
ip netns exec ns57A route add -net 192.168.57.128/26 gw 192.168.57.125

#创建br57B及其相连的主机NS,配置IP和默认路由
#创建Bridge
brctl addbr br57B
#创建namespace
ip netns add ns57B
#将lo接口上线
ip netns exec ns57B ip link set lo up
#创建veth pair
ip link add tap57B type veth peer name tap57B_p
#把tap迁移到namespace
ip link set tap57B netns ns57B
#把相应tap添加到Bridge中
brctl addif br57B tap57B_p
#配置IP地址
ip netns exec ns57B ip addr add local 192.168.57.190/26 dev tap57B
#将Bridge及相关tap状态设置为up
ip link set br57B up
ip link set tap57B_p up
ip netns exec ns57B ip link set tap57B up
#配置默认路由
ip netns exec ns57B route add default gw 192.168.57.129

#创建br57C及其相连的主机NS,配置IP和默认路由
#创建Bridge
brctl addbr br57C
#创建namespace
ip netns add ns57C
#将lo接口上线
ip netns exec ns57C ip link set lo up
#创建veth pair
ip link add tap57C type veth peer name tap57C_p
#把tap迁移到namespace
ip link set tap57C netns ns57C
#把相应tap添加到Bridge中
brctl addif br57C tap57C_p
#配置IP地址
ip netns exec ns57C ip addr add local 192.168.57.254/26 dev tap57C
#将Bridge及相关tap状态设置为up
ip link set br57C up
ip link set tap57C_p up
ip netns exec ns57C ip link set tap57C up
#配置默认路由
ip netns exec ns57C route add default gw 192.168.57.193
#为主机57C配置到192.168.57.0/24的路由(可以不配置,会产生ICMP重定向报文)
ip netns exec ns57C route add -net 192.168.57.0/24 gw 192.168.57.253

#创建各路由器NS
ip netns add RA
ip netns add RB
ip netns add RC
ip netns add RD
ip netns add RE
#各路由器lo接口上线
ip netns exec RA ip link set lo up
ip netns exec RB ip link set lo up
ip netns exec RC ip link set lo up
ip netns exec RD ip link set lo up
ip netns exec RE ip link set lo up

#连接路由器RC和网桥br57A
#创建veth pair
ip link add tapRC_57A type veth peer name tap57A_RC
#把tap迁移到路由器和网桥
ip link set tapRC_57A netns RC
brctl addif br57A tap57A_RC
#配置相应tap的IP地址
ip netns exec RC ip addr add local 192.168.57.1/25 dev tapRC_57A
#将相关tap状态设置为up
ip netns exec RC ip link set tapRC_57A up
ip link set tap57A_RC up

#连接路由器RE和网桥br57A
#创建veth pair
ip link add tapRE_57A type veth peer name tap57A_RE
#把tap迁移到路由器和网桥
ip link set tapRE_57A netns RE
brctl addif br57A tap57A_RE
#配置相应tap的IP地址
ip netns exec RE ip addr add local 192.168.57.125/25 dev tapRE_57A
#将相关tap状态设置为up
ip netns exec RE ip link set tapRE_57A up
ip link set tap57A_RE up

#连接路由器RE和网桥br57B
#创建veth pair
ip link add tapRE_57B type veth peer name tap57B_RE
#把tap迁移到路由器和网桥
ip link set tapRE_57B netns RE
brctl addif br57B tap57B_RE
#配置相应tap的IP地址
ip netns exec RE ip addr add local 192.168.57.129/26 dev tapRE_57B
#将相关tap状态设置为up
ip netns exec RE ip link set tapRE_57B up
ip link set tap57B_RE up

#连接路由器RE和网桥br57C
#创建veth pair
ip link add tapRE_57C type veth peer name tap57C_RE
#把tap迁移到路由器和网桥
ip link set tapRE_57C netns RE
brctl addif br57C tap57C_RE
#配置相应tap的IP地址
ip netns exec RE ip addr add local 192.168.57.253/26 dev tapRE_57C
#将相关tap状态设置为up
ip netns exec RE ip link set tapRE_57C up
ip link set tap57C_RE up

#连接路由器RD和网桥br57C
#创建veth pair
ip link add tapRD_57C type veth peer name tap57C_RD
#把tap迁移到路由器和网桥
ip link set tapRD_57C netns RD
brctl addif br57C tap57C_RD
#配置相应tap的IP地址
ip netns exec RD ip addr add local 192.168.57.193/26 dev tapRD_57C
#将相关tap状态设置为up
ip netns exec RD ip link set tapRD_57C up
ip link set tap57C_RD up

#连接路由器RB和网桥br56A
#创建veth pair
ip link add tapRB_56A type veth peer name tap56A_RB
#把tap迁移到路由器和网桥
ip link set tapRB_56A netns RB
brctl addif br56A tap56A_RB
#配置相应tap的IP地址
ip netns exec RB ip addr add local 192.168.56.1/25 dev tapRB_56A
#将相关tap状态设置为up
ip netns exec RB ip link set tapRB_56A up
ip link set tap56A_RB up

#连接路由器RA和路由器RB
#创建veth pair
ip link add tapRA_RB type veth peer name tapRB_RA
#把tap迁移到路由器
ip link set tapRA_RB netns RA
ip link set tapRB_RA netns RB
#配置相应tap的IP地址
ip netns exec RA ip addr add local 192.168.56.246/30 dev tapRA_RB
ip netns exec RB ip addr add local 192.168.56.245/30 dev tapRB_RA
#将相关tap状态设置为up
ip netns exec RA ip link set tapRA_RB up
ip netns exec RB ip link set tapRB_RA up

#连接路由器RA和路由器RC
#创建veth pair
ip link add tapRA_RC type veth peer name tapRC_RA
#把tap迁移到路由器
ip link set tapRA_RC netns RA
ip link set tapRC_RA netns RC
#配置相应tap的IP地址
ip netns exec RA ip addr add local 192.168.56.249/30 dev tapRA_RC
ip netns exec RC ip addr add local 192.168.56.250/30 dev tapRC_RA
#将相关tap状态设置为up
ip netns exec RA ip link set tapRA_RC up
ip netns exec RC ip link set tapRC_RA up

#连接路由器RA和路由器RD
#创建veth pair
ip link add tapRA_RD type veth peer name tapRD_RA
#把tap迁移到路由器
ip link set tapRA_RD netns RA
ip link set tapRD_RA netns RD
#配置相应tap的IP地址
ip netns exec RA ip addr add local 192.168.56.253/30 dev tapRA_RD
ip netns exec RD ip addr add local 192.168.56.254/30 dev tapRD_RA
#将相关tap状态设置为up
ip netns exec RA ip link set tapRA_RD up
ip netns exec RD ip link set tapRD_RA up

#连接路由器RA和Linux Host
#创建veth pair
ip link add tapRA_H type veth peer name tapH_RA
#把tap迁移到路由器
ip link set tapRA_H netns RA
#配置相应tap的IP地址
ip netns exec RA ip addr add local 192.168.99.100/24 dev tapRA_H
ip addr add local 192.168.99.1/24 dev tapH_RA
#将相关tap状态设置为up
ip netns exec RA ip link set tapRA_H up
ip link set tapH_RA up
#为Linux Host配置到虚拟实验网络的路由
route add -net 192.168.56.0/23 gw 192.168.99.100

#END
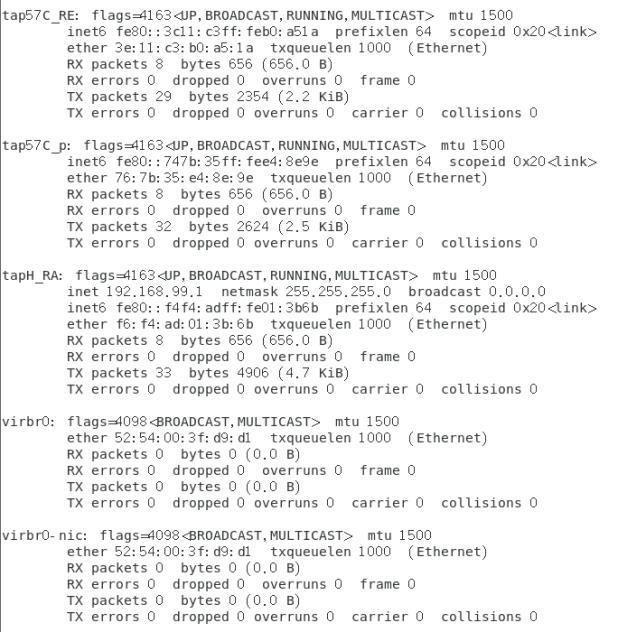
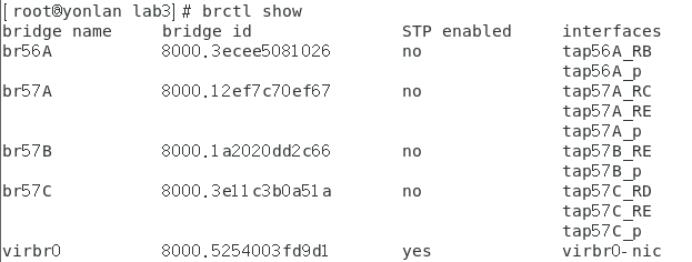
执行shell,利用命令ipconfig -all & brctl show查看信息
然后配置路由表
#!/bin/sh
#本脚本为虚拟网络拓扑进行静态路由配置。
set -x

#各路由器的直连路由,已经在script3.1中设置IP地址时自动生成了,无需手动配置
#RA路由(最长前缀匹配)
ip netns exec RA route add -net 192.168.57.0/24 gw 192.168.56.250
ip netns exec RA route add -net 192.168.57.192/26 gw 192.168.56.254
ip netns exec RA route add -net 192.168.56.0/25 gw 192.168.56.245
#默认路由,(进行ICMP目的不可达实验时删除,以产生网络不可达 #ICMP3-0)
ip netns exec RA route add default gw 192.168.99.1
#RB路由
ip netns exec RB route add default gw 192.168.56.246
#RC路由
ip netns exec RC route add -net 192.168.57.128/25 gw 192.168.57.125
ip netns exec RC route add default gw 192.168.56.249
#RD路由(最长前缀匹配)
ip netns exec RD route add -net 192.168.57.0/24 gw 192.168.57.253
ip netns exec RD route add default gw 192.168.56.253
#RE路由
ip netns exec RE route add default gw 192.168.57.1

#end
关闭网卡offload,有时候运输层网络层等上层计算交给网卡的CPU,数据发到网络上进行计算,这叫offload,是默认开启的
但是抓包的时候是网卡发送数据前,在发送时抓数据包,所以这时候包就是错误的,四台主机都要关闭
#!/bin/sh
#本脚本关闭网卡offload功能。
set -x

#关闭各主机网卡GSO功能,网卡不再替CPU进行TCP\\UDP分片
ip netns exec ns56A ethtool -K tap56A gso off
ip netns exec ns57A ethtool -K tap57A gso off
ip netns exec ns57B ethtool -K tap57B gso off
ip netns exec ns57C ethtool -K tap57C gso off
#关闭各主机网卡的校验和计算功能,网卡不再替CPU进行TCP\\UDP校验和计算
ip netns exec ns56A ethtool -K tap56A tx off rx off
ip netns exec ns57A ethtool -K tap57A tx off rx off
ip netns exec ns57B ethtool -K tap57B tx off rx off
ip netns exec ns57C ethtool -K tap57C tx off rx off

#END
打开shell,将命令行shell模拟成ns56A
ip netns exec ns56A bash
另一个模拟ns57c
ip netns exec ns57C bash
在ns57C上执行wireshark
ip netns exec ns57C wireshark &
在tap57c启动抓包
在57c上打开UDP服务程序
nc -lvu 4499
在ns56A打开端口,并指定IP地址和端口
nc -u 192.168.57.254 4499
然后56A输入一串字符,回车
然后57A也是输入一串,回车

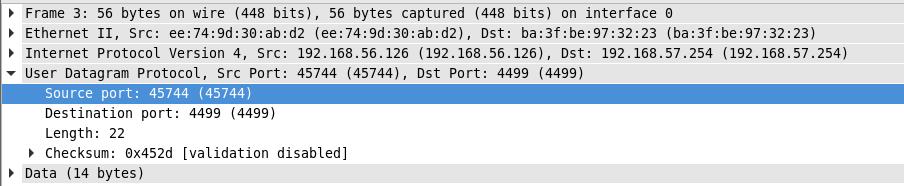
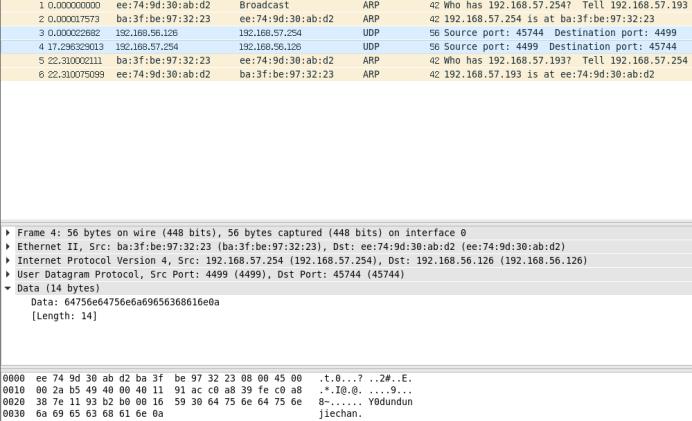
分析
关于端口

是一个临时端口45744
主机ns57c收到报文就知道了,实际上在监听描述符,收到connect请求后,就得到了套接字接口,就得到了端口。
56A发送了guanzhujiaran
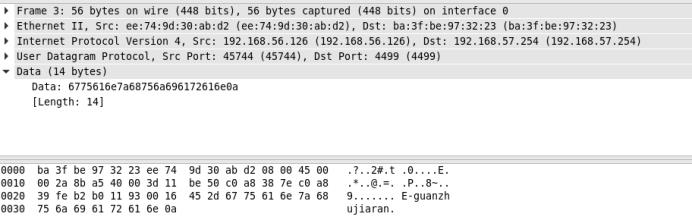
57C发送了dundunjiechan
56A在shell中也收到了
关于校验和
把伪首部和校验和前的按二字节排序,校验和补0,然后相加取反码就是了。
以上是关于UDP协议分析的主要内容,如果未能解决你的问题,请参考以下文章