ES实战系列-Elasticsearch安装
Posted why123wh
tags:
篇首语:本文由小常识网(cha138.com)小编为大家整理,主要介绍了ES实战系列-Elasticsearch安装相关的知识,希望对你有一定的参考价值。
文章目录
Elasticsearch安装
下载7.8.1版本
wget https://artifacts.elastic.co/downloads/elasticsearch/elasticsearch-7.8.1-linux-x86_64.tar.gz
wget https://artifacts.elastic.co/downloads/elasticsearch/elasticsearch-7.8.1-linux-x86_64.tar.gz.sha512
shasum -a 512 -c elasticsearch-7.8.1-linux-x86_64.tar.gz.sha512
tar -xzf elasticsearch-7.8.1-linux-x86_64.tar.gz
cd elasticsearch-7.8.1/ ll
集群部署
# 设置集群名称,集群内所有节点的名称必须一致。
cluster.name: es
# 设置节点名称,集群内节点名称必须唯一。
node.name: es-node1
# 表示该节点会不会作为主节点,true表示会;false表示不会
node.master: true
# 当前节点是否用于存储数据,是:true、否:false
node.data: true
# 索引数据存放的位置
path.data: /opt/elasticsearch-7.8.1/data
# 日志文件存放的位置
path.logs: /opt/elasticsearch-7.8.1/logs
# 需求锁住物理内存,是:true、否:false
bootstrap.memory_lock: true
# 监听地址,用于访问该es
network.host: node1
# es对外提供的http端口,默认 9200
http.port: 9200
# TCP的默认监听端口,默认 9300
transport.tcp.port: 9300
# 设置这个参数来保证集群中的节点可以知道其它N个有master资格的节点。默认为1,对于大的集群来说,可以设置大一点的值(2-4)
discovery.zen.minimum_master_nodes: 2
# es7.x 之后新增的配置,写入候选主节点的设备地址,在开启服务后可以被选为主节点
discovery.seed_hosts: ["node1:9300", "node2:9300", "node3:9300"]
discovery.zen.fd.ping_timeout: 1m
discovery.zen.fd.ping_retries: 5
# es7.x 之后新增的配置,初始化一个新的集群时需要此配置来选举master
cluster.initial_master_nodes: ["es-node1", "es-node2", "es-node3"]
# 是否支持跨域,是:true,在使用head插件时需要此配置
http.cors.enabled: true
# “*” 表示支持所有域名
http.cors.allow-origin: "*"
action.destructive_requires_name: true
action.auto_create_index: .security,.monitoring*,.watches,.triggered_watches,.watcher-history*
xpack.security.enabled: false
xpack.monitoring.enabled: true
xpack.graph.enabled: false
xpack.watcher.enabled: false
xpack.ml.enabled: false
安装报错
[2020-08-17T05:53:23,496][WARN ][o.e.c.c.ClusterFormationFailureHelper] [es-node1] master not discovered yet, this node has not previously joined a bootstrapped (v7+) cluster, and this node must discover master-eligible nodes [node1] to bootstrap a cluster: have discovered [es-node1D73-QBgpTp-Q7RgailBDiQo83R1VLyQZWcs8lAG9o1Ugnode1192.168.199.137:9300dimrtxpack.installed=true, transform.node=true, es-node2LghG7C8pRoamT1h9GYBtRACskX0v3wTwGvUNNSp3Rg2Anode2192.168.199.138:9300dimrtxpack.installed=true, transform.node=true, es-node3BPDEwYozS4OWGkQGED-P2wtoxtMJHXT1SOSmDUYz_tjgnode3192.168.199.139:9300dimrtxpack.installed=true, transform.node=true]; discovery will continue using [192.168.199.138:9300, 192.168.199.139:9300] from hosts providers and [es-node1D73-QBgpTp-Q7RgailBDiQo83R1VLyQZWcs8lAG9o1Ugnode1192.168.199.137:9300dimrtxpack.installed=true, transform.node=true] from last-known cluster state; node term 0, last-accepted version 0 in term 0
- 解决方法
- 修改
cluster.initial_master_nodes为es的node.name,不是服务器名称
- 修改
java.lang.IllegalStateException: transport not ready yet to handle incoming requests
无需处理
创建用户
[root@es1 ~]# adduser es
为这个用户初始化密码,linux会判断密码复杂度,不过可以强行忽略:

[root@es1 ~]# passwd es
更改用户 es 的密码 。
新的 密码:x
无效的密码: 密码未通过字典检查 - 过于简单化/系统化
重新输入新的 密码:
passwd:所有的身份验证令牌已经成功更新。
-
赋予用户权限
在root用户
vi /etc/sudoers
添加 : USERNAME    ALL=(ALL)   ALL
以下配置可以给sudo权限免密
添加 : USERNAME    ALL=(ALL)   NOPASSWD:ALL
ES安装
-
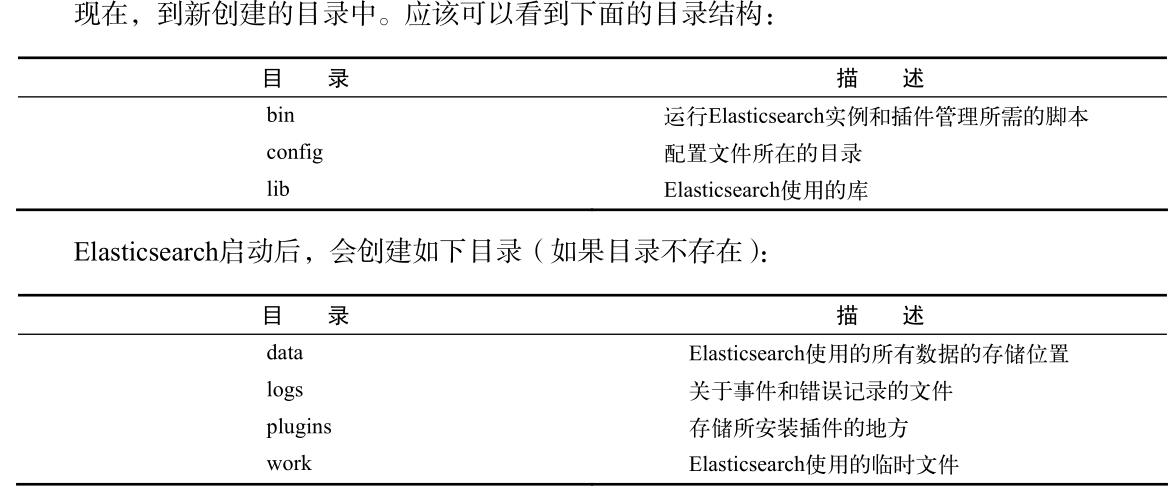
目录结构

-
配置
elasticsearch.yml- 负责设置服务器的默认配置
- 有两个值不能在运行时更改,分别是
cluster.name和node.name
logging.yml- 定义了多少信息写入系统日志,定义了日志文件,并定期创建新文件
- 只有在调整监控、备份方案或系统调试时,才需要修改
- 系统限制打开的文件描述符:32000个,一般在
/etc/security/limits.conf中修改,当前的值可以用ulimit
命令来查看。如果达到极限,Elasticsearch将无法创建新的文件,所以合并会失败,索引会失败,
新的索引无法创建。
- JVM 堆内存限制:默认内存(1024M)
- 志文件中发现
OutOfMemoryError异常的条目,把 ES_HEAP_SIZE 变量设置到大于1024 - 当选择分配给JVM的合适内存大小时,记住,通常不应该分配超过50%的系统总内存
- 志文件中发现
集群安装
-
修改配置文件
$ vim /opt/elasticsearch/elasticsearch5.6.5/config/elasticsearch.yml cluster.name: es (集群名称,同一集群要一样) node.name: es-node1 (节点名称,同一集群要不一样) http.port: 9200 #连接端口 network.host: node1 #默认网络连接地址,写当前主机的静态IP,这里不能写127.0.0.1 path.data: /opt/elasticsearch/data #数据文件存储路径 path.logs: /opt/elasticsearch/logs #log文件存储路径 discovery.zen.ping.unicast.hosts: ["node1","node2","node3"]#集群中master节点的初始列表,可以通过这些节点来自动发现新加入集群的节点。 bootstrap.memory_lock: true bootstrap.system_call_filter: false # 因centos6不支持SecComp而默认bootstrap.system_call_filter为true进行检测,所以,要设置为 false。注:SecComp为secure computing mode简写 http.cors.enabled: true #是否支持跨域,默认为false http.cors.allow-origin: "*" #当设置允许跨域,默认为*,表示支持所有域名 discovery.zen.minimum_master_nodes: 2 #这个参数来保证集群中的节点可以知道其它N个有master资格的节点。默认为1,对于大的集群来说,可以设置大一点的值(2-4) -
elasticsearch备份位置,路径要手动创建
path.repo: ["/opt/elasticsearch/elasticseaarch-5.6.3/data/backups"] -
如果安装elasticsearch-head插件,需要添加以下选项
http.cors.enabled: true http.cors.allow-origin: "*" -
如果安装x-pack插件,我们取消他的basic认证,需要添加以下选项
xpack.security.enabled: false -
修改jvm内存[这个配置项很重要,在现实生产中要配的大一些,但是最大不能超过32g]
vim config/jvm.options
-Xms2g  ---> -Xms512m
-Xmx2g  ---> -Xms512m
管理
- 启动与关闭
每一台设备都要单独启动

前台启动
$ ./elasticsearch

后台启动 -d为守护进程运行
$ ./elasticsearch –d
$ ./elasticsearch & # 使用这种方式他会打印日志在前台
-
查看进程
$ jps 2369 Elasticsearch -
验证是否安装成功

注意事项
es不能使用root用户运行
[2020-07-25T00:44:08,878][WARN ][o.e.b.ElasticsearchUncaughtExceptionHandler] [es-node1] uncaught exception in thread [main]
org.elasticsearch.bootstrap.StartupException: java.lang.RuntimeException: can not run elasticsearch as root
        at org.elasticsearch.bootstrap.Elasticsearch.init(Elasticsearch.java:125) ~[elasticsearch-6.1.1.jar:6.1.1]
        at org.elasticsearch.bootstrap.Elasticsearch.execute(Elasticsearch.java:112) ~[elasticsearch-6.1.1.jar:6.1.1]
        at org.elasticsearch.cli.EnvironmentAwareCommand.execute(EnvironmentAwareCommand.java:86) ~[elasticsearch-6.1.1.jar:6.1.1]
        at org.elasticsearch.cli.Command.mainWithoutErrorHandling(Command.java:124) ~[elasticsearch-cli-6.1.1.jar:6.1.1]
        at org.elasticsearch.cli.Command.main(Command.java:90) ~[elasticsearch-cli-6.1.1.jar:6.1.1]
        at org.elasticsearch.bootstrap.Elasticsearch.main(Elasticsearch.java:92) ~[elasticsearch-6.1.1.jar:6.1.1]
        at org.elasticsearch.bootstrap.Elasticsearch.main(Elasticsearch.java:85) ~[elasticsearch-6.1.1.jar:6.1.1]
Caused by: java.lang.RuntimeException: can not run elasticsearch as root
        at org.elasticsearch.bootstrap.Bootstrap.initializeNatives(Bootstrap.java:104) ~[elasticsearch-6.1.1.jar:6.1.1]
        at org.elasticsearch.bootstrap.Bootstrap.setup(Bootstrap.java:171) ~[elasticsearch-6.1.1.jar:6.1.1]
        at org.elasticsearch.bootstrap.Bootstrap.init(Bootstrap.java:322) ~[elasticsearch-6.1.1.jar:6.1.1]
        at org.elasticsearch.bootstrap.Elasticsearch.init(Elasticsearch.java:121) ~[elasticsearch-6.1.1.jar:6.1.1]
        ... 6 more
错误:索引文件个数限制
ERROR: [2] bootstrap checks failed
[1]: max file descriptors [4096] for elasticsearch process is too low, increase to at least [65536]
[2]: max virtual memory areas vm.max_map_count [65530] is too low, increase to at least [262144]
-
解决方法
vim /etc/security/limits.conf
#在最后添加
* soft nofile 65536
* hard nofile 131072
vi /etc/sysctl.conf vm.max_map_count=655360- 执行:
sysctl -p
- 执行:
bind错误
org.elasticsearch.bootstrap.StartupException: BindTransportException[Failed to bind to [9300-9400]]; nested: BindException[Cannot assign requested address];
        at org.elasticsearch.bootstrap.Elasticsearch.init(Elasticsearch.java:125) ~[elasticsearch-6.1.1.jar:6.1.1]
        at org.elasticsearch.bootstrap.Elasticsearch.execute(Elasticsearch.java:112) ~[elasticsearch-6.1.1.jar:6.1.1]
        at org.elasticsearch.cli.EnvironmentAwareCommand.execute(EnvironmentAwareCommand.java:86) ~[elasticsearch-6.1.1.jar:6.1.1]
        at org.elasticsearch.cli.Command.mainWithoutErrorHandling(Command.java:124) ~[elasticsearch-cli-6.1.1.jar:6.1.1]
        at org.elasticsearch.cli.Command.main(Command.java:90) ~[elasticsearch-cli-6.1.1.jar:6.1.1]
        at org.elasticsearch.bootstrap.Elasticsearch.main(Elasticsearch.java:92) ~[elasticsearch-6.1.1.jar:6.1.1]
        at org.elasticsearch.bootstrap.Elasticsearch.main(Elasticsearch.java:85) ~[elasticsearch-6.1.1.jar:6.1.1]
- 解决:修改配置文件的
host.name
发送信息给master失败
[2020-07-25T02:00:20,423][INFO ][o.e.d.z.ZenDiscovery ] [es-node2] failed to send join request to master [es-node1Jqt6xka3Q6e_HM7HP7eazQh6izGMXsQWWW8bOWfr-3_gnode1192.168.199.137:9300], reason [RemoteTransportException[[es-node1][192.168.199.137:9300][internal:discovery/zen/join]]; nested: IllegalArgumentException[can't add node es-node2Jqt6xka3Q6e_HM7HP7eazQG5EKFO-WR0yZY5gbIKnDDAnode2192.168.199.138:9300, found existing node es-node1Jqt6xka3Q6e_HM7HP7eazQh6izGMXsQWWW8bOWfr-3_gnode1192.168.199.137:9300 with the same id but is a different node instance]; ]
-
原因:是因为复制的elasticsearch文件夹下包含了data文件中示例一的节点数据,需要把示例二data文件下的文件清空
-
解决方法:删除es集群data数据库文件夹下所有文件即可

插件安装
ES-HEAD
-
安装nodejs
mkdir /opt/nodejs wget https://nodejs.org/dist/v10.15.2/node-v10.15.2-linux-x64.tar.xz # 解压 tar -xf node-v10.15.2-linux-x64.tar.xz # 创建软链接 /opt/nodejs/node-v10.15.2-linux-x64 #配置path环境变量 vi ~/.bash_profile export NODE_HOME=/opt/nodejs/node-v10.15.2-linux-x64 export PATH=$PATH:$NODE_HOME/bin source ~/.bash_profile # 执行 node -v 验证安装 -
yum install git npm -
克隆git项目,切换head目录启动head插件
git clone https://github.com/mobz/elasticsearch-head.git cd elasticsearch-head/ ls npm install # 报错,执行 npm install phantomjs-prebuilt@2.1.16 --ignore-scripts nohup npm run start & -
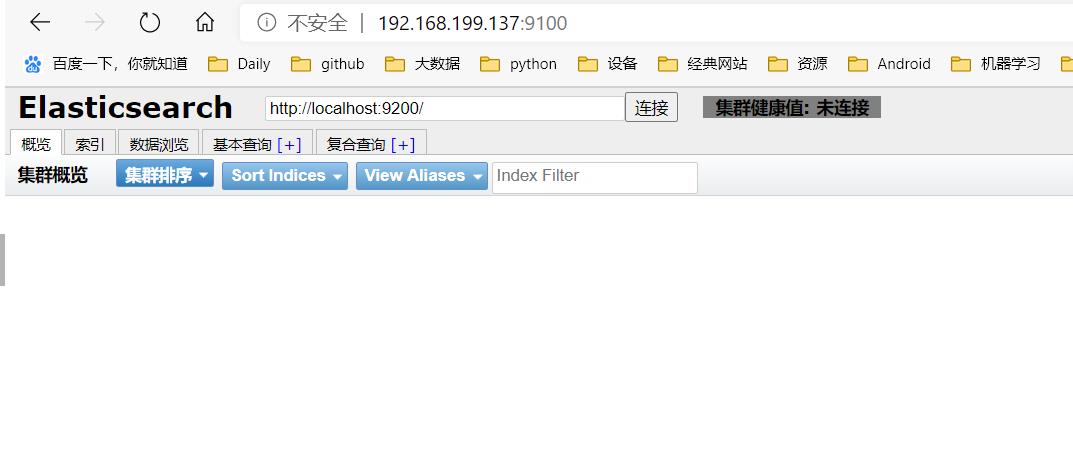
安装成功

-
使用技巧
- 参考链接:
https://blog.csdn.net/bsh_csn/article/details/53908406
- 参考链接:
ES-SQL
# 下载链接
https://github.com/NLPchina/elasticsearch-sql/releases/download/5.4.1.0/es-sql-site-standalone.zip
# 切换到解压目录中的site-server
 npm install express --save

#site-server/site_configuration.json配置文件中修改启动服务的端口

#重启es,再启动es-sql前端
node node-server.js &

# 更新
npm install -g npm

#docker安装
 docker run -d --name elasticsearch-sql -p 9680:8080 -p 9700:9300 -p 9600:9200 851279676/es-sql:6.6.2
cerebro
#可以选择rpm安装或者源码包安装:
#我这里为了方便快捷直接使用rpm
wget https://github.com/lmenezes/cerebro/releases/download/v0.8.5/cerebro-0.8.5-1.noarch.rpm

#安装:
rpm -ivh cerebro-0.8.5-1.noarch.rpm
#配置
rpm -ql cerebro-0.8.5-1
#可以看到配置文件
/usr/share/cerebro/conf/application.conf
#日志文件:
/var/log/cerebro
#配置:
#可以指定配置参数启动:
bin/cerebro -Dhttp.port=1234 -Dhttp.address=127.0.0.1
#可以指定配置文件启动:
启动:
bin/cerebro -Dconfig.file=/some/other/dir/alternate.conf


配置:
# vim /usr/share/cerebro/conf/application.conf

# A list of known hosts
hosts = [

   host = "http://192.168.8.102:9200"
   name = "ES Cluster"
  #  headers-whitelist = [ "x-proxy-user", "x-proxy-roles", "X-Forwarded-For" ]
  #
  # Example of host with authentication
  #
  #  host = "http://some-authenticated-host:9200"
  #  name = "Secured Cluster"
  #  auth =
  #    username = "username"
  #    password = "secret-password"
  #

]

cerebro的启动 状态查看和关闭:
# systemctl stop cerebro
# systemctl start cerebro
# systemctl status cerebro
● cerebro.service - Elasticsearch web admin tool
   Loaded: loaded (/usr/lib/systemd/system/cerebro.service; enabled; vendor preset: disabled)
   Active: active (running) since Thu 2019-12-12 14:36:39 CST; 6s ago
  Process: 11484 ExecStartPre=/bin/chmod 755 /run/cerebro (code=exited, status=0/SUCCESS)

为了便于问题排除可以直接使用命令启动cerebro:
# /usr/bin/cerebro
默认启动的:
[info] play.api.Play - Application started (Prod) (no global state)
[info] p.c.s.AkkaHttpServer - Listening for HTTP on /0:0:0:0:0:0:0:0:9000
允许网络范围内的任意主机登陆访问:


登陆:
node1:9000
安装kibana
vi /kibana/config/kibana.yaml

server.host: "node3"
elasticsearch.url: "http://node3:9200"
# 配置防火墙5601端口
# 启动
./kibana -d
安装7.8.1
curl -O https://artifacts.elastic.co/downloads/kibana/kibana-7.8.1-linux-x86_64.tar.gz
curl https://artifacts.elastic.co/downloads/kibana/kibana-7.8.1-linux-x86_64.tar.gz.sha512 | shasum -a 512 -c -
tar -xzf kibana-7.8.1-linux-x86_64.tar.gz
cd kibana-7.8.1-linux-x86_64/
安装中文分词器
-
常用的分词器有 standard、keyword、whitespace、pattern等。
-
standard 分词器将字符串分割成单独的字词,删除大部分标点符号。keyword 分词器输出和它接收到的相同的字符串,不做任何分词处理。whitespace 分词器只通过空格俩分割文本。pattern 分词器可以通过正则表达式来分割文本。最常用的一般为 standard 分词器。
更多的分词器详见官方文档:https://www.elastic.co/guide/en/elasticsearch/reference/2.4/analysis-standard-tokenizer.html
-
下载中文分词器:https://github.com/medcl/elasticsearch-analysis-ik
-
解压
-
进入elasticsearch-analysis-ik-master/,编译源码
mvn clean install -Dmaven.test.skip=true -
在es的plugins文件夹下创建目录ik
-
将编译后的
/src/elasticsearch-analysis-ik-master/target/releases/elasticsearch-analysis-ik-7.4.0.zip移到/opt/elasticsearch/plugins/目录下 -
执行/.elasticsearch能够正常运行就说明成功了
git clone https://github.com/medcl/elasticsearch-analysis-ik
cd elasticsearch-analysis-ik
#git checkout tags/version
git checkout v6.1.1

mvn clean
mvn compile
mvn package
docker安装ik分词器
../bin/elasticsearch-plugin install https://github.com/medcl/elasticsearch-analysis-ik/releases/download/v6.6.2/elasticsearch-analysis-ik-6.6.2.zip
- 安装成功之后,进行重启
docker restart container-id
测试
-
创建index
curl -XPUT http://localhost:9200/chinese -
create a mapping
curl -XPOST http://192.168.199.137:9200/chinese/fulltext/_mapping -H 'Content-Type:application/json' -d' "properties": "content": "type": "text", "analyzer": "ik_max_word", "search_analyzer": "ik_smart" ' -
index some docs
curl -XPOST localhost:9200/chinese/fulltext/1 -H 'Content-Type:application/json' -d' "content":"美国留给伊拉克的是个烂摊子吗" ' curl -XPOST http://localhost:node1/index/_create/2 -H 'Content-Type:application/json' -d' "content":"公安部:各地校车将享最高路权" ' curl -XPOST http://localhost:node1/index/_create/3 -H 'Content-Type:application/json' -d' "content":"中韩渔警冲突调查:韩警平均每天扣1艘中国渔船" ' curl -XPOST http://localhost:node1/index/_create/4 -H 'Content-Type:application/json' -d' "content":"中国驻洛杉矶领事馆遭亚裔男子枪击 嫌犯已自首" ' -
最细粒度拆分
curl -XPOST node2:9200/chinses/ -H 'Content-Type:application/json' -d' "text": ["中国驻洛杉矶领事馆遭亚裔男子枪击 嫌犯已自首"], "tokenizer": "ik_max_word" ' -
ik_smart: 会做最粗粒度的拆分
-
qury with highlighting
curl -XPOST node1:9200/chinese/_search  -H 'Content-Type:application/json' -d'

    "query" :  "match" :  "content" : "中国" ,
    "highlight" :
        "pre_tags" : ["<tag1>", "<tag2>"],
        "post_tags" : ["</tag1>", "</tag2>"],
        "fields" :
            "content" :


'
分词效果对比
curl -XPUT http://192.168.199.137:9200/ik_test
curl -XPUT http://192.168.199.137:9200/ik_test_1
curl -XPOST http://192.168.199.137:9200/ik_test/fulltext/_mapping  -H 'Content-Type:application/json'-d'

    "fulltext":
        "_all":
            "analyzer": "ik_max_word",
            "search_analyzer": "ik_max_word",
            "term_vector": "no",
            "store": "false"
        ,
        "properties":
            "content":
                "type": "string",
                "store": "no",
                "term_vector": "with_positions_offsets",
                "analyzer": "ik_max_word",
                "search_analyzer": "ik_max_word",
                "include_in_all": "true",
                "boost": 8


'
curl -XPOST http://192.168.199.137:9200/ik_test/fulltext/1 -d'
"content":"美国留给伊拉克的是个烂摊子吗"
'
curl -XPOST http://192.168.199.137:9200/ik_test/fulltext/2 -d'
"content":"公安部:各地校车将享最高路权"
'
curl -XPOST http://192.168.199.137:9200/ik_test/fulltext/3 -d'
"content":"中韩渔警冲突调查:韩警平均每天扣1艘中国渔船"
'
curl -XPOST http://192.168.199.137:9200/ik_test/fulltext/4 -d'
"content":"中国驻洛杉矶领事馆遭亚裔男子枪击 嫌犯已自首"
'

curl -XPOST http://192.168.199.137:9200/ik_test_1/fulltext/1 -d'
"content":"美国留给伊拉克的是个烂摊子吗"
'
curl -XPOST http://192.168.199.137:9200/ik_test_1/fulltext/2 -d'
"content":"公安部:各地校车将享最高路权"
'
curl -XPOST http://192.168.199.137:9200/ik_test_1/fulltext/3 -d'
"content":"中韩渔警冲突调查:韩警平均每天扣1艘中国渔船"
'
curl -XPOST http://192.168.199.137:9200/ik_test_1/fulltext/4 -d'
"content":"中国驻洛杉矶领事馆遭亚裔男子枪击 嫌犯已自首"
'
curl -XPOST http://192.168.199.137:9200/ik_test/fulltext/_search?pretty  -d'
    "query" :  "match" :  "content" : "洛杉矶领事馆" ,
    "highlight" :
        "pre_tags" : ["<tag1>", "<tag2>"],
        "post_tags" : ["</tag1>", "</tag2>"],
        "fields" :
            "content" :


'
7curl -XPOST http://192.168.199.137:9200/ik_test_1/fulltext/_search?pretty  -d'
    "query" :  "match" :  "content" : "洛杉矶领事馆" ,
    "highlight" :
        "pre_tags" : ["<tag1>", "<tag2>"],
        "post_tags" : ["</tag1>", "</tag2>"],
        "fields" :
            "content" :


'
报错
#报错
#"analyzer [ik_max_word] not found for field [content]"]
给所有节点安装ik,并重启
以上是关于ES实战系列-Elasticsearch安装的主要内容,如果未能解决你的问题,请参考以下文章