嵌入式系统stm32 跑马灯实验
Posted Ice丨shine
tags:
篇首语:本文由小常识网(cha138.com)小编为大家整理,主要介绍了嵌入式系统stm32 跑马灯实验相关的知识,希望对你有一定的参考价值。
一、实验目的和实验要求
实验要求:短按实验板扩展板上的按键SW18,依次点亮核心板上D2-D4指示灯。长按按键2秒,实现四个灯循环点亮(跑马灯)。
二、实验原理

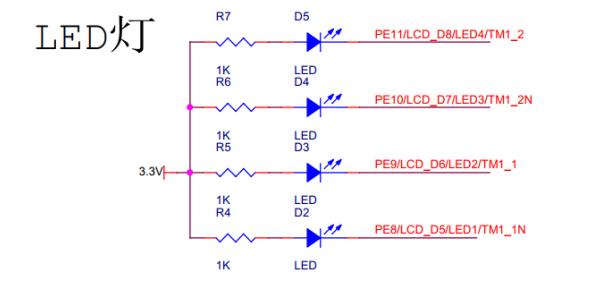
如上图所示,四个 LED 正极通过电阻连接到电源+3.3V,LED 负端连接到 CPU 的 PEx
引脚。由此可知,只需要通过 CPU 控制 PEx 引脚为低电平,对应的指示灯即可点亮,如果
控制 PEx 引脚为高电平,这对应的 LED 熄灭。通过程序循环扫描,即可实现跑马灯控制。
三、实验结果
#include "stm32f10x.h"

#define RCC_APB2ENR         (*((volatile unsigned int*)0x40021018))
#define GPIOE_CRH           (*((volatile unsigned int*)0x40011804))
#define GPIOE_BSRR          (*((volatile unsigned int*)0x40011810))
#define GPIOE_IDR           (*((volatile unsigned int*)0x40011808))   // ¶Ë¿ÚÊäÈëÊý¾Ý¼Ä´æÆ÷
#define GPIOE_ODR           (*((volatile unsigned int*)0x4001180C))

#define GPIOB_CRL           (*((volatile unsigned int*)0x40010C00))
#define GPIOB_IDR           (*((volatile unsigned int*)0x40010C08))

void LED_Init(void)

	RCC_APB2ENR |= 1<<6;
	GPIOE_CRH &=0XFFFF0000;
	GPIOE_CRH |=0x3333;

	GPIOE_BSRR |= 1<<8;
	GPIOE_BSRR |= 1<<9;
	GPIOE_BSRR |= 1<<10;
	GPIOE_BSRR |= 1<<11;


void Delay(unsigned int nCount)

  while(nCount > 0)

  	  nCount --;


int count=0;
void LED_Turn(void)
//通过count判断现在四个灯的状态,并完成切换
	if(count==1)
		GPIOE_BSRR |= 1<<8;
		GPIOE_BSRR |= 1<<25;
		count++;
		Delay(0xfffff);
		Delay(0xfffff);
	else if(count==2)
		GPIOE_BSRR |= 1<<9;
		GPIOE_BSRR |= 1<<26;
		count++;
		Delay(0xfffff);
		Delay(0xfffff);
	else if(count==3)
		GPIOE_BSRR |= 1<<10;
		GPIOE_BSRR |= 1<<27;
		count++;
		Delay(0xfffff);
		Delay(0xfffff);
	else if(count==4)
		GPIOE_BSRR |= 1<<11;
		GPIOE_BSRR |= 1<<24;
		count=1;
		Delay(0xfffff);
		Delay(0xfffff);
	else
		GPIOE_BSRR |= 1<<24;
		count++;
		Delay(0xfffff);
		Delay(0xfffff);


//跑马灯控制函数,让4个灯轮流亮,最后全部重置熄灭
void LED_Turn_Run(void)


	while(1)

		GPIOE_BSRR &= ~(1<<8);
		GPIOE_BSRR |= 1<<24;
		Delay(0xfffff);
		Delay(0xfffff);
		GPIOE_BSRR |= 1<<25;
		Delay(0xfffff);
		Delay(0xfffff);
		GPIOE_BSRR |= 1<<26;
		Delay(0xfffff);
		Delay(0xfffff);
		GPIOE_BSRR |= 1<<27;
		Delay(0xfffff);
		Delay(0xfffff);

	  GPIOE_BSRR |= 1<<8;
		GPIOE_BSRR |= 1<<9;
		GPIOE_BSRR |= 1<<10;
		GPIOE_BSRR |= 1<<11;

		Delay(0xfffff);
		Delay(0xfffff);


void KEY_Init(void)

		RCC_APB2ENR |=1<<3;
		GPIOB_CRL |=0X04000000;


//static u8  fac_us=0;
void delay_us(u32 nus)

		int i,cnt ;
		cnt = nus<<1  ;
		for ( i = 0 ; i < cnt ; i++ );


void delay_ms(u16 nms)

	int i ;
	for( i = 0 ; i < nms; i ++ )
		delay_us(1000) ;


u8 KEY_Scan(void)

	//键盘扫描,单按返回1,长按返回2
	u8 key_1= 0;
	int flag=0;//通过flag记录按键时间长短
	if(GPIOB_IDR & 0x40)
			key_1=1;
	else
  		key_1=0;
	if(key_1==0)

				delay_ms(100);
				if(key_1!=0) return 0;

	while(key_1==0)
			flag++;
			Delay(0xfffff);
			if(flag >= 15) return 2;//flag达到15则判定为长按

			if(GPIOB_IDR & 0x40)
					key_1=1;
			else
					key_1=0;
			if(key_1==0)

				delay_ms(100);
				if(key_1!=0) break;


	if(flag>0) return 1;//flag大于0但是没达到15判定为短按
 	return 0;


int main(void)

	u8 t=0;
	BoardInit();
	LED_Init();
	KEY_Init();
	while(1)

			t=KEY_Scan();
			if(t==1)//在main函数中进行判断按键状态

				LED_Turn();
			else if(t==2)

				LED_Turn_Run();


	return 1;
以上是关于嵌入式系统stm32 跑马灯实验的主要内容,如果未能解决你的问题,请参考以下文章