实用水文篇--SpringBoot整合Netty实现消息推送服务器
Posted Huterox
tags:
篇首语:本文由小常识网(cha138.com)小编为大家整理,主要介绍了实用水文篇--SpringBoot整合Netty实现消息推送服务器相关的知识,希望对你有一定的参考价值。
文章目录
前言
由于今天是要练车的,所以的话只能写一点简单的东西了,做一个整合吧,刚好先前随便说了一下Netty是吧,那么我们就直接实战吧,我们来整合一下Netty。我的设想是使用Netty来实现客户端消息的实时推送,就是这个破玩意:
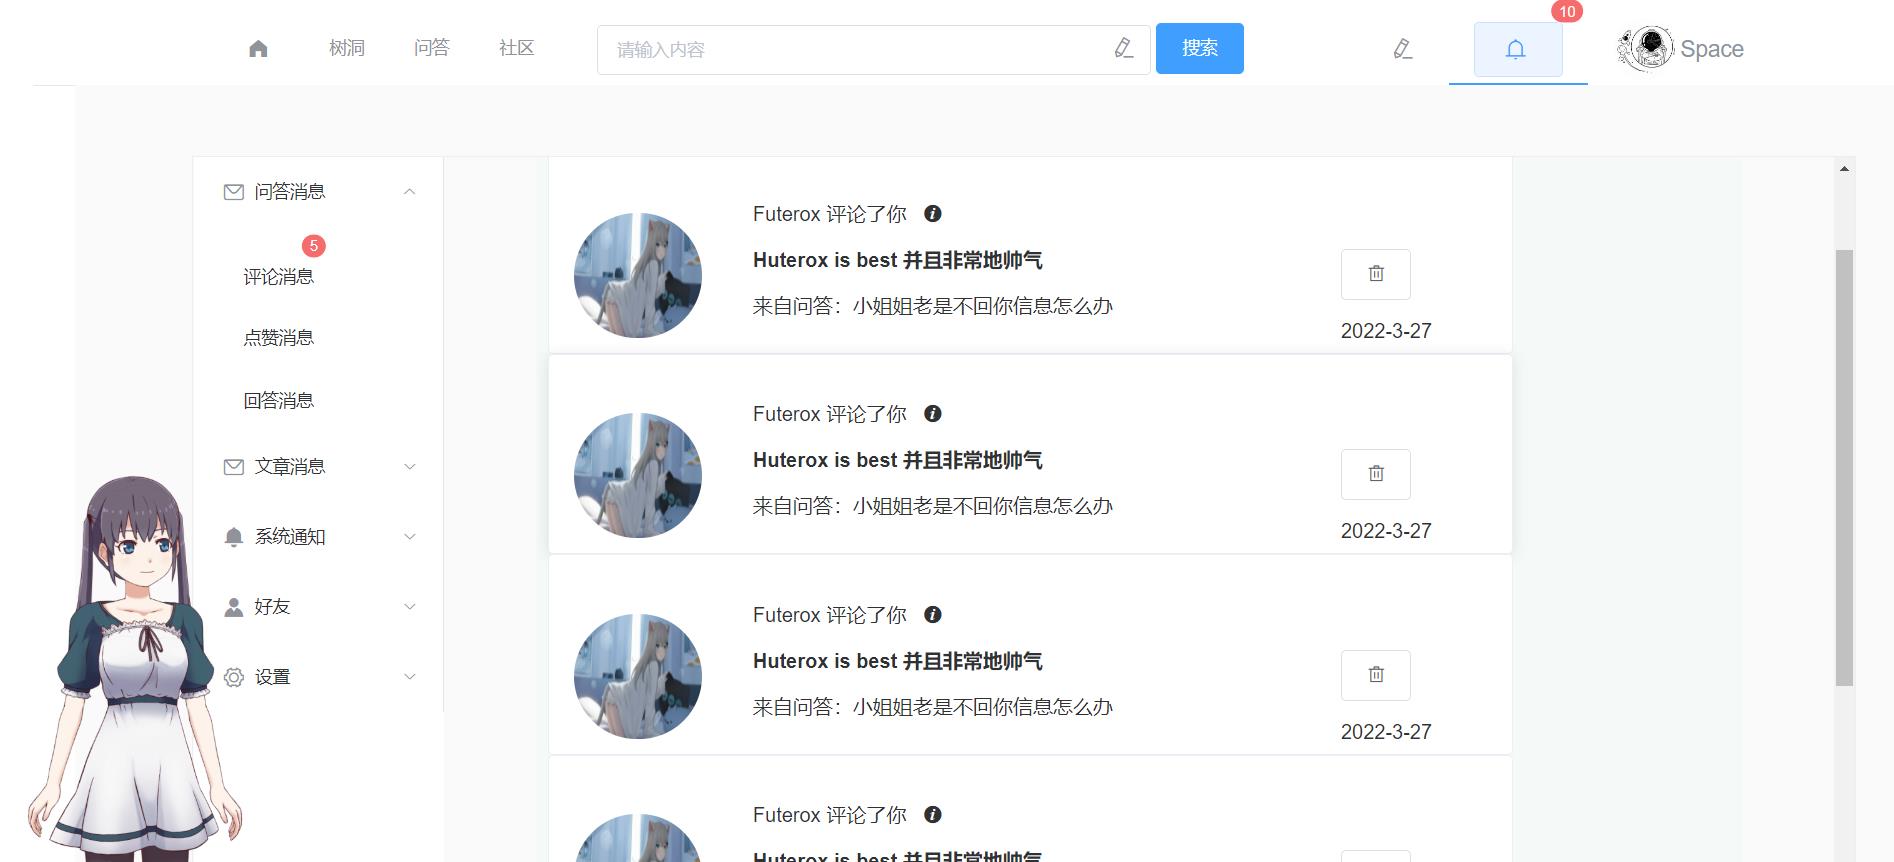
当然还有咱们的聊天,用户聊天,反正都做推送了,再加一个用户聊天有何不可。都TM是一个玩意。
那么既然咱们是使用SpringBoot或者是Spring的话,那么我们就刚好直接使用IOC来实例化咱们的Netty。那么这样的话,我们可以使用Netty来实现实时的消息推送,以及在线用户聊天功能,同时的话,对于咱们后台的管理系统也刚好有这个需求,有新的博文审核消息啥的这个要推送给后台的。那么同时为了提高整个实时在线的工作效率,数据的存储直接进行异步处理,这个方案很多,那么最省事的就是搞个线程池+异步任务就完了,或者直接MQ过去,然后存储,反正这种数据丢了也没事。像博文,问答之类的数据,这些注意一点就完了。
那么本文的话,两个目标,第一个是怎么整合,服务端和客户端怎么整合。第二个就是我们实际上就是说,创建一个服务端,可以完成websock协议。
项目创建
首先我们创建一个新的项目。
在我这里的话是已经创建好了:
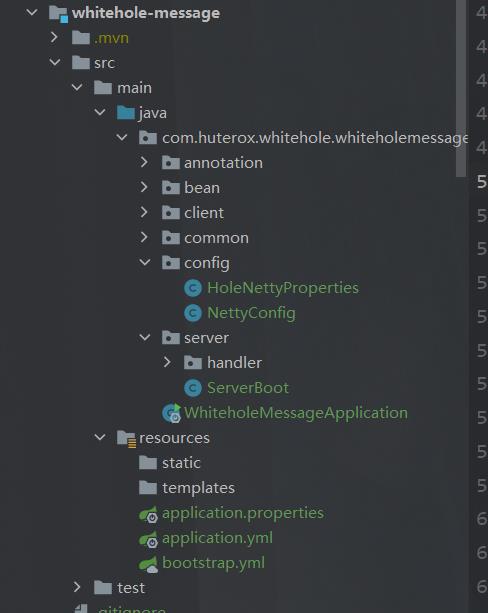
可以看到,我这里的话,做戏做全套,那么这里有两个端,一个是Server,还有是Client,什么意思,就是说,你使用Netty做服务端可以,做客户端链接其他的服务器也可以,rpc嘛。
例如:
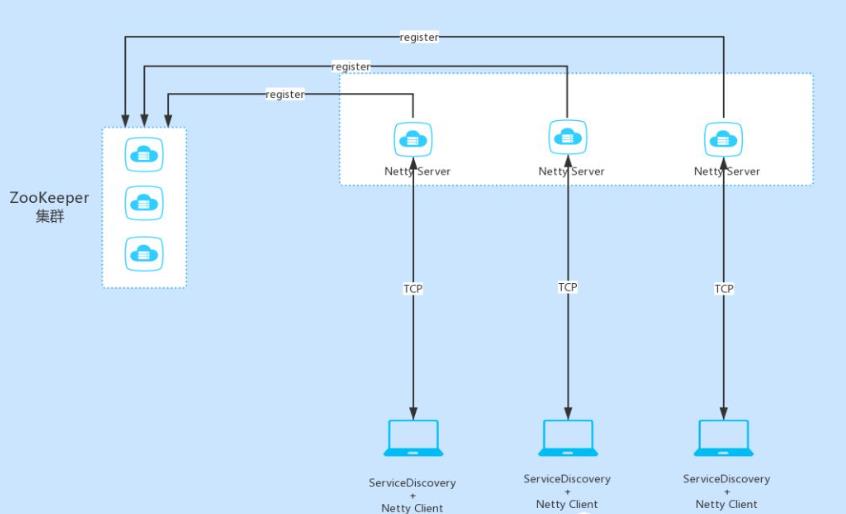
整合
导入依赖
首先是导入依赖,这里的话是SpringBoot,那么直接导入这个就完了:
<!--        导入Netty的依赖-->
        <dependency>
            <groupId>io.netty</groupId>
            <artifactId>netty-all</artifactId>
        </dependency>
编写相关配置
既然是用到了SpringBoot,那么我们直接把对应的配置给提取出来:
#Netty的一些配置
netty:
  boss: 4
  worker: 2
  timeout: 6000
  port: 9000
  #多端口绑定
  portSalve: 9001
  host: 127.0.0.1
这个看你自己,我这里演示就是多端口的。值得一提的是这个演示的,演示完就删了哈,所以这篇博文会尽可能详细。毕竟,我以后搞不好还会回来copy。
服务端创建
首先是我们的服务端,那么在这里的话,我们想要创建一个Netty服务,基本上就三个东西,一个是我们选择哪一个线程模型,这里我们显然选择主从模型。所以的话,那么我们就需要准备两个线程组,之后的话是我们的初始化器,用来初始化Handler,之后是我们自定义的Handler。这里为了更好地演示,我们这里以创建Http处理的为例子。之后的话我们以创建websocket为例子。
ok,既然如此我们知道了需要那些东西,那么我们直接去搞就好了。
读取配置
首先要做的就是读取配置,我这里准备了专门的配置类。
import lombok.Data;
import org.springframework.boot.context.properties.ConfigurationProperties;
import org.springframework.context.annotation.Configuration;

@ConfigurationProperties(prefix = "netty")
@Data
@Configuration
public class HoleNettyProperties

    // boss线程数量 默认为cpu线程数*4

    private Integer boss;

   	// worker线程数量 默认为cpu线程数*2

    private Integer worker;

    // 连接超时时间 默认为30s

    private Integer timeout = 30000;

    // 服务器主端口 默认9000

    private Integer port = 9000;
	// 服务器备用端口

    private Integer portSalve = 9001;

   	// 服务器地址 默认为本地

    private String host = "127.0.0.1";
配置类
之后的话,是我们的一个配置:
这个配置主要就是声明一个Bootstrap开启服务,之后绑定我们设定的配置和处理器。
@Configuration
@EnableConfigurationProperties
public class NettyConfig
    @Autowired
    HoleNettyProperties holeNettyProperties;

    /**
     * boss 线程池
     * 负责客户端连接
     * @return
     */
    @Bean
    public NioEventLoopGroup boosGroup()
        return new NioEventLoopGroup(holeNettyProperties.getBoss());


    /**
     * worker线程池
     * 负责业务处理
     * @return
     */
    @Bean
    public NioEventLoopGroup workerGroup()
        return  new NioEventLoopGroup(holeNettyProperties.getWorker());

    /**
     * 服务器启动器
     * @return
     */
    @Bean
    public ServerBootstrap serverBootstrap()
        ServerBootstrap serverBootstrap  = new ServerBootstrap();
        serverBootstrap
                .group(boosGroup(),workerGroup())   // 指定使用的线程组
                .channel(NioserverSocketChannel.class) // 指定使用的通道
                .option(ChannelOption.CONNECT_TIMEOUT_MILLIS,holeNettyProperties.getTimeout()) // 指定连接超时时间
                .childHandler(new ServerHandler()); // 指定worker处理器
        return serverBootstrap;


    /**
     * 客户端启动器
     * @return
     */
    @Bean
    public Bootstrap bootstrap()
        // 新建一组线程池
        NioEventLoopGroup eventExecutors = new NioEventLoopGroup(holeNettyProperties.getBoss());
        Bootstrap bootstrap = new Bootstrap();
        bootstrap
                .group(eventExecutors)   // 指定线程组
                .option(ChannelOption.SO_KEEPALIVE, true)
                .channel(NioSocketChannel.class) // 指定通道
                .handler(new ClientHandler()); // 指定处理器
        return bootstrap;
可以看到的话,我们这里是有两个的,一个是用来创建服务端的,还有一个是用来创建客户端的。在这里的话,我们主要还是做声明。
区别是 在于指定线程组。以及在我们后面真正实例化的时候,前者是监听,后者是连接。
服务处理器 ServerHandler
这个玩意其实就是用来做初始化的。
public class ServerHandler extends ChannelInitializer<SocketChannel>
    /**
     * 初始化通道以及配置对应管道的处理器
     * @param socketChannel
     * @throws Exception
     */
    @Override
    protected void initChannel(SocketChannel socketChannel) throws Exception
        ChannelPipeline pipeline = socketChannel.pipeline();
        pipeline.addLast(new MessageDecodeHandler());
        pipeline.addLast(new MessageEncodeHandler());
        pipeline.addLast(new ServerListenerHandler());
同时在这里指定了两个消息的编解码器。
public class MessageDecodeHandler extends ByteToMessageDecoder


    @Override
    protected void decode(ChannelHandlerContext channelHandlerContext, ByteBuf byteBuf, List<Object> list) throws Exception
        int len = byteBuf.readInt();
        byte[] content = new byte[len];
        byteBuf.readBytes(content);
        MessageBean messageBean = new MessageBean();
        messageBean.setContent(content);
        messageBean.setLen(len);
        list.add(messageBean);
public class MessageEncodeHandler extends MessageToByteEncoder<MessageBean>

    @Override
    protected void encode(ChannelHandlerContext channelHandlerContext, MessageBean messageBean, ByteBuf byteBuf) throws Exception
        byteBuf.writeInt(messageBean.getLen());
        byteBuf.writeBytes(messageBean.getContent());
那么同样的,我们声明了一个Bean,专门用来承载消息的,主要是转JSON用的。
@Data
@AllArgsConstructor
@NoArgsConstructor
public class MessageBean
    /**
     * 数据长度
     */
    private Integer len;
    /**
     * 通讯数据
     */
    private byte[] content;

    public MessageBean(Object object)
        content = JSONUtil.toJsonStr(object).getBytes(StandardCharsets.UTF_8);
        len = content.length;
这里的话还是用到了JSONUtil,所以的话,还需要导入依赖:
        <dependency>
            <groupId>cn.hutool</groupId>
            <artifactId>hutool-all</artifactId>
            <version>$hutool.version</version>
<!--        <hutool.version>5.5.4</hutool.version>-->
        </dependency>
注意自己对应的版本号,我这里是5.5.4
自定义处理器
最后是我们的自定义处理器,这个东西就是我们实现业务的核心。但是我们这边只是演示,所以的话就随便一点了。
@Slf4j
@ChannelHandler.Sharable
public class ClientListenerHandler extends SimpleChannelInboundHandler<MessageBean>
    /**
     * 服务端上线的时候调用
     * @param ctx
     * @throws Exception
     */
    @Override
    public void channelActive(ChannelHandlerContext ctx) throws Exception
        log.info("连上了服务器",ctx.channel().remoteAddress());


    /**
     * 服务端掉线的时候调用
     * @param ctx
     * @throws Exception
     */
    @Override
    public void channelInactive(ChannelHandlerContext ctx) throws Exception
        log.info("断开了服务器",ctx.channel().remoteAddress());
        ctx.fireChannelInactive();


    /**
     * 读取服务端消息
     * @param channelHandlerContext
     * @param messageBean
     * @throws Exception
     */
    @Override
    protected void channelRead0(ChannelHandlerContext channelHandlerContext, MessageBean messageBean) throws Exception
        log.info("来自服务端的消息:",new String(messageBean.getContent(), CharsetUtil.UTF_8));
        channelHandlerContext.channel().close();


    /**
     * 异常发生时候调用
     * @param ctx
     * @param cause
     * @throws Exception
     */
    @Override
    public void exceptionCaught(ChannelHandlerContext ctx, Throwable cause) throws Exception
        log.error("连接出异常了",ctx.channel().remoteAddress());
        log.error(ExceptionUtil.printStackTrace((Exception) cause));
        ctx.close();
同时这块也有一个异常写入类,用来返回这个错误的,这个看你自己,不要也罢
public class ExceptionUtil

    public static String printStackTrace(Exception e)
        Writer writer = new StringWriter();
        PrintWriter printWriter = new PrintWriter(writer);
        e.printStackTrace(printWriter);
        printWriter.close();
        return writer.toString();
自定义启动类
ok,现在的话我们已经准备好了我们需要的东西(基本上),配置,处理器,线程组,用来开启服务的Bootstrap。那么既然是做SpringBoot的整合,那么我们就在更进一步,待会的的话,我们再搞一个注解。
@Component
@Slf4j
public class ServerBoot
    @Autowired
    ServerBootstrap serverBootstrap;
    @Resource
    NioEventLoopGroup boosGroup;
    @Resource
    NioEventLoopGroup workerGroup;
    @Autowired
    HoleNettyProperties holeNettyProperties;

    /**
     * 开机启动
     * @throws InterruptedException
     */
    @PostConstruct
    public void start() throws InterruptedException
        // 绑定端口启动
        serverBootstrap.bind(holeNettyProperties.getPort()).sync();
        serverBootstrap.bind(holeNettyProperties.getPortSalve()).sync();
        log.info("启动Netty多端口服务器: ,",holeNettyProperties.getPort(),holeNettyProperties.getPortSalve());


    /**
     * 关闭线程池
     */
    @PreDestroy
    public void close() throws InterruptedException
        log.info("关闭Netty服务器");
        boosGroup.shutdownGracefully();
        workerGroup.shutdownGracefully();
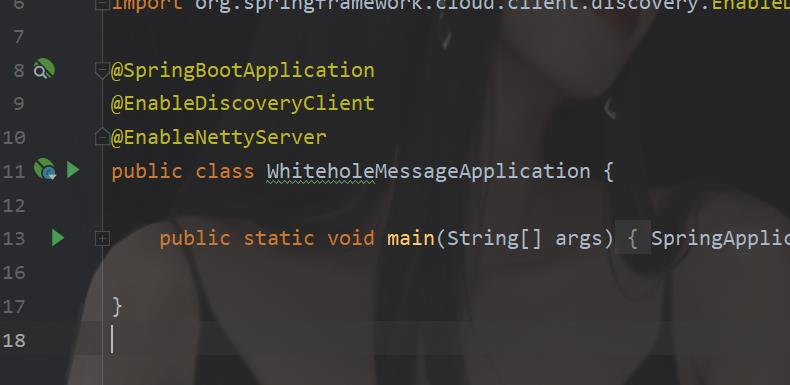
之后,我们创建一个启动注解。
@Import(ServerBoot.class)
@Target(ElementType.TYPE)
@Retention(RetentionPolicy.RUNTIME)
@Documented
public @interface EnableNettyServer
之后要用的时候就直接:
客户端
之后的话,就是我们的客户端的处理。首先配置类俺已经给出来了。区别呢就是咱们的处理器和启动类。
处理器 ClientHandler
首先一样的编解码处理
public class ClientHandler extends ChannelInitializer<SocketChannel>
    @Override
    protected void initChannel(SocketChannel socketChannel) throws Exception
        ChannelPipeline pipeline = socketChannel.pipeline();
        pipeline.addLast(new MessageEncodeHandler());
        pipeline.addLast(new MessageDecodeHandler());
        pipeline.addLast(new ClientListenerHandler());
之后的话是我们具体的业务逻辑:
@Slf4j
@ChannelHandler.Sharable
public class ClientListenerHandler extends SimpleChannelInboundHandler<MessageBean>
    /**
     * 服务端上线的时候调用
     * @param ctx
     * @throws Exception
     */
    @Override
    public void channelActive(ChannelHandlerContext ctx) throws Exception
        log.info("连上了服务器",ctx.channel().remoteAddress());


    /**
     * 服务端掉线的时候调用
     * @param ctx
     * @throws Exception
     */
    @Override
    public void channelInactive(ChannelHandlerContext ctx) throws Exception
        log.info("断开了服务器",ctx.channel().remoteAddress());
        ctx.fireChannelInactive();


    /**
     * 读取服务端消息
     * @param channelHandlerContext
     * @param messageBean
     * @throws Exception
     */
    @Override
    protected void channelRead0(ChannelHandlerContext channelHandlerContext, MessageBean messageBean) throws Exception
        log.info("来自服务端的消息:",new String(messageBean.getContent(), CharsetUtil.UTF_8));
        channelHandlerContext.channel().close();


    /**
     * 异常发生时候调用
     * @param ctx
     * @param cause
     * @throws Exception
     */
    @Override
    public void exceptionCaught(ChannelHandlerContext ctx, Throwable cause) throws Exception
        log.error("连接出异常了",ctx.channel().remoteAddress());
        log.error(ExceptionUtil.printStackTrace((Exception) cause));
        ctx.close();
启动类
之后还是我们的启动类,这个就是和服务的不一样的玩意:
@Component
public class ClientBoot
    @Autowired
    Bootstrap bootstrap;
    @Autowired
    HoleNettyProperties holeNettyProperties;

    /**
     * 主端口连接
     * @return
     * @throws InterruptedException
     */
    public Channel connect() throws InterruptedException
        // 连接服务器
        ChannelFuture channelFuture = bootstrap.connect(holeNettyProperties.getHost(), holeNettyProperties.getPort()).sync();
        // 监听关闭
        Channel channel = channelFuture.channel();
        return channel;

    /**
     * 备用端口连接
     * @return
     * @throws InterruptedException
     */
    public Channel connectSlave() throws InterruptedException
        // 连接服务器
        ChannelFuture channelFuture = bootstrap.connect(holeNettyProperties.getHost(), holeNettyProperties.getPort()).sync();
        // 监听关闭
        Channel channel = channelFuture.channel();
        channel.closeFuture().sync();
        return channel;


    /**
     * 发送消息到服务器端
     * @return
     */
    public void sendMsg(MessageBean messageBean) throws InterruptedException
        connect().writeAndFlush(messageBean);
之后也是我们的启动注解
@Target(ElementType.TYPE)
@Retention(RetentionPolicy