Redis_02_Redis单机版搭建和SpringBoot的使用(实践开发类)
Posted 毛奇志
tags:
篇首语:本文由小常识网(cha138.com)小编为大家整理,主要介绍了Redis_02_Redis单机版搭建和SpringBoot的使用(实践开发类)相关的知识,希望对你有一定的参考价值。
文章目录
一、前言
本文包括Redis的定位与基本特性(本文使用Redis 6.0.9,使用自己本地vmware虚拟机 192.168.100.138 安装redis并使用)。
二、Redis安装
参考:
CentOS7 安装Redis单实例
https://gper.club/articles/7e7e7f7ff3g5bgccg69
阿里云CentOS7 Docker安装Redis
https://gper.club/articles/7e7e7f7ff7g5egc5g6c
Redis一主二从Sentinel监控配置
https://gper.club/articles/7e7e7f7ff3g5bgccg68
CentOS 7 单机安装Redis Cluster(3主3从伪集群)
https://gper.club/articles/7e7e7f7ff3g5bgcdg60
2.1 下载redis并解压压缩包
cd /usr/local/soft/
wget https://download.redis.io/releases/redis-6.0.9.tar.gz
tar -zxvf redis-6.0.9.tar.gz
wget无法下载就直接将url粘贴到浏览器上,windows本地下载,然后ftp上传到linux上
2.2 安装gcc依赖
Redis是C语言编写的,编译需要GCC。Redis6.x.x版本支持了多线程后台处理(接收客户端还是单线程),需要gcc的版本大于4.9,但是CentOS7的默认版本是4.8.5。
查看gcc的版本:
gcc -v
升级gcc版本:
yum -y install centos-release-scl
yum -y install devtoolset-9-gcc devtoolset-9-gcc-c++ devtoolset-9-binutils
scl enable devtoolset-9 bash
echo "source /opt/rh/devtoolset-9/enable" >>/etc/profile
确认gcc的版本(在同一个窗口中!):
gcc -v
2.3 编译安装
cd redis-6.0.9/src
make install
安装成功的结果是src目录下面出现服务端和客户端的脚本
redis-server
redis-cli
redis-sentinel
注意:在 redis-6.0.9/src redis解压目录/src 目录下,执行 make install 是编译并安装,后面可以加参数 make install PREFIX=/usr/local/redis 表示将redis安装到 /usr/local/redis 目录下,如果不指定 PREFIX=/usr/local/redis,就是直接在解压目录安装。
Redis的实际安装目录就是 redis-server、redis-cli、redis-sentinel 所在目录,它们三个都是绿色的,都是可执行完文件。
第一个是 redis服务端,使用 ./redis-server 前端启动或 ./redis-server redis.conf 后端启动来启动,使用shutdown或者shutdown nosave或者kill -9 pid杀死,使用 ps -ef|grep redis 查看(进程名为redis-server的那个进程),使用netstat -nlpt|grep 6379 默认端口为 6379
第二个是 redis客户端 ,使用 ./redis-cli --raw 启动,–raw是可以处理中文,使用 exit 或者 kill -9 pid 杀死,使用 ps -ef|grep redis 查看(进程名为redis-cli的那个进程),
第三个是 redis哨兵,使用 ./redis-sentinel sentinel.conf 后端启动,使用 kill -9 pid 杀死,,使用 ps -ef|grep redis 查看(进程名为redis-sentinel的那个进程),使用netstat -nlpt|grep 26379 ,一般端口端口配置为 26379 ,需要手动到 sentinel.conf 中配置
注意:有了redisCluster,这个sentinel哨兵的主从切换的功能基本就用不到了
2.4 启动redis-server并进入客户端redis-cli
redis启动有两种方式,前端启动和后端启动,区别是:因为默认的前端启动,只要关掉xshell的session就会停止redis-server的运行。
2.4.1 redis有两种启动方式
1、默认启动方式为前端启动
cd  /redis安装目录/bin/     (这里指进入redis安装目录,bin目录下)
./redis-server                   (启动)
默认是前端启动模式,端口是6379
2、后端启动
(1)从redis的解压目录中复制redis.conf到redis的安装目录(本文中/usr/local/redis)
(2)修改安装目录下刚刚复制过来的配置文件:
daemonize yes (表示使用后端模式启动)
(3)[root@bogon bin]# ./redis-server redis.conf 启动
注意:redis安装目录是指 redis-server、redis-cli、redis-sentinel 所在目录,find / -name redis-server 找到,并不一定是redis解压目录
2.4.2 一般使用redis后端启动
步骤1:修改 redis.conf 文件,配置后端启动,设置密码
默认的配置文件是/usr/local/soft/redis-6.0.9/redis.conf
后台启动,不然窗口一关服务就挂了
daemonize no
改成
daemonize yes
下面一行必须改成 bind 0.0.0.0 或注释,否则只能在本机访问
bind 127.0.0.1
如果需要密码访问,取消requirepass的注释,在外网(比如阿里云)这个必须要配置,在自己的vmware虚拟机上一般不用设置密码,就保持 requirepass 这一行注释就好了。
requirepass yourpassword
步骤2:启动(使用redis.conf配置文件启动)
./src/redis-server redis.conf
查看端口是否启动成功: (可以用 netstat -nlpt | grep 6379 也可以用 ps -ef|grep redis 或者 ps -ef|grep 6379)
ps -ef|grep redis
netstat -nltp|grep 6379
步骤3:进入客户端
./redis-cli --raw
如下:./src/redis-server redis.conf 启动服务端,使用 ./redis-cli 启动客户端

2.5 停止redis-server的两种方式
方式1:停止redis-server(在客户端中)
redis> shutdown
方式2:停止redis-server(在linux上)
ps -ef | grep redis
kill -9 xxxx
区别:shutdown默认是 shutdown save ,会触发默认打开的rdb持久化,在linux上生成dump.rdb文件,下一次启动redis-server,在redis-cli使用 keys * 命令,还可以看到上一次的 键值对;kill -9 pid 命令,直接杀死redis-server进程,redis-server进程被杀死之前不会执行rdb持久化
若手动执行 shutdown nosave ,也是可以关闭 redis-server 进程,但是不会执行默认打开的rdb持久化。
三、redis-cli的使用
3.1 database 基本命令
 select 0  # 干掉当前db所有key
 flushdb   # 干掉当前db所有key
 flushall  # 干掉当前db所有key

在redis中,flushdb和flushall 都是清空当前数据库的操作,但是两者有很大的区别:
1、flushall 清空数据库并执行持久化操作,也就是rdb文件会发生改变,变成76个字节大小(初始状态下为76字节),所以执行flushall之后数据库真正意义上清空了.
2、flushdb 清空数据库,但是不执行持久化操作,也就是说rdb文件不发生改变.而redis的数据是从rdb快照文件中读取加载到内存的,所以在flushdb之后,如果想恢复数据库,则可以直接kill掉redis-server进程,然后重新启动服务,这样redis重新读取rdb文件,数据恢复到flushdb操作之前的状态.
注意:要直接kill 掉redis-server服务,因为shutdown操作会触发持久化.
lsof -i:6379 命令查看redis-server的进程号,然后kill即可
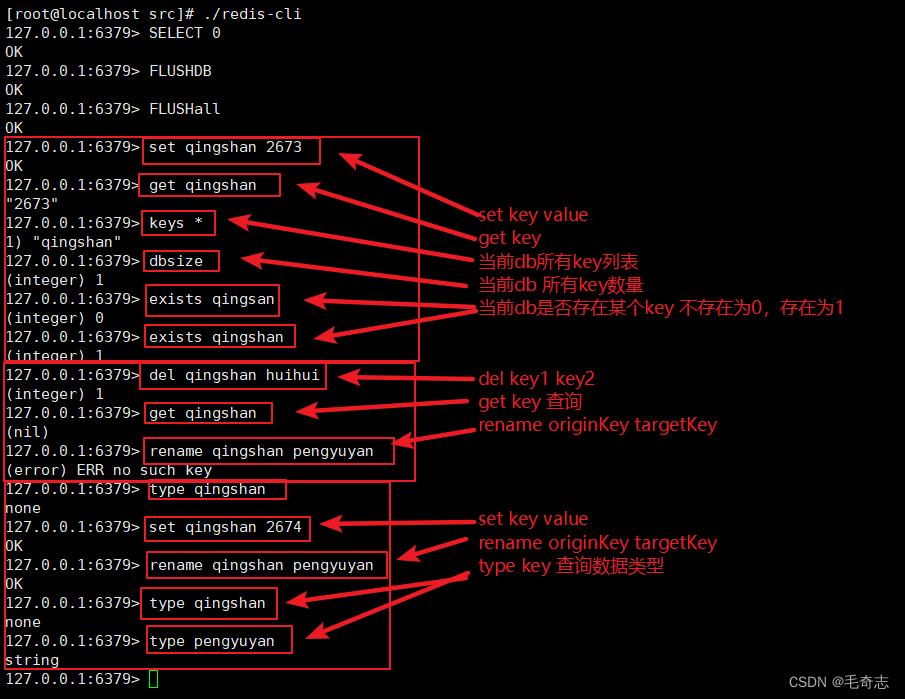
3.2 key基本命令
 set qingshan 2673(增/改)
 get qingshan(查)
 keys *
 dbsize
 exists qingshan
 del qingshan huihui(删)
 rename qingshan pengyuyan
 type qingshan

四、Java项目中使用redis
4.1 Junit测试使用Jedis单连接redis
导入依赖
<dependency>
     <groupId>redis.clients</groupId>
     <artifactId>jedis</artifactId>
     <version>2.7.0</version>
</dependency>
test使用
// Junit测试连接redis和基本的set-get操作
@Test
public void testJedisSingle()
	Jedis jedis = new Jedis("192.168.101.3", 6379);
    //这里表示centos IP为192.168.101.3
	jedis.set("name", "bar");
	String name = jedis.get("name");
	System.out.println(name);
	jedis.close();
附:如果centos上的redis正常启动而且测试可以完成set-get基本操作,但是本地无法连接上centos上的redis,查看防火墙是否关闭。正确的操作是关闭防火墙或开启6379号端口。centos7.0防火墙操作如下:
关闭防火墙
systemctl status firewalld.service查看防火墙状态
systemctl stop firewalld.service 关闭防火墙
systemctl status firewalld.service查看防火墙状态
开启6379端口
添加
firewall-cmd --zone=public --add-port=6379/tcp --permanent    (--permanent永久生效,没有此参数重启后失效)
重新载入
firewall-cmd --reload
查看
firewall-cmd --zone= public --query-port=6379/tcp
注:关闭防火墙和打开6379号端口只要两者选一即可。
4.2 Junit测试使用连接池连接redis
通过单实例连接redis不能对redis连接进行共享,可以使用连接池对redis连接进行共享,提高资源利用率,使用jedisPool连接redis服务,如下代码:
@Test
	public void pool()
		JedisPoolConfig config = new JedisPoolConfig();
		//最大连接数
		config.setMaxTotal(30);
		//最大连接空闲数
		config.setMaxIdle(2);

		JedisPool pool = new JedisPool(config, "192.168.101.3", 6379);
		Jedis jedis = null;

		try
			jedis = pool.getResource();

			jedis.set("name", "lisi");
			String name = jedis.get("name");
			System.out.println(name);
		catch(Exception ex)
			ex.printStackTrace();
		finally
			if(jedis != null)
				//关闭连接
				jedis.close();
4.3 在spring中使用redis
上面的都是使用Junit的测试代码,不是项目中真正运行有效代码,这里介绍spring中整合redis
配置spring配置文件applicationContext.xml
<?xml version="1.0" encoding="UTF-8"?>
<beans xmlns="http://www.springframework.org/schema/beans"
	xmlns:xsi="http://www.w3.org/2001/XMLSchema-instance" xmlns:mvc="http://www.springframework.org/schema/mvc"
	xmlns:context="http://www.springframework.org/schema/context"
	xmlns:aop="http://www.springframework.org/schema/aop" xmlns:tx="http://www.springframework.org/schema/tx"
	xsi:schemaLocation="http://www.springframework.org/schema/beans
		http://www.springframework.org/schema/beans/spring-beans-3.2.xsd
		http://www.springframework.org/schema/mvc
		http://www.springframework.org/schema/mvc/spring-mvc-3.2.xsd
		http://www.springframework.org/schema/context
		http://www.springframework.org/schema/context/spring-context-3.2.xsd
		http://www.springframework.org/schema/aop
		http://www.springframework.org/schema/aop/spring-aop-3.2.xsd
		http://www.springframework.org/schema/tx
		http://www.springframework.org/schema/tx/spring-tx-3.2.xsd ">

<!-- 连接池配置 -->
	<bean id="jedisPoolConfig" class="redis.clients.jedis.JedisPoolConfig">
		<!-- 最大连接数 -->
		<property name="maxTotal" value="30" />
		<!-- 最大空闲连接数 -->
		<property name="maxIdle" value="10" />
		<!-- 每次释放连接的最大数目 -->
		<property name="numTestsPerEvictionRun" value="1024" />
		<!-- 释放连接的扫描间隔(毫秒) -->
		<property name="timeBetweenEvictionRunsMillis" value="30000" />
		<!-- 连接最小空闲时间 -->
		<property name="minEvictableIdleTimeMillis" value="1800000" />
		<!-- 连接空闲多久后释放, 当空闲时间>该值 且 空闲连接>最大空闲连接数 时直接释放 -->
		<property name="softMinEvictableIdleTimeMillis" value="10000" />
		<!-- 获取连接时的最大等待毫秒数,小于零:阻塞不确定的时间,默认-1 -->
		<property name="maxWaitMillis" value="1500" />
		<!-- 在获取连接的时候检查有效性, 默认false -->
		<property name="testOnBorrow" value="true" />
		<!-- 在空闲时检查有效性, 默认false -->
		<property name="testWhileIdle" value="true" />
		<!-- 连接耗尽时是否阻塞, false报异常,ture阻塞直到超时, 默认true -->
		<property name="blockWhenExhausted" value="false" />
	</bean>

	<!-- redis单机 通过连接池 -->
	<bean id="jedisPool" class="redis.clients.jedis.JedisPool" destroy-method="close">
		<constructor-arg name="poolConfig" ref="jedisPoolConfig"/>
		<constructor-arg name="host" value="192.168.101.3"/>
		<constructor-arg name="port" value="6379"/>
	</bean>
测试代码:
   private ApplicationContext applicationContext;

	@Before
	public void init()
		applicationContext = new ClassPathXmlApplicationContext(
				"classpath:applicationContext.xml");


	@Test
	public void testJedisPool()
	JedisPool pool = (JedisPool) applicationContext.getBean("jedisPool");
			try
			jedis = pool.getResource();

			jedis.set("name", "lisi");
			String name = jedis.get("name");
			System.out.println(name);
		catch(Exception ex)
			ex.printStackTrace();
		finally
			if(jedis != null)
				//关闭连接
				jedis.close();
五、尾声
Redis单机版搭建和SpringBoot的使用(实践开发类),完成了。
以上是关于Redis_02_Redis单机版搭建和SpringBoot的使用(实践开发类)的主要内容,如果未能解决你的问题,请参考以下文章