7-调色板-CALayer和触摸
Posted 颐和园
tags:
篇首语:本文由小常识网(cha138.com)小编为大家整理,主要介绍了7-调色板-CALayer和触摸相关的知识,希望对你有一定的参考价值。
开始
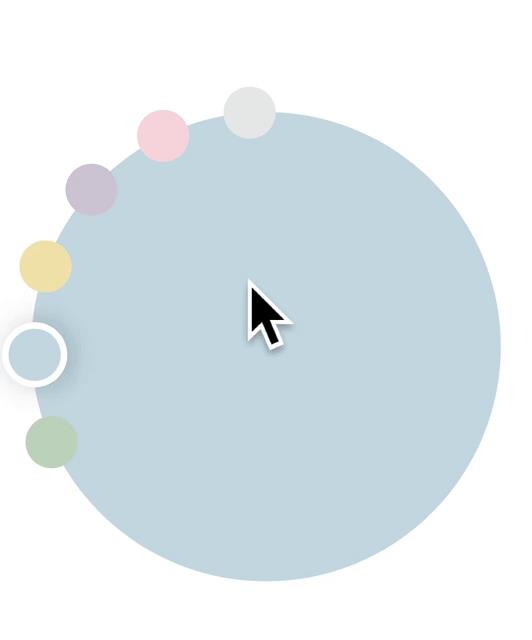
接下来我们将绘制一个调色盘控件。当你点击调色板,调色板上的颜色将被循环选中。效果如下图所示:

绘制界面
首先声明一些常量:
class ColorSwatchView: UIView
    // MARK: Constants
    struct Constants
        static let angleSpan: CGFloat = CGFloat(22).toRadian()
        static let startAngle: CGFloat = CGFloat(114).toRadian()
        static let slotDiameter:CGFloat = 40
        static let slotBorderWidth:CGFloat = 5
toRadian 是一个 CGFloat 的扩展方法:
extension CGFloat
    func toRadian() -> CGFloat
        return self/180*CGFloat.pi
ColorSwatchView 就是组件的名称,我们把要用到的常量都定义在一个结构体内,方便统一维护。
然后定义私有变量:
	// MARK: Variables
    private var selectedColor: PresetColor = .sky
    private var colors:[PresetColor] = []
colors 用于表示 6 个小圆中的颜色,selectedColor 用于表示当前选中的颜色。PresetColor 是我们定义的一个枚举,其中指定了一些预设的颜色:
public enum PresetColor: Int, CaseIterable
    case rose
    case sky
    case dawn
    case sage
    case dusk
    case clear
    public func color() -> UIColor
        switch self
        case .rose:
            return UIColor(red: 0xf7/255, green: 0xda/255, blue: 0xe0/255, alpha: 1)//"f7dae0"
        case .sky:
            return UIColor(red:0xca/255, green: 0xdc/255, blue: 0xe4/255, alpha: 1)//"cadce4"
        case .dawn:
            return UIColor(red:0xf1/255, green: 0xe6/255, blue: 0xb2/255, alpha: 1)//"f1e6b2"
        case .sage:
            return UIColor(red: 0xc5/255, green: 0xd7/255, blue: 0xc3/255, alpha: 1)//"c5d7c3"
        case .dusk:
            return UIColor(red: 0xd3/255, green: 0xcc/255, blue: 0xd8/255, alpha: 1)//"d3ccd8"
        case .clear:
            return UIColor(red: 0xe9/255, green: 0xeb/255, blue: 0xea/255, alpha: 1)//"E9EBEA"
然后定义 3 个懒加载属性:
    // MARK: Lazy Properties
    lazy var slotShadow: NSShadow! =
        let shadow = NSShadow()
        shadow.shadowColor = UIColor(white: 0.1, alpha: 0.2)
        shadow.shadowOffset = CGSize(width: 0, height: 3)
        shadow.shadowBlurRadius = 10
        return shadow
    ()
    lazy var circleLayer: CAShapeLayer =
        let x = Constants.slotDiameter/2
        let rect = bounds.inset(by: UIEdgeInsets(top: x, left:x, bottom: x, right: x))
        let shapeLayer = CAShapeLayer()
        shapeLayer.frame = rect
        shapeLayer.fillColor = UIColor.clear.cgColor
        shapeLayer.path = UIBezierPath(ovalIn: shapeLayer.bounds).cgPath
        shapeLayer.backgroundColor = UIColor.clear.cgColor
        return shapeLayer
    ()
    lazy private var swatchLayer: CALayer =
        let swatchLayer = CALayer()
        swatchLayer.frame = bounds
        return swatchLayer
    ()
slotShadow 定义了小圆阴影。
circleLayer 是一个 CAShapeLayer,用来绘制大圆。
swatchLayer 也是一个 CAShapeLayer,用来作为 6 个小圆的 super layer。
然后是构造函数:
    // MARK: Life Cycle
    override init(frame: CGRect)
        super.init(frame: frame)
        commonInit()

    required init?(coder aDecoder: NSCoder)
        super.init(coder: aDecoder)
        commonInit()

    fileprivate func commonInit()
        layer.addSublayer(circleLayer)
        layer.addSublayer(swatchLayer)
在 commonInit 中,我们添加了 circleLayer 和 swatchLayer。这会导致图层的绘制。
然后定义个私有方法,用来绘制一个小圆:
    private func colorSlotLayer(_ isSelect: Bool) -> CAShapeLayer
        // 1
        let slotLayer = CAShapeLayer()
		 slotLayer.frame = bounds
        // 2
        let borderWidth = isSelect ? Constants.slotBorderWidth : 0
        // 3
        slotLayer.strokeColor = UIColor.white.cgColor
        slotLayer.lineWidth = borderWidth
        // 4
        let w = Constants.slotDiameter+borderWidth
        let rect = CGRect(x: bounds.midX-w/2, y:bounds.minY, width: w, height: w)
        // 5
        slotLayer.path = UIBezierPath(ovalIn: rect).cgPath
        slotLayer.backgroundColor = UIColor.clear.cgColor
        // 6
        if isSelect
            slotLayer.shadowOffset = slotShadow.shadowOffset
            slotLayer.shadowColor = (slotShadow.shadowColor as! UIColor).cgColor
            slotLayer.shadowRadius = slotShadow.shadowBlurRadius
            slotLayer.shadowOpacity = 1

        return slotLayer
- 构建一个 ShapeLayer,并设置其 frame 为父 layer 大小。
- borderWidth 需要根据当前选中的状态而定,因为对于当前选中的颜色,我们需要在绘制小圆时绘制白边和阴影。
- 设置白边的线宽和颜色。当然,如果不是当前选中的颜色,线宽为 0,也就没有白边。
- 因为描边时默认情况下,边线的中轴会对齐几何图形的边缘,这样导致有一半线宽会占据圆内的面积,从而使得圆面积在描边的情况下“缩小”。为了避免这种情况,我们需要在描边时,把圆半径扩大一点。
- 用贝塞尔曲线绘制圆。同时设置默认图层背景色。
- 如果当前小圆代表的是当前选中颜色,那么还要绘制阴影。
目前 colors 和 selectedColor 是私有的,我们需要定义一个公共方法,允许从外部改变两个私有变量,并绘制图层:
func setData(colors: [PresetColor]?, selected: PresetColor)
		 // 1
        if let colors = colors
            self.colors = colors

        // 2
        selectedColor = selected
        // 3
        circleLayer.fillColor = selected.color().cgColor
        if !self.colors.isEmpty
        	  // 4
            swatchLayer.sublayers?.forEach( $0.removeFromSuperlayer() )
            // 5
            for (i,color) in self.colors.enumerated()
            		// 6
                let slotLayer = colorSlotLayer(color==selected)
                slotLayer.fillColor = color.color().cgColor
				   // 7
                swatchLayer.anchorPoint = CGPoint(x: 0.5, y: 0.5)
                // 8
                let angle = Constants.startAngle-Constants.angleSpan*CGFloat(i)
                // 9
                slotLayer.transform = CATransform3DRotate(CATransform3DIdentity, angle, 0, 0, -1)
                // 10
                swatchLayer.addSublayer(slotLayer)
- 修改 colors 数组。
- 修改 selectedColor。
- 将大圆颜色改为选定颜色。
- 将 swatchLayer 中原来的 sublayer 全部移除。
- 遍历 colors 数组,绘制多个小圆(一个颜色一个)。
- 调用 colorSlotLayer 方法生成一个 CAShapeLayer。同时修改图层的 fillColor 为对应的颜色。
- 设置锚点为图层的中心,等会我们将以锚点为中心旋转。注意 CATranform 旋转有一个限制,它只能在 CALayer 的 bounds 内旋转,因此别忘了设置 CALayer 的 bounds。
- 计算旋转的角度。第一个圆从 startAngle 开始,后面的圆依次递减 22 度。
- 旋转。
- 添加 slotLayer 到 swatchLayer 中。
触摸事件的响应
    // MARK: Touches Handles
    override func touchesEnded(_ touches: Set<UITouch>, with event: UIEvent?)
            if touches.count == 1
                        changeColor()


    func changeColor()
            if selectedColor == colors[colors.count-1]
               // 1
                setData(colors: nil, selected: colors[0])
             else if let index = colors.firstIndex(of: selectedColor)
             // 2
               setData(colors: nil, selected: colors[index+1])
- 如果当前颜色已经是 colors 列表中最后一个颜色,那么又从头开始循环。
- 否则,选择下一个颜色。
通过点击大圆循环切换颜色固然是好,但是如果能够直接点击颜色小圆来切换颜色岂非更好?只不过这需要涉及更多的工作。
首先,修改 setData 方法,将其中 slotLayer 的 3d 旋转过程删除,因为我们会将旋转动作从 CALayer 移到 UIPath 上,这样方便我们对每个小圆的触摸位置进行判断:
		   for (i,color) in self.colors.enumerated()

                let slotLayer = colorSlotLayer(color==selected,index: i)
                if let color = UIColor(hexString: color.hexString())
                    slotLayer.fillColor = color.cgColor

                swatchLayer.addSublayer(slotLayer)
然后,在 colorSlotLayer() 方法中,对 UIPath 进行旋转,旋转的角度根据新增的参数 index 进行计算:
	// 1
    private func colorSlotLayer(_ isSelect: Bool, index: Int) -> CAShapeLayer  // 1
    	......
        let path = UIBezierPath(ovalIn: rect)
        // 2
        path.apply(CGAffineTransform(translationX: -bounds.width/2, y: -bounds.height/2))
        path.apply(CGAffineTransform(rotationAngle: rotateAngle(slotIndex: index)))
        path.apply(CGAffineTransform(translationX: bounds.width/2, y: bounds.height/2))
        slotLayer.path = path.cgPath
        ......
- 增加了 index 参数,即 colors 数组中每个元素的索引。
- Path 旋转时默认是从路径的原点(0,0)为中心旋转,所以在旋转之前先将它移动到整个 view 的中心,然后在旋转,选转完之后又将它移动回原来的距离。
旋转角度的计算也非常简单,调用的是 rotateAngle() 方法:
    private func rotateAngle(slotIndex i: Int) -> CGFloat
        return -(Constants.startAngle-Constants.angleSpan*CGFloat(i))
最后是 touchesEnded 方法,在其中调用 CGPath 的 contains 方法对触摸点的坐标进行判断,看它是否是位于某个小圆的 path 内:
    override func touchesEnded(_ touches: Set<UITouch>, with event: UIEvent?)
        let location = touches.first?.location(in: self)

        if let swatchLayers = swatchLayer.sublayers, let point = location
            for (i, slot) in swatchLayers.enumerated()
                if let shapeLayer = slot as? CAShapeLayer, let path = shapeLayer.path
                    if path.contains(point)
                        selectedColor = colors[i]
                        sendActions(for: .touchUpInside)// touch inside of the slot
                        return


        sendActions(for: .touchUpOutside)// touch outside of the slot
ok,这样就大功告成了。当你点击调色板中的小圆时,大圆的背景色即 selectColor 属性会随之改变。
以上是关于7-调色板-CALayer和触摸的主要内容,如果未能解决你的问题,请参考以下文章