使用python批量生成word文档
Posted 幸福丶如此
tags:
篇首语:本文由小常识网(cha138.com)小编为大家整理,主要介绍了使用python批量生成word文档相关的知识,希望对你有一定的参考价值。
一、安装模块
# pip install python-docx
二、功能介绍
1、在word中插入图片
from docx import Document
from docx.shared import Pt      #磅数
from docx.oxml.ns import qn     #中文格式
from docx.shared import Inches  #图片尺寸

document = Document()
document.styles['Normal'].font.name = u'微软雅黑'  #设置文档的基础字体
document.styles['Normal'].font.size = Pt(14)
document.styles['Normal'].element.rPr.rFonts.set(qn('w:eastAsia'),u'微软雅黑')  #设置文档的基础中文字体
document.add_picture('test.jpg',width=Inches(6))  #在文档上方插入图片作为文件红头,宽度为6英寸
2、在word中插入文本
from docx import Document
from docx.enum.text import WD_PARAGRAPH_ALIGNMENT
from docx.shared import Pt      #磅数
from docx.oxml.ns import qn     #中文格式

document = Document()
p1 = document.add_paragraph()  #初始化建立第一个自然段
p1.alignment = WD_PARAGRAPH_ALIGNMENT.CENTER  #对齐方式为居中,没有这句默认为左对齐
run1 = p1.add_run('testxxxxxx')   #添加文本
run1.font.name = u'微软雅黑'      #设置文本字体
run1.element.rPr.rFonts.set(qn('w:eastAsia'),u'微软雅黑')  #设置字体支持中文
run1.font.size = Pt(21)   #设置字体大小为21磅
run1.font.bold = True     #设置加粗
p1.space_after = Pt(5)    #段后距离5磅
p1.space_before = Pt(5)   #段前距离5磅
3、插入表格
from docx import Document
from docx.enum.text import WD_PARAGRAPH_ALIGNMENT
from docx.shared import Pt      #磅数
from docx.oxml.ns import qn     #中文格式

document = Document()
table = document.add_table(rows=3,cols=3,style="Table Grid")   #添加3行3列表格
table.cell(0,0).merge(table.cell(0,2))   #将第一行合并,将0行0列合并到0行2列
table_run1 = table.cell(0,0).paragraphs[0].add_run('xx产品报价表')
table_run1.font.name = u'隶书'
table_run1.element.rPr.rFonts.set(qn('w:eastAsia'),u'隶书')
table.cell(0,0).paragraphs[0].alignment = WD_PARAGRAPH_ALIGNMENT.CENTER

#在表格中插入文本内容
table.cell(1,0).text = '日期'
table.cell(1,1).text = '价格'
table.cell(1,2).text = '备注'
table.cell(2,0).text = today
table.cell(2,1).text = str('100.00')
table.cell(2,2).text = ''
三、整合
#!/usr/bin/env python
#-*- coding:utf-8 -*-
#pip install python-docx
from docx import Document
from docx.enum.text import WD_PARAGRAPH_ALIGNMENT
from docx.shared import Pt      #磅数
from docx.oxml.ns import qn     #中文格式
from docx.shared import Inches  #图片尺寸
import time

company_list = ['客户1','客户2']
today = time.strftime("%Yy%mm%dd",time.localtime()).format(y='年',m='月',d='日') #获取今日时间,整理成年月日格式

for i in company_list:
    document = Document()
    document.styles['Normal'].font.name = u'宋体'  #设置文档的基础字体
    document.styles['Normal'].element.rPr.rFonts.set(qn('w:eastAsia'),u'宋体')  #设置文档的基础中文字体

    #插入图片
    document.styles['Normal'].font.size = Pt(14)      #设置文档字体为14磅
    document.add_picture('test.png', width=Inches(6))  # 在文档上方插入图片作为文件红头,宽度为6英寸

    #建立第一个自然段
    p1 = document.add_paragraph()  #初始化建立第一个自然段
    p1.alignment = WD_PARAGRAPH_ALIGNMENT.CENTER  #对齐方式为居中,没有这句默认为左对齐
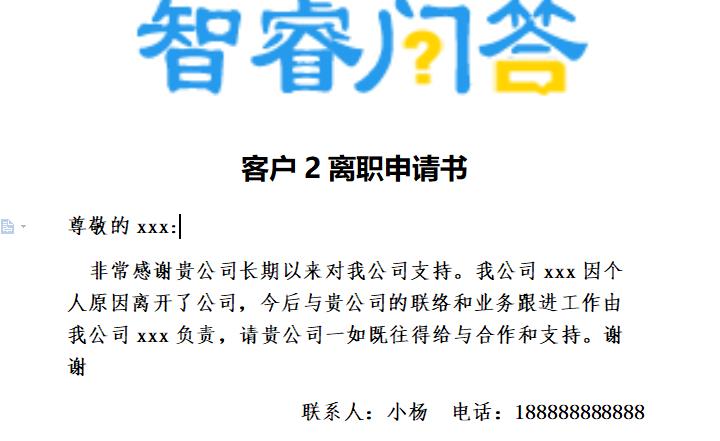
    run1 = p1.add_run('%s离职申请书'%i)
    run1.font.name = u'微软雅黑'   #设置西文字体
    run1.element.rPr.rFonts.set(qn('w:eastAsia'),u'微软雅黑')  #设置段中文字体
    run1.font.size = Pt(21)   #设置字体大小为21磅
    run1.font.bold = True    #设置加粗
    p1.space_after = Pt(5)   #段后距离5磅
    p1.space_before = Pt(5)  #段前距离5磅

    #建立第二个自然段
    p2 = document.add_paragraph()  #初始化建立第二个自然段
    run2 = p2.add_run('尊敬的xxx:')   #这个是对客户称谓
    run2.font.name = u'仿宋_GB2312'   #设置西文字体
    run2.element.rPr.rFonts.set(qn('w:eastAsia'),u'仿宋_GB2312')  #设置段中文字体
    run2.font.size = Pt(16)   #设置字体大小为16磅
    run2.font.bold = True    #设置加粗

    #建立第三个自然段
    p3 = document.add_paragraph()  #初始化建立第三个自然段
    run3 = p3.add_run('  非常感谢贵公司长期以来对我公司支持。我公司xxx因个人原因离开了公司,今后与贵公司的联络和业务跟进工作由我公司xxx负责,请贵公司一如既往得给与合作和支持。谢谢')   #内容
    run3.font.name = u'仿宋_GB2312'   #设置西文字体
    run3.element.rPr.rFonts.set(qn('w:eastAsia'),u'仿宋_GB2312')  #设置段中文字体
    run3.font.size = Pt(16)   #设置字体大小为16磅
    run3.font.bold = True    #设置加粗

    #建立第四个自然段
    p4 = document.add_paragraph()  #初始化建立第四个自然段
    p4.alignment = WD_PARAGRAPH_ALIGNMENT.RIGHT  # 对齐方式为居中
    run4 = p4.add_run('联系人:小杨  电话:188888888888')   #内容
    run4.font.name = u'仿宋_GB2312'   #设置西文字体
    run4.element.rPr.rFonts.set(qn('w:eastAsia'),u'仿宋_GB2312')  #设置段中文字体
    run4.font.size = Pt(16)   #设置字体大小为16磅
    run4.font.bold = True    #设置加粗

    # 添加分页符
    document.add_page_break()

    #插入表格
    table = document.add_table(rows=3,cols=3,style="Table Grid")   #添加3行3列表格
    table.cell(0,0).merge(table.cell(0,2))   #将第一行合并,将0行0列合并到0行2列
    table_run1 = table.cell(0,0).paragraphs[0].add_run('xx产品报价表')
    table_run1.font.name = u'隶书'
    table_run1.element.rPr.rFonts.set(qn('w:eastAsia'),u'隶书')
    table.cell(0,0).paragraphs[0].alignment = WD_PARAGRAPH_ALIGNMENT.CENTER

    table.cell(1,0).text = '日期'
    table.cell(1,1).text = '价格'
    table.cell(1,2).text = '备注'
    table.cell(2,0).text = today
    table.cell(2,1).text = str('100.00')
    table.cell(2,2).text = ''

    #在表格后插入文本
    p5 = document.add_paragraph()  # 初始化建立第一个自然段
    run5 = p5.add_run('此处是广告')

    document.save('%s-离职申请.docx' % i)
四、效果图

以上是关于使用python批量生成word文档的主要内容,如果未能解决你的问题,请参考以下文章