基于CNN卷积神经网络的TensorFlow+Keras深度学习的人脸识别
Posted BIGBOSSyifi
tags:
篇首语:本文由小常识网(cha138.com)小编为大家整理,主要介绍了基于CNN卷积神经网络的TensorFlow+Keras深度学习的人脸识别相关的知识,希望对你有一定的参考价值。
基于CNN卷积神经网络的TensorFlow+Keras深度学习的人脸识别
- 前言
- 项目概述
- 项目核心代码详解
- 核心代码
- 设置数据集目录
- 收集人脸识别数据——UUID格式命名
- 创建标签化数据集
- 构建训练和测试数据的分区
- 创建模型
- 构建距离层
- 构建神经网络模型
- 深度训练模型
- 设置训练batch
- 测试模型识别效果
- 人脸识别APP—窗口UI
前言
在上一篇博客中,利用CNN卷积神经网络的TensorFlow+Keras深度学习搭建了人脸模型:
基于CNN卷积神经网络的TensorFlow+Keras深度学习搭建人脸模型
本篇博客将继续利用CNN卷积神经网络的TensorFlow+Keras深度学习实现人脸识别
项目实现效果

补充
PS:项目地址在最后会开源
本项目使用TensorFlow-GPU进行训练:需要提前搭建好CUDA环境具体可以参考本文:TensorFlow-GPU-2.4.1与CUDA安装教程
模型数据
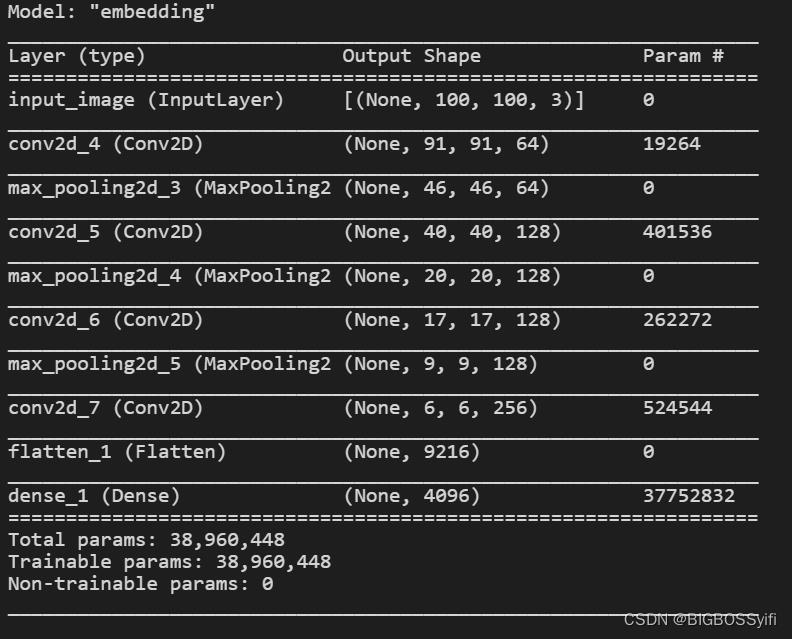
嵌入模型
Model: "embedding"
_________________________________________________________________
Layer (type)                 Output Shape              Param #
=================================================================
input_image (InputLayer)     [(None, 100, 100, 3)]     0
_________________________________________________________________
conv2d (Conv2D)              (None, 91, 91, 64)        19264
_________________________________________________________________
max_pooling2d (MaxPooling2D) (None, 46, 46, 64)        0
_________________________________________________________________
conv2d_1 (Conv2D)            (None, 40, 40, 128)       401536
_________________________________________________________________
max_pooling2d_1 (MaxPooling2 (None, 20, 20, 128)       0
_________________________________________________________________
conv2d_2 (Conv2D)            (None, 17, 17, 128)       262272
_________________________________________________________________
max_pooling2d_2 (MaxPooling2 (None, 9, 9, 128)         0
_________________________________________________________________
conv2d_3 (Conv2D)            (None, 6, 6, 256)         524544
_________________________________________________________________
flatten (Flatten)            (None, 9216)              0
_________________________________________________________________
dense (Dense)                (None, 4096)              37752832
=================================================================
Total params: 38,960,448
Trainable params: 38,960,448
Non-trainable params: 0
_________________________________________________________________
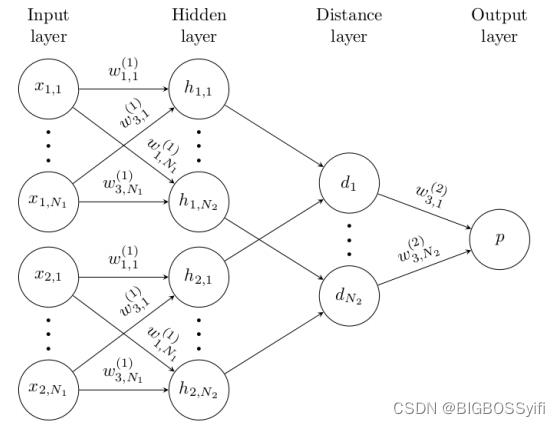
CNN神经网络模型
Model: "SiameseNetWork"
__________________________________________________________________________________________________
Layer (type)                    Output Shape         Param #     Connected to
==================================================================================================
input_image (InputLayer)        [(None, 100, 100, 3) 0
__________________________________________________________________________________________________
validation_img (InputLayer)     [(None, 100, 100, 3) 0
__________________________________________________________________________________________________
embedding (Functional)          (None, 4096)         38960448    input_image[0][0]
                                                                 validation_img[0][0]
__________________________________________________________________________________________________
distance (L1Dist)               (None, 4096)         0           embedding[4][0]
                                                                 embedding[5][0]
__________________________________________________________________________________________________
dense_4 (Dense)                 (None, 1)            4097        distance[0][0]
==================================================================================================
Total params: 38,964,545
Trainable params: 38,964,545
Non-trainable params: 0
__________________________________________________________________________________________________
项目概述
项目运行流程
1. 收集人脸数据—设置数据的路径并对数据集预处理
2. 构建训练模型——搭建深度神经网络
3. 深度训练人脸数据——CNN卷积神经网络+TensorFlow+Keras
4. 搭建人脸识别APP——OpenCV+Kivy.APP
核心环境配置
Python == 3.9.0
labelme == 5.0.1
tensorflow -gpu == 2.7.0 (CUDA11.2)
opencv-python == 4.0.1
Kivy == 2.1.0
albumentations == 0.7.12
项目核心代码详解
目录

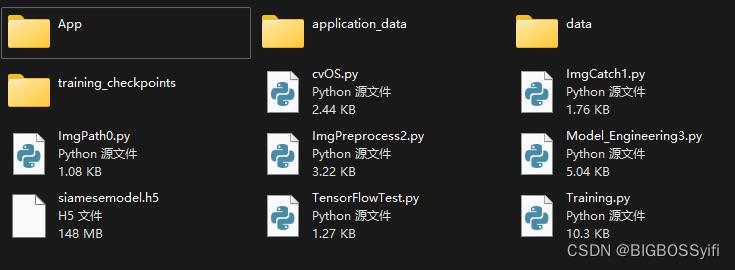
| 名称 | 用途 |
|---|---|
| data | 收集的人脸数据 |
| data-anchor | 被测人脸数据 |
| data-negative | 混淆数据集 |
| data-positive | 预处理后人脸数据 |
| training_checkpoints | 训练数据集日志(检查点) |
| .h5 | 已训练好的人脸模型(.h5) |
| ImgPath0.py | 设置数据集的目录 |
| ImgCatch1.py | 手机人脸数据 |
| ImgPreprocess2.py | 图像预处理 |
| Model_Engineering3 | 构建训练模型 |
| Training.py | 深度训练数据集 |
| cvOS.py | 人脸识别APP |
| TensorFlowTest.py | CUDA环境检测 |
本项目用的到野生人脸数据集下载地址:深度学习人脸训练数据集
本项目基于《Siamese Neural Networks for One-shot Image Recognition》这篇论文为理论基础:Siamese Neural Networks for One-shot Image Recognition


核心代码
引入的核心库文件:
import cv2
import numpy as np
from matplotlib import pyplot as plt

from tensorflow.keras.models import Model
from tensorflow.keras.layers import Layer, Conv2D, Dense, MaxPooling2D, Input, Flatten
import tensorflow as tf
加入GPU内存增长限制—防止爆显存
gpus = tf.config.experimental.list_physical_devices('GPU')
for gpu in gpus:
    tf.config.experimental.set_memory_growth(gpu, True)
设置数据集目录
POS_PATH = os.path.join('data', 'positive')
NEG_PATH = os.path.join('data', 'negative')
ANC_PATH = os.path.join('data', 'anchor')

os.makedirs(POS_PATH)
os.makedirs(NEG_PATH)
os.makedirs(ANC_PATH)

# 导入野生数据集
for directory in os.listdir('666'):
    for file in os.listdir(os.path.join('666', directory)):
        EX_PATH = os.path.join('666', directory, file)
        NEW_PATH = os.path.join(NEG_PATH, file)
        os.replace(EX_PATH, NEW_PATH)
收集人脸识别数据——UUID格式命名
cap = cv2.VideoCapture(0)
while cap.isOpened():
    ret, frame = cap.read()

    # 裁剪图像大小250x250px
    frame = frame[120:120+250,200:200+250, :]

    # 收集人脸数据——正面清晰的数据集
    if cv2.waitKey(1) & 0XFF == ord('a'):
        # 对数据进行UUID命名
        imgname = os.path.join(ANC_PATH, '.jpg'.format(uuid.uuid1()))
        # 写入并保存数据
        cv2.imwrite(imgname, frame)

    # 收集数据集——侧脸斜脸的数据集(可以较模糊)
    if cv2.waitKey(1) & 0XFF == ord('p'):
        # 对数据进行UUID命名
        imgname = os.path.join(POS_PATH, '.jpg'.format(uuid.uuid1()))
        # 写入并保存数据
        cv2.imwrite(imgname, frame)

    cv2.imshow('Image Collection', frame)

    if cv2.waitKey(1) & 0XFF == ord('q'):
        break

# 释放摄像头资源
cap.release()
cv2.destroyAllWindows()
创建标签化数据集
positives = tf.data.Dataset.zip((anchor, positive, tf.data.Dataset.from_tensor_slices(tf.ones(len(anchor)))))
negatives = tf.data.Dataset.zip((anchor, negative, tf.data.Dataset.from_tensor_slices(tf.zeros(len(anchor)))))
data = positives.concatenate(negatives)

samples = data.as_numpy_iterator()
exampple = samples.next()
构建训练和测试数据的分区
def preprocess_twin(input_img, validation_img, label):
    return(preprocess(input_img), preprocess(validation_img), label)

res = preprocess_twin(*exampple)


data = data.map(preprocess_twin)
data = data.cache()
data = data.shuffle(buffer_size=1024)

train_data = data.take(round(len(data)*.7))
train_data = train_data.batch(16)
train_data = train_data.prefetch(8)

test_data = data.skip(round(len(data)*.7))
test_data = test_data.take(round(len(data)*.3))
test_data = test_data.batch(16)
test_data = test_data.prefetch(8)``
创建模型
inp = Input(shape=(100,100,3), name='input_image')
c1 = Conv2D(64, (10,10), activation='relu')(inp)
m1 = MaxPooling2D(64, (2,2), padding='same')(c1)

c2 = Conv2D(128, (7,7), activation='relu')(m1)
m2 = MaxPooling2D(64, (2,2), padding='same')(c2)

c3 = Conv2D(128, (4,4), activation='relu')(m2)
m3 = MaxPooling2D(64, (2,2), padding='same')(c3)

c4 = Conv2D(256, (4,4), activation='relu')(m3)
f1 = Flatten()(c4)
d1 = Dense(4096, activation='sigmoid')(f1)

mod = Model(inputs=[inp], outputs=[d1], name='embedding')
mod.summary()

def make_embedding():
    inp = Input(shape=(100,100,3), name='input_image')
    # 第一层卷积
    c1 = Conv2D(64, (10,10), activation='relu')(inp)
    m1 = MaxPooling2D(64, (2,2), padding='same')(c1)

    # 第二层卷积
    c2 = Conv2D(128, (7,7), activation='relu')(m1)
    m2 = MaxPooling2D(64, (2,2), padding='same')(c2)

    # 第三层卷积
    c3 = Conv2D(128, (4,4), activation='relu')(m2)
    m3 = MaxPooling2D(64, (2,2), padding='same')(c3)

    # 最终卷积
    c4 = Conv2D(256, (4,4), activation='relu')(m3)
    f1 = Flatten()(c4)
    d1 = Dense(4096, activation='sigmoid')(f1)


    return Model(inputs=[inp], outputs=[d1], name='embedding')
    embedding = make_embedding()

构建距离层
# L1距离层
class L1Dist(Layer):

    # 初始化方法
    def __init__(self, **kwargs):
        super().__init__()

    # 数据相似度计算
    def call(self, input_embedding, validation_embedding):
        return tf.math.abs(input_embedding - validation_embedding)
        l1 = L1Dist()
        l1(anchor_embedding, validation_embedding)
构建神经网络模型
input_image = Input(name='input_img', shape=(100,100,3))
validation_image = Input(name='validation_img', shape=(100,100,3))

inp_embedding = embedding(input_image)
val_embedding = embedding(validation_image)

siamese_layer = L1Dist()
distances = siamese_layer(inp_embedding, val_embedding)
classifier = Dense(1, activation='sigmoid')(distances)
siamese_network = Model(inputs=[input_image, validation_image], outputs=classifier, name='SiameseNetwork')

深度训练模型
搭建损失值和优化器
binary_cross_loss = tf.losses.BinaryCrossentropy()
opt = tf.keras.optimizers.Adam(1e-4) # 0.0001
设置训练检查点
checkpoint_dir = './training_checkpoints'
checkpoint_prefix = os.path.join(checkpoint_dir, 'ckpt')
checkpoint = tf.train.Checkpoint(opt=opt, siamese_model=siamese_model)
设置训练batch
test_batch = train_data.as_numpy_iterator()
batch_1 = test_batch.next()

X = batch_1[:2]
y = batch_1[2]

@tf.function
def train_step(batch):

    # 日志记录
    with tf.GradientTape() as tape:
        # 获得人脸数据
        X = batch[:2]
        # 获得标签
        y = batch[2]

        # yhat的值向上传递
        yhat = siamese_model(X, training=True)
        # 计算损失值
        loss = binary_cross_loss(y, yhat)
    print(loss)

    # 计算渐变值
    grad = tape.gradient(loss, siamese_model.trainable_variables)

    # 计算更新的权重传递给模型
    opt.apply_gradients(zip(grad, siamese_model.trainable_variables))

    # 返回损失值
    return loss
设置训练循环
def train(data, EPOCHS):
    # Loop through epochs
    for epoch in range(1, EPOCHS+1):
        print('\\n Epoch /'.format(epoch, EPOCHS))
        progbar = tf.keras.utils.Progbar(len(data))
      以上是关于基于CNN卷积神经网络的TensorFlow+Keras深度学习的人脸识别的主要内容,如果未能解决你的问题,请参考以下文章