Android drawable 玩转自定义图片以及bug的解决
Posted MiracleAce
tags:
篇首语:本文由小常识网(cha138.com)小编为大家整理,主要介绍了Android drawable 玩转自定义图片以及bug的解决相关的知识,希望对你有一定的参考价值。
最新实战教程,让你了解Android自动化刷量、作弊与防作弊的那些事,案例:刷友盟统计、批量注册苹果帐号
很久没有空更新博客了,以至于挺多东西都用过之后就忘记了,没有很好的记录下来,之前在工作的时候也是这样,用完就忘记,所以觉得还是很有必要把自己用过的一些东西,解决的一些问题记录下来的,所以以后尽量坚持一周写一次博客,记录一下自己解决的问题,也与大学共享一下,建议大家也写一下博客或笔记什么的,因为在工作中,自己接触的东西并不可能只是自己刚开始的东西,比如说android,其实在开发一个app或平时在公司工作的时候,还需要用到很多的东西,而且还有可能有一段时间去使用别的语言去开发,如果自己不记录一下,很有可能就会学一样就忘一样,这样不利于自身的发展,所以建议各位还是要记录一下自己的东西才行的。
好了,废话不多说了,我们进入今天的正题,今天主要是有两点,一点就是说一下开发中,一些drawable的小技巧, 还有的就是我之前在开发中,发现的在2.x的android里面的一个drawable的bug
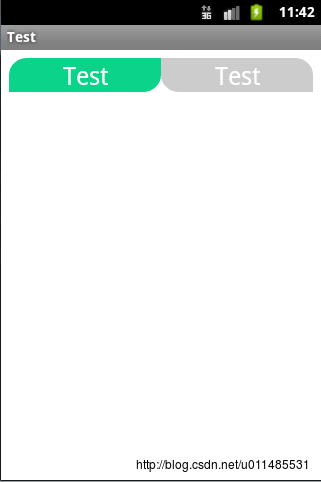
首先,我们来看一张图片

大家实现上面的那个按钮的第一想法就是去找美工MM拿张圆角的背景图片,然后接入背景就可以了,这样子也可以的,但是在做多种尺寸的屏幕适配的时候,这样我们就要加多一步,就是用9path把那背景图片处理一样,这样子做太麻烦了,
其实对于一些纯色的图片或背景,我们都可以在drawable目录下面写一个xml就可以的了,非常的简单,不但不用找美工要图片,还不用自己用9path处理,十分的轻松</p><p>就像上面的那个圆角按钮,就是一个drawable的背景来的,代码如下
/drawable/btn_bg.xml
<pre name="code" class="html"><?xml version="1.0" encoding="utf-8"?>
<shape xmlns:android="http://schemas.android.com/apk/res/android"
    android:shape="rectangle" >

    <corners android:radius="8dp"/>

    <solid android:color="#ff0bd38a"/>

</shape>
是不是非常的简单明了呢,
使用就更简单,把它当成一张图片就好了
<Button
        android:layout_width="match_parent"
        android:layout_height="wrap_content"
        android:background="@drawable/btn_bg"
        android:text="@string/app_name"
        android:textSize="25sp"
        android:textColor="@android:color/white"/>
现在解释一下xml里面的东西,在上面的btn_bg.xml里面,在第3行里面,android:shape="rectangle",rectangle代表的是下面写的是一个方块,还有"oval" 椭圆、"line" 线条,"ring"圆环,其实这三个用得都不多
接下来的就是
corners:圆角
android:radius为角的弧度,值越大角越圆。
我们还可以把四个角设定成不同的角度,方法为:
<corners
    android:topRightRadius="20dp"
    android:bottomLeftRadius="20dp"
    android:topLeftRadius="0dp"
    android:bottomRightRadius="0dp" />
然后就是
solid -- 填充。
solid:实心,就是填充的意思
android:color指定填充的颜色
还有几个没有用到的
stroke -- 描边。
stroke:描边
android:width="2dp" 描边的宽度,android:color 描边的颜色。
我们还可以把描边弄成虚线的形式,设置方式为:
android:dashWidth="5dp"
android:dashGap="3dp"
其中android:dashWidth表示'-'这样一个横线的宽度,android:dashGap表示之间隔开的距离。
这个经常用的,我经常用来做一些边框的

就是这样,一些需要到边框的,都可以写一个drawable
<?xml version="1.0" encoding="utf-8"?>
<shape xmlns:android="http://schemas.android.com/apk/res/android"
    android:shape="rectangle" >

    <stroke
        android:width="1dp"
        android:color="#ffaaaaaa"/>

    <corners android:radius="8dp"/>

    <solid android:color="@android:color/white"/>

</shape>
上面的就是那个边框的了,有需要添加边框的都可以写上面那样的一个drawable
还有的就是
gradient -- 对应颜色渐变。 startcolor、endcolor就不多说了。 android:angle 是指从哪个角度开始变。
gradient:渐变
android:startColor和android:endColor分别为起始和结束颜色,android:angle是渐变角度,必须为45的整数倍。
另外渐变默认的模式为android:type="linear",即线性渐变,可以指定渐变为径向渐变,android:type="radial",径向渐变需要指定半径android:gradientRadius="50"。
这个就非常的少用的了,因为太难控制了,如果图片有多种色彩,还是找美工MM更快一点,自己调的话,还有可能调不出来,所以不推荐使用到它了,
android:angle:渐变的时候,最原始的,即android:angle=“0”时,是从左到右,按照开始颜色到结束颜色来渲染的,android:angle=“90”是从上到下来渲染的,android:angle=“180”是从右到左来渲染的,android:angle=“360”和android:angle=“0”是一样的,所以这里应该是这样的,渲染时按照最原始的渲染色板(把控件内部看作一块可以绕中心旋转的板子)围绕控件中心来旋转相应的度数,即android:angle里面的值就是所需要旋转的角度,只是这个旋转角度必须是45的整数倍
这个是有点复杂的,还是那句,不建议使用,除非真的适用
还有的就是
padding -- 定义内容离边界的距离 这个很好理解,不多说了
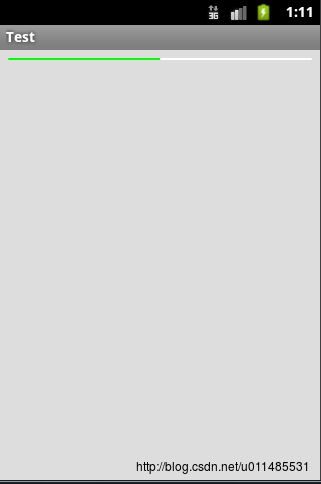
下面给大家演示一下这个怎么用,通过一个自定义进度条来进行演示
<?xml version="1.0" encoding="utf-8"?>
<layer-list xmlns:android="http://schemas.android.com/apk/res/android">

    <item android:id="@android:id/background">
        <shape>
            <corners android:radius="5dip" />
            <solid android:color="#ffffffff"/>
        </shape>
    </item>

    <item android:id="@android:id/secondaryProgress">
        <clip>
            <shape>
                <corners android:radius="5dip" />
                <solid android:color="#ff00ff00"/>
            </shape>
        </clip>
    </item>

    <item android:id="@android:id/progress">
        <clip>
            <shape>
                <corners android:radius="5dip" />
                <solid android:color="#ff00ff00"/>
            </shape>
        </clip>
    </item>

</layer-list>
调用
<ProgressBar
        style="?android:attr/progressBarStyleHorizontal"
        android:layout_width="match_parent"
        android:layout_height="2dp"
        android:progress="50"
        android:progressDrawable="@drawable/progress_horizontal"/>
其实主要就是
android:progressDrawable="@drawable/progress_horizontal"
把我们编写好的xml指定好就行了
效果如下

好了,下面我们来讲一下,android2.x里面,这个drawable里面的一个bug
在我们上面说到
corners:圆角
android:radius为角的弧度,值越大角越圆。
我们还可以把四个角设定成不同的角度,方法为:
<corners
    android:topRightRadius="20dp"
    android:bottomLeftRadius="20dp"
    android:topLeftRadius="0dp"
android:bottomRightRadius="0dp" /> <?xml version="1.0" encoding="utf-8"?>
<shape xmlns:android="http://schemas.android.com/apk/res/android"
android:shape="rectangle" >
<corners
android:topLeftRadius="18dp"
android:topRightRadius="0dp"
android:bottomLeftRadius="18dp"
android:bottomRightRadius="0dp"/>
<solid android:color="#ff0bd38a"/>
</shape>
 这个是在2.x里面显示的效果,你会发现,它下面的左右是的掉转的,你要这样写才行的
<?xml version="1.0" encoding="utf-8"?>
<shape xmlns:android="http://schemas.android.com/apk/res/android"
    android:shape="rectangle" >

    <corners
        android:topLeftRadius="18dp"
        android:topRightRadius="0dp"
        android:bottomLeftRadius="0dp"
        android:bottomRightRadius="18dp"/>

    <solid android:color="#ff0bd38a"/>

</shape>
但是你这样子写,它到了3.x以上的话就会显示成

这样也是掉转了,十分的坑
后来我就在res目录下面新建一个drawable-v12的目录,把正确的写法,放到这个目录下面去就可以了的
因为3.x之后,都会优先在这个目录下面拿drawable的图片资源,所以这样子就可以拿到正确的写法,不正确的就放在drawable目录下面,以兼容2.x的android
这样修改后就可以得到下面的效果


非常完美的解决了这个bug
其实我们可以依次类推,如果以后发现这样的一些bug也可以这样子类似的来解决的
好了,东西有点多,也有点乱,如果有什么不明白的,请留言,或把代码下载下去看看,里面有所以我在文中提到的xml
好了,下次我们说一下android重启的那些事
以上是关于Android drawable 玩转自定义图片以及bug的解决的主要内容,如果未能解决你的问题,请参考以下文章