SetpNumber计数器StepNumber详解,购物车制作(呆),五星好评制作Starjs详解
Posted 勇敢*牛牛
tags:
篇首语:本文由小常识网(cha138.com)小编为大家整理,主要介绍了SetpNumber计数器StepNumber详解,购物车制作(呆),五星好评制作Starjs详解相关的知识,希望对你有一定的参考价值。
【SetpNumber计数器】
<body>
    <script type="module">
        import StepNumber from "./js/StepNumber.js";
        /* 创建一个实例对象 */
        var steps=new StepNumber();
        /* 实例对象添加自定义事件 */
        steps.addEventListener(StepNumber.STEP_CHANGE_EVENT,changeHandler);
        /*将对象的this.elem渲染到页面*/
        steps.appendTo("body");

        function changeHandler(e)
            console.log(e);


    </script>
</body>
import Component from "./Component.js";
import Utils from "./Utils.js";
export default class StepNumber extends Component
    static cssBool=false;
    _step=1;
    bnList;
    input;
    ids;
    static STEP_CHANGE_EVENT = "step_change_event";
    /* 继承构造函数 */
    constructor()
        super("div");
        /* 添加内容 */
        this.elem.className="step-number"
        this.elem.innerhtml=`
           <button class='left'>-</button>
           <input type='text' value='1'>
           <button class='right'>+</button>
        `
        /* 控制是否添加样式 */
        if (!StepNumber.cssBool) StepNumber.setCSS();
        /* 给this.elem 添加点击事件 */
        this.elem.addEventListener("click", e => this.clickHandler(e));
        /* 给this.elem添加input事件 */
        this.elem.addEventListener("input", e => this.inputHandler(e));
        /* 将两个button对象存储 */
        this.bnList = Array.from(this.elem.querySelectorAll("button"));
        /* 获取input对象 */
        this.input = this.elem.querySelector("input");
        /* 初始化修改value值 */
        this.setStep(1);

    /* 点击事件函数 */
    clickHandler(e)
        /* 判断事件的触发对象,如果不是BUTTON元素,return */
        if (e.target.nodeName !== "BUTTON") return;
        /* 判断左右按键 */
        if (e.target.className === "left")
            /* 设置vlaue值 */
            this.setStep(this._step-1);
        else
            this.setStep(this._step+1);

        /* 执行事件抛发,抛发数据 到外面*/
        this.dispatch();

    /* 节流函数 */
    inputHandler(e)
        if(this.ids) return;
        this.ids=setTimeout(()=>
            clearTimeout(this.ids);
            this.ids=undefined;
            this.setStep(this.input.value);
            this.dispatch();
        ,500);

    /* 抛发信息事件 */
    dispatch()
        var evt = new Event(StepNumber.STEP_CHANGE_EVENT);
        /* 外面函数会和收到这个玩意 */
        evt.step=this._step;
        this.dispatchEvent(evt);

    /* 改变input.value值 */
    setStep(value)
        /* 字符可转数值~~又是一个新的知识点 */
        value = ~~value;
        /* button身上的按钮disabled:是否禁用 */
        this.bnList.forEach(item => item.disabled = false);
        /* 最少选择一个,value小于1,赋值为1,禁用左按钮 */
        if(value<=1)
            value=1;
            this.bnList[0].disabled = true;
            /* 同理 */
        else if(value>=99)
            value=99;
            this.bnList[1].disabled=true;

        /* 重新赋值 */
        this._step=value;
        this.input.value=value;

    /* 添加样式 */
    static setCSS()
        StepNumber.cssBool=true;
        Utils.setCSS(`.step-number
            position: relative;
            font-size: 0;

       .step-number>button

          border: 1px solid #ccc;
          padding: 0;
          margin: 0;
          height: 20px;
          width: 20px;

       .step-number>input

         border: 1px solid #ccc;
          outline: none;
          width: 46px;
          height: 18px;
          padding: 0;
          margin: 0;
          border-left: none;
          border-right: none;
          text-align: center;
       `)
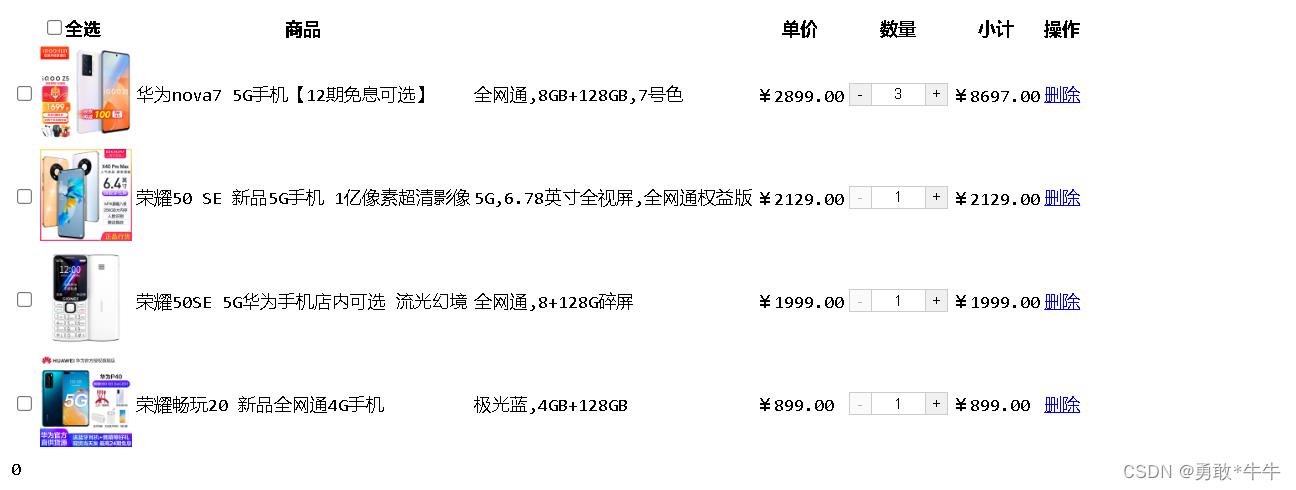
一个数据组
[

     id: 1015,
     list: [
             id: 101501,
             img: "img/101501.jpg",
             price: 2899
         ,

             id: 101502,
             img: "img/101502.jpg",
             price: 5499
         ,

             id: 101503,
             img: "img/101503.jpg",
             price: 3099
         ,

             id: 101504,
             img: "img/101504.jpg",
             price: 1299
         ,

             id: 101505,
             img: "img/101505.jpg",
             price: 1199
         ,


     ],
     info: "华为nova7 5G手机【12期免息可选】 ",
     arguments: ["全网通", "8GB+128GB", "7号色"],
     judge: 1000,
     shop: "OKSJ手机旗舰店",
     icons:
         icon1: ["自营"],
         icon2: ["放心购"],
         icon3: ["新品"],
         icon4: ["赠"]
     ,
     double11: true,
     schedule: null

 	………………………………
]
五星好评制作
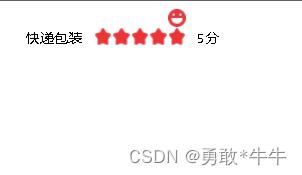
<script type="module">
    import Star from "./js/Star.js";
    var star=new Star("快递包装");
    star.appendTo("body");
</script>
import Component from "./Component.js";
import Utils from "./Utils.js";
export default class Star extends Component
label;
static cssBool = false;
list;
starCon;
pos = -1;
score;
constructor(_label)
super("div");
this.label = _label;
this.elem.className = "stars clear";
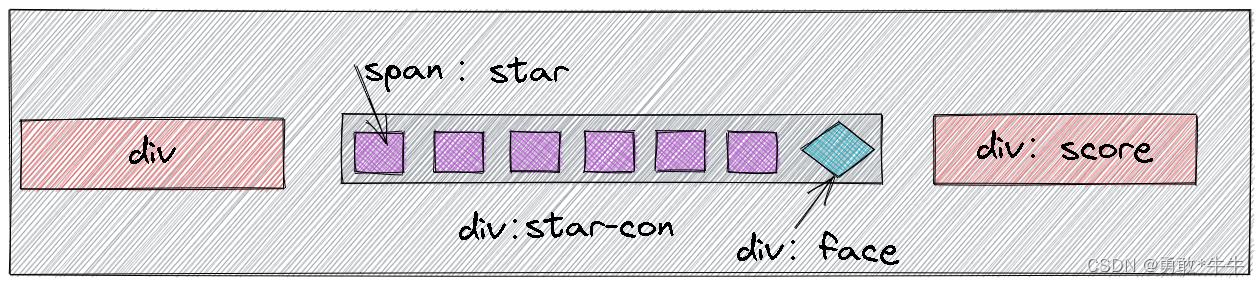
this.elem.innerHTML = `
<div class='star-label'>$this.label</div>
<div class='star-con clear'>
<span class='star'></span>
<span class='star'></span>
<span class='star'></span>
<span class='star'></span>
<span class='star'></span>
<div class='face'></div>
</div>
<div class='score'>0分</div>
`
/* 获取星标对象数组 */
this.list = Array.from(this.elem.querySelectorAll(".star"));
/* 添加样式 */
if (!Star.cssBool) Star.setCSS();
/* 获取star-con */
this.starCon = this.elem.querySelector(".star-con");
/* 获取face */
this.face = this.elem.querySelector(".face");
/* 获取score */
this.score = this.elem.querySelector(".score");
/* 给星星序列添加三种事件,滑过,离开,点击 */
this.starCon.addEventListener("mouseover", e => this.mouseOverHandler(e));
this.starCon.addEventListener("mouseleave", e => this.mouseOverHandler(e));
this.starCon.addEventListener("click", e => this.mouseOverHandler(e));
/* 事件函数 */
mouseOverHandler(e)
/* 判断是否是属于目标事件和目标target */
if (e.target.className !== "star" && e.type === "mouseover") return;
/* 找见触发事件的star下标 */
var index = this.list.indexOf(e.target);
/* 滑过的事件执行代码 */
if (e.type === "mouseover")
/* 改变星标背景,桥接模式 */
this.changeStar((i) => i <= index || i <= this.pos);
/* 设置延时根据移动的下标倍数,控left和背景色 */
Object.assign(this.face.style,
display: "block",
/* 星标距离左边的父容器的左距离 */
left: e.target.offsetLeft + "px",
/* 因为笑脸图标是倒序的 */
backgroundPositionX: (4 - index) * -20 + "px"
)
/* 根据星标下标评分 */
this.score.innerHTML = index + 1 + "分"
else if (e.type === "mouseleave")
/* 当他移开时,判断pos值 */
this.changeStar((i) => i <= this.pos)
/* 笑脸消失 */
this.face.style.display = "none";
/* 分数填入 */
this.score.innerHTML = this.pos + 1 + "分"
else if (e.type === "click")
/* 点击事件确定pos的值 */
this.pos = this.list.indexOf(e.target);
console.log(this.pos);
/* 回调函数判断是否移动背景位置 */
changeStar(fn)
for (var i = 0; i < this.list.length; i++)
/* 如果满足回调条件向左移动背景,显示星标 */
if (fn(i)) this.list[i].style.backgroundPositionY = "-16px";
else this.list[i].style.backgroundPositionY = "0px";
static setCSS()
Star.cssBool = true;
Utils.setCSS(` .stars
position: relative;
font-size: 12px;
padding: 15px;
.clear::after
content: "";
display: block;
visibility: hidden;
clear: both;
height: 0;
overflow: hidden;
.stars>div
float: left;
.stars>.star-con
position: relative;
margin-left: 10px;
margin-right: 10px;
.stars>.star-con>.star
width: 16px;
height: 16px;
display: block;
background-image: url(./img/commstar.png);
float: left;
.stars>.star-con>.face
width: 16px;
height: 16px;
background-image: url(./img/face-red.png);
position: absolute;
top: -16px;
left:0;
transition: left 0.5s;
display:none;
`)
以上是关于SetpNumber计数器StepNumber详解,购物车制作(呆),五星好评制作Starjs详解的主要内容,如果未能解决你的问题,请参考以下文章