RT-Thread 移植到stm32
Posted 旭日初扬
tags:
篇首语:本文由小常识网(cha138.com)小编为大家整理,主要介绍了RT-Thread 移植到stm32相关的知识,希望对你有一定的参考价值。
系列文章目录
RT_thread移植到stm32
目录
前言
将实时操作系统RT_Thread移植到stm32。
一、RT_Thread源码下载
RT-Thread 源码分 RT-Thread Master 和 RT-Thread Nano。Nano 是 Master 的精简版,去掉了一些组件和各种开发板的 BSP,保留了 OS 的核心功能。 地址二、文件目录简介
1、bsp文件
- bsp 文件夹里面存放的是板级支持包,即 board support package 的英文缩写。
- bsp 文件夹下面的 board.c 是 RT-Thread 用来初始化开发板硬件的相 关函数。
- rtconfig.h 是 RT-Thread 功能的配置头文件,里面定义了很多宏,通过这些宏定义,裁剪 RT-Thread 的功能。
2.components 文件夹简介
其它第三方加进来的软件都是组件,比如 gui、 fatfs、lwip 和 finsh 等。3.include 文件夹简介
include 目录下面存放的是 RT-Thread 内核的头文件,是内核不可分割的一 部分。
4 、libcpu 文件夹简介
- 存放RT-thread与单片机的关联,这些文件叫接口文件,通常由汇编和 C 联合编写。
- 这些接口文件都是跟 硬件密切相关的,不同的硬件接口文件是不一样的,但都大同小异。编写这些接 口文件的过程我们就叫移植。
5.src文件
src 目录下面存放的是 RT-Thread 内核的源文件,是内核的核心。二、移植RT-THREAD
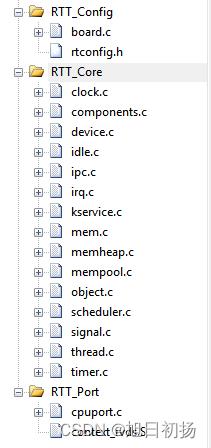
1、新建目录与添加文件

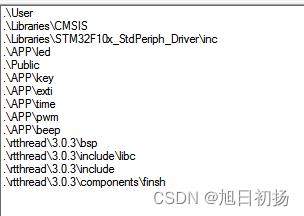
2、添加头文件

3、rtconfig.h文件
/* RT-Thread config file */

#ifndef __RTTHREAD_CFG_H__
#define __RTTHREAD_CFG_H__

//#include "RTE_Components.h"

// <<< Use Configuration Wizard in Context Menu >>>
// <h>Basic Configuration
// <o>Maximal level of thread priority <8-256>
//	<i>Default: 32
//  RT_thread支持多个优先级
#define RT_THREAD_PRIORITY_MAX  32

// <o>OS tick per second
//  <i>Default: 1000   (1ms)
// 每秒钟有多少个tick,tick即是操作系统的时钟周期,默认为1000,及操作系统的时钟周期tick等于1ms
#define RT_TICK_PER_SECOND	1000

// <o>Alignment size for CPU architecture data access
//	<i>Default: 4
//  表示 CPU 处理的数据需要多少个 字节对齐,默认为 4 个字节。
#define RT_ALIGN_SIZE   4

// <o>the max length of object name<2-16>
//	<i>Default: 8
// RT_NAME_MAX 这个宏表示内核对象名字的最大长度,取值 范围为 2~16,默认为 8
#define RT_NAME_MAX	   8

// <c1>Using RT-Thread components initialization
//  <i>Using RT-Thread components initialization
//  使用 RT-Thread 组件初始化,默认使能。
#define RT_USING_COMPONENTS_INIT

// </c>
// <c1>Using user main
//  <i>Using user main
//  使用用户 main 函数,默认打开
#define RT_USING_USER_MAIN
// </c>
// <o>the size of main thread<1-4086>
//	<i>Default: 512
//  main 线程栈大小,取值范围为 1~4086,单位为字节,默 认为 512
#define RT_MAIN_THREAD_STACK_SIZE     512

// </h>
// 钩子函数配置,目前全部关闭
// <h>Debug Configuration
// <c1>enable kernel debug configuration
//  <i>Default: enable kernel debug configuration
//#define RT_DEBUG
// </c>
// <o>enable components initialization debug configuration<0-1>
//  <i>Default: 0
//调试配置。包括了内核调试配置,组件调试配置和线程栈溢 出检测,目前全部关闭
#define RT_DEBUG_INIT 0
// <c1>thread stack over flow detect
//  <i> Diable Thread stack over flow detect
//#define RT_USING_OVERFLOW_CHECK
// </c>
// </h>

// <h>Hook Configuration
// <c1>using hook
//  <i>using hook
//#define RT_USING_HOOK
// </c>
// <c1>using idle hook
//  <i>using idle hook
//#define RT_USING_IDLE_HOOK
// </c>
// </h>

// <e>Software timers Configuration
// <i> Enables user timers

//软件定时器配置,目前关闭,不使用软件定时器。
#define RT_USING_TIMER_SOFT         0
#if RT_USING_TIMER_SOFT == 0
#undef RT_USING_TIMER_SOFT
#endif
// <o>The priority level of timer thread <0-31>
//  <i>Default: 4
#define RT_TIMER_THREAD_PRIO		4
// <o>The stack size of timer thread <0-8192>
//  <i>Default: 512
#define RT_TIMER_THREAD_STACK_SIZE	512
// <o>The soft-timer tick per second <0-1000>
//  <i>Default: 100
#define RT_TIMER_TICK_PER_SECOND	1000
// </e>

// 内部通信配置,包括信号量、互斥量、事件、邮箱和消息队 列, 根据需要配置。
// <h>IPC(Inter-process communication) Configuration
// <c1>Using Semaphore
//  <i>Using Semaphore
#define RT_USING_SEMAPHORE
// </c>
// <c1>Using Mutex
//  <i>Using Mutex
//#define RT_USING_MUTEX
// </c>
// <c1>Using Event
//  <i>Using Event
//#define RT_USING_EVENT
// </c>
// <c1>Using MailBox
//  <i>Using MailBox
#define RT_USING_MAILBOX
// </c>
// <c1>Using Message Queue
//  <i>Using Message Queue
//#define RT_USING_MESSAGEQUEUE
// </c>
// </h>
// 内存管理配置
// <h>Memory Management Configuration
// <c1>Using Memory Pool Management
//  <i>Using Memory Pool Management
//RT_USING_MEMPOOL 这个宏用于表示是否使用内存池,目 前关闭,不使用内存池。
#define RT_USING_MEMPOOL
// </c>
// <c1>Dynamic Heap Management
//  <i>Dynamic Heap Management
// RT_USING_HEAP 这个宏用于表示是否堆,目前关闭,不使 用堆
//#define RT_USING_HEAP
// </c>
// <c1>using small memory
//  <i>using small memory
// RT_USING_SMALL_MEM 这个宏用于表示是否使用小内存, 目前使能
#define RT_USING_SMALL_MEM
// </c>
// <c1>using tiny size of memory
//  <i>using tiny size of memory
// RT_USING_TINY_SIZE 这个宏用于表示是否使用极小内存, 目前关闭,不使用。
//#define RT_USING_TINY_SIZE
// </c>
// </h>
// 控制台配置。控制台即是 rt_kprintf()函数调试输出的设备, 通常使用串口
// <h>Console Configuration
// <c1>Using console
//  <i>Using console
#define RT_USING_CONSOLE
// </c>
// <o>the buffer size of console <1-1024>
//  <i>the buffer size of console
//  <i>Default: 128  (128Byte)
#define RT_CONSOLEBUF_SIZE          128
// <s>The device name for console
//  <i>The device name for console
//  <i>Default: uart1
#define RT_CONSOLE_DEVICE_NAME      "uart1"
// </h>

// FINSH 配置
#if defined(RTE_FINSH_USING_MSH)
#define RT_USING_FINSH
#define FINSH_USING_MSH
#define FINSH_USING_MSH_ONLY
// <h>Finsh Configuration
// <o>the priority of finsh thread <1-7>
//  <i>the priority of finsh thread
//  <i>Default: 6
#define __FINSH_THREAD_PRIORITY     5
#define FINSH_THREAD_PRIORITY       (RT_THREAD_PRIORITY_MAX / 8 * __FINSH_THREAD_PRIORITY + 1)
// <o>the stack of finsh thread <1-4096>
//  <i>the stack of finsh thread
//  <i>Default: 4096  (4096Byte)
#define FINSH_THREAD_STACK_SIZE     512
// <o>the history lines of finsh thread <1-32>
//  <i>the history lines of finsh thread
//  <i>Default: 5
#define FINSH_HISTORY_LINES	        1
// <c1>Using symbol table in finsh shell
//  <i>Using symbol table in finsh shell
#define FINSH_USING_SYMTAB
// </c>
// </h>
#endif

// 设备配置
#if defined(RTE_USING_DEVICE)
#define RT_USING_DEVICE
#endif

// <<< end of configuration section >>>

#endif
4、修改board.c文件
/*
 * File      : board.c
 * This file is part of RT-Thread RTOS
 * COPYRIGHT (C) 2006, RT-Thread Development Team
 *
 * The license and distribution terms for this file may be
 * found in the file LICENSE in this distribution or at
 * http://www.rt-thread.org/license/LICENSE
 *
 * Change Logs:
 * Date           Author       Notes
 * 2017-07-24     Tanek        the first version
 */
#include <rthw.h>
#include <rtthread.h>
#include "board.h"


#ifdef __CC_ARM
//如果同时定义了 RT_USING_USER_MAIN 和 RT_USING_HEAP 这两个宏,表示 RT-Thread 里面创建内核对象时使用动态内存 分配方案
//堆可以是内部的 SRAM 也可以是外部的 SRAM 或 SDRAM,目前的方法 是从内部 SRAM 里面分配一部分静态内存来作为堆空间,这里配置为 4KB

// RT_USING_USER_MAIN 默认使能,通过使能或者失能 RT_USING_HEAP 这个宏来选择使用静态或者动态内存
//  动态内存与静态内存的区别:区别是使用的内存是在程序编译的时候分配还是在运行的时候分配
#if defined(RT_USING_USER_MAIN) && defined(RT_USING_HEAP)
#define RT_HEAP_SIZE 1024
//从内部SRAM里面分配一部分静态内存来作为rtt的堆空间,这里配置为4KB
static uint32_t rt_heap[RT_HEAP_SIZE];
// 堆的起始地址
RT_WEAK void *rt_heap_begin_get(void)

    return rt_heap;

// 堆的结束地址
RT_WEAK void *rt_heap_end_get(void)

    return rt_heap + RT_HEAP_SIZE;

#endif
#endif

extern uint8_t OSRunning;


/**
 * This function will initial your board.
 *初始化开发板硬件
 */
void rt_hw_board_init()

	//更新系统时钟,如果硬件已经能够跑起来都表示系统时钟 是没有问题的,该函数一般由固件库提供
	// SystemCoreClockUpdate();

	// 用于配置 SysTick 每 秒中断多少次,这里配置为 1000,即 1 秒钟内 SysTick 会中断 1000 次,即 中断周期为 1ms
	SysTick_Config(SystemCoreClock / RT_TICK_PER_SECOND);
	// 初始化系统定时器 SysTick,SysTick 给操作系统提供时 基,1 个时基我们称之为一个 tick,tick 是操作系统最小的时间单位
	SysTick_Init(72);

	// 硬件 BSP 初始化统统放在这里,比如 LED,串口,LCD 等。
	NVIC_PriorityGroupConfig(NVIC_PriorityGroup_2);  //中断优先级分组 分2组
	LED_Init();
	USART1_Init(115200);


	OSRunning=1;

    /* Call components board initial (use INIT_BOARD_EXPORT()) */
	// RT-Thread 为开发板组件提供的一个初始化函 数
#ifdef RT_USING_COMPONENTS_INIT
    rt_components_board_init();
#endif

#if defined(RT_USING_CONSOLE) && defined(RT_USING_DEVICE)
// RT-Thread 提供的一个控制 台设置函数,它将指定 rt_kprintf()函数的输出内容具体从什么设备打印出来
	rt_console_set_device(RT_CONSOLE_DEVICE_NAME);
#endif

#if defined(RT_USING_USER_MAIN) && defined(RT_USING_HEAP)
// RT-Thread 提供的一个内存初 始化函数,只有在使用 RT-Thread 提供的动态内存分配函数时才需要使用到
    rt_system_heap_init(rt_heap_begin_get(), rt_heap_end_get());
#endif


//  中断服务函数
void SysTick_Handler(void)

	// 进入中断,对中断计数器 rt_interrupt_nest 加 1 操作。
	/* enter interrupt */
	rt_interrupt_enter();

	/* 更新时基 */
	//用于更新时基,实现时间片,扫描系统 定时器。
	rt_tick_increase();

	/* leave interrupt */
	// 退出中断,对中断计数器 rt_interrupt_nest 减 1 操作
	rt_interrupt_leave();
5、修改定时器文件
#include "SysTick.h"
#include "rtthread.h"

static u8  fac_us=0;							//us延时倍乘数
static u16 fac_ms=0;							//ms延时倍乘数,在os下,代表每个节拍的ms数


extern volatile rt_uint8_t rt_interrupt_nest;

//在board.c文件的rt_hw_board_init()里面将其置为1
uint8_t OSRunning=0;

#ifdef 	RT_THREAD_PRIORITY_MAX					         //RT_THREAD_PRIORITY_MAX定义了,说明要支持RT-Thread
#define delay_osrunning		  OSRunning			       //OS是否运行标记,0,不运行;1,在运行
#define delay_ostickspersec	RT_TICK_PER_SECOND	//OS时钟节拍,即每秒调度次数
#define delay_osintnesting 	rt_interrupt_nest		//中断嵌套级别,即中断嵌套次数
#endif

//us级延时时,关闭任务调度(防止打断us级延迟)
void delay_osschedlock(void)

#ifdef RT_THREAD_PRIORITY_MAX
	 rt_enter_critical();
#endif


//us级延时时,恢复任务调度
void delay_osschedunlock(void)

#ifdef RT_THREAD_PRIORITY_MAX
	  rt_exit_critical();
#endif


//调用OS自带的延时函数延时
//ticks:延时的节拍数
void delay_ostimedly(u32 ticks)

#ifdef RT_THREAD_PRIORITY_MAX
	  rt_thread_delay(ticks);
#endif


//初始化延迟函数
//SYSTICK的时钟固定为AHB时钟的1/8
//SYSCLK:系统时钟频率
void SysTick_Init(u8 SYSCLK)

	u32 reload;
	SysTick_CLKSourceConfig(SysTick_CLKSource_HCLK_Div8);
	fac_us=SYSCLK/8;						//不论是否使用OS,fac_us都需要使用
	reload=SYSCLK/8;				//每秒钟的计数次数
	reload*=1000000/delay_ostickspersec;		//根据delay_ostickspersec设定溢出时间
												//reload为24位寄存器,最大值:16777216,在72M下,约合1.86s左右
	fac_ms=1000/delay_ostickspersec;			//代表OS可以延时的最少单位

	SysTick->CTRL|=SysTick_CTRL_TICKINT_Msk;   	//开启SYSTICK中断
	SysTick->LOAD=reload; 						//每1/delay_ostickspersec秒中断一次
	SysTick->CTRL|=SysTick_CTRL_ENABLE_Msk;   	//开启SYSTICK


//延时nus
//nus为要延时的us数.
void delay_us(u32 nus)

	u32 ticks;
	u32 told,tnow,tcnt=0;
	u32 reload=SysTick->LOAD;					//  LOAD的值
	ticks=nus*fac_us; 							  //  需要的节拍数
	tcnt=0;
	delay_osschedlock();					  	//  阻止OS调度,防止打断us延时
	told=SysTick->VAL;        				//  刚进入时的计数器值
	while(1)

		tnow=SysTick->VAL;
		if(tnow!=told)

			if(tnow<told)tcnt+=told-tnow;	//  这里注意一下SYSTICK是一个递减的计数器就可以了.
			else tcnt+=reload-tnow+told;
			told=tnow;
			if(tcnt>=ticks)break;				  //  时间超过/等于要延迟的时间,则退出.

	;
	delay_osschedunlock();						//恢复OS调度

//延时nms
//nms:要延时的ms数
void delay_ms(u16 nms)

	if(delay_osrunning&&delay_osintnesting==0)	//如果OS已经在跑了,并且不是在中断里面(中断里面不能任务调度)

		if(nms>=fac_ms)							//延时的时间大于OS的最少时间周期

   			delay_ostimedly(nms/fac_ms);		//OS延时

		nms%=fac_ms;							//OS已经无法提供这么小的延时了,采用普通方式延时

	delay_us((u32)(nms*1000));					//普通方式延时
总结
rt-thread移植到stm32的基本步骤。
以上是关于RT-Thread 移植到stm32的主要内容,如果未能解决你的问题,请参考以下文章