Cobbler 自动装机系统
Posted 范桂飓
tags:
篇首语:本文由小常识网(cha138.com)小编为大家整理,主要介绍了Cobbler 自动装机系统相关的知识,希望对你有一定的参考价值。
目录
文章目录
Cobbler
Cobbler 项目是在 2008 年由 RedHat 发布的网络安装服务器套件,支持大多数 Linux 发行版,包括:Red Hat、Fedora、CentOS、Debian、Ubuntu 和 SuSE,也支持网络安装 Windows。
Cobbler 的工作原理
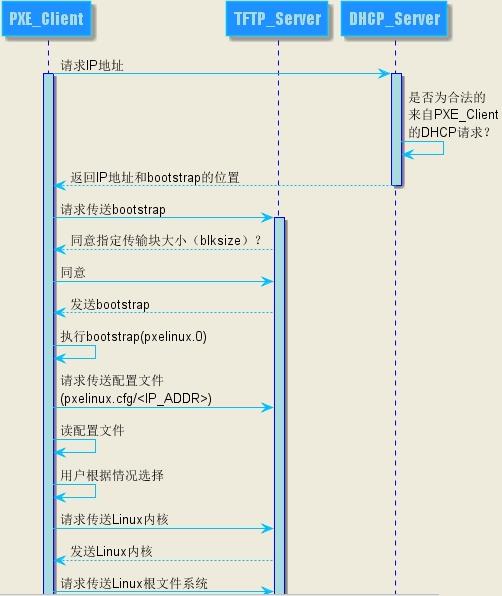
PXE 是由 Intel 开发的技术,支持通过网络来启动操作系统,也可以实现通过网络来批量的安装操作系统。Cobbler 正是基于 PXE 的二次封装,将多种安装参数封装到一个菜单当中。
另外,PXE 只支持 MBR 而不支持 UEFI,Cobbler 则同时支持 MBR 和 UEFI。
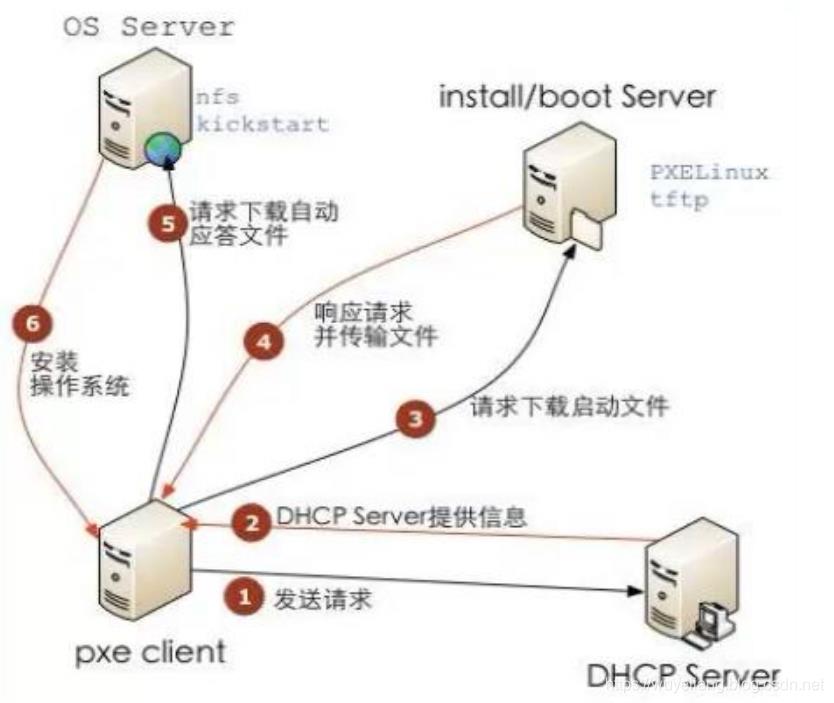
- 远程主机开机启动网络启动,开机后会广播给 DHCP 服务器,分配给远程主机一个 IP 地址。
- 拿到 IP 地址后,远程主机向 Cobbler Server 发送请求下载 OS 启动文件。
- Cobbler Server 告诉远程主机 OS 文件的下载路径,包括 TFTP Server 的 IP 地址和端口等。
- 远程主机到 TFTP Server 下载 OS 引导文件。
- 远程主机执行 OS 引导文件,加载信息和 menu.c32,启动选择菜单,选择要安装的 OS,然后向 Cobbler Server 请求 kickstart 文件和OS 镜像文件。
- 远程主机加载 kickstart 文件,开始安装 OS。
Cobbller 提供了 CLI 和 WEB 两种安装方式,使用起来更加的友好。
cobbler check     # 核对当前设置是否有问题
cobbler list      # 列出所有的 Cobbler 元素
cobbler report    # 列出元素的详细信息
cobbler sync      # 同步配置到数据目录,更改配置最好都要执行下
cobbler reposync  # 同步 YUM 仓库
cobbler distro    # 看导入的发行版系统信息
cobbler distro list # 查看存在几套安装系统
cobbler system    # 查看添加的系统信息
cobbler profile   # 查看配置信息
cobbler profile list  # 查看安装系统的启动菜单项
安装 Cobbler
# 关闭防火墙
$ systemctl disable firewalld.service && systemctl stop firewalld.service && systemctl status firewalld.service

$ yum install epel-release -y
$ yum install cobbler -y
$ yum install dhcp -y

$ systemctl enable cobblerd && systemctl start cobblerd && systemctl status cobblerd
$ systemctl enable tftp && systemctl start tftp && systemctl status tftp
$ systemctl enable httpd && systemctl start httpd && systemctl status httpd
配置 Cobbler
$ vi /etc/cobbler/settings +384
...
server 172.27.10.171  # Cobbler Server IP address


$ vi /etc/cobbler/settings +275
...
next_server 172.27.10.171  # TFTP 等 Next Server IP address


$ openssl passwd -1 <your-password-here>
$1$IIOrD77Q$LLsUPbSkOkE9g7F218SCU1
$ vi /etc/cobbler/settings +92
...
default_password_crypted: "$1$IIOrD77Q$LLsUPbSkOkE9g7F218SCU1"  # 为新安装的主机设置一个默认的用户口令


$ vi /etc/cobbler/settings +240
...
manage_dhcp: 1 # 由 Cobbler 来管理 DHCP


$ vi /etc/cobbler/dhcp.template
...
subnet 172.27.10.0 netmask 255.255.255.0
     option subnet-mask         255.255.255.0;
     range dynamic-bootp        172.27.10.120 172.27.10.127;
     default-lease-time         21600;
     max-lease-time             43200;
     next-server                $next_server;
...


$ systemctl restart cobblerd
$ cobbler sync
检查目前的环境中是否还缺少哪些东西:
$ cobbler check

The following are potential configuration items that you may want to fix:

1 : SELinux is enabled. Please review the following wiki page for details on ensuring cobbler works correctly in your SELinux environment:
    https://github.com/cobbler/cobbler/wiki/Selinux
2 : Some network boot-loaders are missing from /var/lib/cobbler/loaders.  If you only want to handle x86/x86_64 netbooting, you may ensure that you have installed a *recent* version of the syslinux package installed and can ignore this message entirely.  Files in this directory, should you want to support all architectures, should include pxelinux.0, menu.c32, elilo.efi, and yaboot.
3 : enable and start rsyncd.service with systemctl
4 : debmirror package is not installed, it will be required to manage debian deployments and repositories
5 : ksvalidator was not found, install pykickstart
6 : fencing tools were not found, and are required to use the (optional) power management features. install cman or fence-agents to use them
修复以上问题:
# 1.
# 关闭 SELinux
$ sudo setenforce 0
$ sudo sed -i 's/^SELINUX=enforcing/SELINUX=disabled/' /etc/selinux/config

# 2.
$ yum install syslinux -y

# 3.
$ systemctl start rsyncd.service && systemctl enable rsyncd.service && systemctl status rsyncd.service

# 4.
$ yum install debmirror -y
$ vi /etc/debmirror.conf
...
# @dists="sid";
# @arches="i386";

# 5.
$ yum install pykickstart -y

# 6.
$ yum install fence-agents -y
为 Rethat 系发行版 Linux 制作 YUM 源:
$ mkdir /mnt/centos7
$ mount -t iso9660 -o loop CentOS-7-x86_64-Minimal-2003.iso /mnt/centos7
$ vi /etc/fstab
...
/root/CentOS-7-x86_64-Minimal-2003.iso /mnt/centos7 iso9660 defaults,loop 0 0

$ cobbler import --path=/mnt/centos7 --name=centos7
$ ll /var/www/cobbler/ks_mirror/
自定义 KickStart 文件:
$ cd /var/lib/cobbler/kickstarts/
$ cp /root/anaconda-ks.cfg  centos7.cfg

$ cat centos7.cfg
#version=DEVEL
# System authorization information
auth --enableshadow --passalgo=sha512

# Use CDROM installation mediaurl
--url=$tree	# 可以指定详细路径也可以使用 $tree 变量来进行替代

# Use graphical install
reboot	# 安装成功之后可以重启
text	# 采用字符界面进行安装

# Run the Setup Agent on first boot
firstboot --enable
ignoredisk --only-use=sda

# Keyboard layouts
keyboard --vckeymap=us --xlayouts='us'

# System language
lang en_US.UTF-8

# Network information
network  --bootproto=dhcp --device=ens33 --onboot=yes --ipv6=auto --activate
network  --hostname=localhost.localdomain

selinux --disabled # 禁用 SElinux 也可以禁用防火墙

# Root password
# 设置 root 用户的初始密码
rootpw --iscrypted $6$BlwRFg7fgO1i8eQa$F9yjtePt1aOnsIwmNO7mexdnBOsJTVSSyTnwp2hS2lSY87thmNylXw43.Ycj6lfY1wk2NmoQjO/WzEEGBUlZt.
$1$IIOrD77Q$LLsUPbSkOkE9g7F218SCU1

# System services
services --disabled="chronyd"

# System timezone
timezone Asia/Shanghai --isUtc --nontp

# X Window System configuration information
xconfig  --startxonboot

# System bootloader configuration
bootloader --append=" crashkernel=auto" --location=mbr --boot-drive=sda

# Partition clearing information
zerombr	# 清除 MBR 分区
clearpart --all # 清除系统中原有的分区

# Disk partitioning information
part / --fstype="xfs" --ondisk=sda --size=56320
part swap --fstype="swap" --ondisk=sda --size=2000
part /app --fstype="xfs" --ondisk=sda --size=51200
part /boot --fstype="xfs" --ondisk=sda --size=1024

%packages
@^graphical-server-environment
@base
@core
@desktop-debugging
@dial-up
@fonts
@gnome-desktop
@guest-agents
@guest-desktop-agents
@hardware-monitoring
@input-methods
@internet-browser
@multimedia
@print-client
@x11
kexec-tools

%end


%post
# 删除旧的 YUM 仓库,可根据实际情况稍作调整。
rm -rf /etc/yum.repos.d/*
cat > /etc/yum.repos.d/base.repo <<EOF
[base]
name=base
baseurl=file:///misc/cd
gpgcheck=0
EOF
%end

# 查看已经导入的系统
$ cobbler distro list
   centos7-x86_64

# 关联应答文件
$ cobbler profile add \\
	--name=centos7-x86_64 \\
	--distro=centos7-x86_64 \\
	--kickstart=/var/lib/cobbler/kickstarts/centos7.cfg
# --name 我们需要添加的启动菜单的名字
# --distro 我们自定制的 KS 文件关联的 OS 名称
# --kickstart 我们自定制的 KS 文件的路径

# 查看对应的应答文件
$ cobbler profile list
   centos7-x86_64
查看/编辑启动菜单:
$ cat /var/lib/tftpboot/pxelinux.cfg/default

DEFAULT menu
PROMPT 0
MENU TITLE Cobbler | http://cobbler.github.io/
TIMEOUT 200
TOTALTIMEOUT 6000
ONTIMEOUT local

LABEL local
        MENU LABEL (local)
        MENU DEFAULT
        LOCALBOOT -1

LABEL centos7-x86_64
        kernel /images/centos7-x86_64/vmlinuz
        MENU LABEL centos7-x86_64
        append initrd=/images/centos7-x86_64/initrd.img ksdevice=bootif lang=  kssendmac text  ks=http://172.27.10.171/cblr/svc/op/ks/profile/centos7-x86_64
        ipappend 2


MENU end
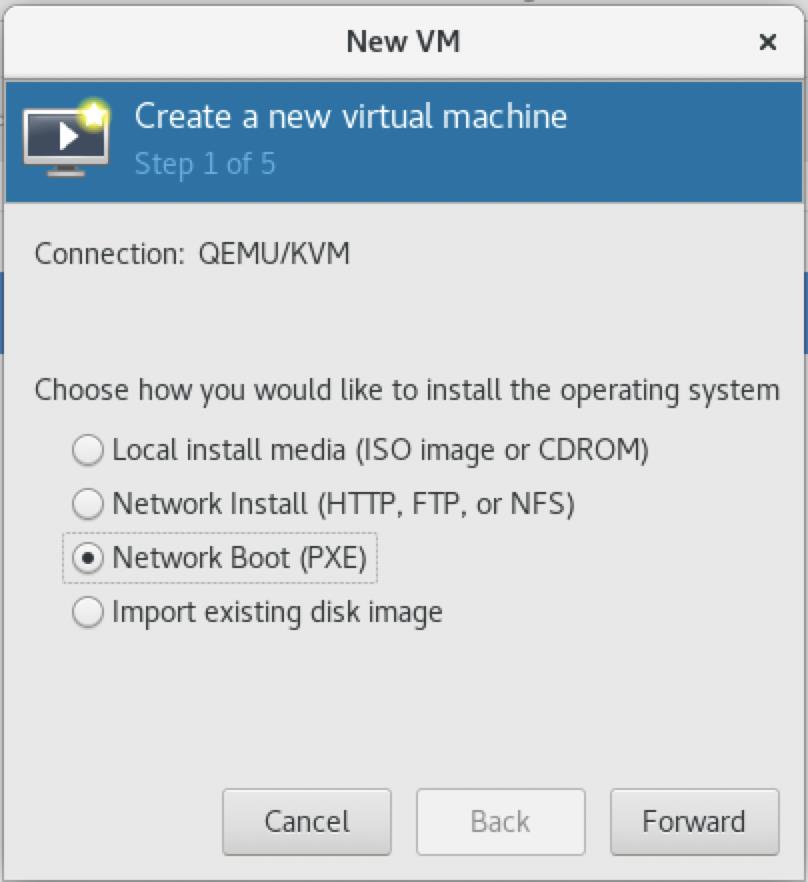
测试
使用 VM 环境来进行测试。
以上是关于Cobbler 自动装机系统的主要内容,如果未能解决你的问题,请参考以下文章