使用 Yarp 做网关
Posted dotNET跨平台
tags:
篇首语:本文由小常识网(cha138.com)小编为大家整理,主要介绍了使用 Yarp 做网关相关的知识,希望对你有一定的参考价值。
资料
GitHub: https://github.com/microsoft/reverse-proxy
YARP 文档:https://microsoft.github.io/reverse-proxy/articles/getting-started.html
主动和被动健康检查 : https://microsoft.github.io/reverse-proxy/articles/dests-health-checks.html#active-health-check
gRpc:https://microsoft.github.io/reverse-proxy/articles/grpc.html
实战项目概览
Yarp Gateway 示意图
共享类库
创建一个 .Net6.0 的类库,项目名称:Artisan.Shared.Hosting.AspNetCore, 其它项目公用方法放在这个项目。
Serilog 日志
需要的包:
<PackageReference Include="Serilog.AspNetCore" Version="5.0.0" />
    <PackageReference Include="Serilog.Sinks.Async" Version="1.5.0" />
    <PackageReference Include="Serilog.Sinks.Console" Version="4.0.1" />
    <PackageReference Include="Serilog.Sinks.File" Version="5.0.0" />
代码清单:Artisan.Shared.Hosting.AspNetCore/SerilogConfigurationHelper.cs
using Serilog;
using Serilog.Events;

namespace Artisan.Shared.Hosting.AspNetCore;

public static class SerilogConfigurationHelper
    public static void Configure(string applicationName)

        Log.Logger = new LoggerConfiguration()#if DEBUG
            .MinimumLevel.Debug()#else
            .MinimumLevel.Information()#endif
            .MinimumLevel.Override("Microsoft", LogEventLevel.Information)
            .MinimumLevel.Override("Microsoft.EntityFrameworkCore", LogEventLevel.Warning)
            .Enrich.FromLogContext()
            .Enrich.WithProperty("Application", $"applicationName")
            .WriteTo.Async(c => c.File($"AppDomain.CurrentDomain.BaseDirectory/Logs/logs.txt"))
            .WriteTo.Async(c => c.Console())
            .CreateLogger();
创建服务
IdentityService
创建一个【AspNetCore Web Api】项目,项目名称为:IdentityService
Program
代码清单:IdentityService/Program.cs
using Artisan.Shared.Hosting.AspNetCore;
using Microsoft.OpenApi.Models;
using Serilog;

namespace IdentityService;

public class Program
    public static int Main(string[] args)

        var assemblyName = typeof(Program).Assembly.GetName().Name;

        SerilogConfigurationHelper.Configure(assemblyName);

        try

            Log.Information($"Starting assemblyName.");

            var builder = WebApplication.CreateBuilder(args);
            builder.Host
                .UseSerilog();

            builder.Services.AddControllers(); //Web MVC
            builder.Services.AddSwaggerGen(options =>

                options.SwaggerDoc("v1", new OpenApiInfo  Title = "Identity Service", Version = "v1" );
                options.DocInclusionPredicate((docName, description) => true);
                options.CustomSchemaIds(type => type.FullName);
            );

            var app = builder.Build();            if (app.Environment.IsDevelopment())

                app.UseDeveloperExceptionPage();

            app.UseRouting();
            app.UseSwagger();
            app.UseSwaggerUI();
            app.UseEndpoints(endpoints =>

                endpoints.MapControllers(); //Web MVC
            );

            app.Run();            return 0;

        catch (Exception ex)

            Log.Fatal(ex, $"assemblyName terminated unexpectedly!");            return 1;

        finally

            Log.CloseAndFlush();
其中:
SerilogConfigurationHelper.Configure(assemblyName);是配置 Serilog 日志:引用上面创建的共享项目:【Artisan.Shared.Hosting.AspNetCore】
User 实体
代码清单:IdentityService/Models/User.cs
public class User

        public int Id  get; set;
        public string Name  get; set;
UserController
代码清单:IdentityService/Controlles/UserController.cs
using Microsoft.AspNetCore.Mvc;
using IdentityService.Models;
using System.Threading.Tasks;

namespace IdentityService.Controllers

    [ApiController]
    [Route("/api/identity/users")]
    public class UserController : Controller

        private readonly ILogger<UserController> _logger;

        private static List<User> Users = new List<User>()

            new User() Id = 1, Name = "Jack",
            new User() Id = 2, Name = "Tom",
            new User() Id = 3, Name = "Franck",
            new User() Id = 4, Name = "Tony",
        ;

        public UserController(ILogger<UserController> logger)

            _logger = logger;


        [HttpGet]
        public async Task<List<User>>  GetAllAsync()
                    return await Task.Run(() =>

                return Users;
            );


        [HttpGet]
        [Route("id")]
        public async Task<User> GetAsync(int id)
                    return await Task.Run(() =>

                var entity = Users.FirstOrDefault(p => p.Id == id);                if (entity == null)

                    throw new Exception($"未找到用户:id");
                                return entity;
            );


        [HttpPost]
        public async Task<User> CreateAsync(User user)
                    return await Task.Run(() =>

                Users.Add(user);                return user;
            );


        [HttpPut]
        [Route("id")]
        public async Task<User> UpdateAsync(int id, User user)
                    return await Task.Run(() =>

                var entity = Users.FirstOrDefault(p => p.Id == id);                if(entity == null)

                    throw new Exception($"未找到用户:id");

                entity.Name = user.Name;                return entity;
            );


        [HttpDelete]
        [Route("id")]
        public async Task<User> DeleteAsync(int id)
                    return await Task.Run(() =>

                var entity = Users.FirstOrDefault(p => p.Id == id);                if (entity == null)

                    throw new Exception($"未找到用户:id");

                Users.Remove(entity);                return entity;
            );
OrderService
创建一个【AspNetCore Web Api】项目,项目名称为:OrderService
Program
代码清单:OrderService/Program.cs
using Artisan.Shared.Hosting.AspNetCore;
using Microsoft.OpenApi.Models;
using Serilog;

namespace OrderService;
public class Program
    public static int Main(string[] args)

        var assemblyName = typeof(Program).Assembly.GetName().Name;

        SerilogConfigurationHelper.Configure(assemblyName);

        try

            Log.Information($"Starting assemblyName.");

            var builder = WebApplication.CreateBuilder(args);
            builder.Host
                .UseSerilog();

            builder.Services.AddControllers(); //Web MVC
            builder.Services.AddSwaggerGen(options =>

                options.SwaggerDoc("v1", new OpenApiInfo  Title = "Order Service", Version = "v1" );
                options.DocInclusionPredicate((docName, description) => true);
                options.CustomSchemaIds(type => type.FullName);
            );

            var app = builder.Build();            if (app.Environment.IsDevelopment())

                app.UseDeveloperExceptionPage();

            app.UseRouting();
            app.UseSwagger();
            app.UseSwaggerUI();
            app.UseEndpoints(endpoints =>

                endpoints.MapControllers(); //Web MVC
            );

            app.Run();            return 0;

        catch (Exception ex)

            Log.Fatal(ex, $"assemblyName terminated unexpectedly!");            return 1;

        finally

            Log.CloseAndFlush();
Order 实体
代码清单:OrderService/Models/Order.cs
public class Order

        public string Id  get; set;
        public string Name  get; set;
OrderController
代码清单:OrderService/Controlles/OrderController.cs
using Microsoft.AspNetCore.Mvc;
using OrderService.Models;
using System.Diagnostics;

namespace OrderService.Controllers

    [ApiController]
    [Route("/api/ordering/orders")]
    public class OrderController : Controller

        private readonly ILogger<OrderController> _logger;

        private static List<Order> Orders = new List<Order>()

            new Order() Id = "1", Name = "Order #1",
            new Order() Id = "2", Name = "Order #2",
            new Order() Id = "3", Name = "Order #3",
            new Order() Id = "4", Name = "Order #4",
        ;

        public OrderController(ILogger<OrderController> logger)

            _logger = logger;


        [HttpGet]
        public async Task<List<Order>> GetAllAsync()
                    return await Task.Run(() =>
                            return Orders;
            );


        [HttpGet]
        [Route("id")]
        public async Task<Order> GetAsync(string id)
                    return await Task.Run(() =>

                var entity = Orders.FirstOrDefault(p => p.Id == id);                if (entity == null)

                    throw new Exception($"未找到订单:id");
                                return entity;
            );


        [HttpPost]
        public async Task<Order> CreateAsync(Order order)
                    return await Task.Run(() =>

                Orders.Add(order);                return order;
            );


        [HttpPut]
        [Route("id")]
        public async Task<Order> UpdateAsync(string id, Order Order)
                    return await Task.Run(() =>

                var entity = Orders.FirstOrDefault(p => p.Id == id);                if (entity == null)

                    throw new Exception($"未找到订单:id");

                entity.Name = Order.Name;                return entity;
            );


        [HttpDelete]
        [Route("id")]
        public async Task<Order> DeleteAsync(string id)
                    return await Task.Run(() =>

                var entity = Orders.FirstOrDefault(p => p.Id == id);                if (entity == null)

                    throw new Exception($"未找到订单:id");

                Orders.Remove(entity);                return entity;
            );
创建网关
创建一个【AspNetCore 空】项目,项目名称为:YarpGateway
引用包
<PackageReference Include="Yarp.ReverseProxy" Version="1.1.0" />添加 Yarp
代码清单:YarpGateway/Program.cs
using Artisan.Shared.Hosting.AspNetCore;
using Serilog;
using YarpGateway.Extensions;

namespace YarpGateway;

public class Program
    public static  int Main(string[] args)

        var assemblyName = typeof(Program).Assembly.GetName().Name;

        SerilogConfigurationHelper.Configure(assemblyName);

        try

            Log.Information($"Starting assemblyName.");

            var builder = WebApplication.CreateBuilder(args);
            builder.Host
                .UseSerilog()
                .AddYarpJson(); // 添加Yarp的配置文件

            // 添加Yarp反向代理ReverseProxy
            builder.Services.AddReverseProxy()
                .LoadFromConfig(builder.Configuration.GetSection("ReverseProxy"));

            var app = builder.Build();

            app.UseRouting();
            app.UseEndpoints(endpoints =>
                            // 添加Yarp终端Endpoints
                endpoints.MapReverseProxy();
            );

            app.Run();            return 0;

        catch (Exception ex)

            Log.Fatal(ex, $"assemblyName terminated unexpectedly!");            return 1;

        finally

            Log.CloseAndFlush();
其中:
方法AddYarpJson() 是为了把 Yarp 的有关配置从appsetting.json独立处理,避免配置文件很长很长,其代码如下:
代码清单:YarpGateway/Extensions/GatewayHostBuilderExtensions.cs
namespace YarpGateway.Extensions;

public static class GatewayHostBuilderExtensions
    public const string AppYarpJsonPath = "yarp.json";

    public static IHostBuilder AddYarpJson(
        this IHostBuilder hostBuilder,        bool optional = true,        bool reloadOnChange = true,        string path = AppYarpJsonPath)
            return hostBuilder.ConfigureAppConfiguration((_, builder) =>

            builder.AddJsonFile(
                    path: AppYarpJsonPath,
                    optional: optional,
                    reloadOnChange: reloadOnChange
                )
                .AddEnvironmentVariables();
        );
其中:
reloadOnChange = true 保证配置文件修改时, Yarp 能重新读取配置文件。
添加 Yarp配置文件 : yarp.json
记得保证文件的属性:
复制到输出目录:如果内容较新则复制
生成操作:内容
代码清单:YarpGateway/yarp.json
  "ReverseProxy":     "Routes":       "Identity Service":         "ClusterId": "identityCluster",        "Match":           "Path": "/api/identity/**everything"

      ,      "Ordering Service":         "ClusterId": "orderingCluster",        "Match":           "Path": "/api/ordering/**everything"


    ,    "Clusters":       "identityCluster":         "Destinations":           "destination1":             "Address": "http://localhost:7711"


      ,      "orderingCluster":         "Destinations":           "destination1":             "Address": "http://localhost:7721"
                    "destination2":             "Address": "http://localhost:7722"
运行
Yarp Gateway 示意图:
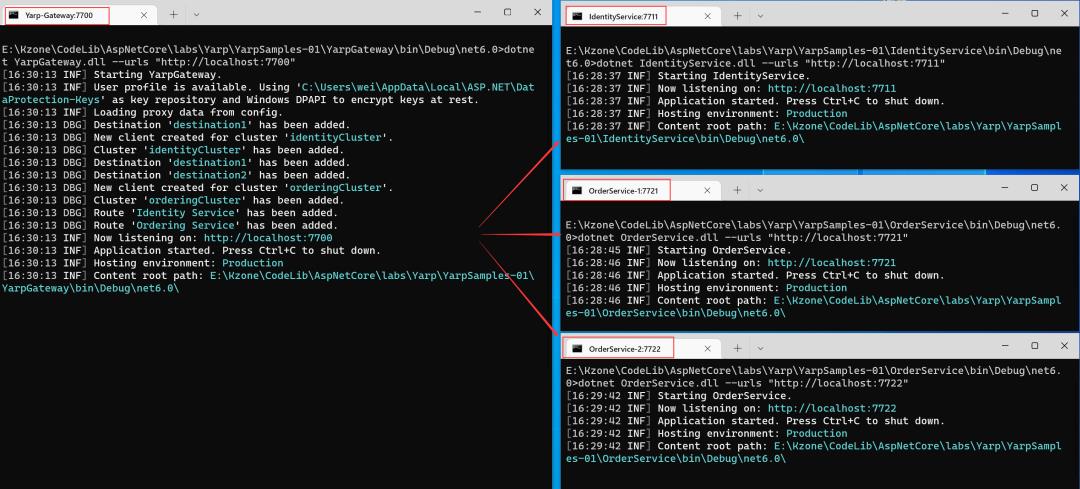
启动网关
在项目的bin/net6.0目录下打开 CMD,执行如下命令启动网关:
dotnet YarpGateway.dll --urls "http://localhost:7700"监听端口:7700
IdentityService
在项目的bin/net6.0目录下打开 CMD,执行如下命令启动 Web API 服务:
dotnet IdentityService.dll --urls "http://localhost:7711"监听端口:7711
OrderService
开启两个 OrderServcie 的进程,
在 bin/net6.0目录下打开 CMD,执行如下命令启动 Web API 服务:
第一个监听端口:7721
dotnet OrderService.dll --urls "http://localhost:7721"第二个监听端口:7722
dotnet OrderService.dll --urls "http://localhost:7722"测试
路由功能
打开 PostMan,创建调用服务的各种请求。
IdentityService
创建 GET 请求调用网关: http://localhost:7700/api/identity/users
请求会被转发到 IdentityService的集群节点:http://localhost:7711/api/identity/users
OrderService
创建 GET 请求调用网关: http://localhost:7700/api/ordering/orders
请求会被转发到 OrderService 的集群中如下某个节点中的一个:
http://localhost:7721/api/ordering/orders
http://localhost:7722/api/ordering/orders
支持请求类型
Tips:
由于是两个服务,每个服务的进程都是独立的,数据也是独立,数据并没有共享,故测试结果可能不是你所预期的,比如:
第一步:增加数据,这次是由第一个服务处理的;
第二步:查询数据,如果这次查询是由第二个服务器处理的话,就会找不到刚才新增的数据。
当然在实际开发中,我们的数据都是从同一个数据库中读取,不会出现数据不一致的情况。
HTTP 1.0 / 2.0
创建 GET 请求: http://localhost:7700/api/ordering/orders/1
创建 POST 请求: http://localhost:7700/api/ordering/orders 参数:
    "id":"10",
    "name":"Order #100"
创建 PUT 请求: http://localhost:7700/api/ordering/orders/10 参数:
    "id":"10",
    "name":"Order #100-1"
创建 DELETE 请求: http://localhost:7700/api/ordering/orders/10
结论
上述4种 HTTP 请求都支持。
gRpc
待测试...
结论
支持 gRpc
新增集群服务节点
Yarp 支持动态添加服务集群服务节点,只要在配置文件 yarp.json, 添加新的服务配置,Yarp会自动加载新的服务节点:
代码清单:yarp.json
  "ReverseProxy":
    "Routes":
      "Identity Service":
        "ClusterId": "identityCluster",
        "Match":
          "Path": "/api/identity/**everything"

      ,
       ...    ,
     "Clusters":
          "orderingCluster":
            "Destinations":
              "destination1":
                "Address": "http://localhost:7721"
              ,
    +          "destination2":
    +            "Address": "http://localhost:7722"
    +
添加上述配置后,会看到如下日志信息:
14:51:11 DBG] Destination 'destination2' has been added.
[14:51:11 DBG] Existing client reused for cluster 'orderingCluster'.
结论
Yarp 会重新加载配置,使得新增的集群新服务节点生效。
删除集群服务节点
删除集群下的某个服务节点
-          "destination2":
-            "Address": "http://localhost:7722"-
Yarp 会重新加载配置,该集群服务节点被删除。
[14:41:26 DBG] Destination 'destination2' has been removed.
[14:41:26 DBG] Existing client reused for cluster 'orderingCluster'.
结论
Yarp 会重新加载配置,使得被删除的集群服务节点配置失效。
某集群节点因故障离线
把监听7722端口的服务终止,请求还是会发送到这个端口程序上!!!
结论
Yarp 默认不会做健康检查
相关:
主动和被动健康检查 : https://microsoft.github.io/reverse-proxy/articles/dests-health-checks.html#active-health-check
完成上一节的练习后,还遗留了一个问题:
如何通过 YarpGateway 访问内部服务的Swagger呢?
问题:无法访问内部服务 Swagger
外部访问 IdentityService 和 OrderService 是通过 网关:YarpGateway 访问的,使用者这个并不知道这个两个服务的具体地址,也就是不知道如何访问它们的 Swagger,那么:
如何通过 YarpGateway 访问这两个服务的Swagger呢?
实现原理
使用网关内部服务的 Swagger 信息,其地址为:
http://ip:port/swagger/v1/swagger.json例如,OrderService 服务的 Swagger 信息为:
http://localhost:7721/swagger/v1/swagger.json在网关中使用内部服务的 Swagger 终点,再注册 Swagger 终点。
访问 OrderService 服务的 Swagger 信息地址:http://localhost:7711/swagger/v1/swagger.json
返回如下信息:(只列举部分数据)
  "openapi": "3.0.1",
  "info":
    "title": "Identity Service",
    "version": "v1"
  ,
  "paths":
    "/api/identity/users":
      "get":
        "tags": [
          "User"
        ],
        "responses":
          "200":
            "description": "Success",
            "content":
              "text/plain":
                "schema":
                  "type": "array",
                  "items":
                    "$ref": "#/components/schemas/IdentityService.Models.User"


              ,
              "application/json":
                "schema":
                  "type": "array",
                  "items":
                    "$ref": "#/components/schemas/IdentityService.Models.User"


              ,
              "text/json":
                "schema":
                  "type": "array",
                  "items":
                    "$ref": "#/components/schemas/IdentityService.Models.User"


      ,

     .....
内部服务支持跨域
网关要请求内部服务的Swagger 信息,这是跨域请求,所以要求两个服务支持对网关的跨域请求。
在IdentityService 和 OrderService 项目中都做如下修改:
添加跨域配置
在 appsettins.json 文件中添加跨域配置:
  "App":
    "CorsOrigins": "http://localhost:7700"      // 网关地址,支持网关的Yarp gatewary跨域请求
其中,这个地址http://localhost:7700 就是网关的地址。
支持跨域
修改 Program.cs文件:
代码清单:IdentityService/Program.cs
代码清单:OrderService/Program.cs
......
            IConfiguration configuration = builder.Configuration;

            builder.Services.AddCors(options =>

                options.AddDefaultPolicy(builder =>

                    builder
                        .WithOrigins(
                            configuration["App:CorsOrigins"]
                                .Split(",", StringSplitOptions.RemoveEmptyEntries)
                                .ToArray()
                        )
                        .SetIsOriginAllowedToAllowWildcardSubdomains()
                        .AllowAnyHeader()
                        .AllowAnyMethod()
                        .AllowCredentials();
                );
            );
......

            app.UseRouting();
 +          app.UseCors();  // 添加跨域支持
            app.UseSwagger();
            app.UseSwaggerUI();
.....
网关添加 Swagger
在网关项目【YarpGateway】中做如下修改:
代码清单:YarpGateway/Program.cs
builder.Services.AddControllers(); //Web MVC
            ......
            builder.Services.AddSwaggerGen(options =>

                options.SwaggerDoc("v1", new OpenApiInfo

                    Title = "Gateway", Version = "v1"
                );
                options.DocInclusionPredicate((docName, description) => true);
                options.CustomSchemaIds(type => type.FullName);
            );

            ......            // 添加内部服务的Swagger终点
            app.UseSwaggerUIWithYarp();            //访问网关地址,自动跳转到 /swagger 的首页
            app.UseRewriter(new RewriteOptions()
                // Regex for "", "/" and "" (whitespace)
                .AddRedirect("^(|\\\\|\\\\s+)$", "/swagger"));

            app.UseRouting();
其中,调用方法 app.UseSwaggerUIWithYarp(); 的目的是:添加内部服务的Swagger终点,其代码如下:
代码清单:YarpGateway/Extensions/YarpSwaggerUIBuilderExtensions.cs
using Yarp.ReverseProxy.Configuration;

namespace YarpGateway.Extensions;
public static class YarpSwaggerUIBuilderExtensions
    public static IApplicationBuilder UseSwaggerUIWithYarp(this IApplicationBuilder app)

        var serviceProvider = app.ApplicationServices;

        app.UseSwagger();
        app.UseSwaggerUI(options =>

            var configuration = serviceProvider.GetRequiredService<IConfiguration>();
            var logger = serviceProvider.GetRequiredService<ILogger<Program>>();
            var proxyConfigProvider = serviceProvider.GetRequiredService<IProxyConfigProvider>();
            var yarpConfig = proxyConfigProvider.GetConfig();

            var routedClusters = yarpConfig.Clusters
                .SelectMany(t => t.Destinations,
                    (clusterId, destination) => new  clusterId.ClusterId, destination.Value );

            var groupedClusters = routedClusters
                .GroupBy(q => q.Value.Address)
                .Select(t => t.First())
                .Distinct()
                .ToList();

            foreach (var clusterGroup in groupedClusters)

                var routeConfig = yarpConfig.Routes.FirstOrDefault(q =>
                    q.ClusterId == clusterGroup.ClusterId);                if (routeConfig == null)

                    logger.LogWarning($"Swagger UI: Couldn't find route configuration for clusterGroup.ClusterId...");                    continue;


                options.SwaggerEndpoint($"clusterGroup.Value.Address/swagger/v1/swagger.json", $"routeConfig.RouteId API");
                options.OAuthClientId(configuration["AuthServer:SwaggerClientId"]);
                options.OAuthClientSecret(configuration["AuthServer:SwaggerClientSecret"]);

        );        return app;
关键代码:
options.SwaggerEndpoint($"clusterGroup.Value.Address/swagger/v1/swagger.json", $"routeConfig.RouteId API");通过 IProxyConfigProvider 得到内部服务的信息,如下图所示:
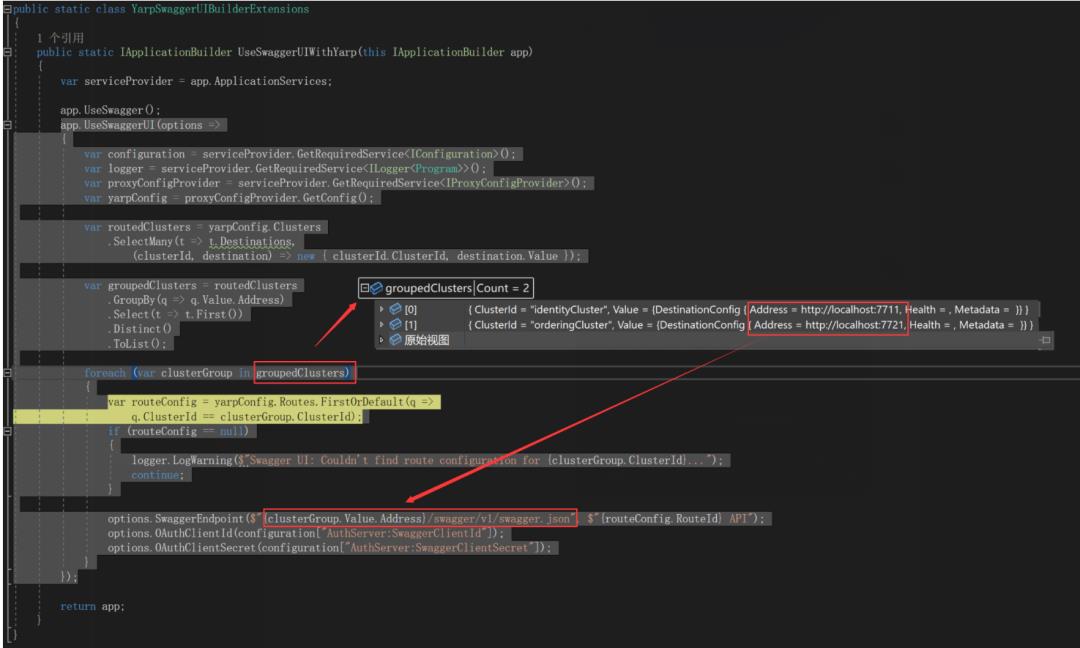
然后,拼接出内部服务的 Swagger 信息地址,
$"clusterGroup.Value.Address/swagger/v1/swagger.json"最终得到两个服务的Swagger信息地址:
IdentityServer 的 Swagger 信息地址:
http://localhost:7711/swagger/v1/swagger.jsonOrderService 的 Swagger 信息地址:
http://localhost:7721/swagger/v1/swagger.json最后,根据信息添加Swagger终点:
options.SwaggerEndpoint(
        $"clusterGroup.Value.Address/swagger/v1/swagger.json",
        $"routeConfig.RouteId API");
其中,
routeConfig.RouteId: Identity Service 或 Ordering Service
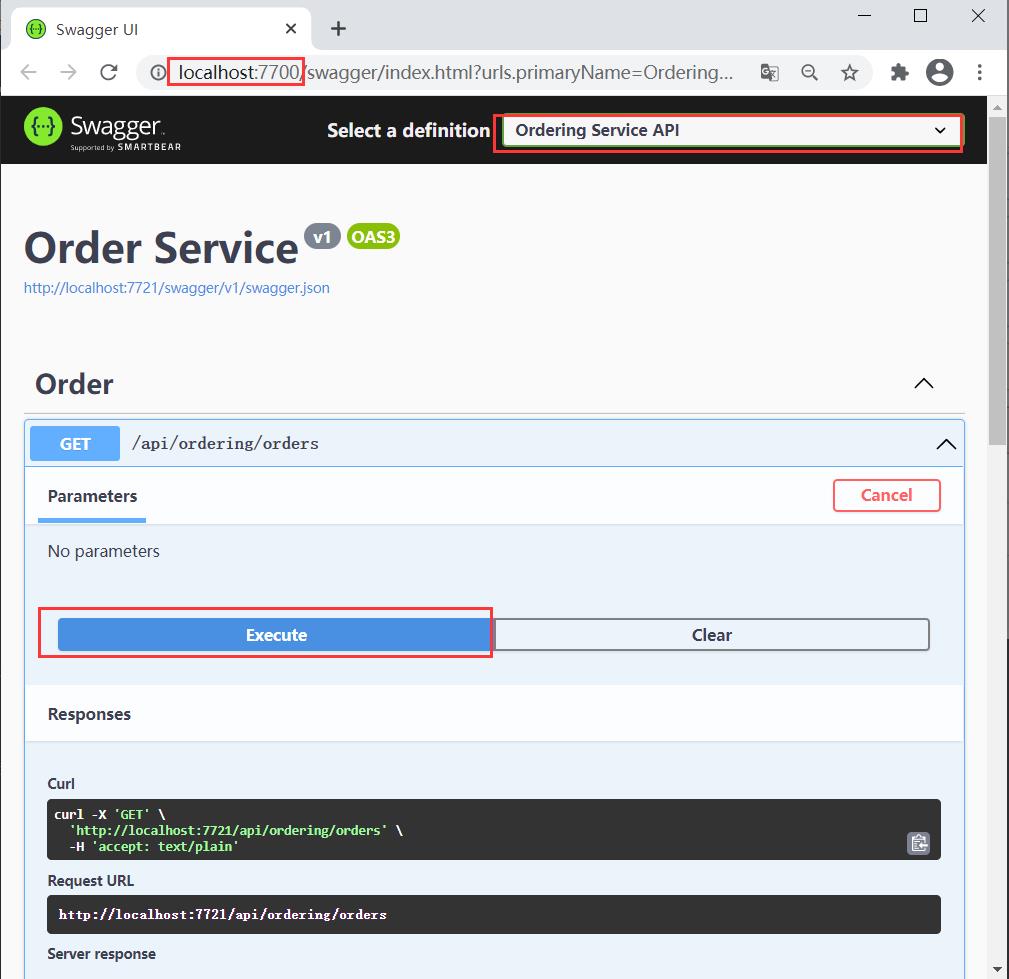
访问网关 Swagger
访问网关地址:http://localhost:7700
自动跳转到其 Swagger首页:http://localhost:7700/swagger/index.html
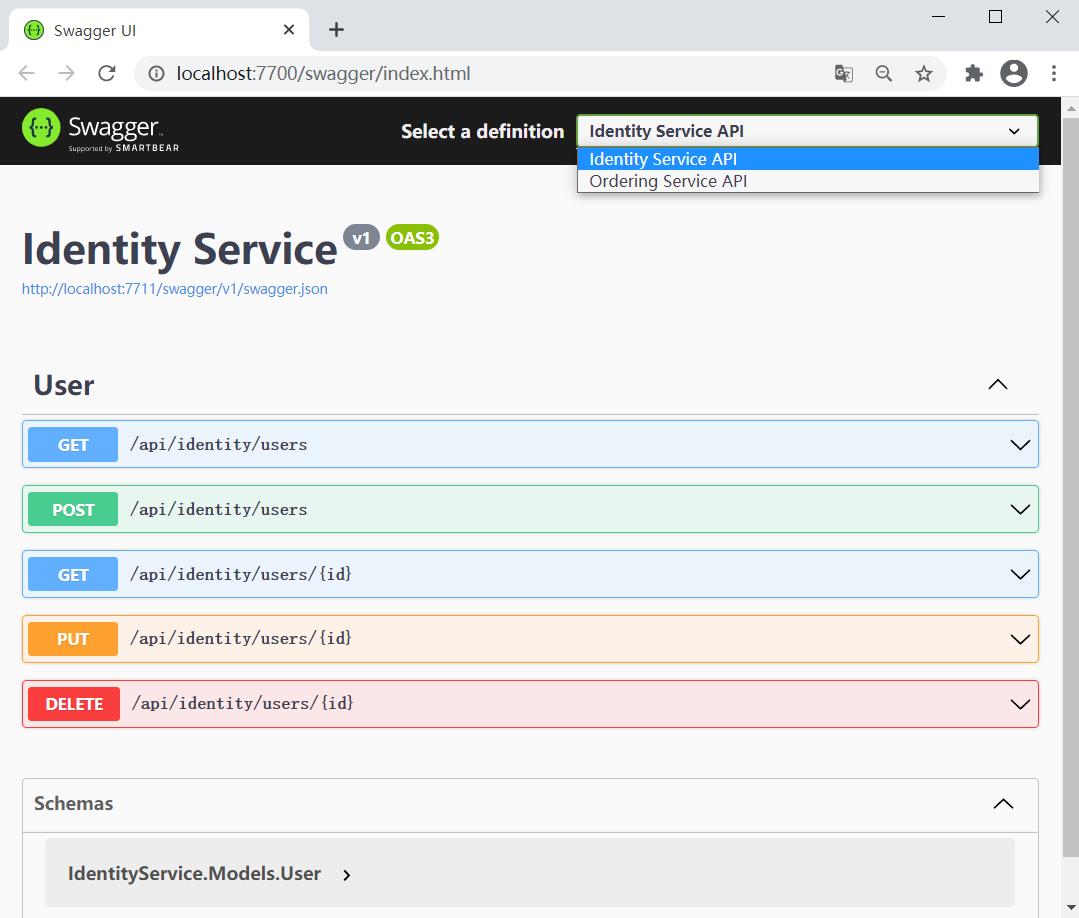
右上角有个下拉框,可以选择不同的服务的Swagger,这里切换到 OrderService 的Swagger,如下图所示:
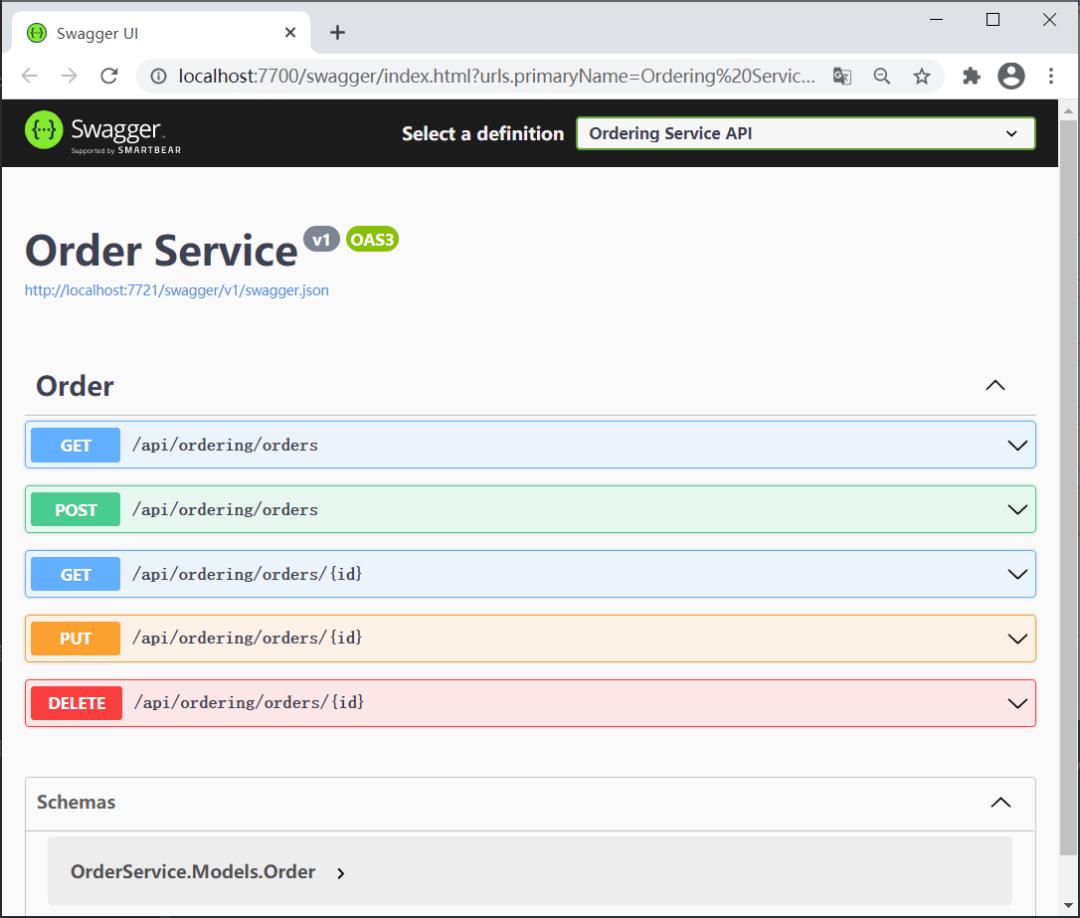
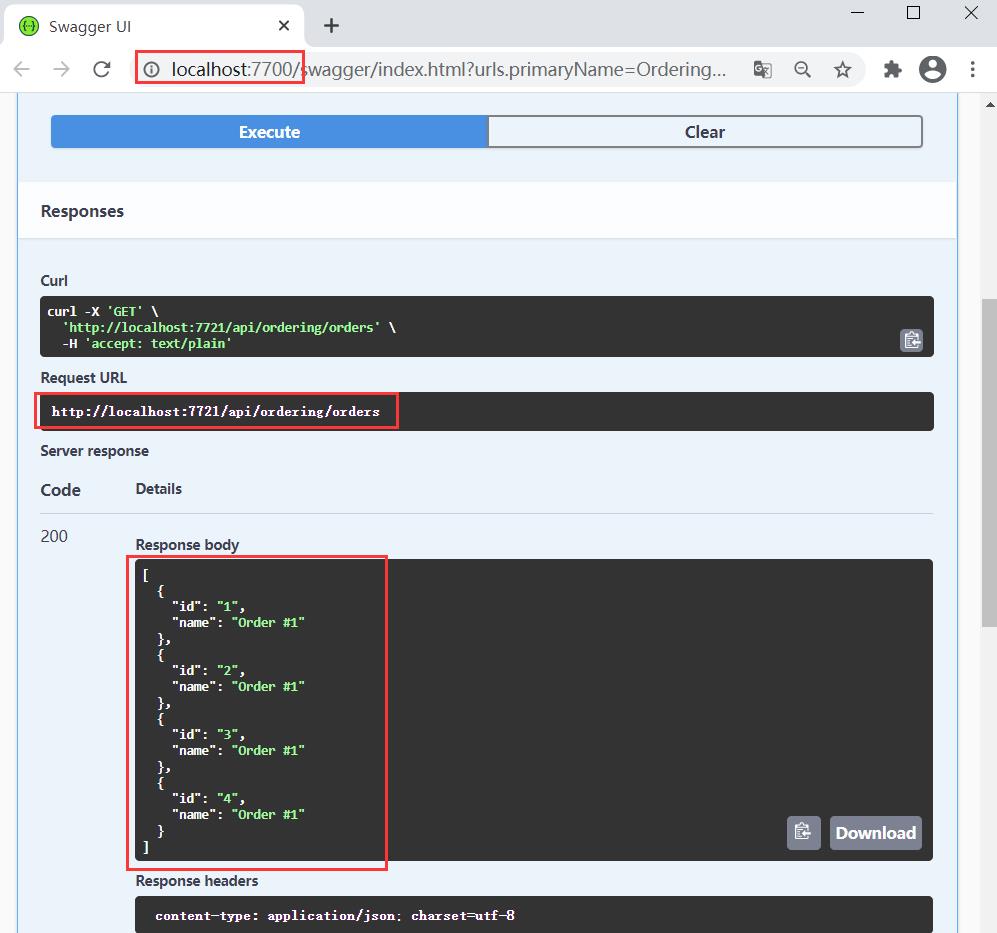
在网关 Swagger 调用服务接口
可以在网关 Swagger 调用内部服务接口,如下图所示:
返回:
 开发者涨薪指南
 48位大咖的思考法则、工作方式、逻辑体系
以上是关于使用 Yarp 做网关的主要内容,如果未能解决你的问题,请参考以下文章