大数据:Spark ShuffleExecutor是如何fetch shuffle的数据文件
Posted raintungli
tags:
篇首语:本文由小常识网(cha138.com)小编为大家整理,主要介绍了大数据:Spark ShuffleExecutor是如何fetch shuffle的数据文件相关的知识,希望对你有一定的参考价值。
1. 前言
在前面的博客中讨论了Executor, Driver之间如何汇报Executor生成的Shuffle的数据文件,以及Executor获取到Shuffle的数据文件的分布,那么Executor是如何获取到Shuffle的数据文件进行Action的算子的计算呢?
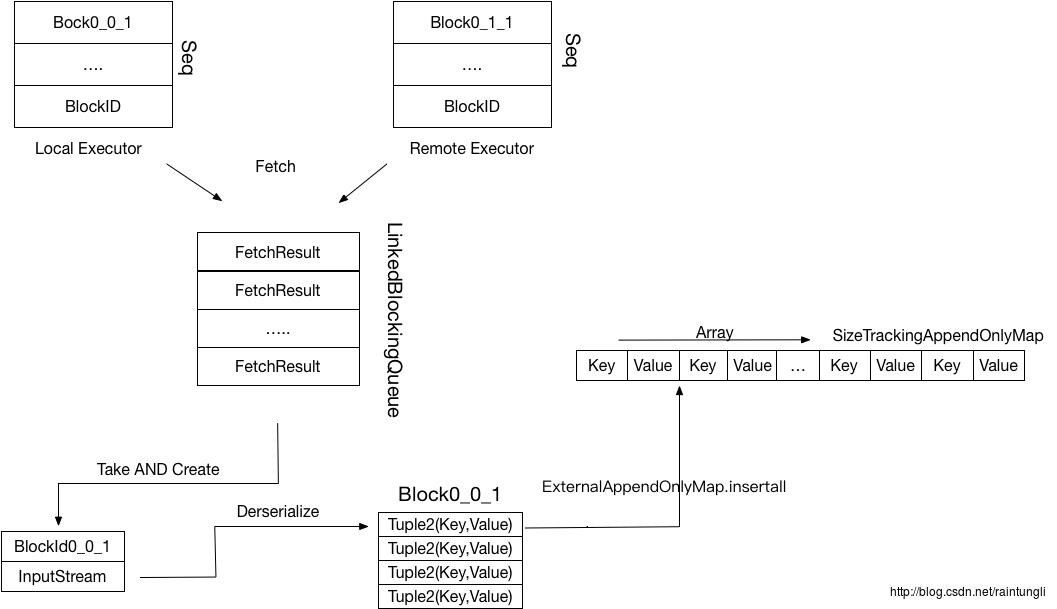
在ResultTask中,Executor通过MapOutPutTracker向Driver获取了ShuffID的Shuffle数据块的结构,整理成以BlockManangerId为Key的结构,这样可以更容易区分究竟是本地的Shuffle还是远端executor的Shuffle
2. Fetch数据
在MapOutputTracker中获取到的BlockID的地址,是以BlockManagerId的seq数组Seq[(BlockManagerId, Seq[(BlockId, Long)])] BlockManagerId结构
class BlockManagerId private (
    private var executorId_ : String,
    private var host_ : String,
    private var port_ : Int,
    private var topologyInfo_ : Option[String])
  extends Externalizable
是以ExecutorId,Executor Host IP, Executor Port 标示从哪个Executor获取Shuffle的数据文件,通过Seq[BlockManagerId, Seq(BlockID,Long)]的结构,当前executor很容易区分究竟哪些是本地的数据文件,哪些是远端的数据,本地的数据可以直接本地读取,而需要不通过网络来获取。
2.1 读取本Executor文件
如何认为是本地数据? Spark认为区分是通过相同的ExecutorId来区别的, 如果ExecutorId和自己的ExecutorId相同,认为是本地Local,可以直接读取文件。 for ((address, blockInfos) <- blocksByAddress)
totalBlocks += blockInfos.size
if (address.executorId == blockManager.blockManagerId.executorId)
// Filter out zero-sized blocks
localBlocks ++= blockInfos.filter(_._2 != 0).map(_._1)
numBlocksToFetch += localBlocks.size
这里有两种情况:
- 同一个Executor会生成多个Task,单个Executor里的Task运行可以直接获取本地文件,不需要通过网络
- 同一台机器多个Executor,在这种情况下,不同的Executor获取相同机器下的其他的Executor的文件,需要通过网络
2.2 读取非本Executor文件
2.2.1 构造FetchRequest请求
获取非本Executor的文件,在Spark里会生成一个FetchRequest,为了避免单个Executor的MapId过多发送多个FetchRequest请求,会合并同一个Executor的多个请求,合并的规则由最大的请求参数控制spark.reducer.maxSizeInFlight
val targetRequestSize = math.max(maxBytesInFlight / 5, 1L)
val iterator = blockInfos.iterator
        var curRequestSize = 0L
        var curBlocks = new ArrayBuffer[(BlockId, Long)]
        while (iterator.hasNext)
          val (blockId, size) = iterator.next()
          // Skip empty blocks
          if (size > 0)
            curBlocks += ((blockId, size))
            remoteBlocks += blockId
            numBlocksToFetch += 1
            curRequestSize += size
           else if (size < 0)
            throw new BlockException(blockId, "Negative block size " + size)

          if (curRequestSize >= targetRequestSize)
            // Add this FetchRequest
            remoteRequests += new FetchRequest(address, curBlocks)
            curBlocks = new ArrayBuffer[(BlockId, Long)]
            logDebug(s"Creating fetch request of $curRequestSize at $address")
            curRequestSize = 0


        // Add in the final request
        if (curBlocks.nonEmpty)
          remoteRequests += new FetchRequest(address, curBlocks)
2.2.1 发送FetchRequest
FetchRequest并不是并行提交的,对同一个Task来说,在Executor的做combine的时候是一个一个的BlockID块合并的,而Task本身就是一个线程运行的,所以不需要设计FetchRequest成并行提交,当一个BlockID完成计算后,才需要判断是否需要进行下一个FetchRequest请求,因为FetchRequest是多个Block提交的,为了控制Executor获取多个BlockID的shuffle数据的带宽,在提交FetchRequest的时候控制了请求的频率
在满足下面以下条件下,才允许提交下个FetchRequest
- 当正在请求的所有BlockId的内容和下一个FetchRequest的请求内容之和小于maxBytesInFlight的时候,才能进行下一个FetchRequest 的请求
- 当正在请求的数量小于所设置的最大的允许请求数量的时候,才能进行下一个FetchRequest的请求,控制参数如下:
spark.reducer.maxReqsInFlight2.2.2 完整的FetchRequest流程

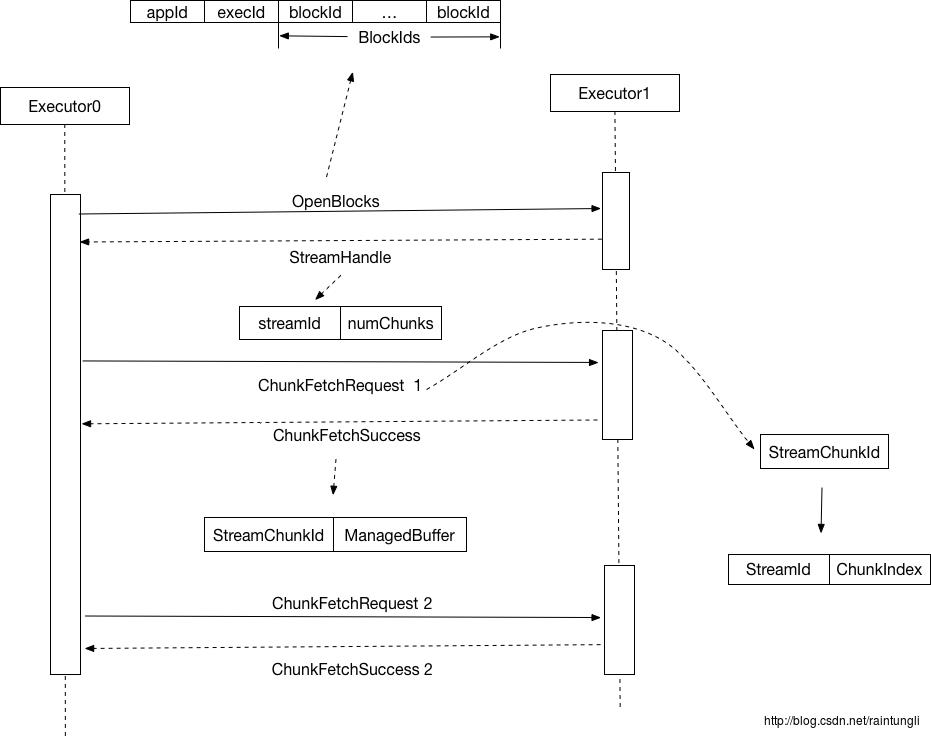
- Executor A 通过ExternalShuffleClient 进行fetchBlocks的操作,如果配置了
最大重试参数的话,将启动一个能重试RetryingBlockFetcher的获取器io.maxRetries- 初始化TransportClient,OneForOneBlockFetcher获取器
- 在OneForOneBlockFetcher里首先向另一个Executor B发送了OpenBlocks的询问请求,里面告知ExecutorID, APPID和BlockID的集合
- Executor B获取到BlockIDs,后通过BlockManager获取相关的BlockID的文件(通过mapid, reduceid获取相关的索引和数据文件),构建FileSegmentManagedBuffer
- 通过StreamManager(OneForOneStreamManager) registerStream 生成streamId,和StreamState(多个ManagedBuffer,AppID)的缓存
返回所生成的StreamId- Executor B 返回给 StreamHandle的消息,里面包含了StreamId和Chunk的数量,这里chunk的数量其实就是Block的数量
- Executor A 获取到 StreamHandle的消息,一个一个的发送ChunkFetchRequest里面包含了StreamId, Chunk index,去真实的获取Executor B的shuffle数据文件
- Executor B 通过传递的ChunkFetchRequest消息获取到StreamId, Chunk index, 通过缓存获取到对应的FileSgementManagedBuffer,返回chunkFetchSuccess消息,里面包含着streamID, 和FileSegmentManagedBuffer
- 在步骤3-6步骤里是堵塞在Task线程里,而步骤7一个一个发送ChunkFetchRequest后,并不堵塞等待返回结果,结果是通过回调函数来实现的,在调用前注册了一个回调函数
client.fetchChunk(streamHandle.streamId, i, chunkCallback); private class ChunkCallback implements ChunkReceivedCallback @Override public void onSuccess(int chunkIndex, ManagedBuffer buffer) // On receipt of a chunk, pass it upwards as a block. listener.onBlockFetchSuccess(blockIds[chunkIndex], buffer); @Override public void onFailure(int chunkIndex, Throwable e) // On receipt of a failure, fail every block from chunkIndex onwards. String[] remainingBlockIds = Arrays.copyOfRange(blockIds, chunkIndex, blockIds.length); failRemainingBlocks(remainingBlockIds, e);- 在这里的listener就是前面fetchBlocks里注入的BlockFetchingListener
new BlockFetchingListener override def onBlockFetchSuccess(blockId: String, buf: ManagedBuffer): Unit = // Only add the buffer to results queue if the iterator is not zombie, // i.e. cleanup() has not been called yet. ShuffleBlockFetcherIterator.this.synchronized if (!isZombie) // Increment the ref count because we need to pass this to a different thread. // This needs to be released after use. buf.retain() remainingBlocks -= blockId results.put(new SuccessFetchResult(BlockId(blockId), address, sizeMap(blockId), buf, remainingBlocks.isEmpty)) logDebug("remainingBlocks: " + remainingBlocks) logTrace("Got remote block " + blockId + " after " + Utils.getUsedTimeMs(startTime)) override def onBlockFetchFailure(blockId: String, e: Throwable): Unit = logError(s"Failed to get block(s) from $req.address.host:$req.address.port", e) results.put(new FailureFetchResult(BlockId(blockId), address, e))- 如果获取成功将封装SuccessFetchResult里面保存着blockId,地址,数据大小,以及ManagedBuffer,并保存到results的queue中
2.2.3 Fetch 迭代获取数据文件
Executor在BlockStoreShuffeReader的read函数中构建ShuffleBlockFetcherIterator,ShuffleBlockFetcherIterator是个InputStream的迭代器,每个BlockID生成一个InputStream,在设计里并没有区分是本地的还是远端的,每一次迭代都是从堵塞的Queue里获取到BlockID的ManagerBuffer,通过调用ManagerBuffer.createInputStream获取每个InputStream,进行读取并且反序列话,进行KV的combine.
如何判断所有的BlockID已经读取完了?
override def hasNext: Boolean = numBlocksProcessed < numBlocksToFetch3. Fetch 交互协议
在前面的博客里描述了很多交互协议都使用了Java的原生态的反序列化,但在上文描述的Fetch协议中,是Spark单独定义的一套协议标准,自己实现encoder和decoder ChunkFetchRequest, ChunkFetchSuccess, RpcRequest, RpcResponse.... 这些都是直接使用Java进行封装,在Network-Commmon的包里,所有的消息最后都实现了基本的接口。3.1 Message Encoder
public interface Message extends Encodable而核心的是Encodable,有点类似Java的 Serializable接口,需要自己实现Encoder和Decoder的方法
public interface Encodable
  /** Number of bytes of the encoded form of this object. */
  int encodedLength();

  /**
   * Serializes this object by writing into the given ByteBuf.
   * This method must write exactly encodedLength() bytes.
   */
  void encode(ByteBuf buf);
如何让Netty调用Encodable encode方法呢? 在Netty里暴露出的类MessageToMessageEncoder,里暴露encode的抽象方法,这是一个可以允许对传递的消息进行一次自定义的编码
在Spark里自己实现MessageToMessageEncoder的encoder的方法MessageToMessageEncoderprotected abstract void encode(ChannelHandlerContext paramChannelHandlerContext, I paramI, List<Object> paramList) /* */ throws Exception;
public final class MessageEncoder extends MessageToMessageEncoder<Message>

  private static final Logger logger = LoggerFactory.getLogger(MessageEncoder.class);

  /***
   * Encodes a Message by invoking its encode() method. For non-data messages, we will add one
   * ByteBuf to 'out' containing the total frame length, the message type, and the message itself.
   * In the case of a ChunkFetchSuccess, we will also add the ManagedBuffer corresponding to the
   * data to 'out', in order to enable zero-copy transfer.
   */
  @Override
  public void encode(ChannelHandlerContext ctx, Message in, List<Object> out) throws Exception
    Object body = null;
    long bodyLength = 0;
    boolean isBodyInFrame = false;

    // If the message has a body, take it out to enable zero-copy transfer for the payload.
    if (in.body() != null)
      try
        bodyLength = in.body().size();
        body = in.body().convertToNetty();
        isBodyInFrame = in.isBodyInFrame();
       catch (Exception e)
        in.body().release();
        if (in instanceof AbstractResponseMessage)
          AbstractResponseMessage resp = (AbstractResponseMessage) in;
          // Re-encode this message as a failure response.
          String error = e.getMessage() != null ? e.getMessage() : "null";
          logger.error(String.format("Error processing %s for client %s",
            in, ctx.channel().remoteAddress()), e);
          encode(ctx, resp.createFailureResponse(error), out);
         else
          throw e;

        return;


    Message.Type msgType = in.type();
    // All messages have the frame length, message type, and message itself. The frame length
    // may optionally include the length of the body data, depending on what message is being
    // sent.
    int headerLength = 8 + msgType.encodedLength() + in.encodedLength();
    long frameLength = headerLength + (isBodyInFrame ? bodyLength : 0);
    ByteBuf header = ctx.alloc().heapBuffer(headerLength);
    header.writeLong(frameLength);
    msgType.encode(header);
    in.encode(header);
    assert header.writableBytes() == 0;

    if (body != null)
      // We transfer ownership of the reference on in.body() to MessageWithHeader.
      // This reference will be freed when MessageWithHeader.deallocate() is called.
      out.add(new MessageWithHeader(in.body(), header, body, bodyLength));
     else
      out.add(header);
在encoder的方法里去对Message进行了编码
3.2 Message Decoder
和3.1类似,Spark 针对Netty 封装了MessageDecoderpublic final class MessageDecoder extends MessageToMessageDecoder<ByteBuf> public void decode(ChannelHandlerContext ctx, ByteBuf in, List<Object> out)
Message.Type msgType = Message.Type.decode(in);
Message decoded = decode(msgType, in);
assert decoded.type() == msgType;
logger.trace("Received message : ", msgType, decoded);
out.add(decoded);
3.3 传递文件
3.3.1 发送文件
还记的前面fetch文件的返回结果么?respond(new ChunkFetchSuccess(req.streamChunkId, buf)); body = in.body().convertToNetty(); public Object convertToNetty() throws IOException
if (conf.lazyFileDescriptor())
return new DefaultFileRegion(file, offset, length);
else
FileChannel fileChannel = new FileInputStream(file).getChannel();
return new DefaultFileRegion(fileChannel, offset, length);
  public abstract long transferTo(WritableByteChannel paramWritableByteChannel, long paramLong)
throws IOException;if (body != null)
// We transfer ownership of the reference on in.body() to MessageWithHeader.
// This reference will be freed when MessageWithHeader.deallocate() is called.
out.add(new MessageWithHeader(in.body(), header, body, bodyLength));
我们来看看什么是MessageWithHeader
class MessageWithHeader extends AbstractReferenceCounted implements FileRegion public long transferTo(final WritableByteChannel target, final long position) throws IOException
Preconditions.checkArgument(position == totalBytesTransferred, "Invalid position.");
// Bytes written for header in this call.
long writtenHeader = 0;
if (header.readableBytes() > 0)
writtenHeader = copyByteBuf(header, target);
totalBytesTransferred += writtenHeader;
if (header.readableBytes() > 0)
return writtenHeader;
// Bytes written for body in this call.
long writtenBody = 0;
if (body instanceof FileRegion)
writtenBody = ((FileRegion) body).transferTo(target, totalBytesTransferred - headerLength);
else if (body instanceof ByteBuf)
writtenBody = copyByteBuf((ByteBuf) body, target);
totalBytesTransferred += writtenBody;
return writtenHeader + writtenBody;
在这里巧妙的将Header和文件封装成了一个文件的region,在TransferTo的函数里先传递头,然后在调用
writtenBody = ((FileRegion) body).transferTo(target, totalBytesTransferred - headerLength);3.3.2 接收文件
在3.2章节里介绍了如何decode message的方法,对消息ChunkFetchSuccess进行decode生成ChunkFetchSuccess对象 public static ChunkFetchSuccess decode(ByteBuf buf)
StreamChunkId streamChunkId = StreamChunkId.decode(buf);
buf.retain();
NettyManagedBuffer managedBuf = new NettyManagedBuffer(buf.duplicate());
return new ChunkFetchSuccess(streamChunkId, managedBuf);
注意:这里的ManagedBuffer不在是FileSegmentManagedBuffer,而是NettyManagedBuffer,里面的ByteBuf才是文件的内容
4. 总结
- Fetch Shuffle data 数据区分本地数据,远端数据,本地数据和远端数据的区分依据是ExecutorID
- 单个Task线程Fetch Shuffle Data数据是以Block为最小单位,串行获取并进行运算
- 远端Fetch的多个Block 数据,是异步发送请求,通过回调函数来异步获取返回结果提交到堵塞的队列中,让Task线程获取、读取,运算
- Fetch的交互协议,并没有使用Java的默认反序列的协议,而是自己独立封装Encode、Decode,进行编码和解码
以上是关于大数据:Spark ShuffleExecutor是如何fetch shuffle的数据文件的主要内容,如果未能解决你的问题,请参考以下文章
