Shiro 详细教程(集各教程内容为一体)
Posted 张学徒
tags:
篇首语:本文由小常识网(cha138.com)小编为大家整理,主要介绍了Shiro 详细教程(集各教程内容为一体)相关的知识,希望对你有一定的参考价值。
在参考中发现了 《Apache Shiro 参考手册》,强烈建议参看学习。
Shiro 简介
Shiro是apache旗下一个开源框架,它将软件系统的安全认证相关的功能抽取出来,实现用户身份认证,权限授权、加密、会话管理等功能,组成了一个通用的安全认证框架。

首先创建一个 SpringBoot 项目,并在 pom.xml 文件中引入如下会用到的依赖
    <dependencies>
        <dependency>
            <groupId>org.springframework.boot</groupId>
            <artifactId>spring-boot-starter-thymeleaf</artifactId>
        </dependency>
        <dependency>
            <groupId>org.springframework.boot</groupId>
            <artifactId>spring-boot-starter-web</artifactId>
        </dependency>
        <dependency>
            <groupId>org.mybatis.spring.boot</groupId>
            <artifactId>mybatis-spring-boot-starter</artifactId>
            <version>2.2.2</version>
        </dependency>

        <dependency>
            <groupId>org.springframework.boot</groupId>
            <artifactId>spring-boot-devtools</artifactId>
            <scope>runtime</scope>
            <optional>true</optional>
        </dependency>
        <dependency>
            <groupId>mysql</groupId>
            <artifactId>mysql-connector-java</artifactId>
            <scope>runtime</scope>
        </dependency>
        <dependency>
            <groupId>org.projectlombok</groupId>
            <artifactId>lombok</artifactId>
            <optional>true</optional>
        </dependency>
        <dependency>
            <groupId>org.springframework.boot</groupId>
            <artifactId>spring-boot-starter-test</artifactId>
            <scope>test</scope>
        </dependency>


        <!-- 导入shiro和spring整合依赖 -->
        <dependency>
            <groupId>org.apache.shiro</groupId>
            <artifactId>shiro-spring</artifactId>
            <version>1.4.0</version>
        </dependency>

    </dependencies>

    <build>
        <plugins>
            <plugin>
                <groupId>org.springframework.boot</groupId>
                <artifactId>spring-boot-maven-plugin</artifactId>
                <configuration>
                    <excludes>
                        <exclude>
                            <groupId>org.projectlombok</groupId>
                            <artifactId>lombok</artifactId>
                        </exclude>
                    </excludes>
                </configuration>
            </plugin>
        </plugins>
    </build>
resources 文件夹下创建 shiro.ini 文件
[users]
zhangsan=123
lisi=123
wangwu=123
测试 Shiro
@Test
public void test01()
	// 创建安全管理器,设置它的 Realm
	DefaultSecurityManager defaultSecurityManager = new DefaultSecurityManager();
	defaultSecurityManager.setRealm(new IniRealm("classpath:shiro.ini"));
	//将安装工具类中设置默认安全管理器
	SecurityUtils.setSecurityManager(defaultSecurityManager);
	//获取主体对象
	Subject subject = SecurityUtils.getSubject();
	//创建token令牌
	UsernamePasswordToken token = new UsernamePasswordToken("xiaochen1", "123");
	try
		subject.login(token);//用户登录
		System.out.println("登录成功~~");
	 catch (UnknownAccountException e)
		e.printStackTrace();
		System.out.println("用户名错误!!");
	catch (IncorrectCredentialsException e)
		e.printStackTrace();
		System.out.println("密码错误!!!");
在这个测试中,我们可以把 ini 当做是个账号的数据库,UsernamePasswordToken token = new UsernamePasswordToken("xiaochen1", "123"); 这一行看作是用户登陆时发来的账号和密码
subject.login(token); 这里进行登陆,开始进行验证上面的 token,这时设置的 IniRealm 对象会查找数据库(当前是 shiro.ini 文件)里是否有匹配的账号,然后验证密码,如果没有报错就是登陆成功,报错那就是不对。
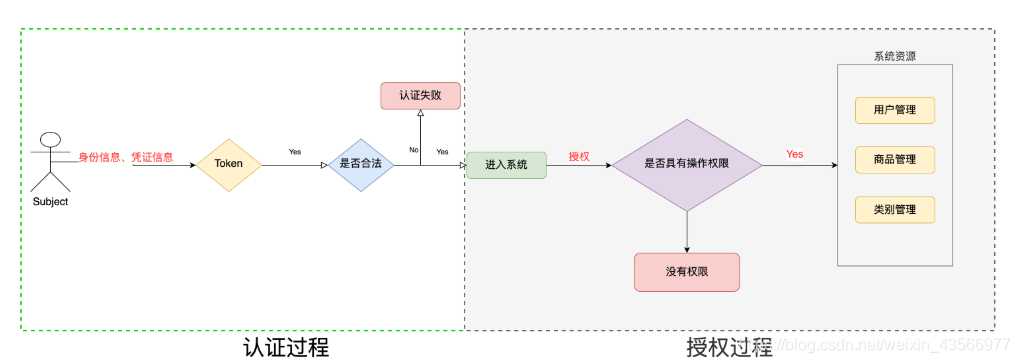
该方法主要执行以下操作:
- 检查提交的进行认证的令牌信息
- 根据令牌信息从数据源(通常为数据库)中获取用户信息
- 对用户信息进行匹配验证。
- 验证通过将返回一个封装了用户信息的AuthenticationInfo实例。
- 验证失败则抛出AuthenticationException异常信息。
以下是几种出现的错误:
-
UnknownAccountException(账号错误/没有账号) -
IncorrectCredentialsException(密码错误) -
DisabledAccountException(帐号被禁用) -
LockedAccountException(帐号被锁定) -
ExcessiveAttemptsException(登录失败次数过多) -
ExpiredCredentialsException(凭证过期)等
上面代码运行过程:

上边的程序使用的是读取本地 ini 文件的方式进行测试进行验证判断用户名和密码是否正确,但正式开发中是不能用这种的,都需要从数据库中读取对应登陆的用户的信息,所以需要自定义 Realm 处理这些逻辑,以及添加更多样的操作。
Subject即主体,外部应用与subject进行交互,subject记录了当前操作用户,将用户的概念理解为当前操作的主体,可能是一个通过浏览器请求的用户,也可能是一个运行的程序。Subject在shiro中是一个接口,接口中定义了很多认证授相关的方法,外部程序通过subject进行认证授,而subject是通过SecurityManager安全管理器进行认证授权
Realm即领域,相当于 datasource 数据源,SecurityManager进行安全认证需要通过Realm获取用户权限数据,比如:如果用户身份数据在数据库那么Realm就需要从数据库获取用户身份信息。就是在Realm里写认证和授权逻辑的,执行的时候会执行 Realm 里的认证和授权逻辑。
注意:不要把
Realm理解成只是从数据源取数据,在Realm中还有认证授权校验的相关的代码。
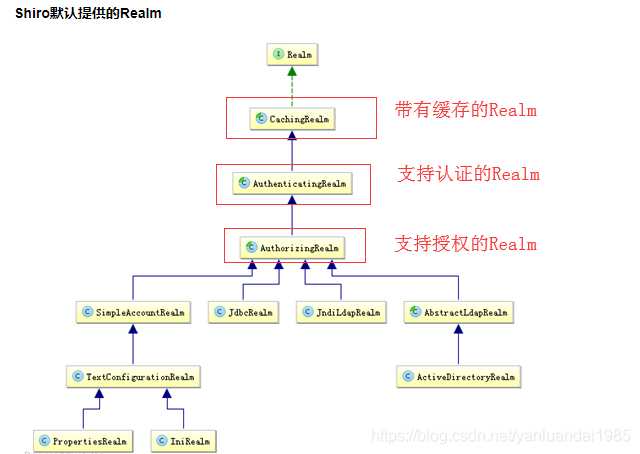
一般在真实的项目中,我们不会直接实现 Realm 接口,也不会直接继承最底层的功能贼复杂的 IniRealm。我们一般的情况就是直接继承 AuthorizingRealm,能够继承到认证与授权功能。它需要强制重写两个方法:doGetAuthenticationInfo,doGetAuthorizationInfo
[
Shiro 提供的 Realm 体系较为复杂,一般我们为了使用 Shiro 的基本目的就是:认证、授权。可以看以下 SimpleAccountRealm 的部分源码中的两个方法。授权(doGetAuthorizationInfo)、认证(doGetAuthenticationInfo)。两部分的源码:
public class SimpleAccountRealm extends AuthorizingRealm
		//.......省略
    protected AuthenticationInfo doGetAuthenticationInfo(AuthenticationToken token) throws AuthenticationException
        UsernamePasswordToken upToken = (UsernamePasswordToken) token;
        SimpleAccount account = getUser(upToken.getUsername());

        if (account != null)

            if (account.isLocked())
                throw new LockedAccountException("Account [" + account + "] is locked.");

            if (account.isCredentialsExpired())
                String msg = "The credentials for account [" + account + "] are expired";
                throw new ExpiredCredentialsException(msg);


        return account;


    protected AuthorizationInfo doGetAuthorizationInfo(PrincipalCollection principals)
        String username = getUsername(principals);
        USERS_LOCK.readLock().lock();
        try
            return this.users.get(username);
         finally
            USERS_LOCK.readLock().unlock();
上面就是他的一个认证授权时的逻辑,我们可以自定义一个 UserRealm,以实现更复杂更强大的认证、授权逻辑。
public class UserRealm extends AuthorizingRealm
    //授权方法(访问不同的 controller 里的接口时进行授权)
    @Override
    protected AuthorizationInfo doGetAuthorizationInfo(PrincipalCollection principals)
		// 这个 username 是下面 doGetAuthenticationInfo 方法 return 的对象的第一个参数的值
        final String username = (String) principalCollection.getPrimaryPrincipal();
        System.out.println("执行授权:授权的用户名 " + username);

        final SimpleAuthorizationInfo info = new SimpleAuthorizationInfo();
        // 查询设置用户的权限 permission(下面假装是数据库查询到的数据)
        Set<String> permissions = new HashSet<>();
        permissions.add("auth:add_user");
        permissions.add("auth:update_user");
        info.setStringPermissions(permissions);

        // 查询设置用户的角色 Role(下面假装是数据库查询到的数据)
        Set<String> roles = new HashSet<>();
        roles.add("管理员");
        info.setRoles(roles);

        return info;


    //认证方法,在登陆的时候会进行验证
    @Override
    protected AuthenticationInfo doGetAuthenticationInfo(AuthenticationToken token) throws AuthenticationException
        System.out.println("执行认证");
        final UsernamePasswordToken token = (UsernamePasswordToken) authenticationToken;

		/*
		//按数据库查询应该是以下代码,但为了方便起见,后面的写个假数据
		User user = userService.findUser(token.getUsername());
		if(user != null)
			// 当前 Realm 中的 doGetAuthorizationInfo 方法那个参数就是这个第一个参数,保存了当前用户信息
		    return new SimpleAuthenticationInfo(
                    user,
                    user.getPassword(),
                    this.getName()
            );

        */

		// 数据库查询用户名和密码(这里假作已经查询到了结果)
        String name = "zhangsan";
        String password = "123";
        if (name.equals(token.getUsername()))
			// new SimpleAuthenticationInfo 的时候会自动校验密码
            return new SimpleAuthenticationInfo(
                    token.getPrincipal(),
                    password,
                    this.getName()
            );


        return null;
测试
@Test
public void test01()
	// 创建安全管理器,设置它的 Realm
	final DefaultSecurityManager defaultSecurityManager = new DefaultSecurityManager();
	defaultSecurityManager.setRealm(new UserRealm());
	// 设置处理认证和授权的安全管理器
	SecurityUtils.setSecurityManager(defaultSecurityManager);

	final Subject subject = SecurityUtils.getSubject();
	// 前端发送来的账号和密码生成的通行令牌,用来让 Realm 的 doGetAuthenticationInfo 方法里执行认证过程
	UsernamePasswordToken token = new UsernamePasswordToken("zhangsan", "123");
	try
		subject.login(token);
	 catch (UnknownAccountException e)
		e.printStackTrace();
		System.out.println("用户名错误!!");
	 catch (IncorrectCredentialsException e)
		e.printStackTrace();
		System.out.println("密码错误!!!");
上面运行过程

配置 Shiro
下面开始写 Controller 层逻辑需要用到的类。
创建 ShiroConfig,配置 shiro 的类:
import com.example.shirotest.common.UserRealm;	// 引用自定义的 UserRealm
import org.apache.shiro.authc.credential.HashedCredentialsMatcher;
import org.apache.shiro.spring.web.ShiroFilterFactoryBean;
import org.apache.shiro.web.mgt.DefaultWebSecurityManager;
import org.springframework.aop.framework.autoproxy.DefaultAdvisorAutoProxyCreator;
import org.springframework.beans.factory.annotation.Qualifier;
import org.springframework.context.annotation.Bean;
import org.springframework.context.annotation.Configuration;

import java.util.LinkedHashMap;
import java.util.Map;

/**
 * Shiro
 *
 * @author z
 * @datetime 2022-5-16
 */
@Configuration
public class ShiroConfig

    /**
     * 创建 Realm,bean会让方法返回的对象放入到spring的环境,以便使用
     */
    @Bean(name = "userRealm")
    public UserRealm getRealm()
        return new UserRealm();


    /**
     * @Qualifier 注释指定注入 Bean 的名称,用来消除歧义的
     */
    @Bean(name = "defaultWebSecurityManager")
    public DefaultWebSecurityManager getDefaultWebSecurityManager(@Qualifier("userRealm") UserRealm userRealm)
        DefaultWebSecurityManager defaultWebSecurityManager = new DefaultWebSecurityManager();
        defaultWebSecurityManager.setRealm(userRealm);
        return defaultWebSecurityManager;


    @Bean
    public ShiroFilterFactoryBean getShiroFilterFactoryBean(@Qualifier("defaultWebSecurityManager") DefaultWebSecurityManager defaultWebSecurityManager)
        ShiroFilterFactoryBean shiroFilterFactoryBean = new ShiroFilterFactoryBean();
        //设置一个安全管理器来关联 SecurityManager
        shiroFilterFactoryBean.setSecurityManager(defaultWebSecurityManager);

        // 默认登陆界面
        shiroFilterFactoryBean.setLoginUrl("/loginPage");

        // 设置权限(非注解方式设置对应 url 的权限)
        // 注意要用 LinkedHashMap 遍历列表时时候按顺序进行匹配判断 URL
        // 所以下面的 /** 要放在最后,否则如果放在第一个则所有的 URL 都
        // 可以被匹配到,那么之后的就失效了
        Map<String, String> filterMap = new LinkedHashMap<>();
        filterMap.put("/loginPage", "anon");
        filterMap.put("/user/login", "anon");

        filterMap.put("/add", "perms[user:add, admin]");
        filterMap.put("/update", "perms[user:update]");

        filterMap.put("/**", "authc");

        shiroFilterFactoryBean.setFilterChainDefinitionMap(filterMap);

        return shiroFilterFactoryBean;


    /**
     *  开启Shiro的注解 (如@RequiresRoles,@RequiresPermissions)
     * @return
     */
    @Bean
    public DefaultAdvisorAutoProxyCreator advisorAutoProxyCreator()
        DefaultAdvisorAutoProxyCreator advisorAutoProxyCreator = new DefaultAdvisorAutoProxyCreator();
        advisorAutoProxyCreator.setProxyTargetClass(true);
        return advisorAutoProxyCreator;
上面的 ShiroFilterFactoryBean 方法中主要主要配置接口的角色权限,确定接口由哪些角色或者哪些权限的用户可以访问。至于 shiro 是怎么知道当前用户是否具有某个角色或权限需要用到后面的 doGetAuthorizationInfo() 方法。
| Filter | 解释 |
|---|---|
anon | 无参,开放权限,可以理解为匿名用户或游客 |
authc | 无参,需要认证 |
user | 无参,表示必须存在用户,当登入操作时不做检查 |
perms[user] | 参数可写多个,表示需要某个或某些权限才能通过,多个参数时写 perms["user:add, admin"],当有多个参数时必须每个参数都通过才算通过 |
roles[admin] | 参数可写多个,表示是某个或某些角色才能通过,多个参数时写 roles["admin, user"],当有多个参数时必须每个参数都通过才算通过 |
Shiro内置的 FilterChain
| Filter Name | Class |
|---|---|
| anon | org.apache.shiro.web.filter.authc.AnonymousFilter |
| authc | org.apache.shiro.web.filter.authc.FormAuthenticationFilter |
| authcBasic | org.apache.shiro.web.filter.authc.BasicHttpAuthenticationFilter |
| perms | org.apache.shiro.web.filter.authz.PermissionsAuthorizationFilter |
| port | org.apache.shiro.web.filter.authz.PortFilter |
| rest | org.apache.shiro.web.filter.authz.HttpMethodPermissionFilter |
| roles | org.apache.shiro.web.filter.authz.RolesAuthorizationFilter |
| ssl | org.apache.shiro.web.filter.authz.SslFilter |
| user | org.apache.shiro.web.filter.authc.UserFilter |
anon: 所有url都都可以匿名访问authc: 需要认证才能进行访问user: 配置记住我或认证通过可以访问
Shiro 权限字符串:
- 组成规则
在Shiro中使用权限字符串必须按照Shiro指定的规则。
权限字符串组合规则为:“资源类型标识符:操作:资源实例标识符”
- 资源类型标识符: 一般会按模块,对系统划分资源。比如
user模块,product模块,order模块等,对应的资源类型标识符就是:user,product,order。 - 操作: 一般为增删改查(
create,delete,update,find),还有*标识统配。 - 资源实例标识符: 如果Subject控制的是资源类型,那么资源实例标识符就是 “
*” ;如果Subject控制的是资源实例,那么就需要在资源实例标识符就是该资源的唯一标识(ID等)。
- 示例
-
*:*:*表示 Subject 对所有类型的所有实例有所有操作权限,相当于超级管理员。 -
user:create:*表示 Subject 对user类型的所有实例有创建的权限,可以简写为:user:create。 -
user:update:001表示 Subject 对ID为001的 user 实例有修改的权限。 -
user:*:001表示 Subject 对ID为001的user实例有所有权限。
Filter Chain定义说明:
- 1、一个URL可以配置多个Filter,使用逗号分隔
- 2、当设置多个过滤器时,全部验证通过,才视为通过
- 3、部分过滤器可指定参数,如perms,roles
上面的自定义的 UserRealm 和 ShiroConfig 创建的步骤你可以把它算作一个固定的套路,只要使用 Shiro 就难以避免,必须要创建这两个类,以及实现其中的方法。
MD5 加密
我们创建一个 MD5Utils 工具类,对密码进行加密,加密后的密码破解难度是“不可能破解出来”,即便黑客获取到数据库,也无法知道具体密码
import org.apache.shiro.crypto.hash.Md5Hash;
public class MD5Utils
/**
* 加密盐值
*/
public static final String SALT = "^3&5as@9.[km0";
/**
* 密码进行MD5加密
*/
public static