内网穿透工具NPS安装使用
Posted 幽反丶叛冥
tags:
篇首语:本文由小常识网(cha138.com)小编为大家整理,主要介绍了内网穿透工具NPS安装使用相关的知识,希望对你有一定的参考价值。
摘要:在内网部署的 gitlab 同事在出差的时候,导致无法使用,继而重新回到以前使用的 马云gitee 上面。这里记录一下通过 nps 将gitlab 映射到公网,使其可以直接访问。
相关文章
一、nps优势及所需环境
1.1 nps优势
- 强大的网页管理面板,nps可以在服务端通过网页管理所有用户行为以及映射记录.
- 集成了多种协议,支持tcp、udp流量转发,可支持任何tcp、udp上层协议(访问内网网站、本地支付接口调试、ssh访问、远程桌面,内网dns解析等等……),还支持内网http代理、内网socks5代理、p2p等。
在进行安装前可以自行细读官网教程,教程很详细
nps下载地址: https://github.com/ehang-io/nps/releases
nps使用教程: https://ehang-io.github.io/nps/#/?id=nps
1.2所需环境
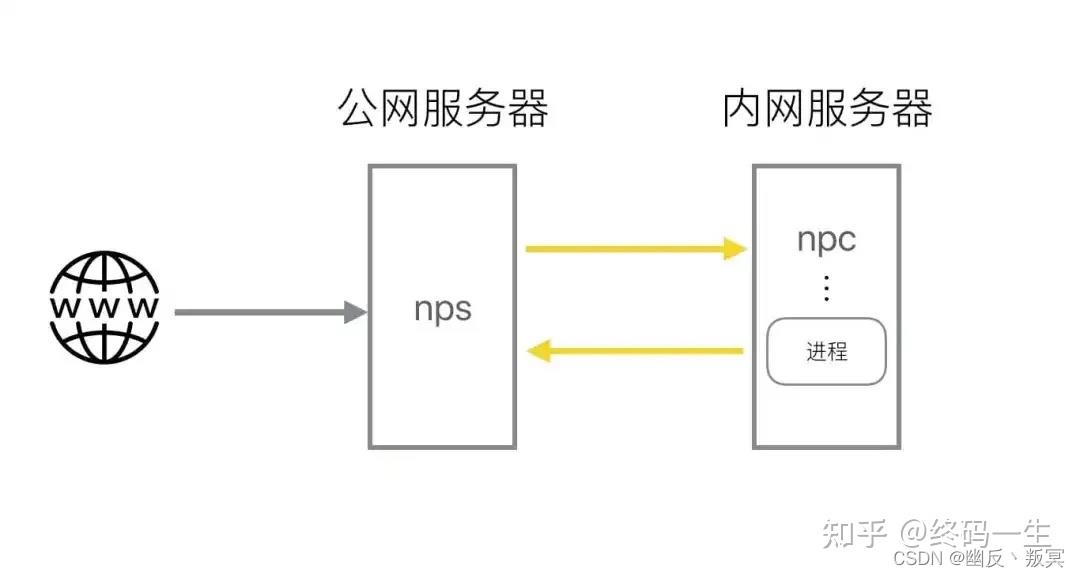
- 一台有公网IP的服务器(VPS)运行服务端(NPS)
- 一个或多个运行在内网的服务器或者PC运行客户端(NPC)
实际环境
公网IP服务器:阿里云ESC服务 Centos 7.4
[root@izm5e1om21c063c81zk7k8z ~]# lsb_release -a
LSB Version:	:core-4.1-amd64:core-4.1-noarch
Distributor ID:	CentOS
Description:	CentOS Linux release 7.4.1708 (Core)
Release:	7.4.1708
Codename:	Core
[root@izm5e1om21c063c81zk7k8z ~]#
内网分别使用了部署gitlab的 Centos 7.9 及一台 win10测试机
二、服务端安装
此处以安装包直接安装为例
1、关闭防火墙
这里我处理的比较粗暴,直接关闭了防护墙,因为 nps 配置的端口太多了,比较麻烦。
查看防火墙状态,下方表示防火期处于关闭状态
[root@izm5e1om21c063c81zk7k8z conf]# systemctl status firewalld
● firewalld.service - firewalld - dynamic firewall daemon
   Loaded: loaded (/usr/lib/systemd/system/firewalld.service; disabled; vendor preset: enabled)
   Active: inactive (dead)
     Docs: man:firewalld(1)
[root@izm5e1om21c063c81zk7k8z conf]#
确保防火墙开放了所有端口
[root@izm5e1om21c063c81zk7k8z conf]# iptables -L -n
Chain INPUT (policy ACCEPT)
target     prot opt source               destination

Chain FORWARD (policy ACCEPT)
target     prot opt source               destination

Chain OUTPUT (policy ACCEPT)
target     prot opt source               destination
[root@izm5e1om21c063c81zk7k8z conf]#
关闭防火墙
[root@izm5e1om21c063c81zk7k8z conf]# systemctl stop firewalld
[root@izm5e1om21c063c81zk7k8z conf]# systemctl disable firewalld
[root@izm5e1om21c063c81zk7k8z conf]#
2、下载解压安装包
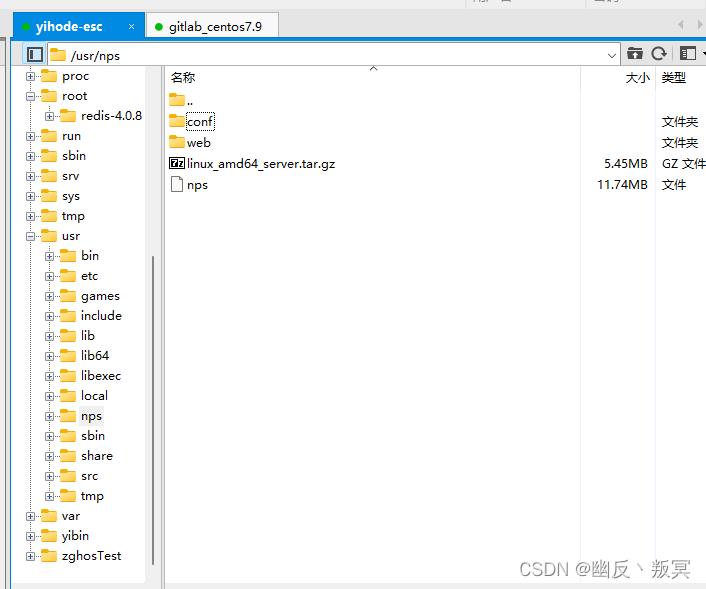
通过自己的电脑,打开 安装包下载地址 选择自己所需要的服务端版本(其中 server 为服务端,解压后为 nps,client 为客户端,解压后为 npc)。下载好后通过 xftp 将压缩拷贝至服务器(这里暂定压缩包及安装地址为 usr/nps 目录)。在拷贝成功后进入压缩包所在位置目录,进行解压。
[root@izm5e1om21c063c81zk7k8z usr]# cd nps
[root@izm5e1om21c063c81zk7k8z nps]# ls
linux_amd64_server.tar.gz
[root@izm5e1om21c063c81zk7k8z nps]# tar -xzvf linux_amd64_server.tar.gz
3、修改 nps 配置文件
[root@izm5e1om21c063c81zk7k8z usr]# cd ./nps
[root@izm5e1om21c063c81zk7k8z nps]# ls
conf  linux_amd64_server.tar.gz  nps  web
[root@izm5e1om21c063c81zk7k8z nps]# cd conf
[root@izm5e1om21c063c81zk7k8z conf]# ls
clients.json  hosts.json  nps.conf  server.key  server.pem  tasks.json
[root@izm5e1om21c063c81zk7k8z conf]# vim nps.conf
nps 的配置在 nps.conf 中,通过 vim开始编辑。
#HTTP(S) proxy port, no startup if empty
#域名代理http代理监听端口
http_proxy_port=6020
#域名代理https代理监听端口
https_proxy_port=6030

##bridge
#服务端客户端通信端口 默认为8024
bridge_port=6050

#web
#服务器IP或者域名
web_host=
#web界面管理用户名
web_username=
#web界面管理密码
web_password=
#web界面管理密码
web_port = 6060
注意:若服务器已占用 80/443 端口,请将 httpsProxyPort&httpProxyPort 更换为其它端口,否则端口冲突将导致面板无法开启。
按下"i"或者“insert”开始编辑,编辑完成后按"Esc"退出编辑模式,在输入":wq"保存并退出。
注意:需要在阿里云的安全规则 出站规则规则中进行放行
切换到包含nps文件的目录下进行启动nps
[root@izm5e1om21c063c81zk7k8z nps]# ls
conf  linux_amd64_server.tar.gz  nps  web
./nps start  /* 后台启动服务 */
./nps stop  /* 结束后台进程 */
./nps reload  /* 重新加载配置 */
如果以上不能正常启用,可以采用以下方式,先安装一下
[root@izm5e1om21c063c81zk7k8z usr]# cd nps
[root@izm5e1om21c063c81zk7k8z nps]# ls
conf  linux_amd64_server.tar.gz  nps  web
[root@izm5e1om21c063c81zk7k8z nps]# sudo ./nps install

...
2022/05/18 11:34:56 install ok!
2022/05/18 11:34:56 Static files and configuration files in the current directory will be useless
2022/05/18 11:34:56 The new configuration file is located in /etc/nps you can edit them
2022/05/18 11:34:56 You can start with:
nps start|stop|restart|uninstall|update or nps-update update
anywhere!
[root@izm5e1om21c063c81zk7k8z nps]# sudo nps start
注意:nps install 之后的 nps 不在原位置,请使用 whereis nps 查找具体目录覆盖 nps 二进制文件
[root@izm5e1om21c063c81zk7k8z conf]# whereis nps
nps: /usr/bin/nps /etc/nps
[root@izm5e1om21c063c81zk7k8z conf]# cd ~
[root@izm5e1om21c063c81zk7k8z ~]# cd ../
[root@izm5e1om21c063c81zk7k8z /]# ls
bin   dev       etc   lib    lost+found  media  NDES  proc  run   srv  tmp  var    zghosTest
boot  dump.rdb  home  lib64  lslnb       mnt    opt   root  sbin  sys  usr  yibin
[root@izm5e1om21c063c81zk7k8z /]# cd ./etc/nps
[root@izm5e1om21c063c81zk7k8z nps]# ls
conf  web
[root@izm5e1om21c063c81zk7k8z nps]# vim ./conf/nps.conf
[root@izm5e1om21c063c81zk7k8z nps]# nps stop
[root@izm5e1om21c063c81zk7k8z nps]# nps start
[root@izm5e1om21c063c81zk7k8z nps]# ps -ef|grep nps
root     31571     1  1 09:02 ?        00:00:00 /usr/bin/nps service
root     31583 27387  0 09:02 pts/0    00:00:00 grep --color=auto nps
[root@izm5e1om21c063c81zk7k8z nps]#
其之前的配置文件也完全的加载到 etc/nps这个目录中
4、进入后台管理 web 页
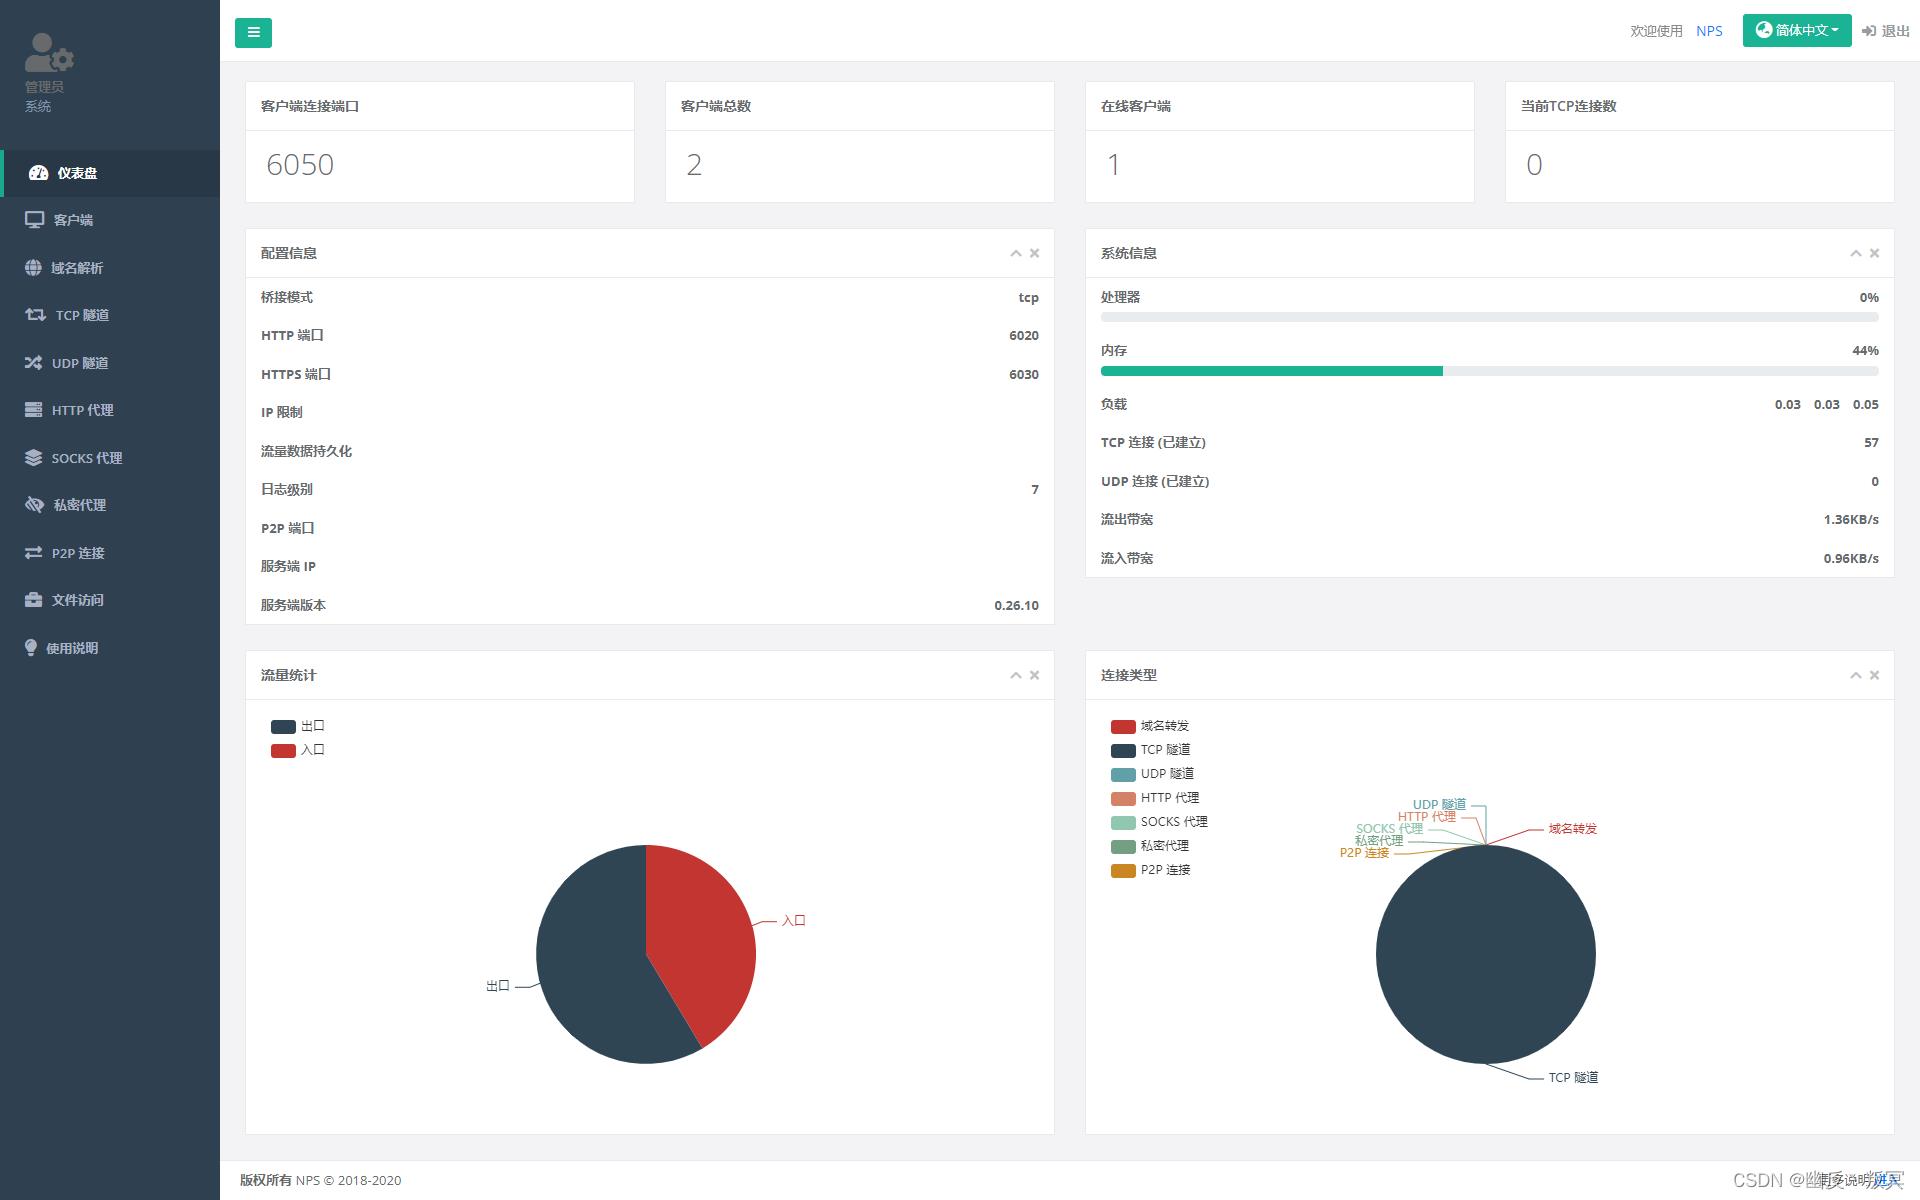
启动后,可以访问网页管理面板(在浏览器中输入"<你服务器的IP或域名>:<网页面板端口>"),如果能打开网页并成功登陆,则说明服务端配置完成。
三、客户端的安装
1、下载解压安装包
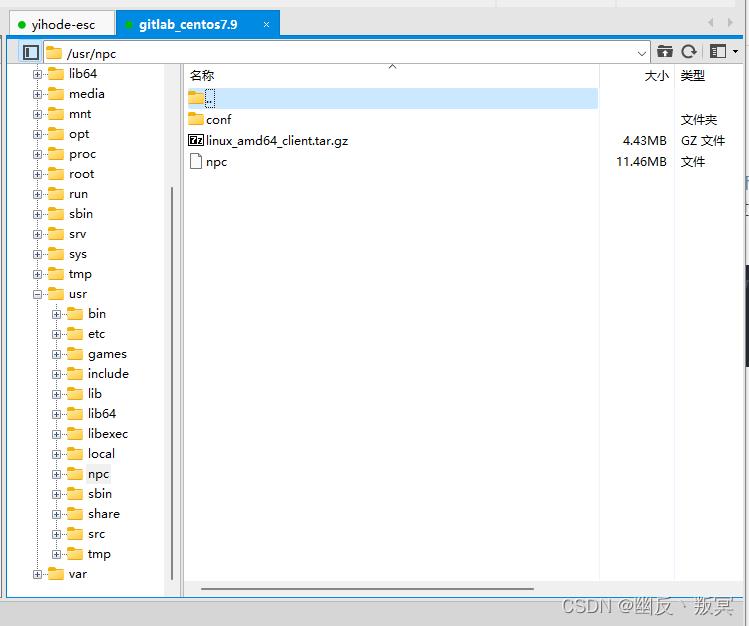
通过自己的电脑,打开 安装包下载地址 选择自己所需要的客户端版本(其中 server 为服务端,解压后为 nps,client 为客户端,解压后为 npc)。下载好后通过 xftp 将压缩拷贝至客户端(这里暂定压缩包及安装地址为 usr/npc 目录)。在拷贝成功后进入压缩包所在位置目录,进行解压。
[root@localhost usr]# cd npc
[root@localhost npc]# ls
linux_amd64_client.tar.gz
[root@localhost npc]# tar xzvf linux_amd64_client.tar.gz
2、管理web添加设备
登录管理面板"<服务端IP或域名>:<面板端口>",在左侧导航栏找到"客户端",并选择添加一个客户端
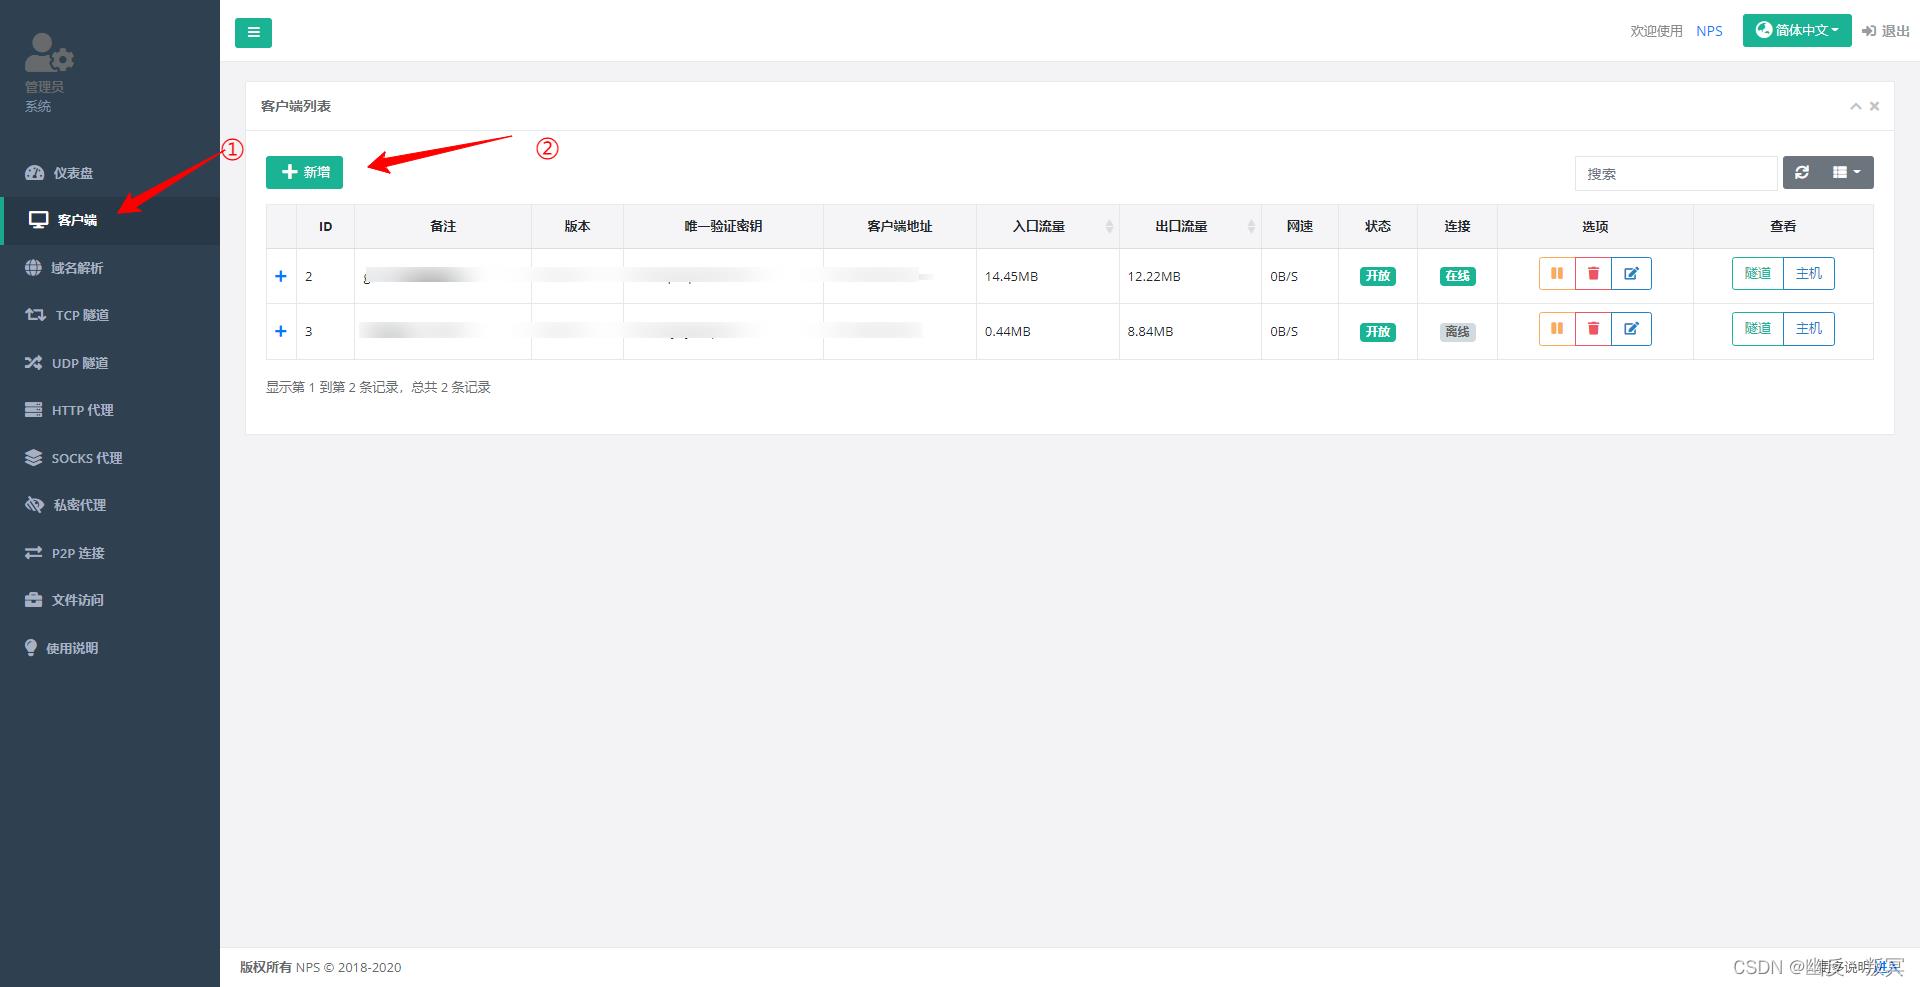
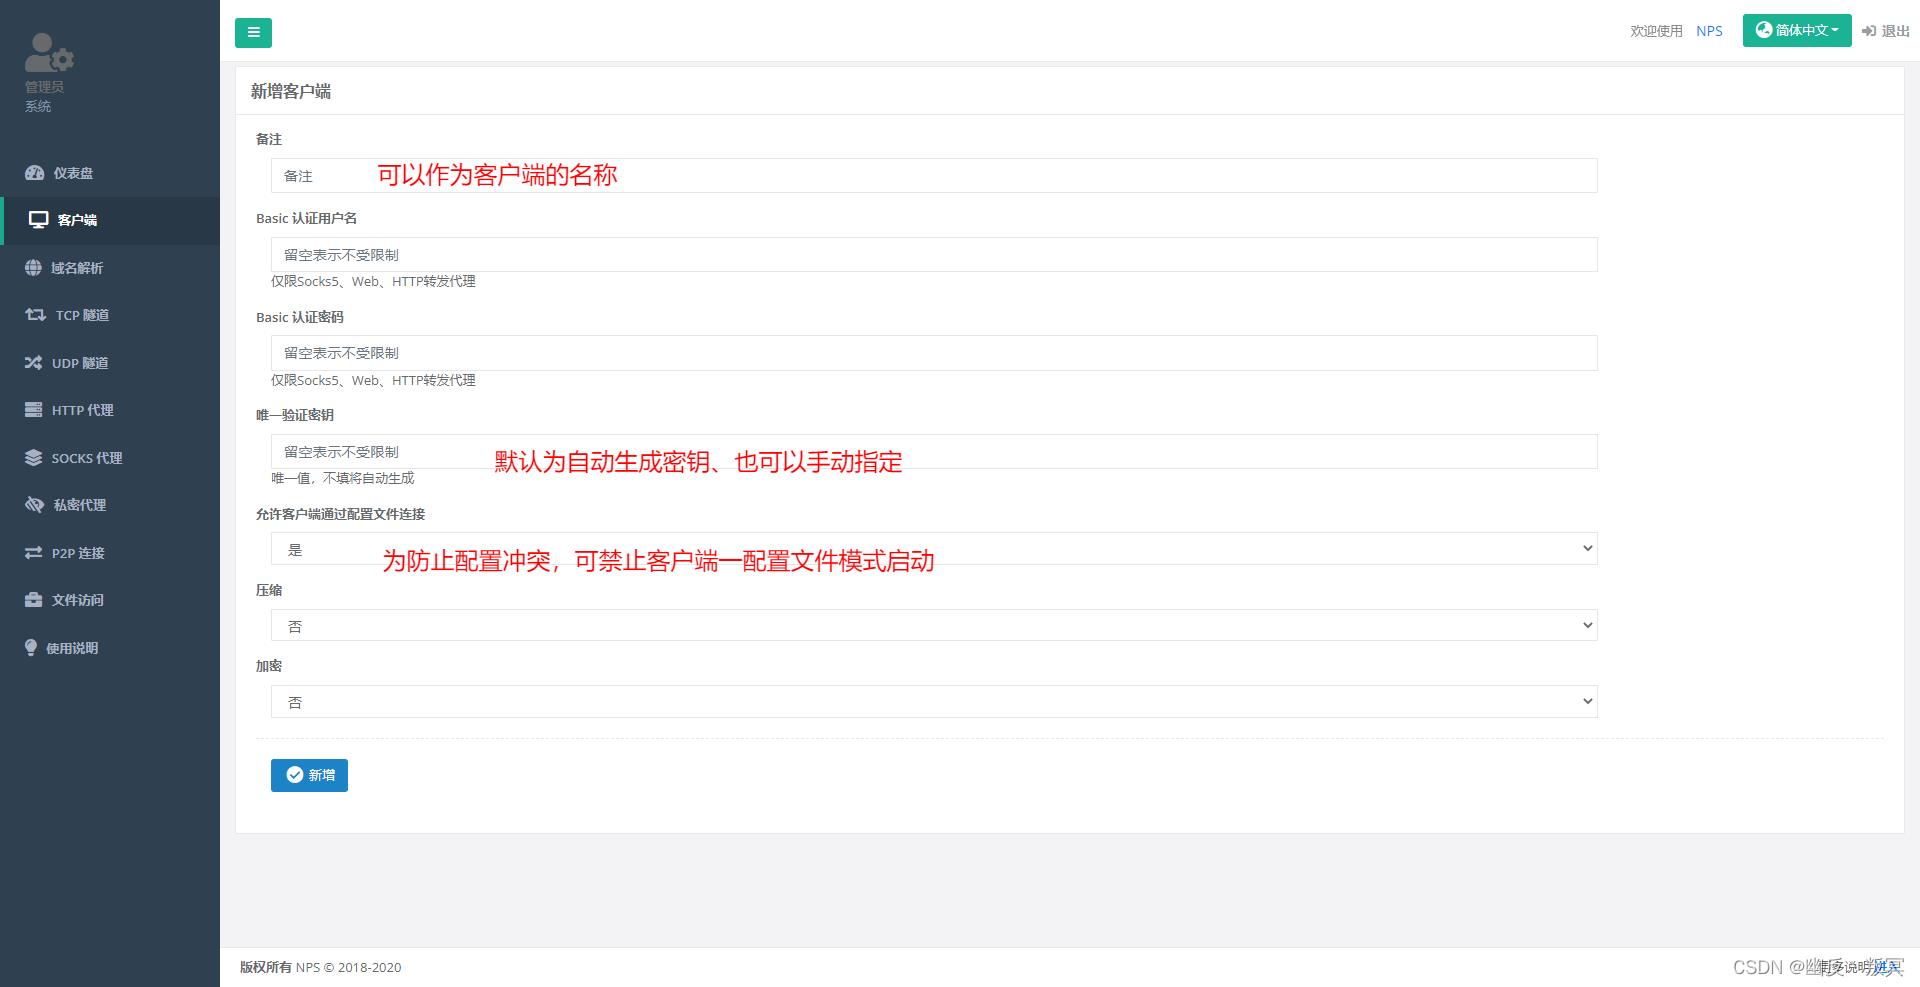 添加完成后,可以在列表中看到客户端信息,且客户端处于离线状态(因为我们还未在内网设备上输入指令连接服务端)。点击左侧按钮查看详细信息,我们可以看到系统生成(或手动指定)的通信密钥,以及客户端连接服务端的命令。
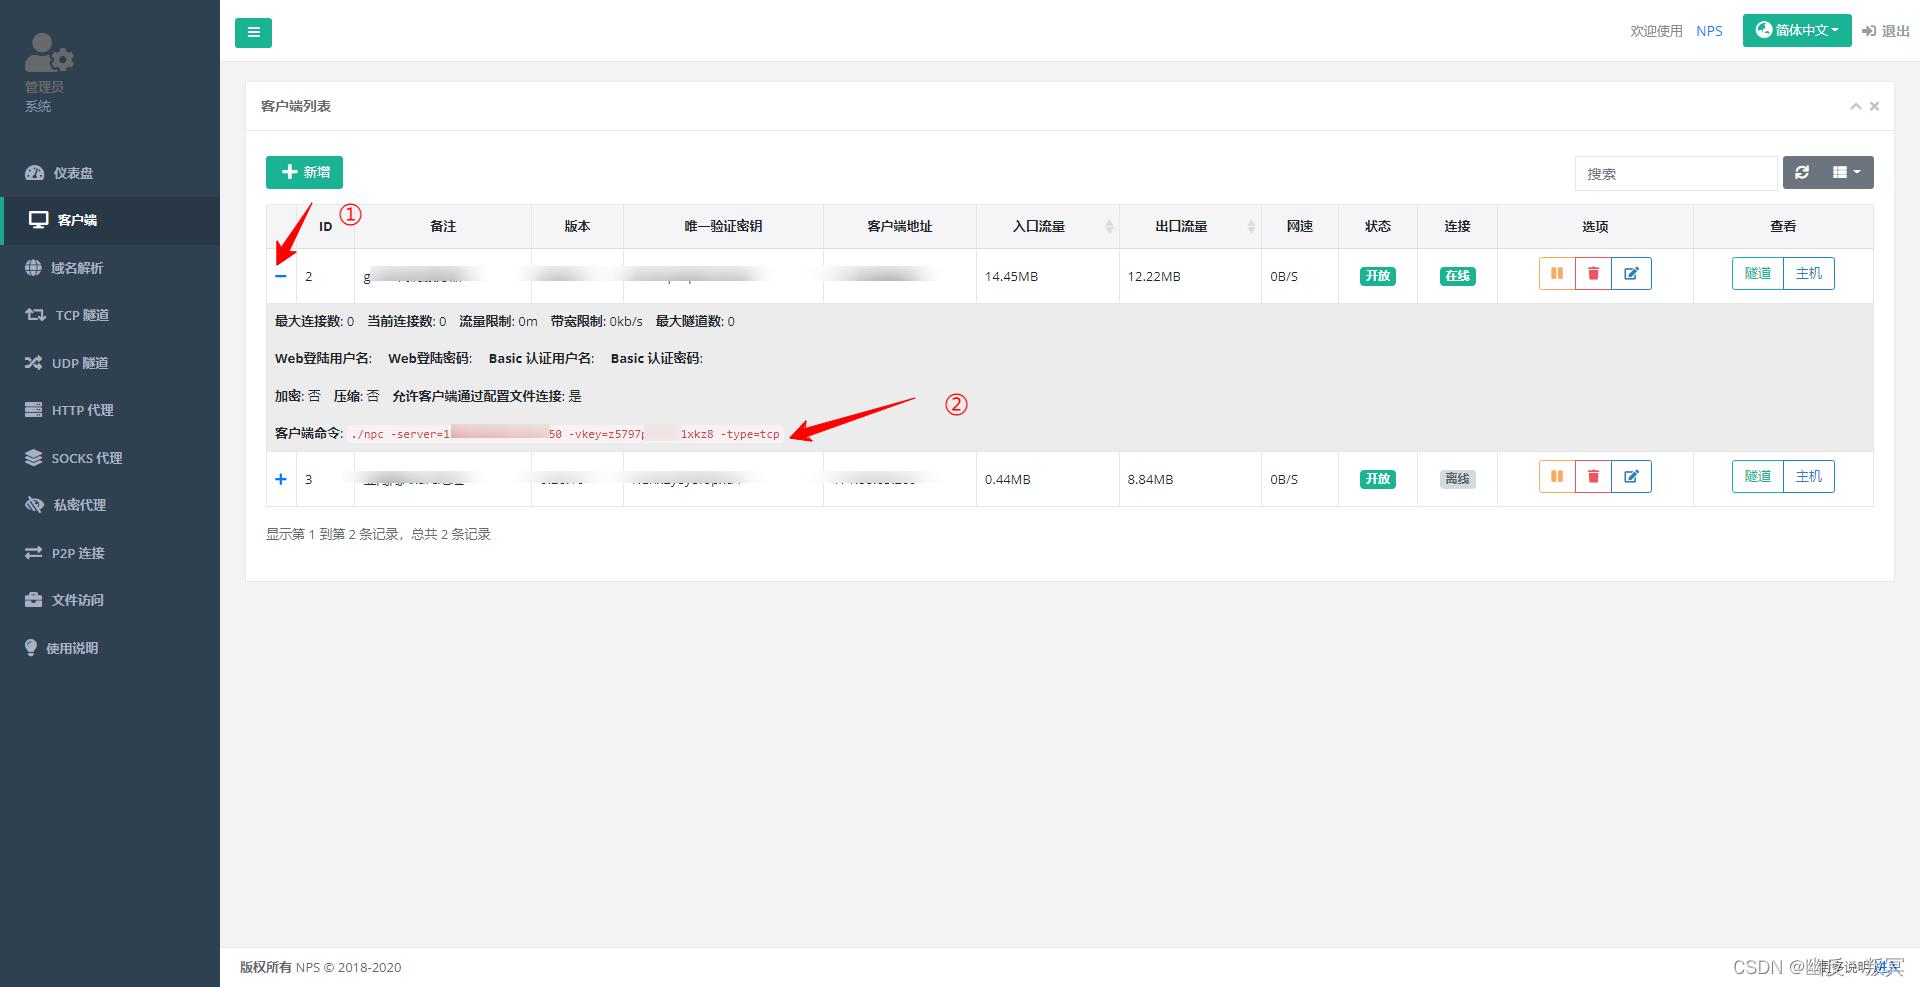 Windows下使用的命令与面板中显示的有所不同,请把"./npc"部分替换为"npc"
[root@localhost npc]# ./npc -server=xxx.xxx.xxx.xxx:xxxx -vkey=xxxxxxxxxxxxxxxx -type=tcp
2022/05/18 12:20:10.477 [I] [npc.go:231]  the version of client is 0.26.10, the core version of client is 0.26.0
2022/05/18 12:20:10.601 [I] [client.go:72]  Successful connection with server 139.129.117.1:6050
2022/05/18 12:30:17.990 [D] [client.go:216]  new tcp connection with the goal of 127.0.0.1:80, remote address:171.88.65.209:2062
2022/05/18 12:30:17.990 [D] [client.go:216]  new tcp connection with the goal of 127.0.0.1:80, remote address:171.88.65.209:2063
2022/05/18 12:30:18.480 [D] [client.go:216]  new tcp connection with the goal of 127.0.0.1:80, remote address:171.88.65.209:2064
如果没有报错,可以访问网页管理面板查看客户端是否变为在线状态。如进入在线状态,则可以添加内网穿透规则

四、建立gitlab的TCP隧道
以gitlab代码仓库为例,其默认使用80端口。假设局域网内有一台IP为172.16.1.166的Liunx设备,那么,在同一局域网下,只要访问172.16.1.166:80即可连接。但如果想要从外网连接,则必须添加一条tcp转发规则,把内网设备的80端口,映射到服务端的某个端口,这里假设使用服务器的10000端口。假如服务器IP为12.34.56.78,那么,映射完成后,外网访问12.34.56.78:10000的请求会全部被转发到172.16.1.166:80,也就是说,访问12.34.56.78:10000即可连接内网的liunx设备。具体配置如下。先登录网页管理面板,选择客户端,对对应的客户端右侧点击隧道,就可以快速的创建。

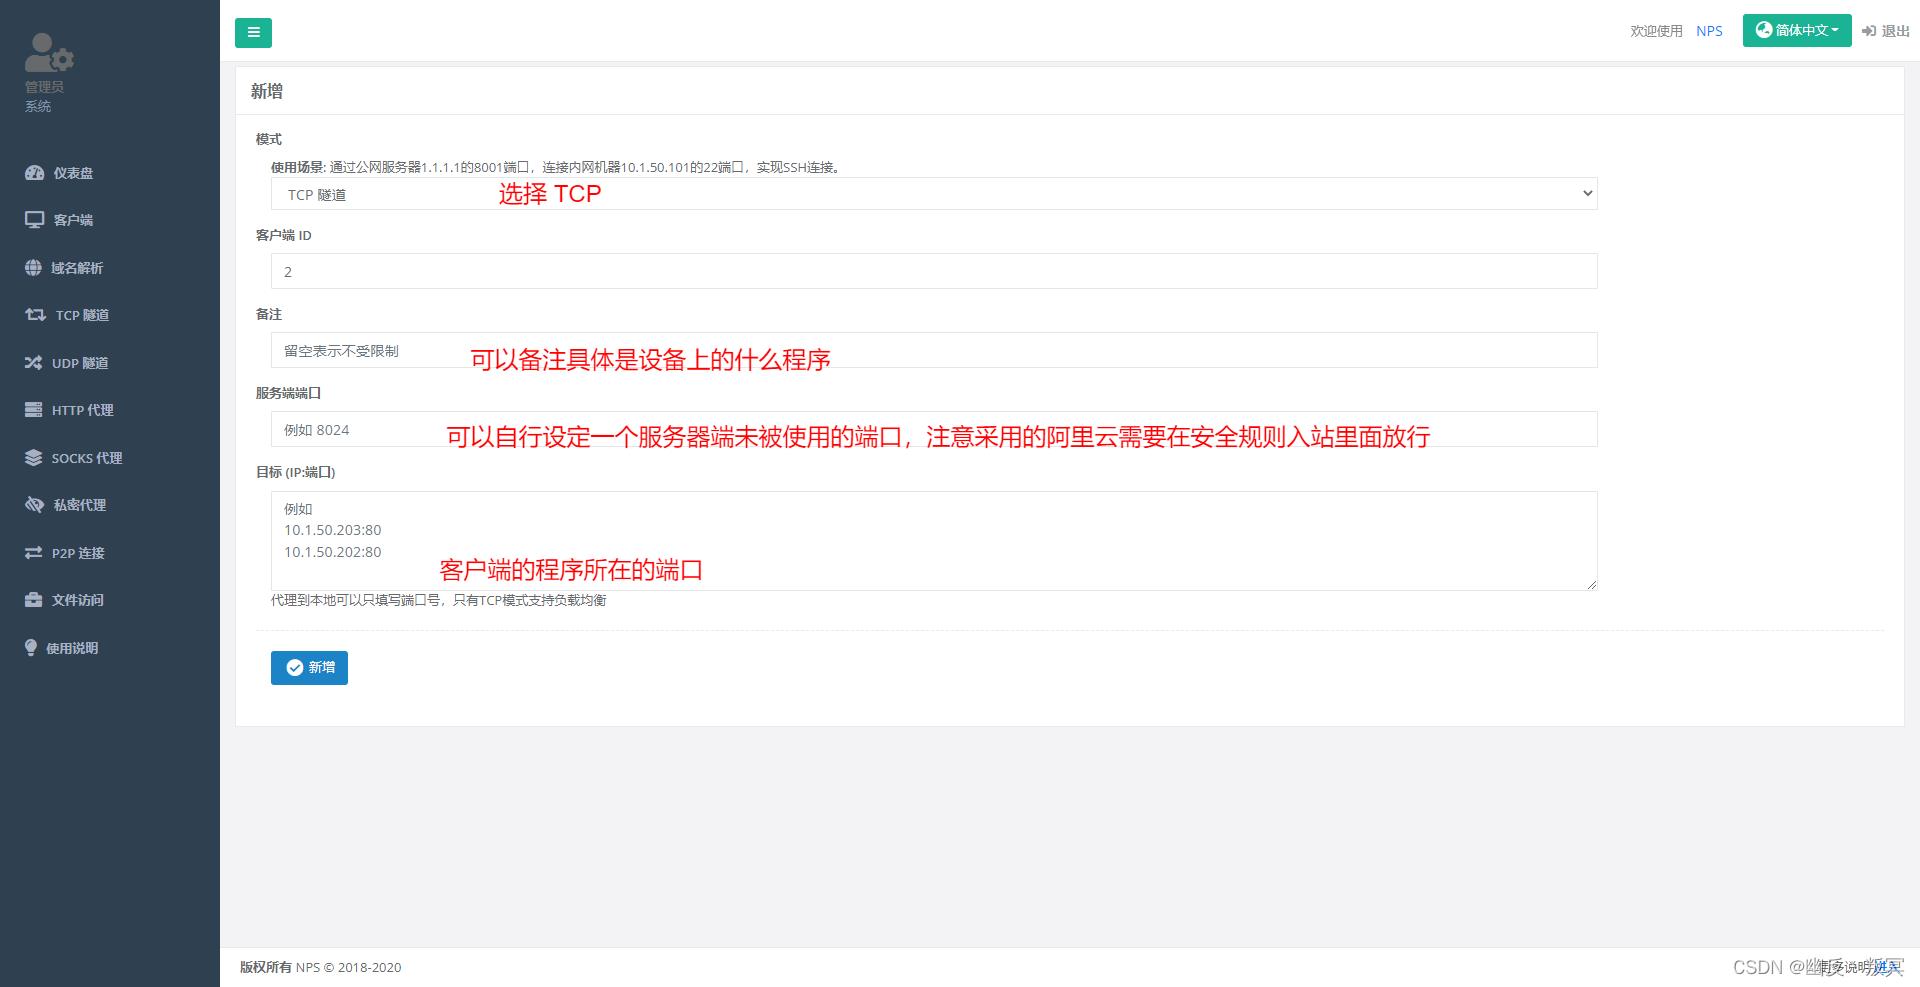 在阿里云的安全规则 出站规则规则中进行放行。
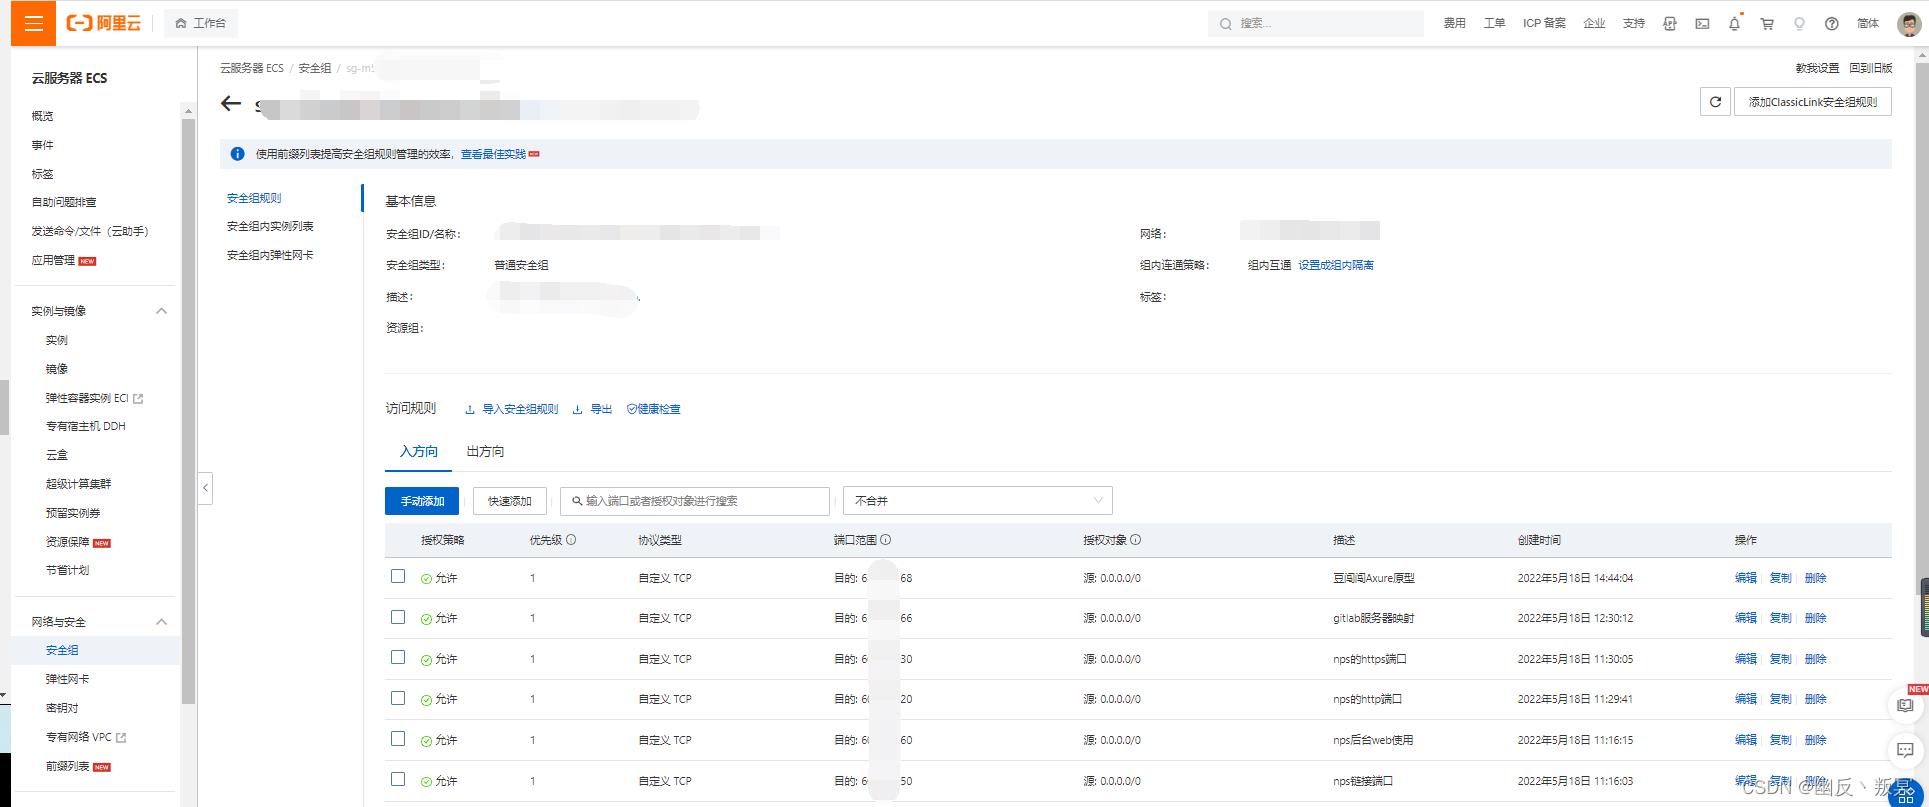 完成后,尝试通过 服务器IP:外网端口 连接内网liunx设备,如可以成功连接,则内网穿透成功。
 在gitlab的http克隆链接中,还是对应的局域网地址,需要自己手动在开发工具git配置链接中更换为映射的 ip:prot
五、域名http的配置
六、参考链接
内网穿透工具nps使用教程
NPS - 轻量级且高性能内网穿透工具(安装使用教程)
nps配置http
以上是关于内网穿透工具NPS安装使用的主要内容,如果未能解决你的问题,请参考以下文章