OkHttp源码中Dispatcher和connectionPool线程池分析
Posted hymKing
tags:
篇首语:本文由小常识网(cha138.com)小编为大家整理,主要介绍了OkHttp源码中Dispatcher和connectionPool线程池分析相关的知识,希望对你有一定的参考价值。
在前面《OkHttp原理流程源码分析》中梳理分析了OkHttp中同步发起网络请求和异步发起网络请求,最终的请求分发是有Dispatcher分发器来完成的,Dispatcher分发器的实现中涉及到的线程池的应用代码,并未做分析,今天我们先看第一个线程池应用,Dispatcher中的线程池实现。
一、OkHttp中Dispatcher的线程池实现
异步网络请求最终会被Dispatcher统一管理调度,client.dispatcher().enqueue(new AsyncCall(responseCallback));,enquene()实现了入队列的逻辑。
public final class Dispatcher
  synchronized void enqueue(AsyncCall call)
    //正在运行请求中的call数<64&&同一主机地址运行请求中的call数<5
    if (runningAsyncCalls.size() < maxRequests && runningCallsForHost(call) < maxRequestsPerHost)
      //添加到运行中的管理队列中
      runningAsyncCalls.add(call);
      //直接调用executeService.execute方法,执行调用,后续就到拦截器流程了
      executorService().execute(call);
     else
      readyAsyncCalls.add(call);
这里我们主要分析一下这里的线程池,看一下executorService的实现,同样是在Dispatcher类的源码中:
public final class Dispatcher
 public synchronized ExecutorService executorService()
    if (executorService == null)
      // 创建线程池
      executorService = new ThreadPoolExecutor(0, Integer.MAX_VALUE, 60, TimeUnit.SECONDS,
          new SynchronousQueue<Runnable>(), Util.threadFactory("OkHttp Dispatcher", false));

    return executorService;
上述代码中,通过new ThreadPoolExecutor创建,我们看一下这里使用的构造函数中的每个参数:
/**
 * 通过初始化参数和默认拒绝处理器创建一个线程池
 * @param corePoolSize 核心线程数,即使她们是idle状态,也会保留。除非通allCoreThreadTimeOut设置了,才可能销毁。

 * @param maximumPoolSize 在池子中允许的最大的线程数
 * @param keepAliveTime 当线程池中空闲线程数量超过corePoolSize时,多余的线程会在多长时间内
 * 被销毁
 * @param keepAliveTime的时间单位参数
 * @param workQueue 工作队列,在任务执行之前,持有任务集合。只有runable 任务通过excute方法被
 * 提交的才会被持有。
 * @param threadFactory 创建线程池的工厂
 * @throws IllegalArgumentException 非法参数异常
 * @throws NullPointerException 空指针异常
 */
public ThreadPoolExecutor(int corePoolSize,
                          int maximumPoolSize,
                          long keepAliveTime,
                          TimeUnit unit,
                          BlockingQueue<Runnable> workQueue,
                          ThreadFactory threadFactory)
    this(corePoolSize, maximumPoolSize, keepAliveTime, unit, workQueue,
         threadFactory, defaultHandler);
在以上注释中,我们对创建线程池的构造方法,进行了参数解释。Dispatcher类中调用此构造函数传入的参数分别如下:
- @param corePoolSize 核心线程数:0;
- @param maximumPoolSize 在池子中允许的最大的线程数:Integer.MAX_VALUE
- @param keepAliveTime 非核心线程存活时间:60 秒
- @param keepAliveTime的时间单位参数 seconds
- @param workQueue 工作队列:SynchronousQueue
- @param threadFactory 创建线程池的工厂:Util.threadFactory工厂类
核心线程数为0,线程池中可以创建的线程数为整形的最大值。
工作队列为SynchronousQueue,这个队列的容量不是0就是1。
这样的线程池设计,是不是有问题呢?
理论上来讲,性能极好的情况下,这样的线程池,拥有最高的并发吞吐能力,为什么,你提交多少runable,线程池就立即执行,发现没有空闲的线程,就创建线程执行。
但实际上怎么可能有这么好的性能呢?当然OkHttp的设计者,也并没有不考虑这个问题,在为了让线程池本身具有很好的吞吐能力的同事,OkHttp对框架内部提交的任务,进行了自维护。也就是runningAsyncCalls.size() < maxRequests && runningCallsForHost(call) ;使得最大并发线程就最多不超过64个。
其实这块的代码设计,是比较简单的。为什么要单独拿出来说呢,我觉得这种设计考虑挺好,既然是OkHttp框架自己处理任务的事情,就交给框架自己,另外框架内部还要处理同域名的域名请求的任务的提交,那就有框架自己同一来管理就好了。
这样的设计我觉得职责还是挺清晰的,线程池你就啥呀别管了,我给你你就执行就好了呗。
二、 OkHttp中ConnectionPool连接池的实现
《OkHttp原理流程源码分析》这篇文章中,关于ConnectionInterceptor,我们简单的分析了其主要流程如下:
/** 打开一个到目标服务器的连接以及执行下一个拦截器 */
public final class ConnectInterceptor implements Interceptor
  public final OkHttpClient client;

  public ConnectInterceptor(OkHttpClient client)
    this.client = client;


  @Override public Response intercept(Chain chain) throws IOException
    RealInterceptorChain realChain = (RealInterceptorChain) chain;
    Request request = realChain.request();
    StreamAllocation streamAllocation = realChain.streamAllocation();

    // We need the network to satisfy this request. Possibly for validating a conditional GET.
    boolean doExtensiveHealthChecks = !request.method().equals("GET");

    //关键代码
    HttpCodec httpCodec = streamAllocation.newStream(client, chain, doExtensiveHealthChecks);
    //创建一个链接
    RealConnection connection = streamAllocation.connection();
    return realChain.proceed(request, streamAllocation, httpCodec, connection);
HttpCodec是一个编解码请求和请求和响应的接口,HttpCodec接口的实现分别对应Http1Codec、Http2Codec。httpCodec实例对象是通过streamAllocation.newStream(client, chain, doExtensiveHealthChecks);来获得的。
同时通过streamAllocation获得的是一个RealConnection的对象。
这个拦截器的作用就是打开一个和Server的连接,并HttpCodec、RealConnection实例传递给下一个拦截器CallServerInterceptor,发起执行网络请求,可以理解成ConnectionInterceptor的核心作用就是为真实的网络请求做最直接的准备工作。
今天主要分析两个问题:
1、socket的连接池是如何创建的?
2、socket的连接池的复用原理?
2.1 OkHttp中连接复用
创建一个链接池的核心代码:
HttpCodec httpCodec = streamAllocation.newStream(client, chain, doExtensiveHealthChecks);
RealConnection connection = streamAllocation.connection();
streamAllocation的实例对象的创建,是在RetryAndFollowUpInterceptor拦截器中创建的,并传递到了ConnectionInterceptor中。接着我们继续看newStream(创建一个新流对象):
public final class StreamAllocation
  public HttpCodec newStream(OkHttpClient client, Chain chain, boolean doExtensiveHealthChecks)
       ....
        try
            //这里创建了真实的连接
            RealConnection resultConnection = this.findHealthyConnection(connectTimeout, readTimeout, writeTimeout, pingIntervalMillis, connectionRetryEnabled, doExtensiveHealthChecks);
            HttpCodec resultCodec = resultConnection.newCodec(client, chain, this);
            synchronized(this.connectionPool)
                this.codec = resultCodec;
              //这是连接已HttpCodec的实例返回
                return resultCodec;

         ...
还没有看到connectionPool的创建,继续看this.findHealthyConnection()方法的源码实现:
private RealConnection findHealthyConnection(int connectTimeout, int readTimeout, int writeTimeout, int pingIntervalMillis, boolean connectionRetryEnabled, boolean doExtensiveHealthChecks) throws IOException
    while(true) //死循环,完全阻塞式查找
      //候选连接查找
        RealConnection candidate = this.findConnection(connectTimeout, readTimeout, writeTimeout, pingIntervalMillis, connectionRetryEnabled);
        synchronized(this.connectionPool)
            if (candidate.successCount == 0)
              //如果是全新的连接,直接返回,可以查看successCount理解这段代码的含义
                return candidate;


        //非全新的,要看当前候选连接是否可用了
        if (candidate.isHealthy(doExtensiveHealthChecks))
            return candidate;

        //如果不可用,继续查找
        this.noNewStreams();
候选连接查找的实现,在findConnection()方法的实现中,继续看源码:
private RealConnection findConnection(int connectTimeout, int readTimeout, int writeTimeout, int pingIntervalMillis, boolean connectionRetryEnabled) throws IOException
   ....
    //第一步:查找当前连接是否可用,如果可用直接返回。
    synchronized(this.connectionPool)
        ...
        //检查当前有没有可用连接,如果有就用
        releasedConnection = this.connection;
        toClose = this.releaseIfNoNewStreams();
        if (this.connection != null)
            result = this.connection;
            releasedConnection = null;


        //当前可用连接为空
        if (result == null)
            //从连接池中查找可用连接
            Internal.instance.get(this.connectionPool, this.address, this, (Route)null);
            if (this.connection != null)
              //非空,表示找到可用连接,赋值给查找结果result
                foundPooledConnection = true;
                result = this.connection;
             else
                // 空,备选路由使用当前路由
                selectedRoute = this.route;


    //第二步:选择新的路由,继续查找可用连接(从连接池中的查找,实际上可能经历两次,进行了路由切换查找)
    ...
    //无论通过上述哪种方式,如果找到了就返回。
    if (result != null)
        return result;
     else
        //否则
        // 新路由选择先置为false
        boolean newRouteSelection = false;
        // 如果条件满足,选择一条新路由
        if (selectedRoute == null && (this.routeSelection == null || !this.routeSelection.hasNext()))
            newRouteSelection = true;
            this.routeSelection = this.routeSelector.next();

        //锁住连接池(连接池的创建还没看到)
        synchronized(this.connectionPool)
          ...
            if (newRouteSelection)
                List<Route> routes = this.routeSelection.getAll();
                int i = 0;

                for(int size = routes.size(); i < size; ++i)
                  // 在此路由下根据ip集合去匹配连接池中的连接
                  // Route的构造函数:Route(Address address, Proxy proxy, InetSocketAddress inetSocketAddress)
                    Route route = (Route)routes.get(i);
                    Internal.instance.get(this.connectionPool, this.address, this, route);
                    if (this.connection != null)
                        foundPooledConnection = true;
                        //找到赋值给结果result,并终止遍历查找
                        result = this.connection;
                        this.route = route;
                        break;


            // 还没找到
            if (!foundPooledConnection)
                if (selectedRoute == null)
                    selectedRoute = this.routeSelection.next();


                this.route = selectedRoute;
                this.refusedStreamCount = 0;
                //只能创建连接
                result = new RealConnection(this.connectionPool, selectedRoute);
                this.acquire(result, false);


        if (foundPooledConnection)
            this.eventListener.connectionAcquired(this.call, result);
            return result;
         else

          //执行新创建连接连接
            result.connect(connectTimeout, readTimeout, writeTimeout, pingIntervalMillis, connectionRetryEnabled, this.call, this.eventListener);
            this.routeDatabase().connected(result.route());
            //创建socket
            Socket socket = null;
            synchronized(this.connectionPool)
                this.reportedAcquired = true;
                //新创建的连接要记录到连接池
                Internal.instance.put(this.connectionPool, result);
                if (result.isMultiplexed())
                    //内部重复的socket连接去重,就是释放旧的连接,保留新的连接
                    socket = Internal.instance.deduplicate(this.connectionPool, this.address, this);
                    result = this.connection;


            Util.closeQuietly(socket);
            this.eventListener.connectionAcquired(this.call, result);
            return result;
这部分的源码实现有点多,在源码中已经添加了部分注释,接下来,我们梳理一下连接复用和创建的简单流程图。
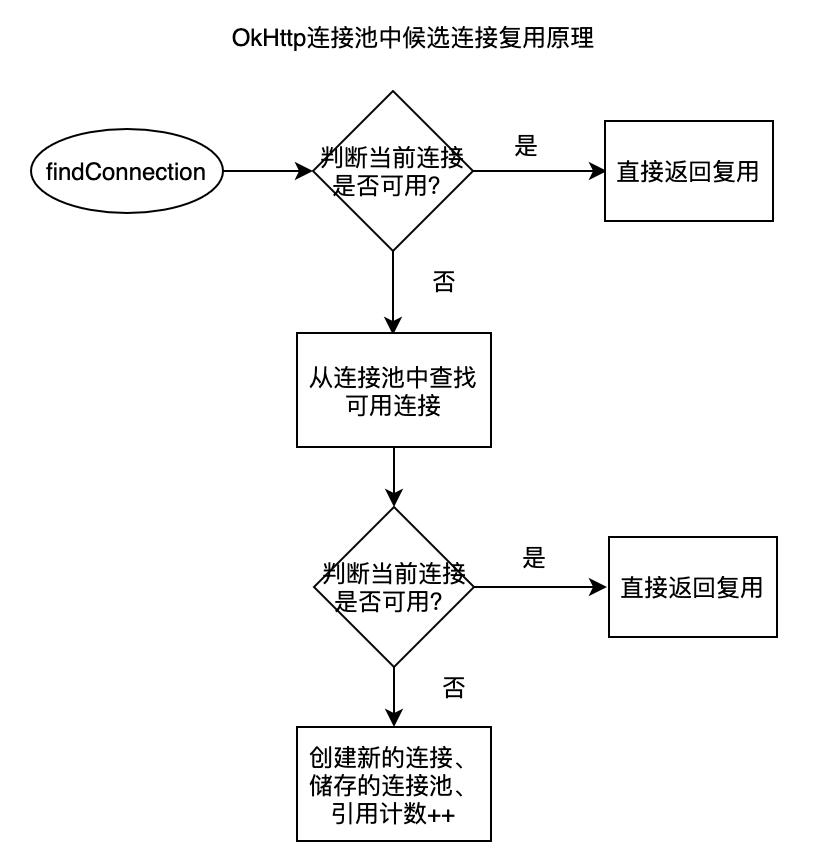
查找可复用的连接的流程梳理就如上图,在从连接池中的查找细节中,从连接池查找连接时会查询两次,第一次只是根据当前目标服务器地址去查,如果没有查到,则第二次会重新选择路由表,然后用该地址去匹配。
连接的复用流程是完事了,在连接复用的源码流程,我们看到了多处 this.connectionPool,这个理论上就应该是我们的连接池。那这个连接池是在哪儿创建的呢。
2.2 OkHttp中的连接池的创建
this.connectionPool,这个显然是一个连接池,接下来我们就分析OkHttp网络请求框架中的连接池的本身到底是啥,查看connectionPool()的源码实现。
2.2.1 连接池实现
连接池的本质就是通过Deque connections 这样一个双端队列维护的connecitons的容器。
public final class ConnectionPool
  //最大的空闲连接数--每个地址的最大空闲连接数
  private final int maxIdleConnections;
  //连接持续时间
  private final long keepAliveDurationNs;
  ...
  /**维护线程连接数的双端队列*/
  private final Deque<RealConnection> connections = new ArrayDeque<>();
  /**
   * 根据参数创建一个连接池来满足一个单一的用户进程。
   * 持有5个连接,每个连接的存活时间是5分钟
   */
  public ConnectionPool()
    // 默认实现
    this(5, 5, TimeUnit.MINUTES);

  // 有参数的构造,说明也可以做定制实现
  public ConnectionPool(int maxIdleConnections, long keepAliveDuration, TimeUnit timeUnit)
    this.maxIdleConnections = maxIdleConnections;
    this.keepAliveDurationNs = timeUnit.toNanos(keepAliveDuration);

    // Put a floor on the keep alive duration, otherwise cleanup will spin loop.
    if (keepAliveDuration <= 0)
      throw new IllegalArgumentException("keepAliveDuration <= 0: " + keepAliveDuration);


  ......
  //添加一个真实的连接
  void put(RealConnection connection)
    assert (Thread.holdsLock(this));
    //启动清理runable,也交给当前线程池进行处理
    if (!cleanupRunning)
      cleanupRunning = true;
      //清理线程池
      executor.execute(cleanupRunnable);

    connections.add(connection);

  为了方便查看,以下部分代码调整了这段代码在实际源码的位置
  private final Runnable cleanupRunnable = new Runnable()
    @Override public void run()
      //清理线程,通过死循环进行连接的清理
      while (true)
        //执行清理并返回下次需要清理的时间
        long waitNanos = cleanup(System.nanoTime());
        if (waitNanos == -1) return;
        if (waitNanos > 0)
          long waitMillis = waitNanos / 1000000L;
          waitNanos -= (waitMillis * 1000000L);
          synchronized (ConnectionPool.this)
            try
              ConnectionPool.this.wait(waitMillis, (int) waitNanos);
             catch (InterruptedException ignored)


  ;
在构建连接池的时候,限制了最大的空闲连接数只能是5个,每个空闲连接数的存活时间是5分钟,在每次添加一个RealConnection实例对象到连接池中的时候,会立即检查清理线程是否在运行,如果不在运行,则启动清理检查的runable的循环执行,根据清理策略进行清理。
2.2.2 清理线程池实现
public final class ConnectionPool
  /**
   * 线程池实现
   */
  private static final Executor executor = new ThreadPoolExecutor(0 /* corePoolSize */,
      Integer.MAX_VALUE /* maximumPoolSize */, 60L /* keepAliveTime */, TimeUnit.SECONDS,
      new SynchronousQueue<Runnable>(), Util.threadFactory("OkHttp ConnectionPool", true));
这个线程池的构造参数如下:
corePoolSize:0;maximumPoolSize:Integer.MAX_VALUE;非核心线程的存活时间:60s;
workQueue:SynchronousQueue(),无容量的工作队列。
线程创建工厂:Util.threadFactory(“OkHttp ConnectionPool”, true)) ,是否守护为true;
这个线程池的实现和Dispatcher线程池的实现基本一致,上面的这种线程池的设计,是让线程池本身具备最大的吞吐能力。
2.2.3 再看连接(RealConnection的复用)
获取一个连接(RealConnection)的源码实现如下:
@Nullable RealConnection get(Address address, StreamAllocation streamAllocation, Route route)
  assert (Thread.holdsLock(this));
  for (RealConnection connection : connections)
    // 取可用连接的核心判断逻辑
    if (connection.isEligible(address, route))
      streamAllocation.acquire(connection, true);
      return connection;


  /**是否合格的可用连接的判断*/
  public boolean isEligible(Address address, @Nullable Route route)
        if (this.allocations.size() < this以上是关于OkHttp源码中Dispatcher和connectionPool线程池分析的主要内容,如果未能解决你的问题,请参考以下文章