LabelStudio + MMDetection 实现目标分割预标注
Posted 何小有
tags:
篇首语:本文由小常识网(cha138.com)小编为大家整理,主要介绍了LabelStudio + MMDetection 实现目标分割预标注相关的知识,希望对你有一定的参考价值。
在 Label Studio ML Backend 提供的预标注模型示例中,只有 mmdetection 这个 目标检测预标注 示例,而没有 目标分割预标注 示例,因此我参考野生的 目标分割预标注 代码 interactive_segmentation.py 并结合 MMDetection 的 Mask R-CNN 算法,实现了一个 目标分割预标注 的演示代码。
首先下载 Label Studio ML backend 项目代码到本地,并按 目标检测预标注文档 的内容,先实现目标检测预标注。
然后在 label_studio_ml/examples 目录下新创建一个 mask_segmentation 目录,再到 mask_segmentation 目录创建一个新的 mask_segmentation.py 文件:
import os
import logging
import boto3
import cv2
import PIL
import numpy as np

from mmdet.apis import init_detector, inference_detector

from label_studio_ml.model import LabelStudioMLBase
from label_studio_ml.utils import get_image_size, get_single_tag_keys
from label_studio.core.utils.io import json_load, get_data_dir
from label_studio.core.settings.base import DATA_UNDEFINED_NAME
from label_studio_converter.brush import encode_rle
from botocore.exceptions import ClientError
from urllib.parse import urlparse


logger = logging.getLogger(__name__)


class MaskSegmentation(LabelStudioMLBase):
    """基于 https://github.com/open-mmlab/mmdetection 的目标分割器"""

    def __init__(self, config_file, checkpoint_file, image_dir=None, labels_file=None, score_threshold=0.5, device='cpu', **kwargs):
        """
        将 MMDetection model 模型从配置和检查点加载到内存中.
        """
        super(MaskSegmentation, self).__init__(**kwargs)

        self.config_file = config_file
        self.checkpoint_file = checkpoint_file
        self.labels_file = labels_file
        # 默认 Label Studio 图片上传文件夹
        upload_dir = os.path.join(get_data_dir(), 'media', 'upload')
        self.image_dir = image_dir or upload_dir
        logger.debug(f'self.__class__.__name__ 从 self.image_dir 读取图像')
        if self.labels_file and os.path.exists(self.labels_file):
            self.label_map = json_load(self.labels_file)
        else:
            self.label_map =

        self.from_name, self.to_name, self.value, self.labels_in_config = get_single_tag_keys(
            self.parsed_label_config, 'BrushLabels', 'Image')
        schema = list(self.parsed_label_config.values())[0]
        self.labels_in_config = set(self.labels_in_config)

        # 从 <Label> 标签中的 `predicted_values="airplane,car"` 属性收集标签映射
        self.labels_attrs = schema.get('labels_attrs')
        if self.labels_attrs:
            for label_name, label_attrs in self.labels_attrs.items():
                for predicted_value in label_attrs.get('predicted_values', '').split(','):
                    self.label_map[predicted_value] = label_name

        print('从以下位置加载新模型: ', config_file, checkpoint_file)
        self.model = init_detector(config_file, checkpoint_file, device=device)
        self.score_thresh = score_threshold

    def _get_image_url(self, task):
        image_url = task['data'].get(self.value) or task['data'].get(DATA_UNDEFINED_NAME)
        if image_url.startswith('s3://'):
            # presign s3 url
            r = urlparse(image_url, allow_fragments=False)
            bucket_name = r.netloc
            key = r.path.lstrip('/')
            client = boto3.client('s3')
            try:
                image_url = client.generate_presigned_url(
                    ClientMethod='get_object',
                    Params='Bucket': bucket_name, 'Key': key
                )
            except ClientError as exc:
                logger.warning(f'无法为 image_url 生成预签名 URL. 理由: exc')
        # 示例值 /data/upload/8/936bcb98-6535-11ec-85f0-594e4647184a.png
        return image_url

    def predict(self, tasks, **kwargs):
        assert len(tasks) == 1
        task = tasks[0]
        image_url = self._get_image_url(task)
        image_path = self.get_local_path(image_url, project_dir=self.image_dir)
        # 加载图片
        image = cv2.cvtColor(cv2.imread(image_path), cv2.COLOR_BGR2RGB)
        _result_mask = np.zeros(image.shape[:2], dtype=np.uint16)
        # 获得预测
        model_results = inference_detector(self.model, image_path)
        result_box = model_results[0]  # 标框区域数据
        result_mask = model_results[1]  # Mask数据
        results = []
        all_scores = []
        img_width, img_height = get_image_size(image_path)
        # 把 model_results 改成 result_box 就和示例 mmdetection 一样
        # for bboxes, label in zip(model_results, self.model.CLASSES):
        iterabl = 0
        for bboxes, label in zip(result_box, self.model.CLASSES):
            output_label = self.label_map.get(label, label)

            if output_label not in self.labels_in_config:
                # print('在项目配置中找不到 ' + output_label + ' 标签.')
                iterabl += 1
                continue
            _iter = 0
            for bbox in bboxes:
                # 示例值 [173.1038, 197.33136, 747.7704, 556.80554, 0.97078586]
                bbox = list(bbox)
                if not bbox:
                    continue
                score = float(bbox[-1])
                if score < self.score_thresh:
                    continue
                x, y, xmax, ymax = bbox[:4]
                # 将 mask 换为 RGBA 图像
                got_image = PIL.Image.fromarray(result_mask[iterabl][_iter])
                rgbimg = PIL.Image.new("RGBA", got_image.size)
                rgbimg.paste(got_image)
                datas = rgbimg.getdata()
                # 使 RGBA 图像像素透明
                newData = []
                for item in datas:
                    if item[0] == 0 and item[1] == 0 and item[2] == 0:
                        newData.append((0, 0, 0, 0))
                    else:
                        newData.append(item)
                rgbimg.putdata(newData)
                # 从图像中获取像素
                pix = np.array(rgbimg)
                # rgbimg.save("test/test"+output_label+str(_iter)+".png")
                # 编码为 rle
                result_mask_iter = encode_rle(pix.flatten())
                results.append(
                    "original_width": x,
                    "original_height": y,
                    'from_name': self.from_name,
                    'to_name': self.to_name,
                    'type': 'brushlabels',
                    'value':
                        'brushlabels': [output_label],
                        "rle": result_mask_iter,
                        "format": "rle",
                    ,
                    'score': score
                )
                all_scores.append(score)
                _iter += 1
            iterabl += 1
        avg_score = sum(all_scores) / max(len(all_scores), 1)
        return [
            'result': results,
            'score': avg_score
        ]
回到根目录下,执行以下命令,创建并初始化 目标分割预标注 项目目录,并下载相应的算法模型,再运行预标注服务。
# 创建并初始化目录
label-studio-ml init mask-segmentation --from label_studio_ml/examples/mask_segmentation/mask_segmentation.py
# 下载相应的算法模型
cd mask-segmentation
git clone https://github.com/open-mmlab/mmdetection.git
cd mmdetection
mkdir checkpoints
cd checkpoints
wget http://download.openmmlab.com/mmdetection/v2.0/mask_rcnn/mask_rcnn_r50_fpn_1x_coco/mask_rcnn_r50_fpn_1x_coco_20200205-d4b0c5d6.pth
# 回到根目录运行
cd ../../..
label-studio-ml start mask-segmentation --with config_file=mask-segmentation/mmdetection/configs/mask_rcnn/mask_rcnn_r50_fpn_1x_coco.py checkpoint_file=mask-segmentation/mmdetection/checkpoints/mask_rcnn_r50_fpn_1x_coco_20200205-d4b0c5d6.pth hostname=http://localhost:8081 -p 8082
其中 hostname=http://localhost:8081 是 Label Studio 的访问地址,8082 是 目标分割预标注 服务的访问端口,这里按实际情况进行修改。
然后在 Label Studio 项目的 Settings / Machine Learning 页面配置好 目标分割预标注 服务。
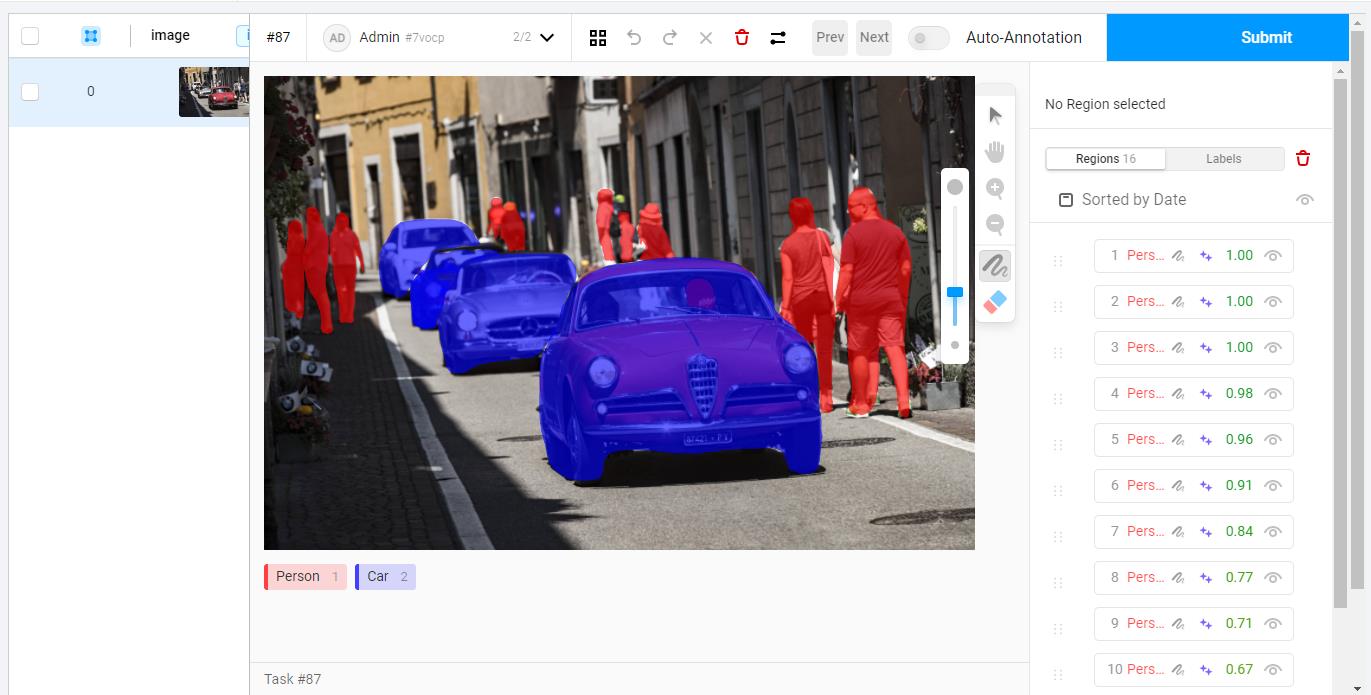
最后在 Label Studio 项目的 Settings / Labeling Interface 页面选择 Computer Vision > Semantic Segmentation with Masks 标注模板,并按下面的格式配置预标注项:
  <Label value="Airplane" predicted_values="airplane" background="rgba(255, 0, 0, 0.7)"/>
  <Label value="Car" predicted_values="car" background="rgba(0, 0, 255, 0.7)"/>
我们可以直接使用 MMDetection 已经提供的 81 个预训练模型,具体请看 COCO标签的完整列表,在其中选择需要的模型,填入 value 和 predicted_values 的值就可以生效。
待标注图片:

预标注演示:
以上是关于LabelStudio + MMDetection 实现目标分割预标注的主要内容,如果未能解决你的问题,请参考以下文章